|
 Boundary Waters Quetico ForumGroup Forum: Boat Builders and RepairCLC kit build: Passagemaker Dinghy
|
Author
Text
")

03/21/2018 07:50AM
This winter I've been building a Passagemaker Dinghy from a kit that I purchased from Clcboats.com . It is a 12ft boat that can be sailed, rowed or powered with a small motor. I haven't taken a ton of pictures along the way, but I figured I'd post what I have taken in case anyone is curious about stitch and glue boats.

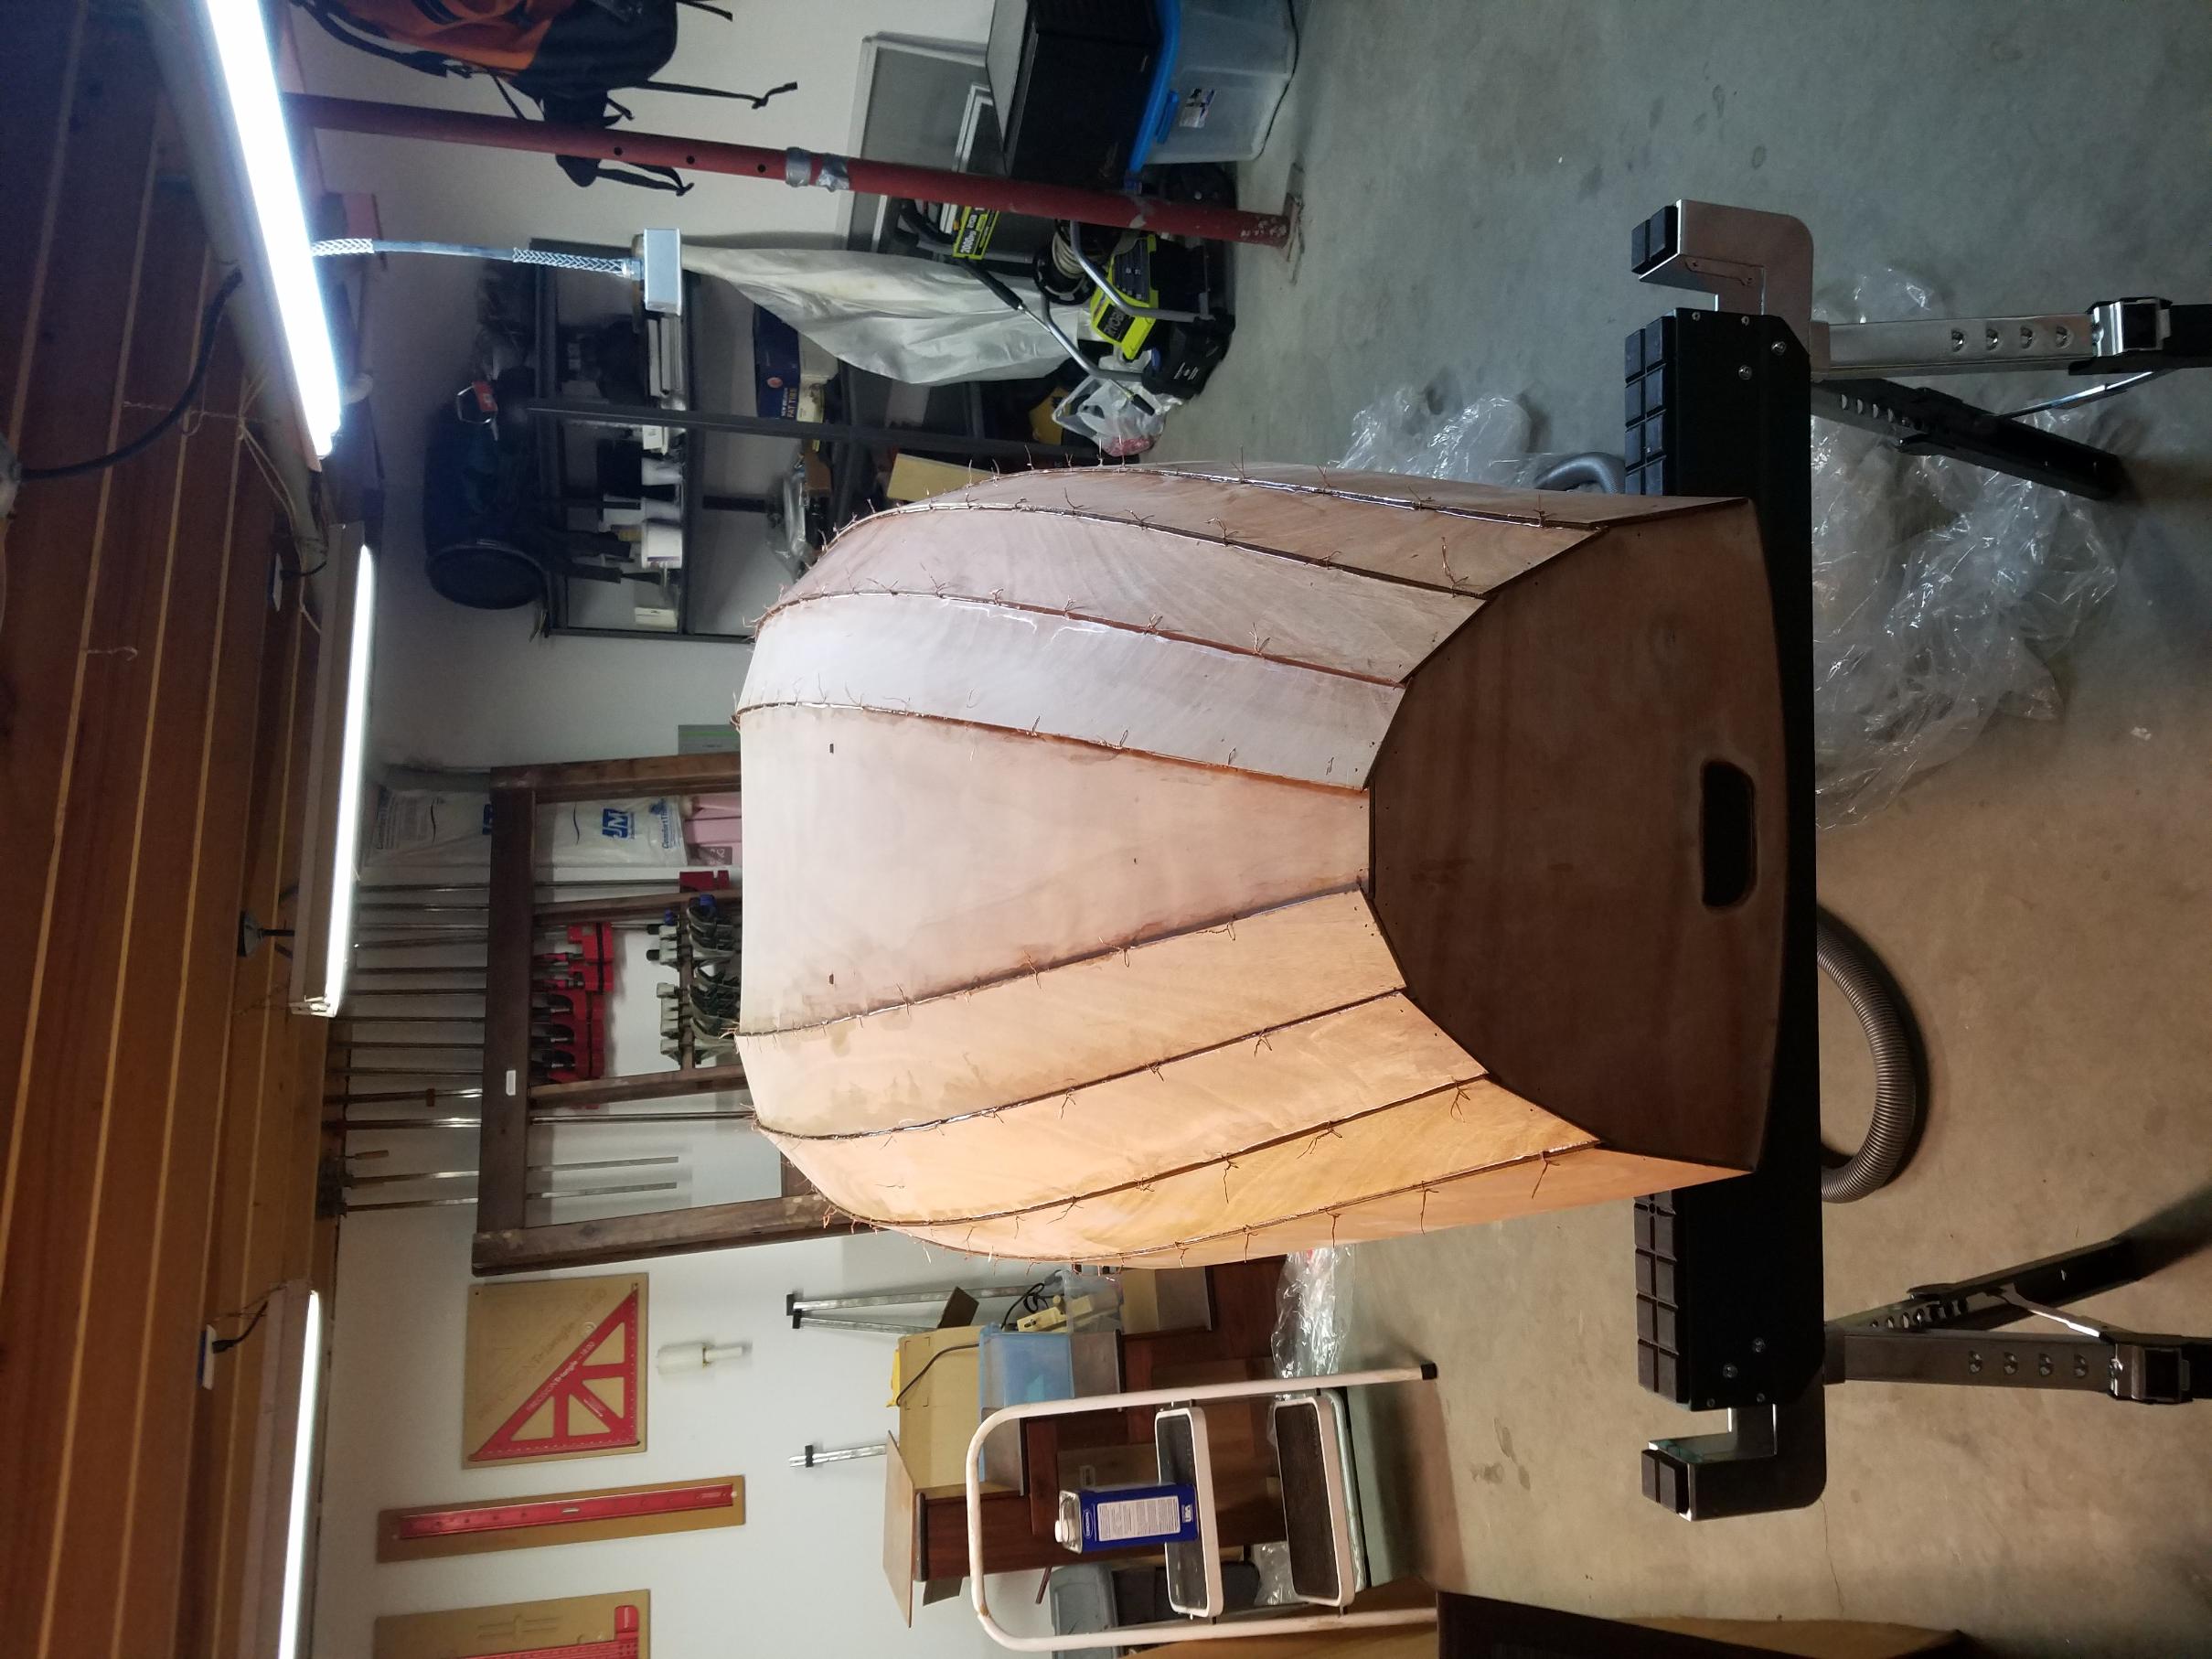
Above is a shot of the basic shell, stitched together and 'tack welded' with a mixture of epoxy thickened with sawdust. The next step was to pull the wire stitches out, and make a nice, even fillet of thickened epoxy/sawdust along the strakes.

Another shot of the hull, stitched together. The transoms were the most difficult part to stitch, but overall it wasn't too bad.

Here the seats have been maksed off, to prepare for attaching them to the hull with a fillet. These were the hardest fillets to make on the boat. I found the fillets easier to make as I got further into the project, and for me the trick was to thicken the mixture up more than I was initially.

Here's the bottom of the hull, after a couple of coats of epoxy. I am ready to add the skeg near the rear transom, and then I will flip the boat back over and work on getting the interior epoxied, and install the rubrails. The box behind the boat contains material to build a small pack-canoe, which will be my next project.
Above is a shot of the basic shell, stitched together and 'tack welded' with a mixture of epoxy thickened with sawdust. The next step was to pull the wire stitches out, and make a nice, even fillet of thickened epoxy/sawdust along the strakes.
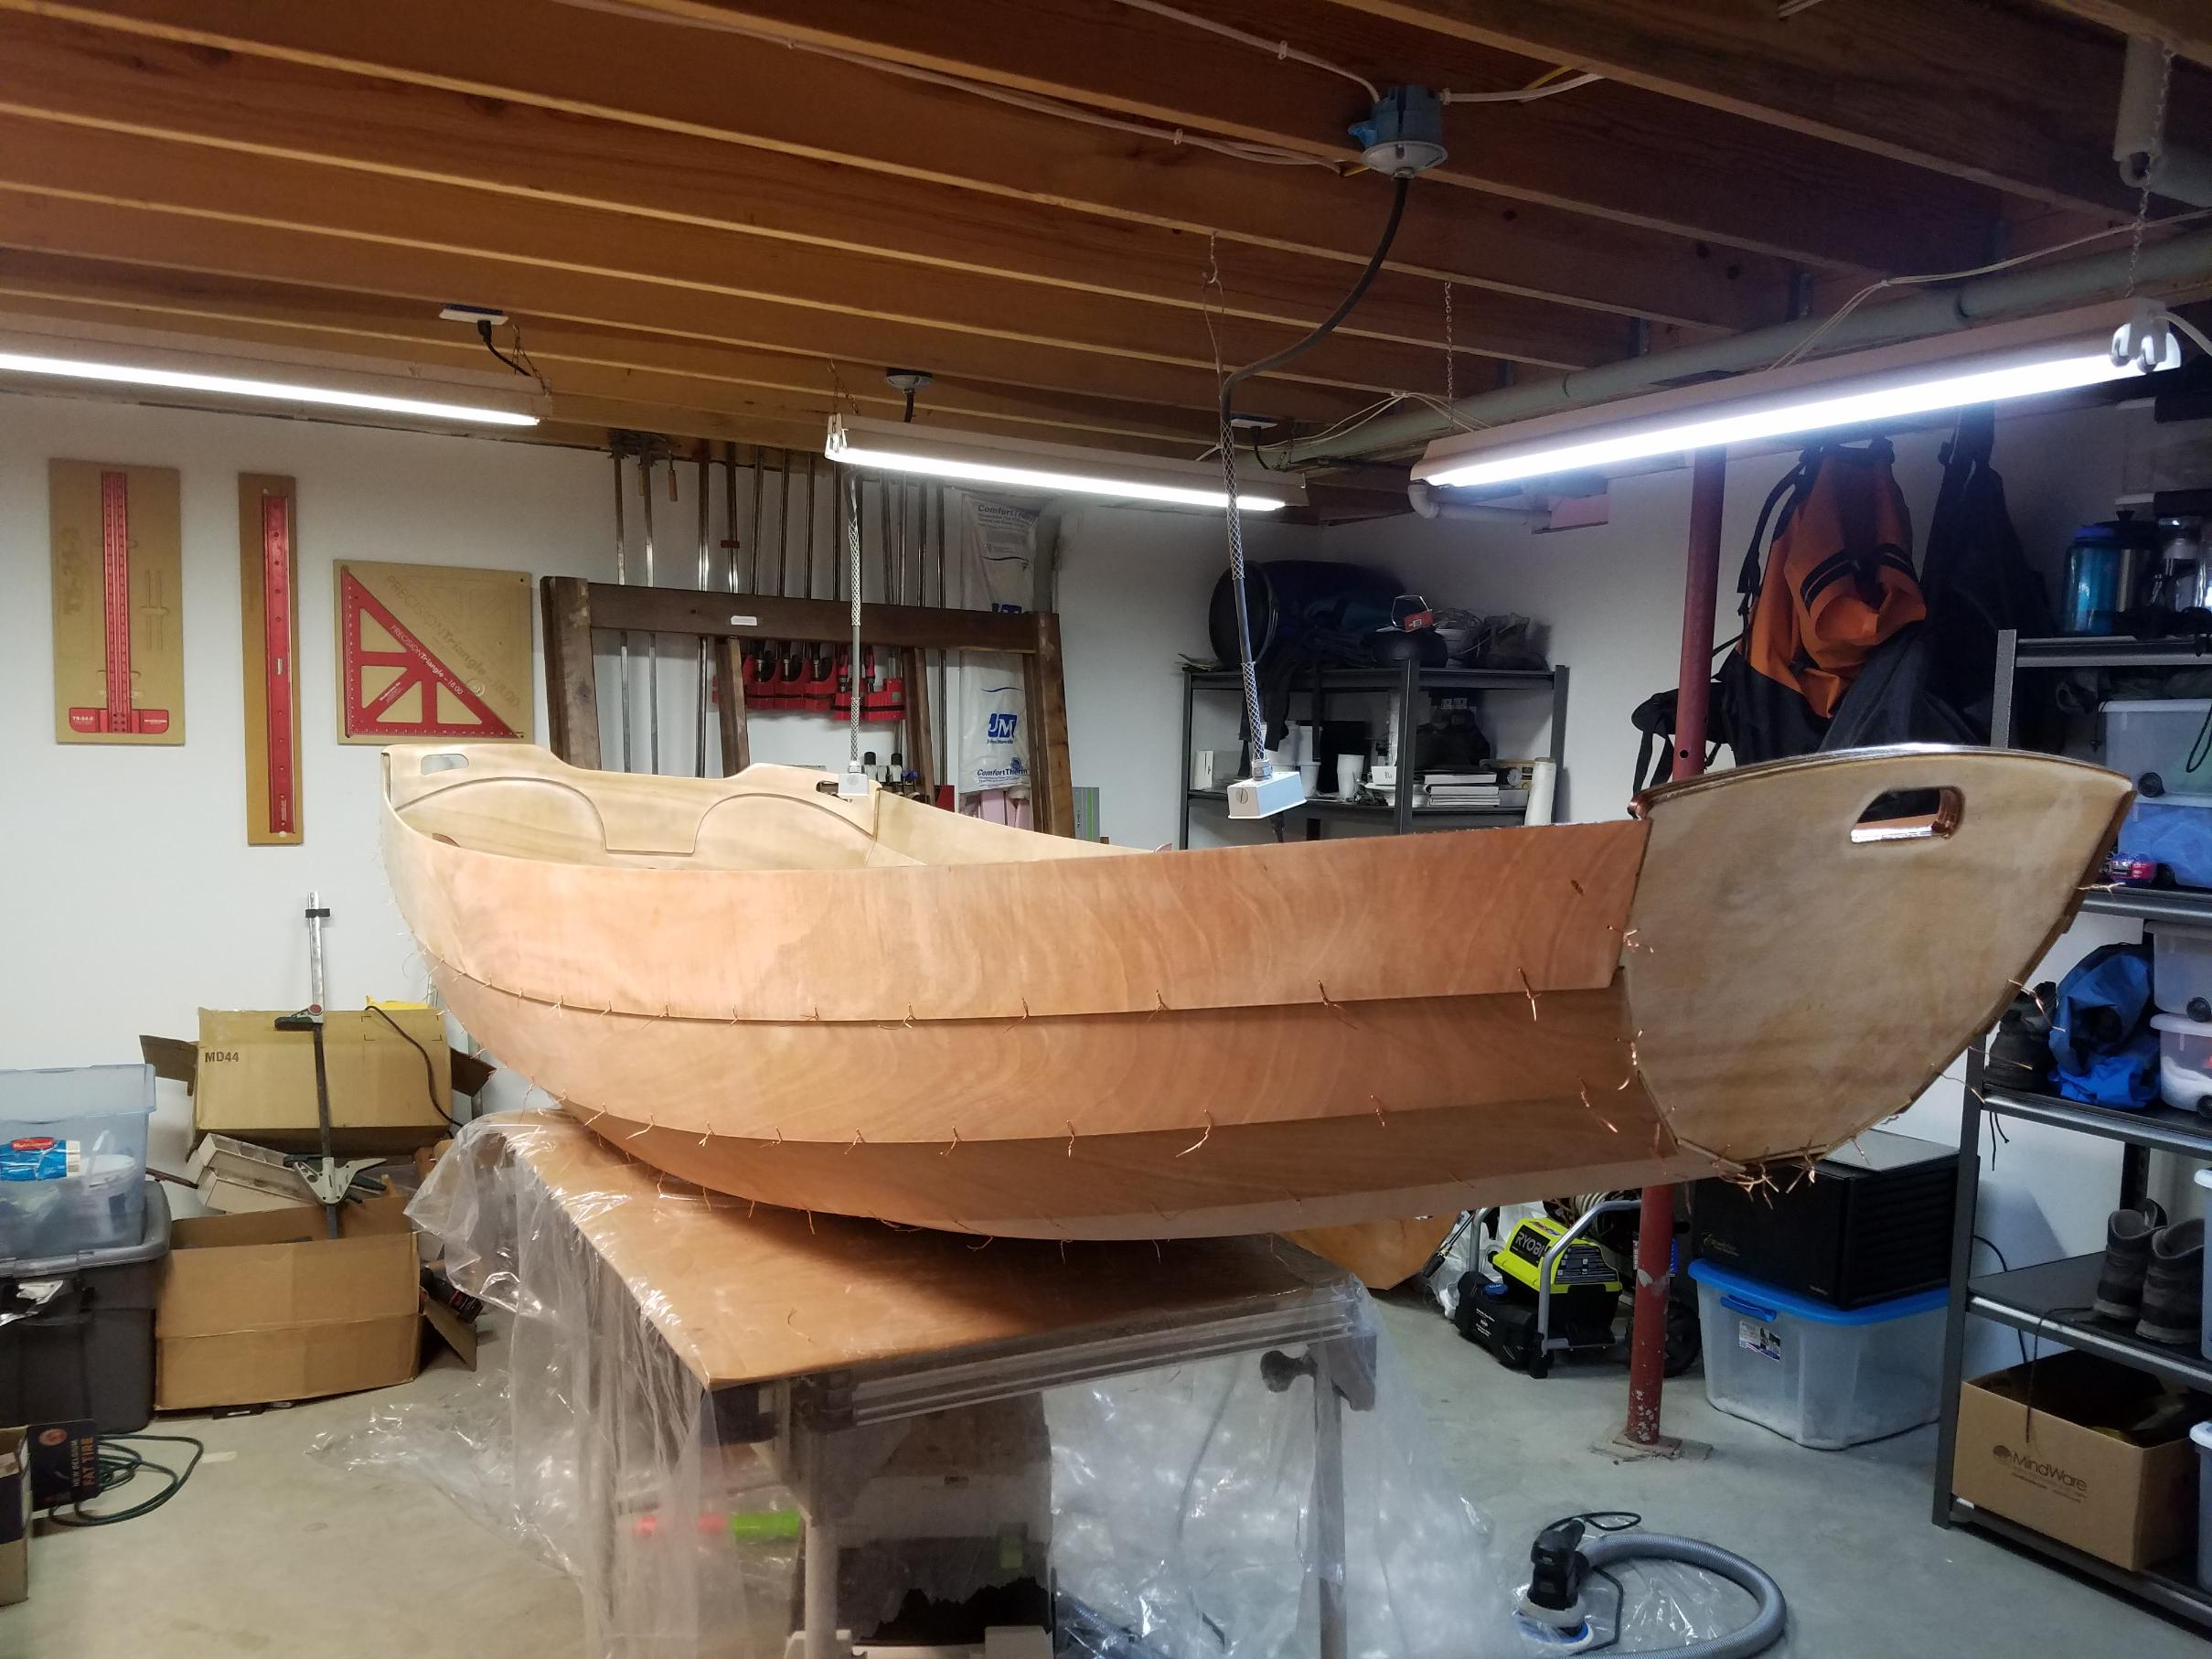
Another shot of the hull, stitched together. The transoms were the most difficult part to stitch, but overall it wasn't too bad.

Here the seats have been maksed off, to prepare for attaching them to the hull with a fillet. These were the hardest fillets to make on the boat. I found the fillets easier to make as I got further into the project, and for me the trick was to thicken the mixture up more than I was initially.

Here's the bottom of the hull, after a couple of coats of epoxy. I am ready to add the skeg near the rear transom, and then I will flip the boat back over and work on getting the interior epoxied, and install the rubrails. The box behind the boat contains material to build a small pack-canoe, which will be my next project.

03/21/2018 09:24AM
Thanks Grizzlyman. It should weigh in at around 90lbs, which I think is pretty reasonable for a boat this size. I suspect one could trim quite a few pounds off of it with some minor design modifications, but there is little incentive to since it would never be a 'portaging boat'. The pack-boat that I build next will be around 25-26lbs.
03/25/2018 09:18PM
That is a sweet little boat. Your exterior finish looks very good. It reminds me of the 10' Nutshell sailing pram that I once had.
I really like the look of a lapstrake hull and was thinking of building the CLC Sassafras 12' canoe. Is that what is in the box? Make sure you post pictures of the canoe build.
"Boredom, Tyler - that's what's wrong. And how do you beat boredom, Tyler?... Adventure...(Never Cry Wolf, 1983)
03/26/2018 08:18AM
Thanks HighPlainsDrifter. I have enjoyed the process of lapstrake building so far. Getting a good finish has been tenuous however, as I am constantly trying to find a balance of getting everything sanded to my standards vs. ensuring that I don't sand through the plywood veneer. I do a fair amount of furniture building and cabinet building with hardwood, where this isn't an issue.
That is indeed a Sassafras 12 in the box, which I am hoping to start and complete this summer. I have a number of bushwhack lakes around my cabin (2 miles north of Craig Lake State Park) that I'd like to explore. I have gotten my Prism to a couple of them, but shaving 4' off the length would make it easier to portage through the bush. I will start a thread when I begin that project.
That is indeed a Sassafras 12 in the box, which I am hoping to start and complete this summer. I have a number of bushwhack lakes around my cabin (2 miles north of Craig Lake State Park) that I'd like to explore. I have gotten my Prism to a couple of them, but shaving 4' off the length would make it easier to portage through the bush. I will start a thread when I begin that project.
03/26/2018 10:50AM
Nice build !
I was curious, about the Lapstrake method ?
So you start at the keel, and work to the shear ?
I thought it looked different, in that the keel is overlapped by the plank, and when the hull rests on the ground, it is actually resting on a side plank, and not the keel. What is the theory there ?
Interesting !
Jim
Keep your paddle wet and your seat dry!
03/26/2018 11:28AM
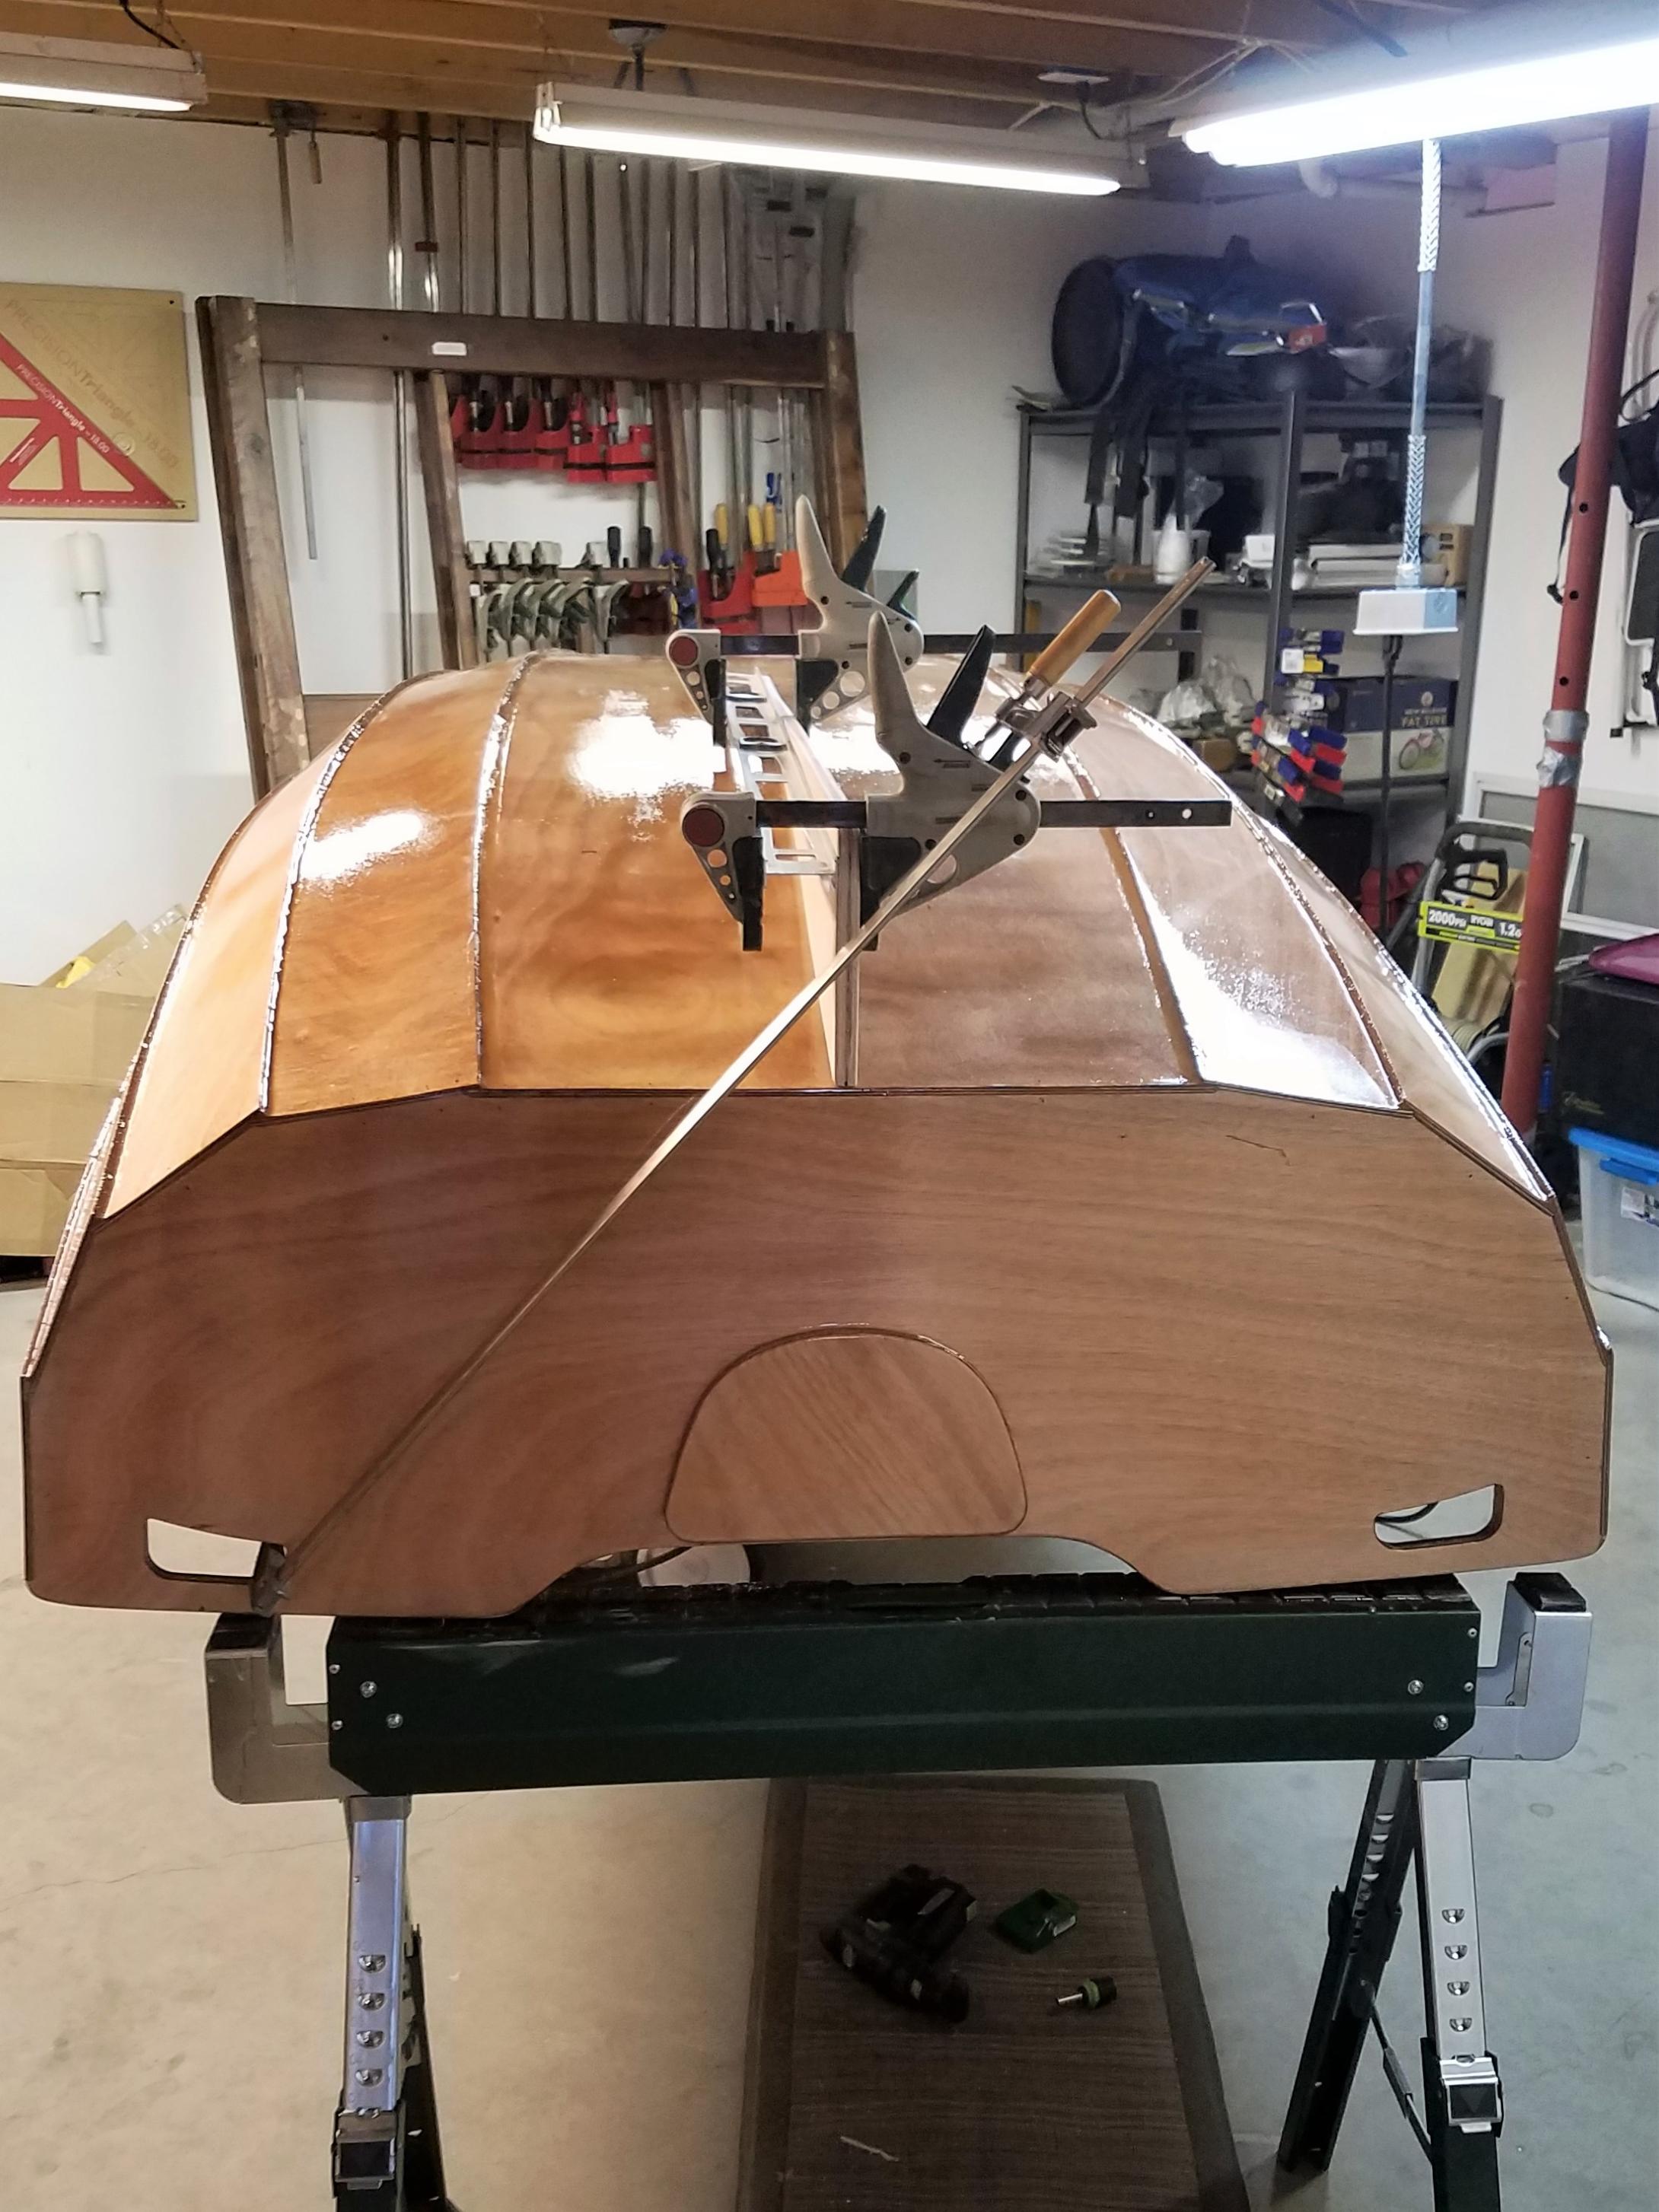
This weekend I attached the Skeg. Unfortunately, it is composed of 2 pieces of glued up 3/8" plywood, rather than 1 piece of 3/4". Once glued up, the skeg had a bit of wave in it on the sharp end. Apparently this is a common problem. I did manage to fight most of the wave out of it with clamps and a straight edge. There will also be a small keel strip about 7" out from either side of the skeg. If you were to run it up on the beach or set it on the ground, it would rest on the skeg and/or the keel strips.

Jim, you are correct that the boat is stitched from the bottom upwards. One thing that surprised me in the construction manual is that only the very bottom of the boat is fiberglassed on the outside, while on the inside the bottom and first strakes are fiberglassed. As Jim pointed out, the edge of the 1st strakes actually protrude past the bottom of the boat a little. I've been tempted to glass at least that edge of the first strakes, but I don't see it being an issue. There are quite a few of these put to use as yacht-tenders and small sail boats.
Jim, you are correct that the boat is stitched from the bottom upwards. One thing that surprised me in the construction manual is that only the very bottom of the boat is fiberglassed on the outside, while on the inside the bottom and first strakes are fiberglassed. As Jim pointed out, the edge of the 1st strakes actually protrude past the bottom of the boat a little. I've been tempted to glass at least that edge of the first strakes, but I don't see it being an issue. There are quite a few of these put to use as yacht-tenders and small sail boats.
03/26/2018 10:00PM
The natural wood finish on your boat is very attractive. I can see where sanding that hull would be much more painstaking than sanding a typical cedar strip canoe. Most of the lapstrake hulls that I have looked were painted for probably a good reason.......... to cover a multitude of sins fixed with thickened epoxy. You do nice work.
"Boredom, Tyler - that's what's wrong. And how do you beat boredom, Tyler?... Adventure...(Never Cry Wolf, 1983)
04/16/2018 12:42PM
This weekend I glued on the 'gunnels' (they call them rubrails in the manual) on one side. They are composed of 2, 3/4" pieces of mahogany on each side, presumably so it is easier to make the compound bend. Both pieces are attached, one on top of the other, on the outside of the boat. I thought about putting a small rabbet on one piece so it would overlap the exposed plywood edge, but I recently moved and sadly, I do not have my woodshop setup yet. I ended up using 28 clamps in all, and if I had more I would have used them. I found the spring clamps to be pretty useless, and parallel clamps are a bit to heavy to suspend of the boats edge. The f-style clamps seemed to be ideal for this task.
Once I get the other gunnel glued on, I will attach the oarlock risers, and move it to my pole-shed for finish work. My 6yo really wants me to paint the exterior fire-engine red. I did by the paint for it (the things you do for kids) but I am really liking the natural wood look.
I ended up making too much thickened epoxy, so I glued together the gunnels and strakes for my upcoming canoe build. I will post pictures of that build in another thread when I get further along.

Subscribe to Thread
Become a member of the bwca.com community to subscribe to thread and get email updates when new posts are added. Sign up Here
Community Links
 Search BWCA.com
 Donate
 Featured Sponsor