|
 Boundary Waters Quetico ForumGroup Forum: Boat Builders and RepairMy NWC excurzen build
|
Author
Text
")


03/15/2015 04:55PM
Made a wood steamer out of an old potatoe gun and my Turkey fryer. Don't laugh. It worked. I think I'm happy with the stem pieces. Haven't decided yet though.
Then i slapped the forms up just so I could see the shape of the design. I still need to sand the curves of the forms and center them fully on the strongback. Those of you who have built before understand that a picture doesn't do the forms justice. Makes them look very narrow. I love the shape of this design!


Then i slapped the forms up just so I could see the shape of the design. I still need to sand the curves of the forms and center them fully on the strongback. Those of you who have built before understand that a picture doesn't do the forms justice. Makes them look very narrow. I love the shape of this design!


03/15/2015 09:52PM
I'm putting my set up together hopefully tomorrow.
I'll post a pic. Changing my feather boards a little, But I'm still running my strips BETWEEN the fence and the bit.
I know many cringe at this, but my router has no problem with 1/4" cedar. I've beaded and coved strips for no less than 30 canoes and kayaks this way, and no problems.
Jim
I'll post a pic. Changing my feather boards a little, But I'm still running my strips BETWEEN the fence and the bit.
I know many cringe at this, but my router has no problem with 1/4" cedar. I've beaded and coved strips for no less than 30 canoes and kayaks this way, and no problems.
Jim
Keep your paddle wet and your seat dry!
03/16/2015 06:13AM
Great start!
I think I've underestimated how useful a skilsaw can be. I've been learning about timber framing lately, and I feel like that's one of the only modern tools that a lot of these guys would hate to be without. Now I see I've been wasting a ton of wood at the table saw all this time when a better solution was right under my nose. You gotta love good tools!
I'm anxious to hear your thoughts on the Excurzen. That will probably be my next build.
03/16/2015 12:25PM
quote 1JimD: " I'm putting my set up together hopefully tomorrow.
I'll post a pic. Changing my feather boards a little, But I'm still running my strips BETWEEN the fence and the bit.
I know many cringe at this, but my router has no problem with 1/4" cedar. I've beaded and coved strips for no less than 30 canoes and kayaks this way, and no problems.
Jim "
this would aid in making all the strips exactly the same finished height. I can see some benefits. As long as i could rig a shield above the bit in case for some reason my bit came flying out, i don't see a problem with this.
03/16/2015 12:40PM
I put the bead on all but about 10 strips last night before the wife came outside and said i was making too much noise. So I'll have to finish those before switching my bit over to cove.
Mounted my homemade table to base of strongback. That way i didn't have to catch the strips when they came out. they simply "fell" into a neat pile. Worked out pretty good. I'd still like to see your setup Jim, or anyone else with other ideas.


Mounted my homemade table to base of strongback. That way i didn't have to catch the strips when they came out. they simply "fell" into a neat pile. Worked out pretty good. I'd still like to see your setup Jim, or anyone else with other ideas.


03/16/2015 08:13PM
Do to time constraints, I was unable to take pictures. I beaded and coved half my strips, as the planks were thinner. Tomorrow I'll do the wider strips and get pics.
Everybody has a different method, we just use what works. I've modified my technic a lot, and feel it's the best I've come up with. The only thing I'd like to change, is to set up another router table for the other bit. It would save changing bits, and resetting the fence.
You know you're having fun when the wife tells you to quit for the night ! Ha !
Jim
Keep your paddle wet and your seat dry!
03/16/2015 09:47PM
I have a scrap piece of 1/4" plywood roughly 12" wide that serves as my temporary outfeed table when milling strips. Only one fastener, a screw that attaches it to the bottom of the router table. The other end sits on a saw horse. Of course the 1/4" ply is saggy so I clamp some pieces of 1x4 or 2x4, whatever is laying around, to the sides to give it support. This also creates a tray so as the strips come out of the router I can just push them in to the tray and keep feeding. Instead of having the set each strip aside as it's cut I can let 15 build up and move them to the side all at once.


03/17/2015 08:01AM
quote opolka: "Made a wood steamer out of an old potatoe gun and my Turkey fryer. Don't laugh. It worked. I think I'm happy with the stem pieces. Haven't decided yet though.
Then i slapped the forms up just so I could see the shape of the design. I still need to sand the curves of the forms and center them fully on the strongback. Those of you who have built before understand that a picture doesn't do the forms justice. Makes them look very narrow. I love the shape of this design!
What side of the forms are your cleats on? They need to be on the side towards the stems so you can bang your forms towards the center when you want to remove them. Or you may not be able to get your forms out. Looking at your 3rd picture from the left they are on the wrong side. Cleats towards stems, forms towards center.
CB
03/17/2015 08:54AM
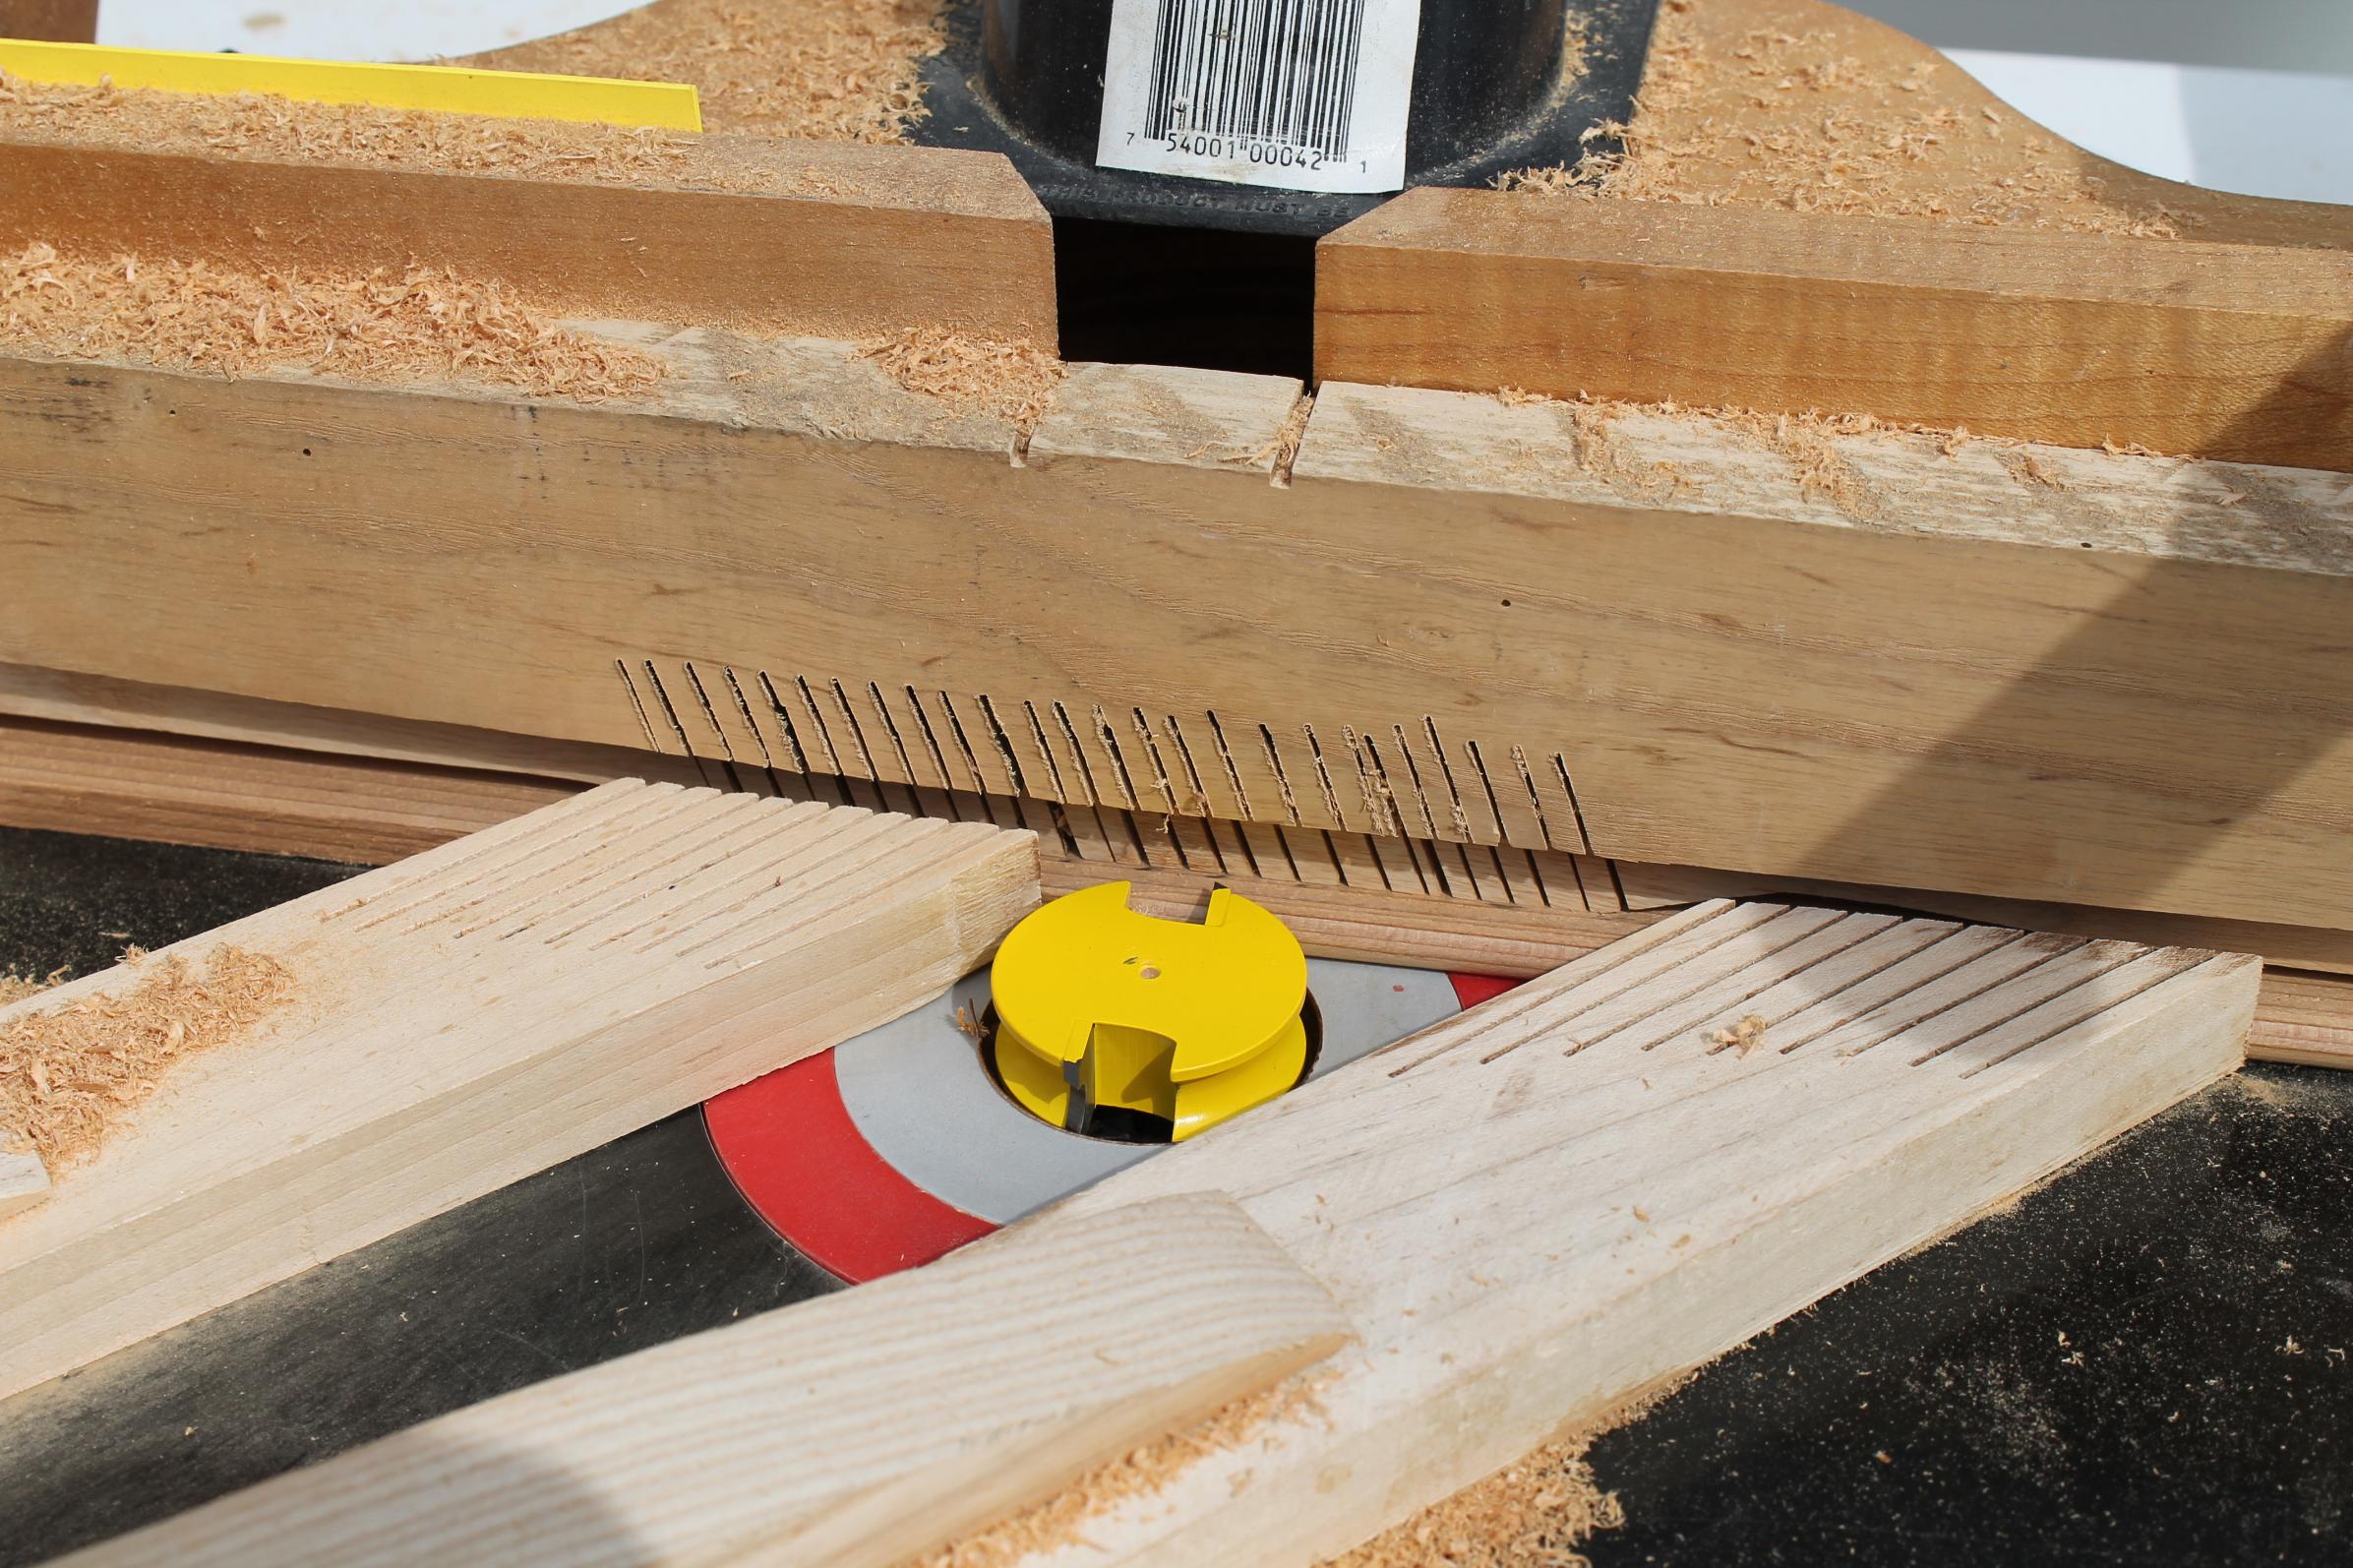
quote opolka: "I put the strongback cleats on and used that as my base to rip strips. I employed 1JimD's idea of a circular saw with a homemade fence.
I used some pieces of redwood strips so i did not cut into my cleats. Simply threw them away when done.


"
Jameson locked and loaded in the 3rd picture. Nice!
03/17/2015 05:56PM
So due to an error on my part (got a little crazy shaping the inner stem) i had to redo my stem pieces. Turned out fine, i used Oak for the outside pieces this time. 1/4 inch was a little big to bend without steam, so i made them between 1/8 and 1/4. Inner are still redwood. 4 strips for inner and 5 strips for outer.


03/19/2015 08:34AM
Rusty
If you buy planks like I do, that are not planed to a uniform thickness, Say on the ends they are 1", and in the middle, the plank is 3/4". I set the gap between the bit and the fence at 3/4". After that first pass, they are all uniform.
This way I don't need a planer.
Uniformity is the name of the game, in order for your joints to match each other, as you strip up the sides.
Jim
Keep your paddle wet and your seat dry!
03/19/2015 09:21PM
So i am being held up putting the Cove on my strips. Work schedule is keeping me from getting it done during the week due to the noise i will make. Might have to wait until the weekend.
I did, however, string line and center of the top of my forms and got the stations securely fastened now. The rocker proved slightly more challenging to string than i originally anticipated, but got it figured out. I'll be ready to rock and roll once the strips are ready now.

I did, however, string line and center of the top of my forms and got the stations securely fastened now. The rocker proved slightly more challenging to string than i originally anticipated, but got it figured out. I'll be ready to rock and roll once the strips are ready now.

03/21/2015 04:12AM
Got my strips all coved. Then I finished sanding the forms smooth and taped them. I Did a final check to make sure I was pleased with all the curves and rough shaped the inner stem pieces and attached them to the stem forms. Screwed my starter strips on, and I'm ready to rock and roll boys! I'll post some pics once I get stripped up a ways
03/21/2015 09:41AM
Alan, my favorite part is putting the forms on the strongback! Wait, that first strip is fun too. Wait, curving around to the bottom of the hull, or finishing the football, no wait, putting the seats in...
"Canoeing through a postcard" -Brother in Law Mark
03/21/2015 01:14PM
quote Rustycards: "Alan, my favorite part is putting the forms on the strongback! Wait, that first strip is fun too. Wait, curving around to the bottom of the hull, or finishing the football, no wait, putting the seats in..."
I hear ya. Many times during the build I find myself saying, "this is my favorite part"......except when it's time to sand the inside. But being done with the inside is certainly right up there!
Alan
03/21/2015 03:11PM
Building a strip canoe, is definitely a life enlightening thing ! You learn things, good and bad about yourself ! Hopefully more good, than bad !
Watching a canoe take shape, and running your hand across a freshly sanded hull brings a lot of joy to me ! If it didn't, I'd take up something like golf, or bird watching.
Jim
Watching a canoe take shape, and running your hand across a freshly sanded hull brings a lot of joy to me ! If it didn't, I'd take up something like golf, or bird watching.
Jim
Keep your paddle wet and your seat dry!
03/23/2015 10:46PM
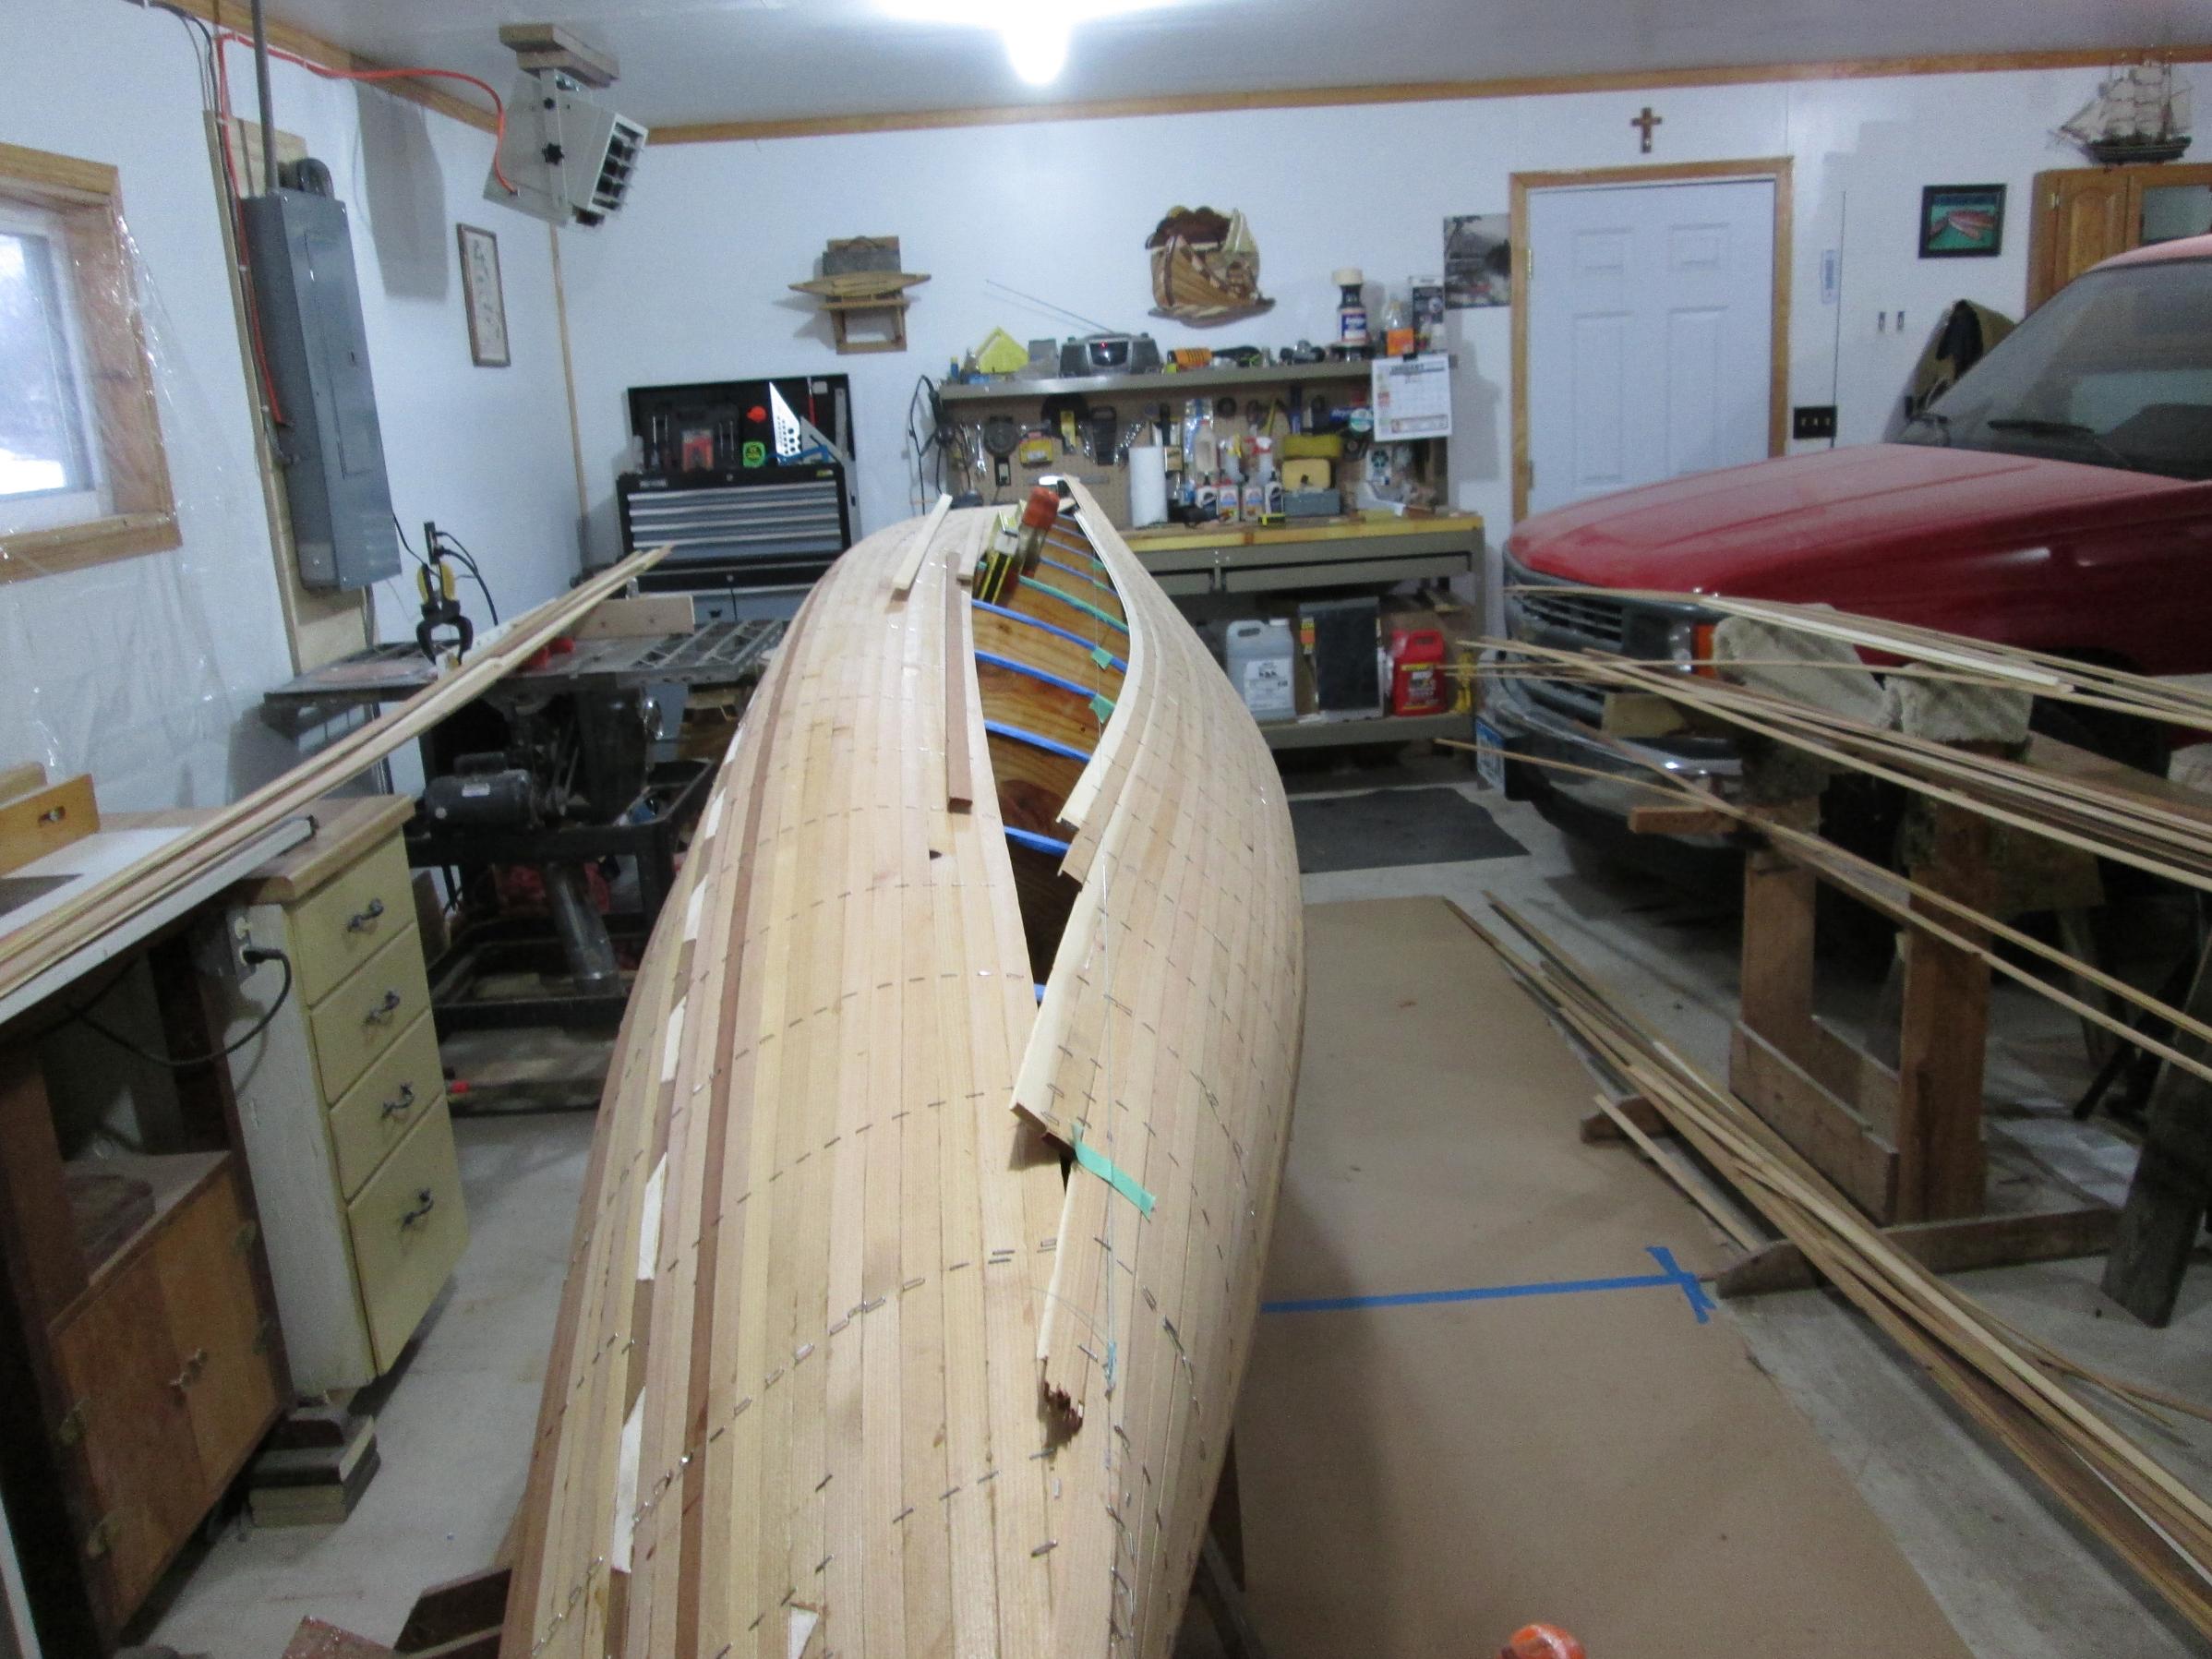
Got some strips on. Really liking the shape. I did, however, use my jigsaw to cut the hanging over strips and forgot my safety glasses on a cut. I paid for it. Had to make a trip to the eye doctor for him to dig a chunk of wood out of my eye. Won't be making that mistake again. On a happy note, here's some pics. I'm in love with the curves.


03/24/2015 09:48AM
Hi Opolka
Sorry about the jig saw ! A Japanese pull saw is your friend !
And excessive glue is not ! Cut way back on the strip glue !!! Use just enough glue to hold your strips together, until you are done sanding ! Epoxy will seep into the joints and provide the best glue !
You will appreciate it when it comes time to sand, believe me ! It cut my sanding time in half, and produces a stronger hull !
Looks good !
Jim
Keep your paddle wet and your seat dry!
03/26/2015 02:03PM
Yeah, i may have gotten a little carried away with glue around the tumblehome. Ha. Have since cut back. I like to see the glue a bit when I press the piece down tight, but I hear what you are saying. Didn't snap a pic, but I'm about two strips away from the football, and very pleased with the color variations i have with my strips. I'll get some more pics posted in the next day or so.
03/26/2015 02:09PM
Are you stripping with the cove up or down? It seemed logical to me to strip with the cove up but I found as you make the turn at the bilge it gets pretty hard to place glue without things getting really messy.
Then I realized that many other people strip with the cove down and it's much easier to place the glue and keep it clean that way. I clamp a couple scrap pieces of wood with notches cut in them to the forms about 8' apart. Lay the strip in the notches (which holds the strip with the cove up), place the glue, and then set the strip in place.
Alan

03/26/2015 08:46PM
quote opolka: "Got some strips on. Really liking the shape. I did, however, use my jigsaw to cut the hanging over strips and forgot my safety glasses on a cut. I paid for it. Had to make a trip to the eye doctor for him to dig a chunk of wood out of my eye. Won't be making that mistake again. On a happy note, here's some pics. I'm in love with the curves.
As others have said, get a nice little pull saw. Watch your fingers though, they will cut right to the bone immediately. I use two, one with a spine made by Marples to give straight cuts such as long scarf joints. The other is a really flexible little one nice for smaller cuts.
One other friendly piece of advice is to not drive the staples in flush, it will make them harder to remove and bruise the wood and leave a dark mark even after sanding.
Good luck, it is looking great so far.
Bryan
03/27/2015 05:03AM
Staplers
I used to dismantle a stapler, and grind down the anvil that pushes the staple, But now it's so easy to wrap several layers of tape on the bottom of the stapler to build up thickness. I just do that.
And yes Bryan It's lookin good !
Jim
I used to dismantle a stapler, and grind down the anvil that pushes the staple, But now it's so easy to wrap several layers of tape on the bottom of the stapler to build up thickness. I just do that.
And yes Bryan It's lookin good !
Jim
Keep your paddle wet and your seat dry!
03/27/2015 06:48AM
quote 1JimD: " Staplers
I used to dismantle a stapler, and grind down the anvil that pushes the staple, But now it's so easy to wrap several layers of tape on the bottom of the stapler to build up thickness. I just do that.
And yes Bryan It's lookin good !
Jim"
I do the same thing, and then I let the glue build up on the stapler. Within a few strips the staples tend to stand almost 1/4 inch proud. It makes it pretty easy.
03/27/2015 08:30AM
I found a stapler with a force adjustment knob on the top, not sure of the brand but it cost about $30 if I remember correctly. It is perfectly consistent, I leave about an 1/8" of staple sticking out (9/16" staples). When I start I just use a little scrap strip to calibrate it for the forms being used.


03/30/2015 02:42PM
Lol. Love it. Anyways, I'm past the stern and bow stems. All set to start the football. I'm utilizing a double keel strip. Think it'll look good. On the plus side, i can install the outer stem pieces whenever i want now. I went with RAKA epoxy and everything is here now. I know I'm a ways from done, but I can already taste the water.


03/30/2015 07:25PM
quote 1JimD: " Sorry for the confusion Nick !
My intent was to invite Jason Opolka over, if he was available. Or anyone else, able to make it.
I'll start another thread when I finish glassing the outside.
Jim"
No apologies necessary. I'm back up to speed now!
Couple of nice looking boats!


04/06/2015 08:42PM
Looks great Jason !
Those last strips take so long, but are soo rewarding !
Next is staple pulling and sanding.
Save the staples, and keep them in a jar ! They are fun to look at, and think how much work it was to get them in that jar !
Jim
Those last strips take so long, but are soo rewarding !
Next is staple pulling and sanding.
Save the staples, and keep them in a jar ! They are fun to look at, and think how much work it was to get them in that jar !
Jim
Keep your paddle wet and your seat dry!
04/17/2015 02:12PM
Still working on sanding for now. But made a trip to a small mom and pops saw mill this morning. Guy named Virgil was super excited to hear I was making a cedar canoe and dug into his special stash and produced clear SG ash for me. Was very satisfied. Grabbed that and a beautiful basswood plank. after shooting the shit for an hour, he charged me next to nothing and I was on my way.


04/24/2015 06:36PM
Had the day off of work. So i got the cloth all ready to go and started wet out. Went pretty smooth for my first attempt. Took just shy of 4 hours for the wet out to be ready for the first fill coat. Then just 3 hours after that for the final coat. Looks good, but I'll have to hit some areas with the sander later.


04/25/2015 08:48PM
It's very unusual to fill the weave of your cloth with a wet out coat, and one other coat !
If you sand now, you will be sanding into your cloth ! Not good !
Look at the cloth at an angle. If you can see any bit of pattern of the cloth, you need another coat !
Here is my schedule for wetting out cloth.
First wet out coat applied, I wait until the resin goes past the tacky stage.
Second coat goes on, I wait an hour, maybe up to one and a half hour. The trick here is to apply each fill coat, while the previous coat is STILL TACKY ! This almost eliminates RUNS ! Saving a ton of scraping, and sanding later.
My last hull took one wet out coat, and three fill coats
Remember to allow your resin to cure at least a week before sanding ! Uncured resin in the lungs and on your skin is evil !
Jim
Keep your paddle wet and your seat dry!


05/09/2015 01:10PM
Got my gunwales milled. Just need to sand the epoxy on the inside of the hull and i can start attaching them. In the meantime i also got the rear seat frame cut and assembled. Epoxy there should be cured by the time i get my cane in the mail. I'll post some pictures after that.
05/17/2015 11:31PM
Due to pictures being on both my phone and iPad, these picture uploads may be out of order. Bare with me. I installed the inwales last night and prepped the outwales in the meantime. Then tonight I got the outwales slapped on completing the gunwales


06/05/2015 10:17AM


My daughter really likes it. Lol. When we went to test it out she didn't want to get out. Canoe is 17'5" and weighs about 65 lbs. Pending if I can figure out a good way to haul her, she will be hitting the gunflint this Sunday when we put out. Her name is TBD
09/18/2017 10:48PM
Opolka, you have a beautiful canoe and I really appreciate the build pictures to see the process. I'm thinking of building an Excurzen this winter as a tripping canoe for my family. Do you feel like it fills the role of a family tripping canoe well? How is it from a primary and secondary stability standpoint? Does being unloaded have a significant effect on stability? Thanks for your time and help!

Subscribe to Thread
Become a member of the bwca.com community to subscribe to thread and get email updates when new posts are added. Sign up Here
Community Links
 Search BWCA.com
 Donate
 Featured Sponsor