|
 Boundary Waters Quetico ForumGroup Forum: Do It Yourself GearWinter projects
|
Author
Text
")


12/07/2015 02:40PM
So far for me this winter I'm making a raincover for my backpacking pack in prep for next summer's Philmont trek.
I plan to use the scrap silpoly to make some stuff sacks or maybe hipbelt pouches for my pack.
My daughter is getting a pillow kit from ripstopbytheroll as she wants me to teach her how to use the machine. Thought a complete kit would be a good starting point.
I might eventually have some quilts to make/alter if I or some friends pick up the down throw that Costco sells for $20. After some alterations the throw turns into a decent summer quilt or layering quilt for winter camping.
When a man is part of his canoe, he is part of all that canoes have ever known. - Sigurd F. Olson, "The Singing Wilderness"

12/08/2015 10:21PM
I am working on a pattern and then sewing a combination rope/tarp bag system - sort of like CCS makes -
That is after the Christmas projects - sew fleece pants, finish knitting mittens, make doll clothes, design and make flannel board with story characters for a teacher friend, new zipper in formal dress for granddaughter....the list seems to keep growing.
Maybe in January I will get to my own project. Well actually February or maybe March.
12/09/2015 06:20PM
im working on christmas presents including two underquilts, a hammock, and a dozen or so tarp anchors. future projects include a hammock with built in bugnet and underquilt, a square tarp, and maybe if time permits, a light weight backpack.
12/09/2015 10:13PM
Wow! Everyone's busy! Nice to be able to make things just how you want them or at least save some cash. So far I'm liking the sil/poly 4000 mat'l from ripstop by the roll. It's much easier to work with than the silnylon and more waterproof. I'm tempted to order a bunch for a shelter but hard to do at Christma$. Maybe in February. Hope to get picks of my latest projects up soon. Still waiting for some Ti foil from Canada though. Would like to see other peoples projects though.
“The more you know, the less you carry” Mors Kochanski
12/10/2015 09:19AM
I'll try to take some photos while we're making the stuff. I'd like to work up to a new tarp some day, that seems like a fun project.
The hip belt pouches are following a pattern I found here at Back Packing Light. The guy's website that has a couple other patterns can be found here.
The hip belt pouches are following a pattern I found here at Back Packing Light. The guy's website that has a couple other patterns can be found here.
When a man is part of his canoe, he is part of all that canoes have ever known. - Sigurd F. Olson, "The Singing Wilderness"
12/10/2015 10:53AM
I used to backpack and I remember wanting pockets on my hip belt for camera, power bar compass etc. It was annoying having to take off the pack just to access these items. Not the same problem with canoeing as portages are only so long and about the only thing a person wants is water. Sounds like a great project.
I watched the vid's about slowing down the old Singer. Looks like the pulley reduction would be the way to go. Once I get my Viking back, I'll probably just put the big Singer up for sale on Craigs list so I'm not going to worry about that.
I watched the vid's about slowing down the old Singer. Looks like the pulley reduction would be the way to go. Once I get my Viking back, I'll probably just put the big Singer up for sale on Craigs list so I'm not going to worry about that.
“The more you know, the less you carry” Mors Kochanski
12/10/2015 07:22PM
I'm sort of obsessed with making stuff right now. I just finished a fur hat for winter and am working on my sled bag and some wind pants which should take a few weeks. Then I'll turn to next spring/summer for which I am planning to make a new silnylon single pole tent, and hopefully a new semi-portable camp kitchen - think old boyscout patrol box updated to a Gordon Ramsay standard.
By the way, I just ordered my walking foot base on the strong recommendations on this forum.
By the way, I just ordered my walking foot base on the strong recommendations on this forum.
12/10/2015 07:38PM
Great projects. The tent sounds like a challenge. Did you find a pattern or are you winging it?
When I bought a walking foot for my White machine, it worked fine right out of the package. When I bought one for my Viking it kept jamming up on the needle set screw. Just a note of caution... you might have to adjust the arm a little.
When I bought a walking foot for my White machine, it worked fine right out of the package. When I bought one for my Viking it kept jamming up on the needle set screw. Just a note of caution... you might have to adjust the arm a little.
“The more you know, the less you carry” Mors Kochanski
12/10/2015 09:38PM
Underquilt and topquilt from the costco throws I picked up, some more shelving in the garage, a new light above my reloading bench and a new gathered end hammock & bug net.
“It is clearly absurd to limit the term 'education' to a person's formal schooling.” - Murray Rothbard
12/10/2015 09:50PM
For the tent design I was inspired by both your tent, Portagekeeper, and an 19th century English Army design that is still popular in the UK. It's pushing the limits of my skills, no doubt. I don't have an actual pattern, but have a lot of pages of paper that look something like this. Digging up all my 10th grade algebra here. We'll see if it turns out...


12/11/2015 06:10AM
Ahhh, I thought you might be talking about a single pole hoop tent. Yah, your blueprints look a little more technical than mine. I cheated and set up a string model in my shop. The one plus that I get out of that is that I can then get a feel for size. Can you post a pic of a UK model? Are you planning to heat it? Good luck! Looks like you're well on your way!
“The more you know, the less you carry” Mors Kochanski
12/11/2015 10:25AM
That's a nice looking 'mid Jaywalker. I saw a blue one on Reddit recently that somebody built w/a stove jack in. Is this going to be a hot or cold tent?
Floorless tents intrigue for their lightweight properties but I have the typical concerns about bugs, mud, etc. Do you use a ground sheet to put your stuff on?
Floorless tents intrigue for their lightweight properties but I have the typical concerns about bugs, mud, etc. Do you use a ground sheet to put your stuff on?
When a man is part of his canoe, he is part of all that canoes have ever known. - Sigurd F. Olson, "The Singing Wilderness"
12/11/2015 11:09AM
quote Floorless tents intrigue for their lightweight properties but I have the typical concerns about bugs, mud, etc. Do you use a ground sheet to put your stuff on?"
In my pyramid I used tyvek ground sheets just for sleeping on. In my new shelter there are partials sewn in... one across the rear and one along each side. The side ones can be folded out of the way for day use of chairs. There's nothing where the stove goes but the skirting.
Had a bunch of rain on our last trip and though continued rain left a puddle in the doorway, the sleeping area was fine. Site selection is everything.
“The more you know, the less you carry” Mors Kochanski
12/11/2015 11:25AM
quote Grandma L: "I am working on a pattern and then sewing a combination rope/tarp bag system - sort of like CCS makes -
"
I've always planned to sew corner pockets on my tarps and just never seem to get around to it. Maybe this year.
“The more you know, the less you carry” Mors Kochanski
12/11/2015 11:48AM
I made a few quilts last year. Karo Step UQ for gathered end hammock, summer TQ, and a winter UQ and TQ for my wife's Warbonnet Ridge Runner. I now need to replicate the Ridge Runner quilts for my own setup! I've also started poking around at making my own backpacks. I'll most likely include a stuff sack and tarp somewhere too. :) Hopefully the ole sewing machine is up for it.
Ridge Runner UQ Build
Ridge Runner UQ Build
"It's a dangerous business, Frodo, going out your door. You step onto the road, and if you don't keep your feet, there's no knowing where you might be swept off to." – Bilbo Baggins
12/11/2015 03:07PM
The only quilts that I have made are insulated with PL Sport insulation. Haven't worked with down yet and am leery of trying to separate the down into the proper increments. Tough to divide something into small amounts when it doesn't weigh anything and wants to float all over the place.
“The more you know, the less you carry” Mors Kochanski
12/12/2015 12:41PM
While I am reluctant to be too specific on my tent plans for fear of providing a yardstick against which my future shortcomings will be measured, I will do so anyway. This company makes them in the UK, or to get a better flavor just Google Bell Tents UK and look at the images that come up. It's not quite a pyramid in that it will have short walls of 18-24 inches (tbd), and will have more than 4 sides - likely 10. I may just use a ground cloth, or at most build in half a floor. Bugs don't worry me too much, but I've found it nice to have a place for my wet dog to come into the tent or for me to take off wet jackets. Its primary usage will be summer so will have some windows for ventilation, but for spring/fall usage will likely add a 3 inch stove pipe access. Correction from my earlier post - it has one main pole, and two smaller poles to help shape the door. I count this as an ambitious project above my current skill level, so we'll have to see if it actually turns out like I hope. I am thinking of this as my primary Flyfish trip tent, as it was on a fishing trip where I found my current BWCA tent too small and uncomfortable.
12/14/2015 10:33AM
quote PortageKeeper: "The only quilts that I have made are insulated with PL Sport insulation. Haven't worked with down yet and am leery of trying to separate the down into the proper increments. Tough to divide something into small amounts when it doesn't weigh anything and wants to float all over the place."
I was able to watch a few good videos prior to taking the plunge into working with down. If you have a shop vac and a small amount no-see-um (or similar mesh) available, it makes the whole process a breeze...but one that doesn't blow your down around. I find working with the huge amount of fabric more cumbersome than working with down now. I'll add some pictures of the process sometime. Once the shell is done it takes 1 to 2 hours to fill the baffles depending on how much down you want in each.
"It's a dangerous business, Frodo, going out your door. You step onto the road, and if you don't keep your feet, there's no knowing where you might be swept off to." – Bilbo Baggins
12/15/2015 09:24AM
Was waiting on some grease for my machine that finally arrived yesterday. I've kept it oiled, mostly, but since I got my mom's machine I hadn't put any grease on the gears. It sounded happier last night, which is good. Curious what everyone is using to lube their machines? Until recently I had been using the same bottle of oil that my mom gave me when she "lent" me her machine several years ago and it was already old then.
I switched to Tri-Flow w/PFTE based on a lot of positive remarks on several sewing boards and supply shop sites. Already had the liquid, just needed the grease and nobody around me carries it in the store.
Sewed up the pack cover last night after working in the grease. My first time working with rolled hems and also with any sort of silicon impregnated fabric. It turned out pretty well, only a few spots where the hem got away from me a little bit. Hopefully have enough remnant fabric to make a stuff sack for it.
Thinking about adding some grosgrain ribbon and center release buckles to the top & maybe bottom to help pull it in more around the pack and keep it secured.
When a man is part of his canoe, he is part of all that canoes have ever known. - Sigurd F. Olson, "The Singing Wilderness"
12/15/2015 11:21AM
I've only heard lately that Tri-flow is ok for machines so I started using it on my Viking. I've heard lithium grease as well but can't guarantee that it won't eat plastic so Id confirm that. I otherwise have just re-distributed excess grease that was already on the gears.
I haven't had any luck using gross grain with side release buckles (too thin) and assume that cenetr release would be the same. I have to go with med thickness webbing.
I haven't had any luck using gross grain with side release buckles (too thin) and assume that cenetr release would be the same. I have to go with med thickness webbing.
“The more you know, the less you carry” Mors Kochanski
12/15/2015 03:35PM
Thanks for the tip PK. A couple online vendors seem to have 'thin' center release buckles in their offering specifically for grosgrain but at least one of them, can't remember which at the moment, was out of stock last I checked.
I know such a thing exists and works decently, since Enlightened Equipment uses grosgrain and center buckles for their quilt attachments.
Ok - just checked. It's DIY Gear Supply that has the low profile center release buckles. Maybe it'll be an eBay item.
The reading I did suggested lithium grease is bad in the long term, as the excess dries out and gets really caky. Before I put on the grease I used a toothpick and clean rag to scrape and clean out a lot of the old dried yellow/brown grease.
When a man is part of his canoe, he is part of all that canoes have ever known. - Sigurd F. Olson, "The Singing Wilderness"
12/21/2015 09:31AM
I am anxious to get the Christmas sewing out of the way and get back to my own camping projects.
And, the parts for my Serger came!!!!!!
I got new - cutting knives both upper and lower. Now the fabric should fly through the machine and have great clean cuts!
And, the parts for my Serger came!!!!!!
I got new - cutting knives both upper and lower. Now the fabric should fly through the machine and have great clean cuts!
12/21/2015 12:16PM
Mirth - I'll have to keep my eye open for some low profile buckles. Sometimes those are exactly what you need for this or that.
G.L. - I only have a partial idea of what serger's are for. Maybe you could explain or show us in a pic. My understanding is that they are for single pass seams such as in a jacket sleeve(?) Why do they need so many spools of thread?
Cedar Boy - Please keep us posted on the canoe form/canoe.
Still anxious for my Viking to come back from the shop. I have since got my White running better. In the mean time I have picked up lots of thread - mostly black and in larger spools. Also bought a plain tape binder attachment and some 7/8" gross grain to try on edges. Those things should be here soon.
“The more you know, the less you carry” Mors Kochanski
12/21/2015 05:56PM
quote wingnut: " PK, what kind of tape binder do you use and where do you find it. "
I bought this one . I'll not know if it's any good 'til I try it out. There are so many styles and prices to choose from that I'm guessing it will be hit and miss. Bought it because of the price, and you can choose your width before buying. I don't know how much I'll use it so I didn't pay extra for a swing-away model.
“The more you know, the less you carry” Mors Kochanski
12/22/2015 06:51AM
I just got a pair of Sherpa Snowshoes that need to be re-laced for what I think is a STEAL of a deal. I'm thinking I should use leather to do the re-lacing. Does anyone have experience lacing snowshoes? I was thinking about stopping at Axe-Man Surplus and picking up a bag of their scrap leather laces and using what I could out of there. Sound like a decent idea?
"It's a dangerous business, Frodo, going out your door. You step onto the road, and if you don't keep your feet, there's no knowing where you might be swept off to." – Bilbo Baggins
12/22/2015 07:43AM
quote VaderStrom: "I just got a pair of Sherpa Snowshoes that need to be re-laced for what I think is a STEAL of a deal. I'm thinking I should use leather to do the re-lacing. Does anyone have experience lacing snowshoes? I was thinking about stopping at Axe-Man Surplus and picking up a bag of their scrap leather laces and using what I could out of there. Sound like a decent idea?"
When we laced ours at the Ely Folk School last September, our kit included tubular nylon lacing. To lace my medium-size Ojibwa shoes (54" long), laces of 25', 50', and 16' were used for each toe, center, and tail section, respectively. Most of the lacing is about 3/8" wide; my center sections use a wider lace, over 1/2" wide. All of my wife's small-size shoes' (48") lacing was the narrower width. After three dips in Varathane spar urethane, they looked fabulous.

"You can observe a lot just by watching." -- Yogi Berra
12/22/2015 07:45AM
I've been looking into making a pair of traditional snowshoes myself and doing the lacing also. Gil Gilpatrick has a book titled Building wooden snowshoes and snowshoe furniture that has the lacing procedure laid out in it. I went to the local library to find a copy, choosing the latest version. I had to read and re read the book before it started to really sink in but at least now I have a bit of a grasp on how It's done. There's a member on the board who has built over 50 pair with the user name Knoozer.
There are a lot of different options on lacing material from traditional leather strips, nylon strips that Gilpatrick uses, paracord or what I am planning to use 400 LB test Monofillament. I like the Idea of the Mono being light and the snow not sticking to them. Good luck with your shoes.
There are a lot of different options on lacing material from traditional leather strips, nylon strips that Gilpatrick uses, paracord or what I am planning to use 400 LB test Monofillament. I like the Idea of the Mono being light and the snow not sticking to them. Good luck with your shoes.
12/22/2015 03:35PM
I appreciate the pointers, however, it seems ya'll are talking about making the lacing for traditional wood frame snowshoes. The snowshoes I'm talking about look like this:
Sherpa Snowshoes=_
Sherpa Snowshoes=_
"It's a dangerous business, Frodo, going out your door. You step onto the road, and if you don't keep your feet, there's no knowing where you might be swept off to." – Bilbo Baggins
12/22/2015 04:40PM
quote VaderStrom: "I appreciate the pointers, however, it seems ya'll are talking about making the lacing for traditional wood frame snowshoes. The snowshoes I'm talking about look like this:
Sherpa Snowshoes=_ "
You could see if this stuff may work for you. Lacing
"Rivers know this: there is no hurry. We shall get there someday.” ~A.A. Milne
12/22/2015 07:39PM
quote VaderStrom: "I appreciate the pointers, however, it seems ya'll are talking about making the lacing for traditional wood frame snowshoes. The snowshoes I'm talking about look like this:
Sherpa Snowshoes=_ "
Oh.
quote OldFingers57: "You could see if this stuff may work for you. Lacing "
Yeah, Country Ways was where our kits came from.
"You can observe a lot just by watching." -- Yogi Berra
01/04/2016 09:16AM
Got some work in on the quilt over the long weekend. I hemmed off a two column wide section from the throw that will be used to create the foot box and also add another 6" of length to the quilt. Now I'm ripping the vertical seams from the pieces so I end up with horizontal baffles once the quilt is done.
The low profile center release buckles are back in stock at DIY Gear Supply. Think I might pick a couple up to finish the rain cover.
The low profile center release buckles are back in stock at DIY Gear Supply. Think I might pick a couple up to finish the rain cover.
When a man is part of his canoe, he is part of all that canoes have ever known. - Sigurd F. Olson, "The Singing Wilderness"
01/04/2016 10:25AM
quote mirth: "Got some work in on the quilt over the long weekend. I hemmed off a two column wide section from the throw that will be used to create the foot box and also add another 6" of length to the quilt. Now I'm ripping the vertical seams from the pieces so I end up with horizontal baffles once the quilt is done.
The low profile center release buckles are back in stock at DIY Gear Supply. Think I might pick a couple up to finish the rain cover."
So these do work with gross grain?
Thanks.
“The more you know, the less you carry” Mors Kochanski
01/04/2016 10:38AM
quote PortageKeeper: "quote mirth: "Got some work in on the quilt over the long weekend. I hemmed off a two column wide section from the throw that will be used to create the foot box and also add another 6" of length to the quilt. Now I'm ripping the vertical seams from the pieces so I end up with horizontal baffles once the quilt is done.
The low profile center release buckles are back in stock at DIY Gear Supply. Think I might pick a couple up to finish the rain cover."
So these do work with gross grain?
Thanks."
Yes. They do.
"It's a dangerous business, Frodo, going out your door. You step onto the road, and if you don't keep your feet, there's no knowing where you might be swept off to." – Bilbo Baggins
01/08/2016 02:24PM
Had some time to complete the quilt last night. All told I think I've got about 10 hours into it. It was a good experience that was not without difficulty. Using new thread that I got from Ripstop By The Roll, I had several times where the yarns in the thread became separated and some of them started to unwind up in the machine. Also had a couple birds nests that resulted from not maintaining tension on the tag end of the thread when starting in a new spot.
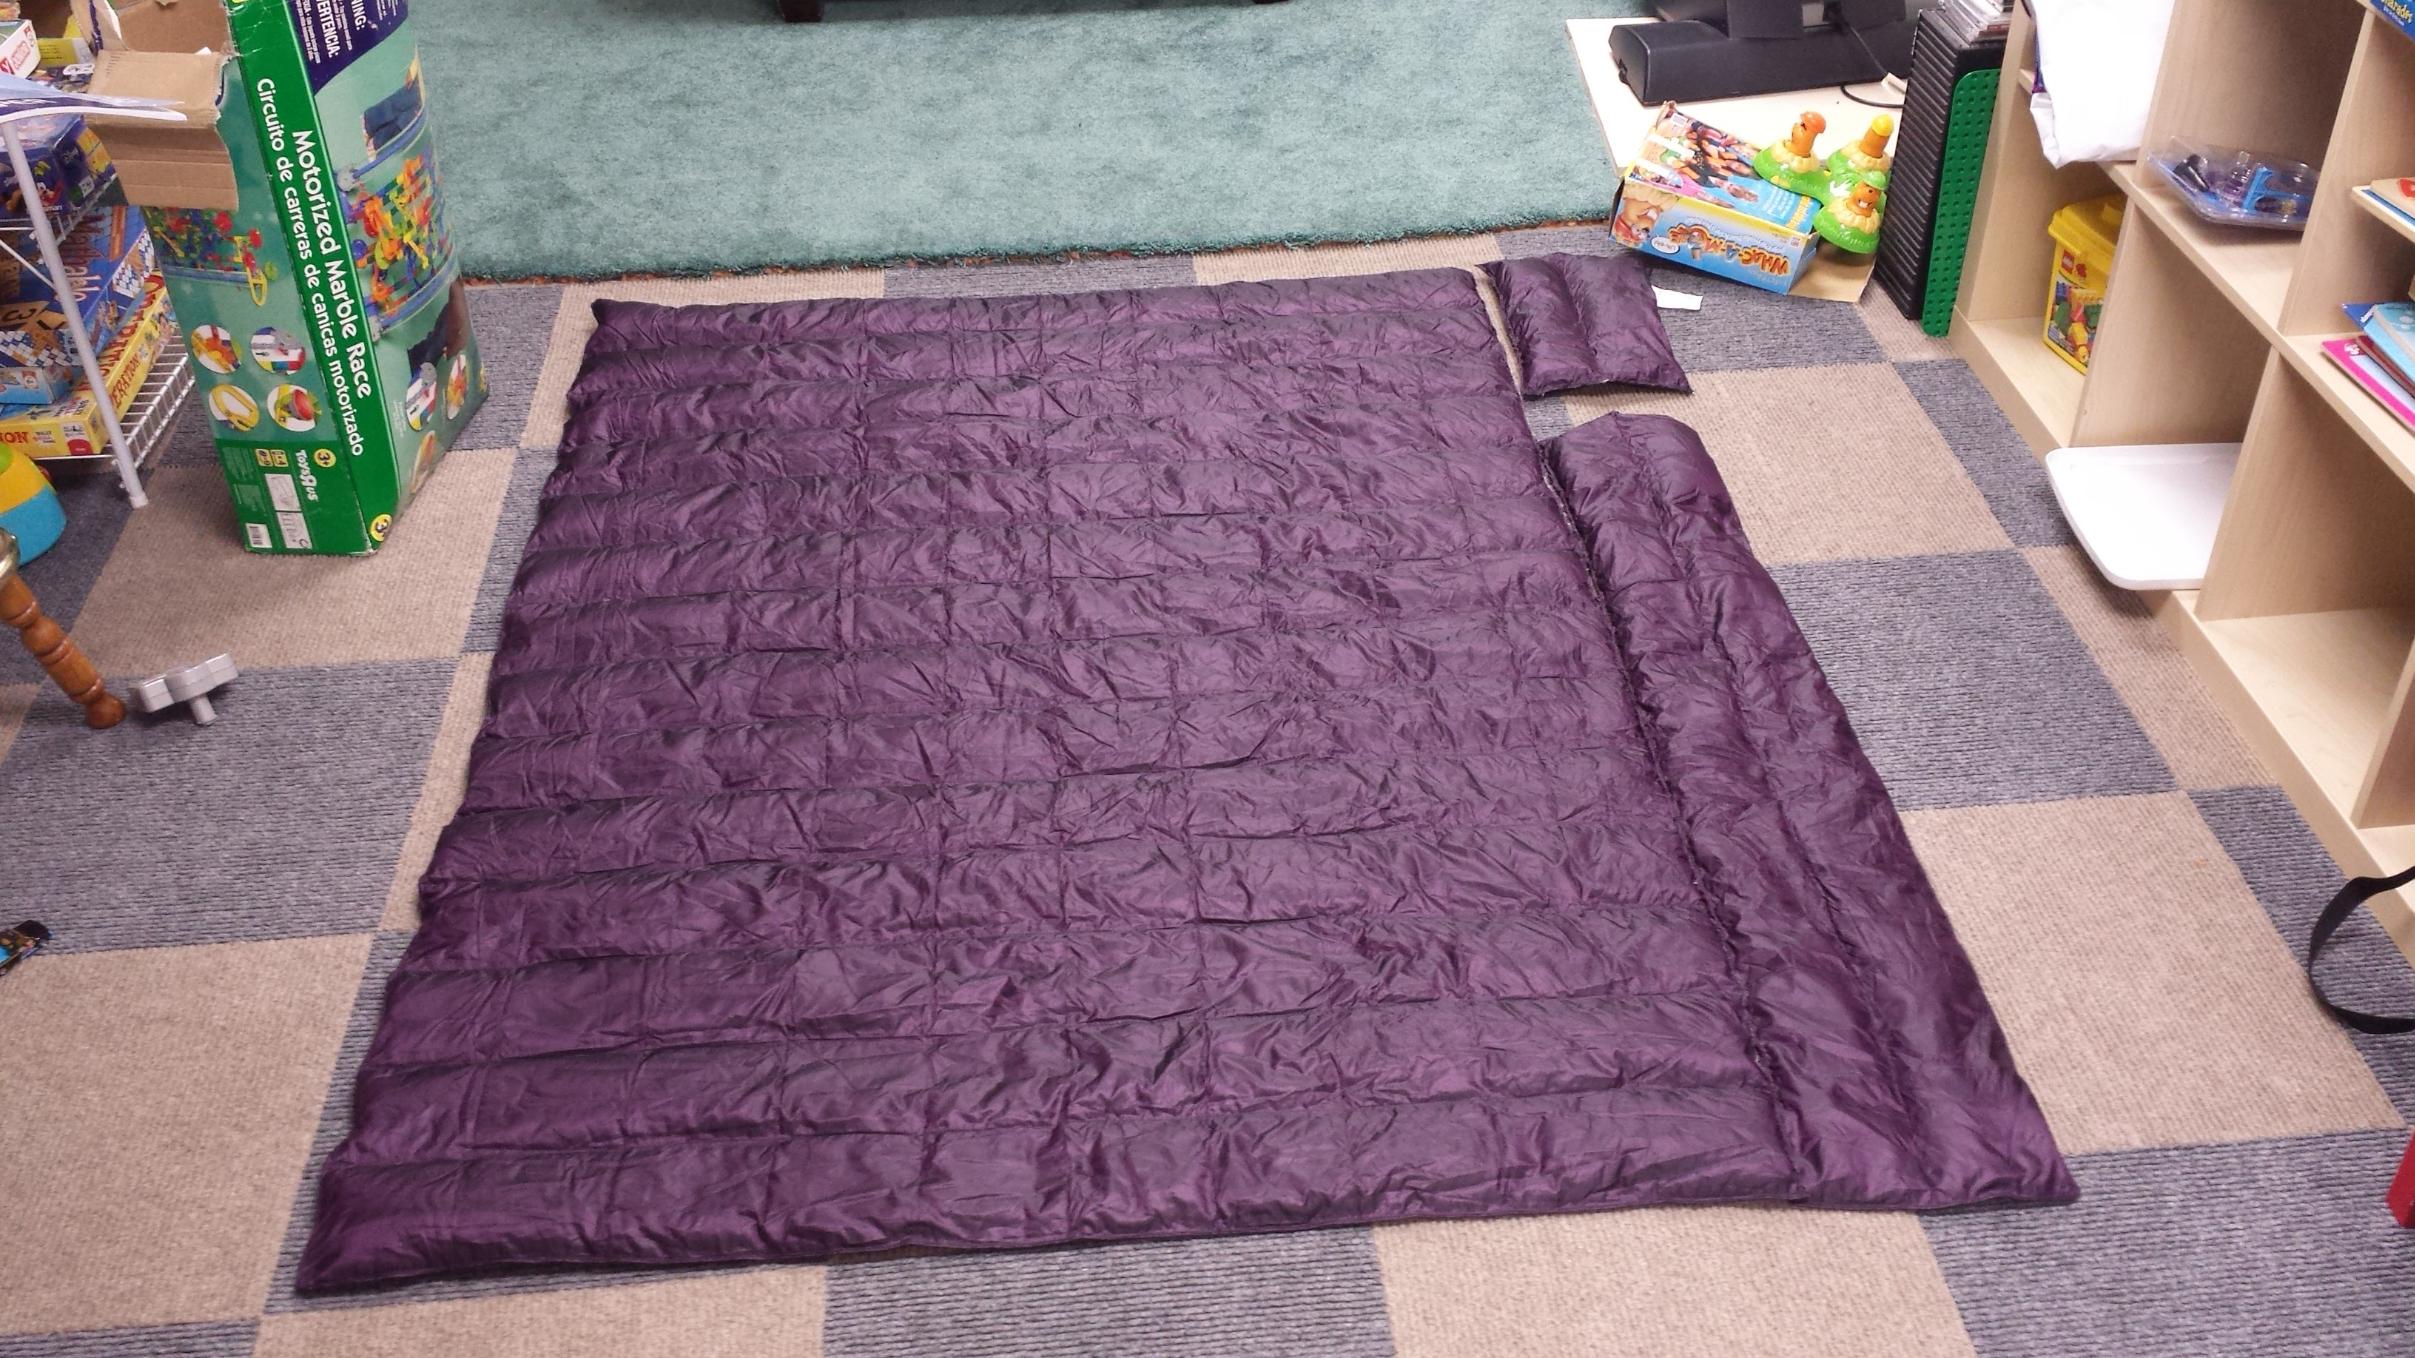
Here's the throw basically as sold from Costco. I've already hemmed off & detached a 2 column wide piece from the throw to be converted into the foot box and add an extra 10" of length in the quilt. The foot box was shortened to 2x4 squares then I removed the vertical stitching to create horizontal baffles & moved the down from the side squares into the middle. The side squares were then hemmed off & the now empty squares were removed and discarded

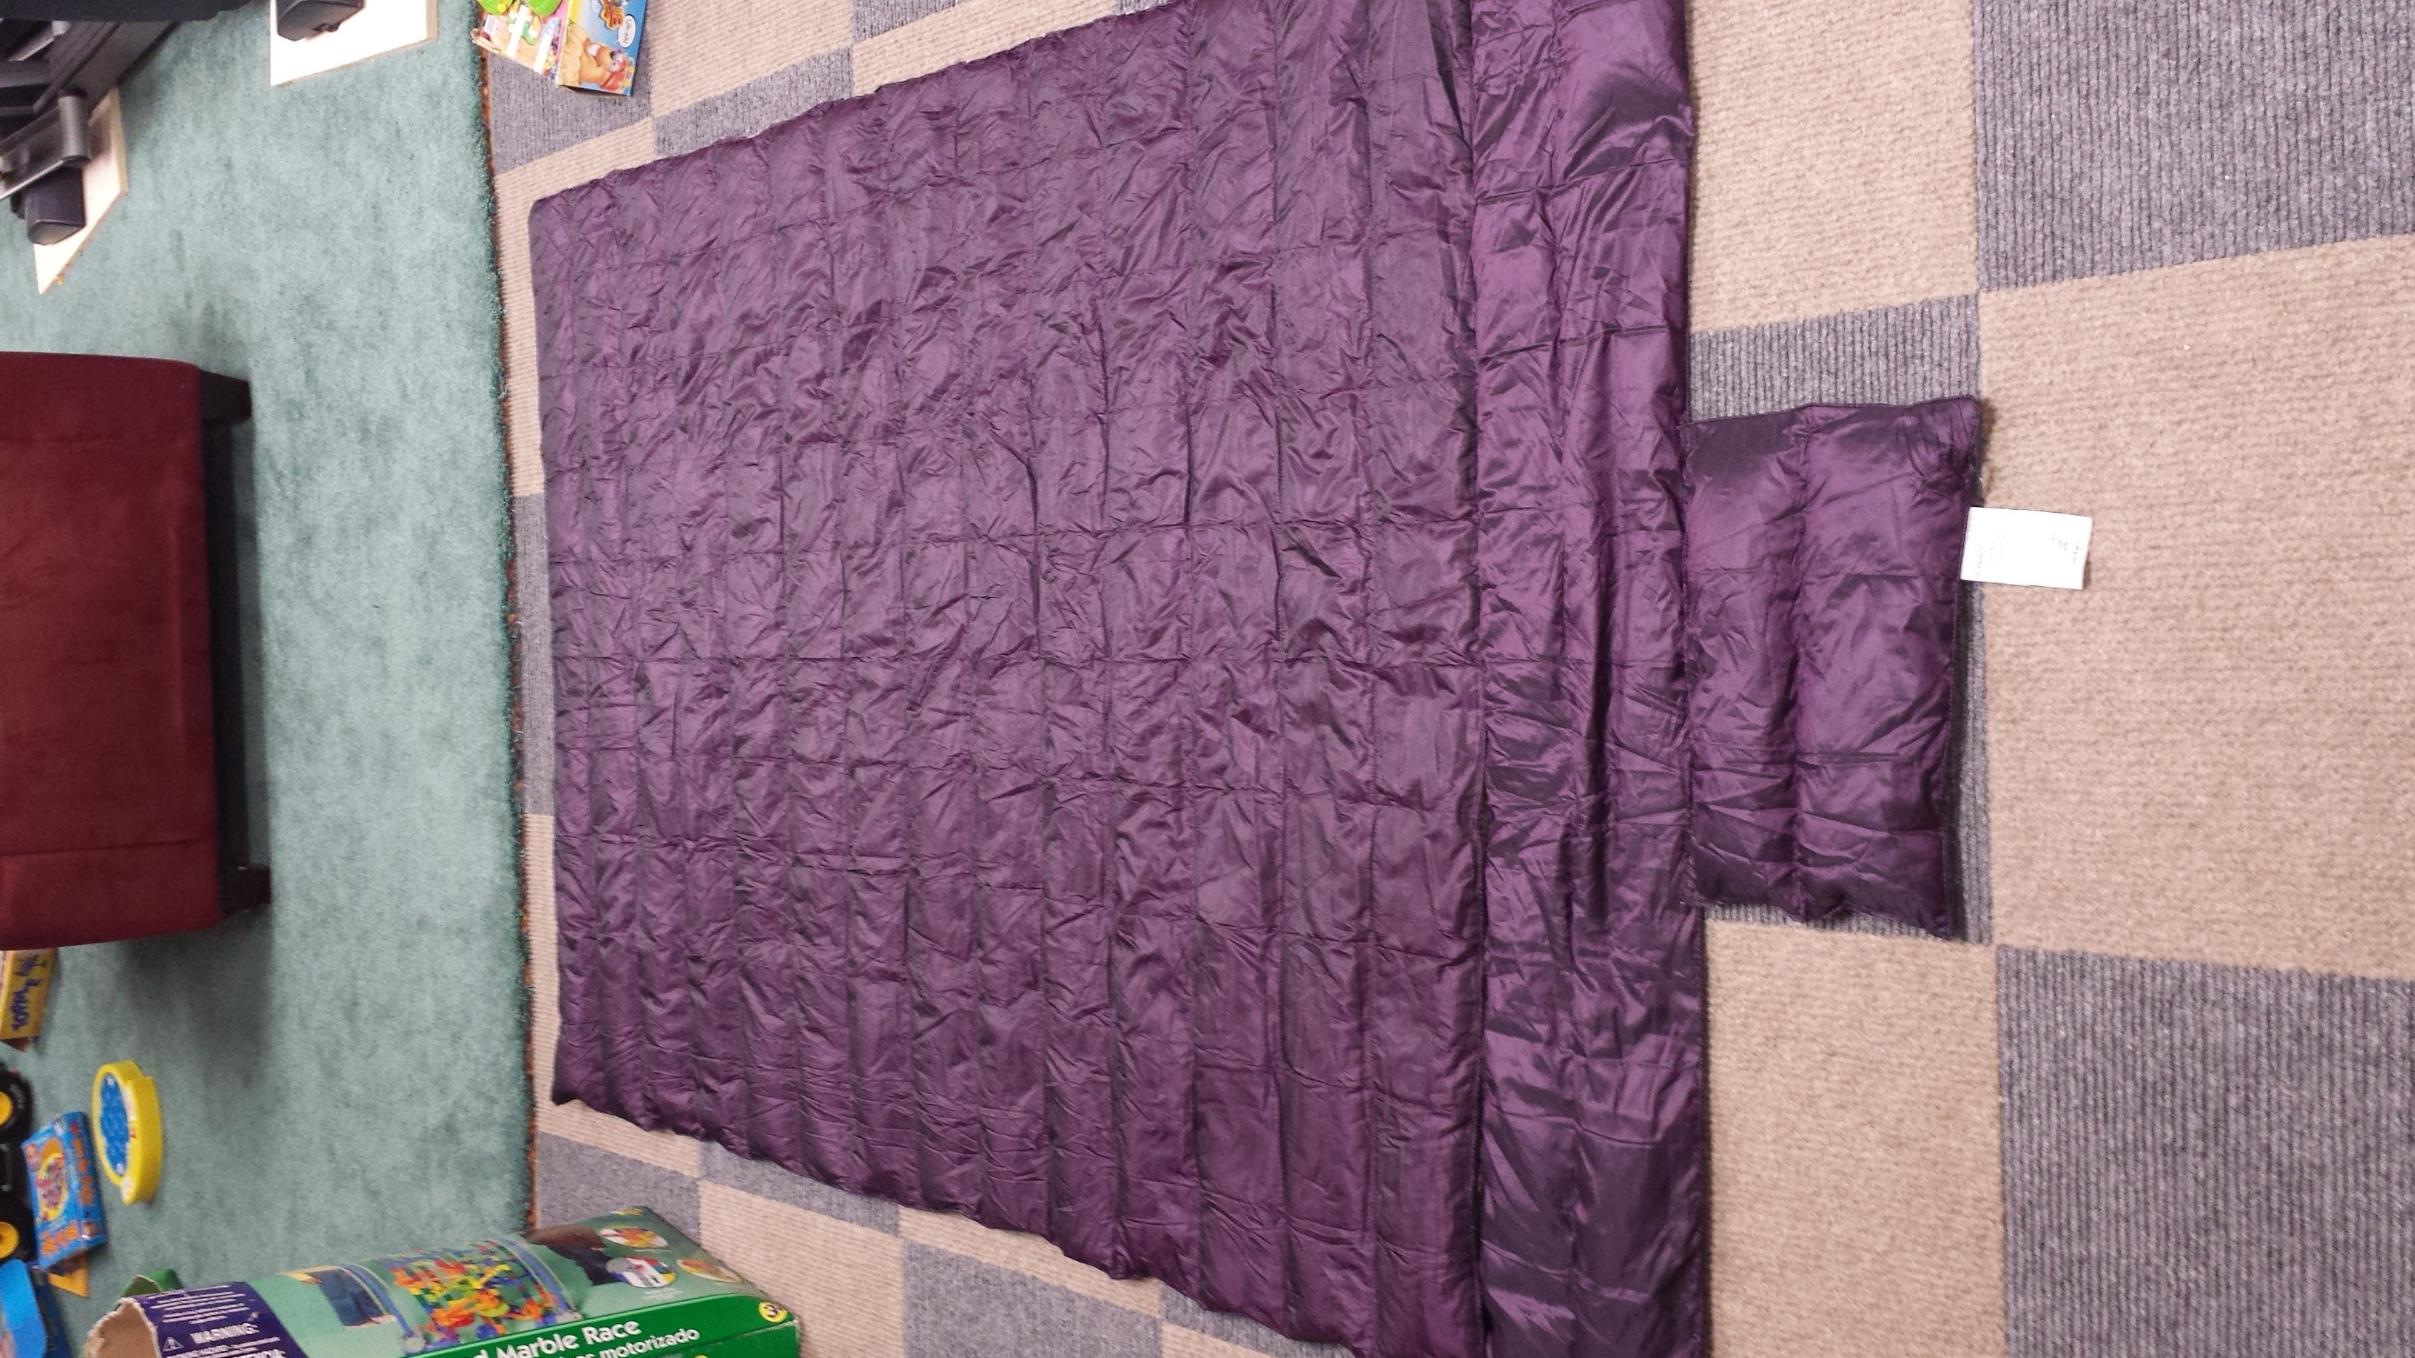
Here are the pieces laid out as they will be stitched together.

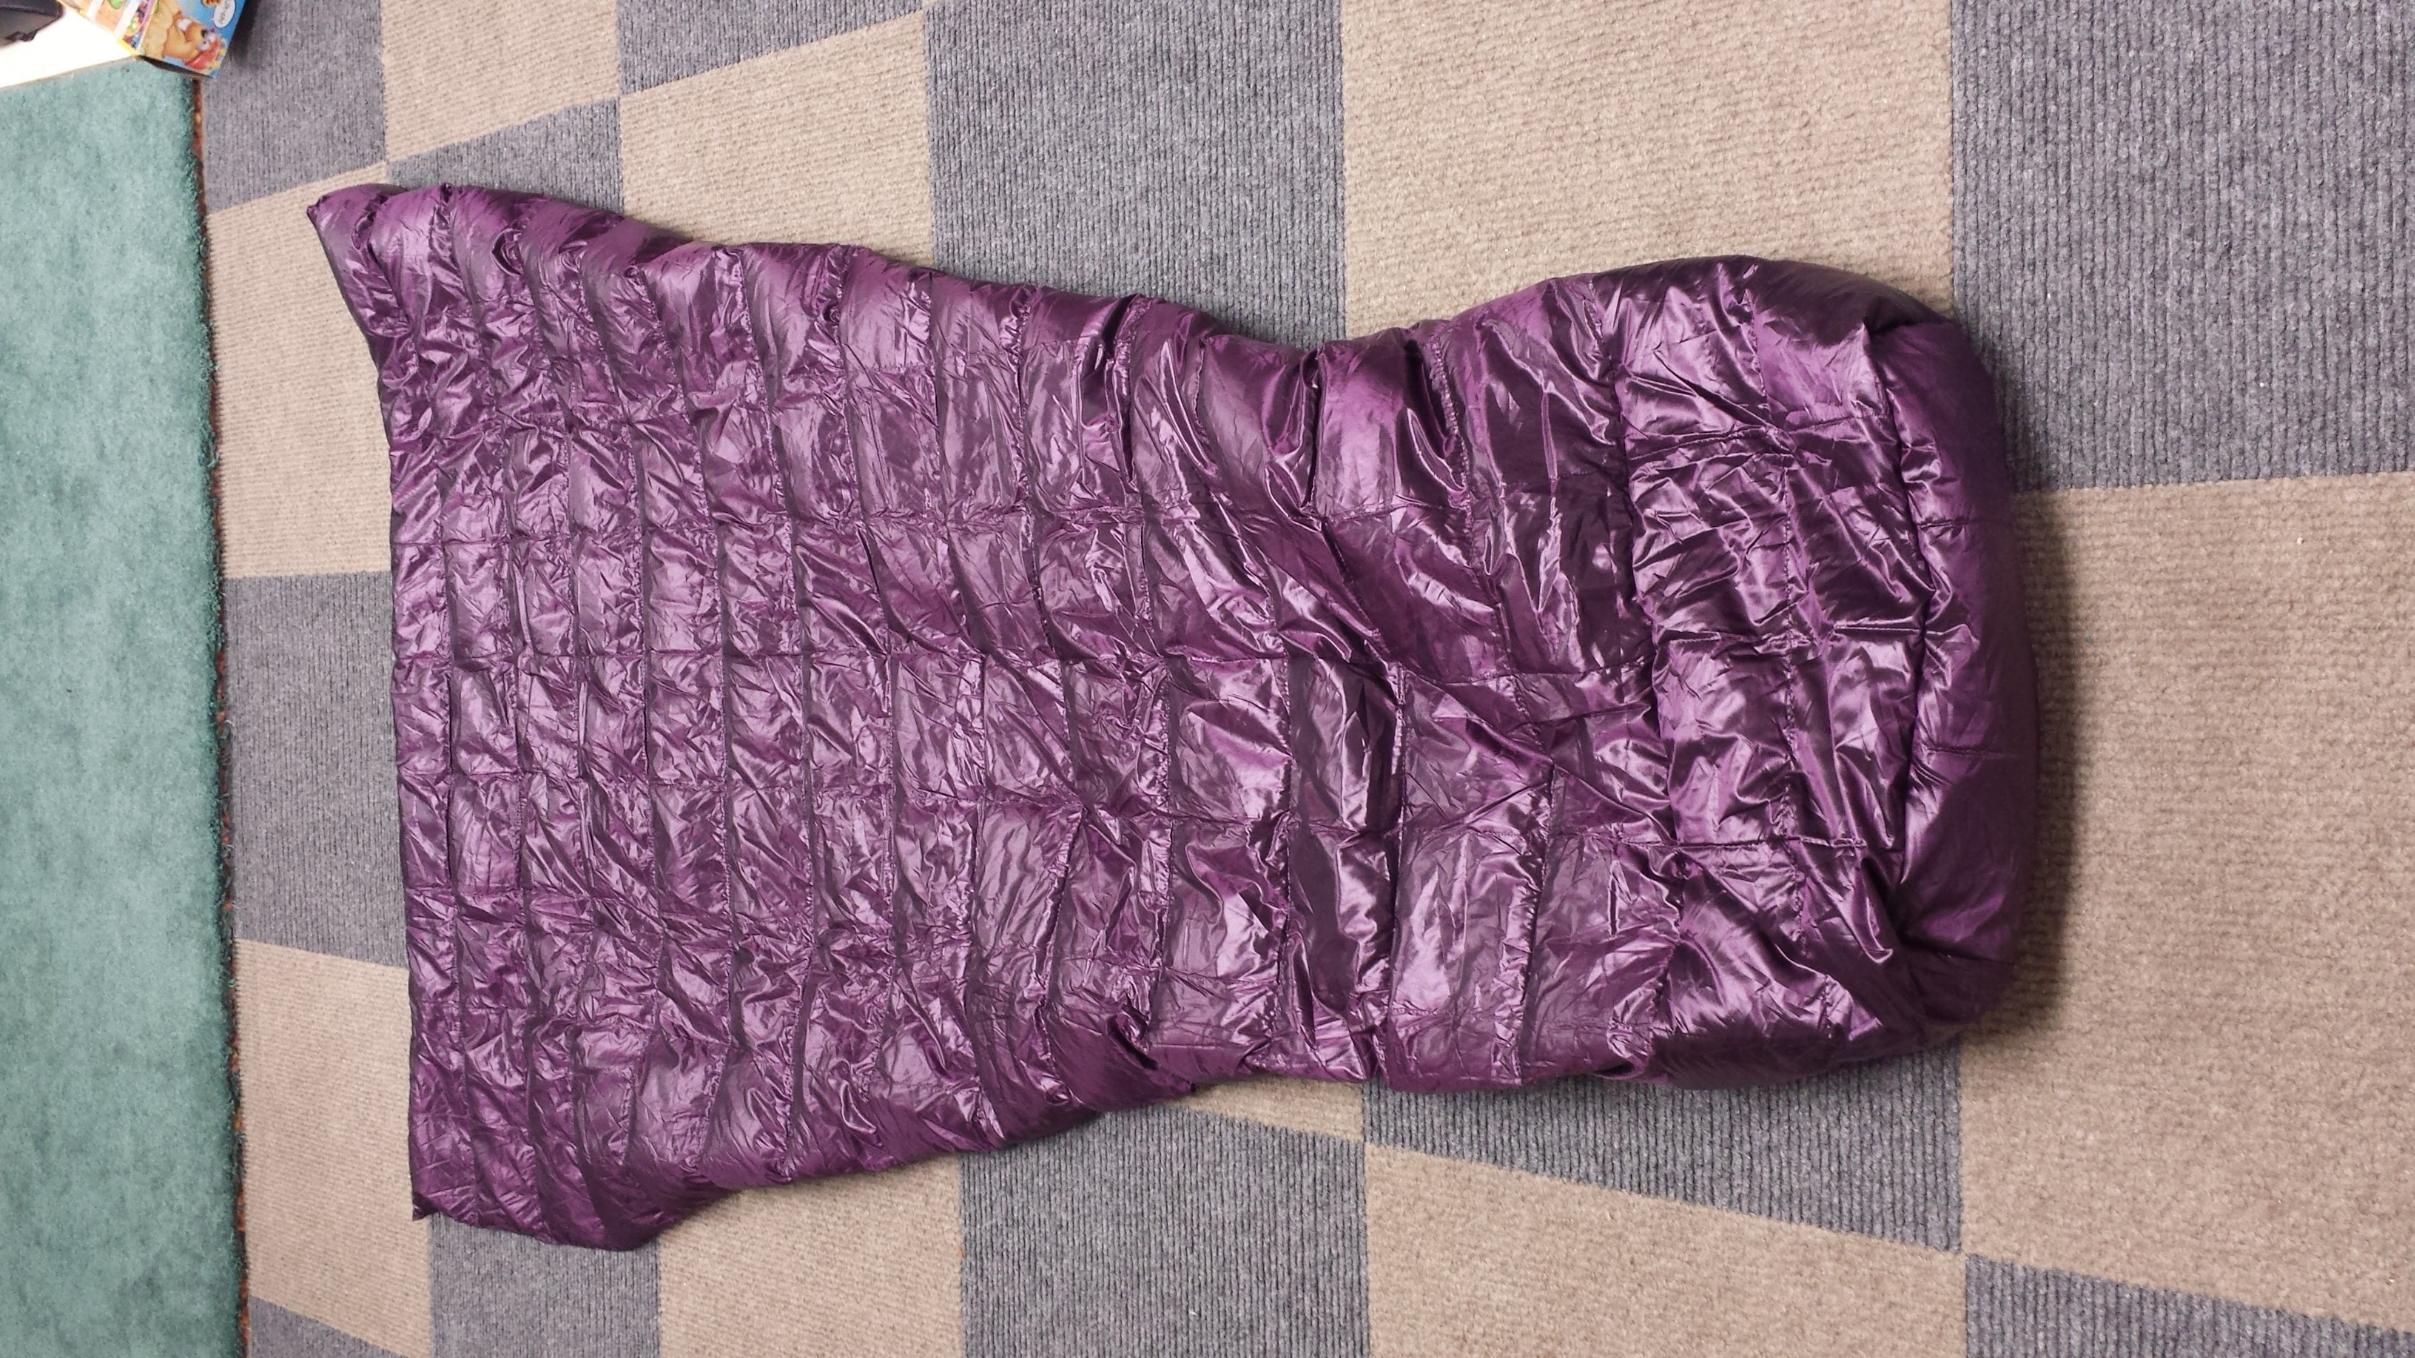
Top view of the finished quilt. I managed to save the factory care tags & thought it would be funny to keep them on the completed quilt to make it appear to be a retail item.

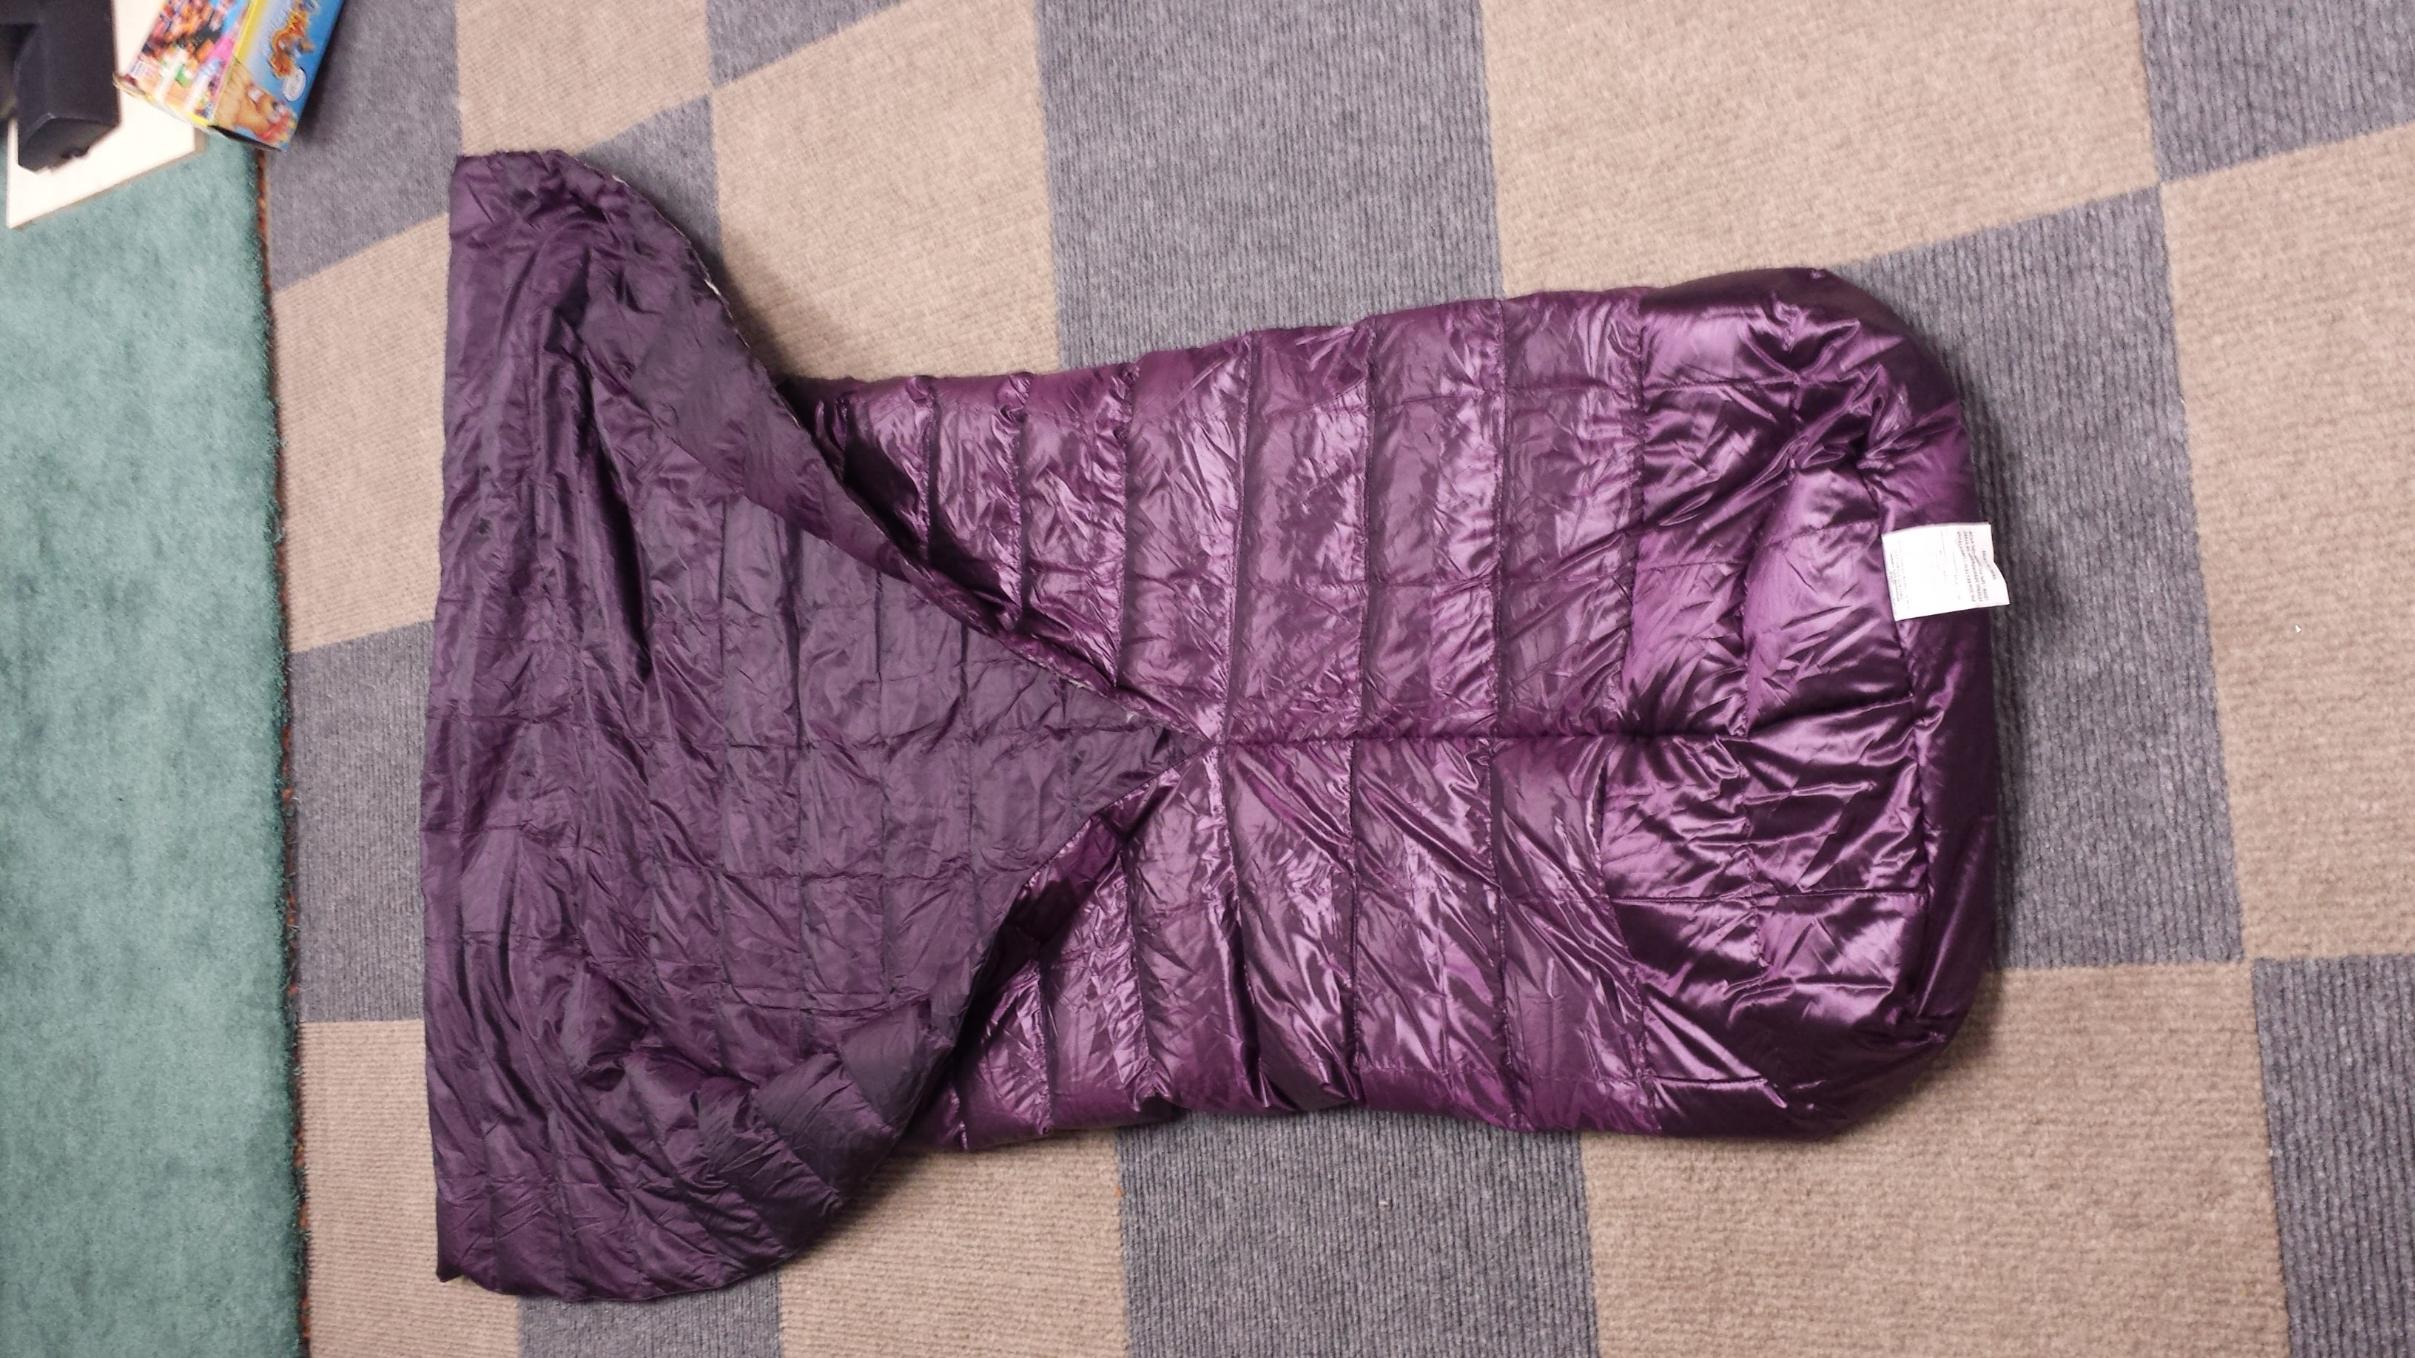
Back view of the finished quilt. I sewed the foot box closed about 25".

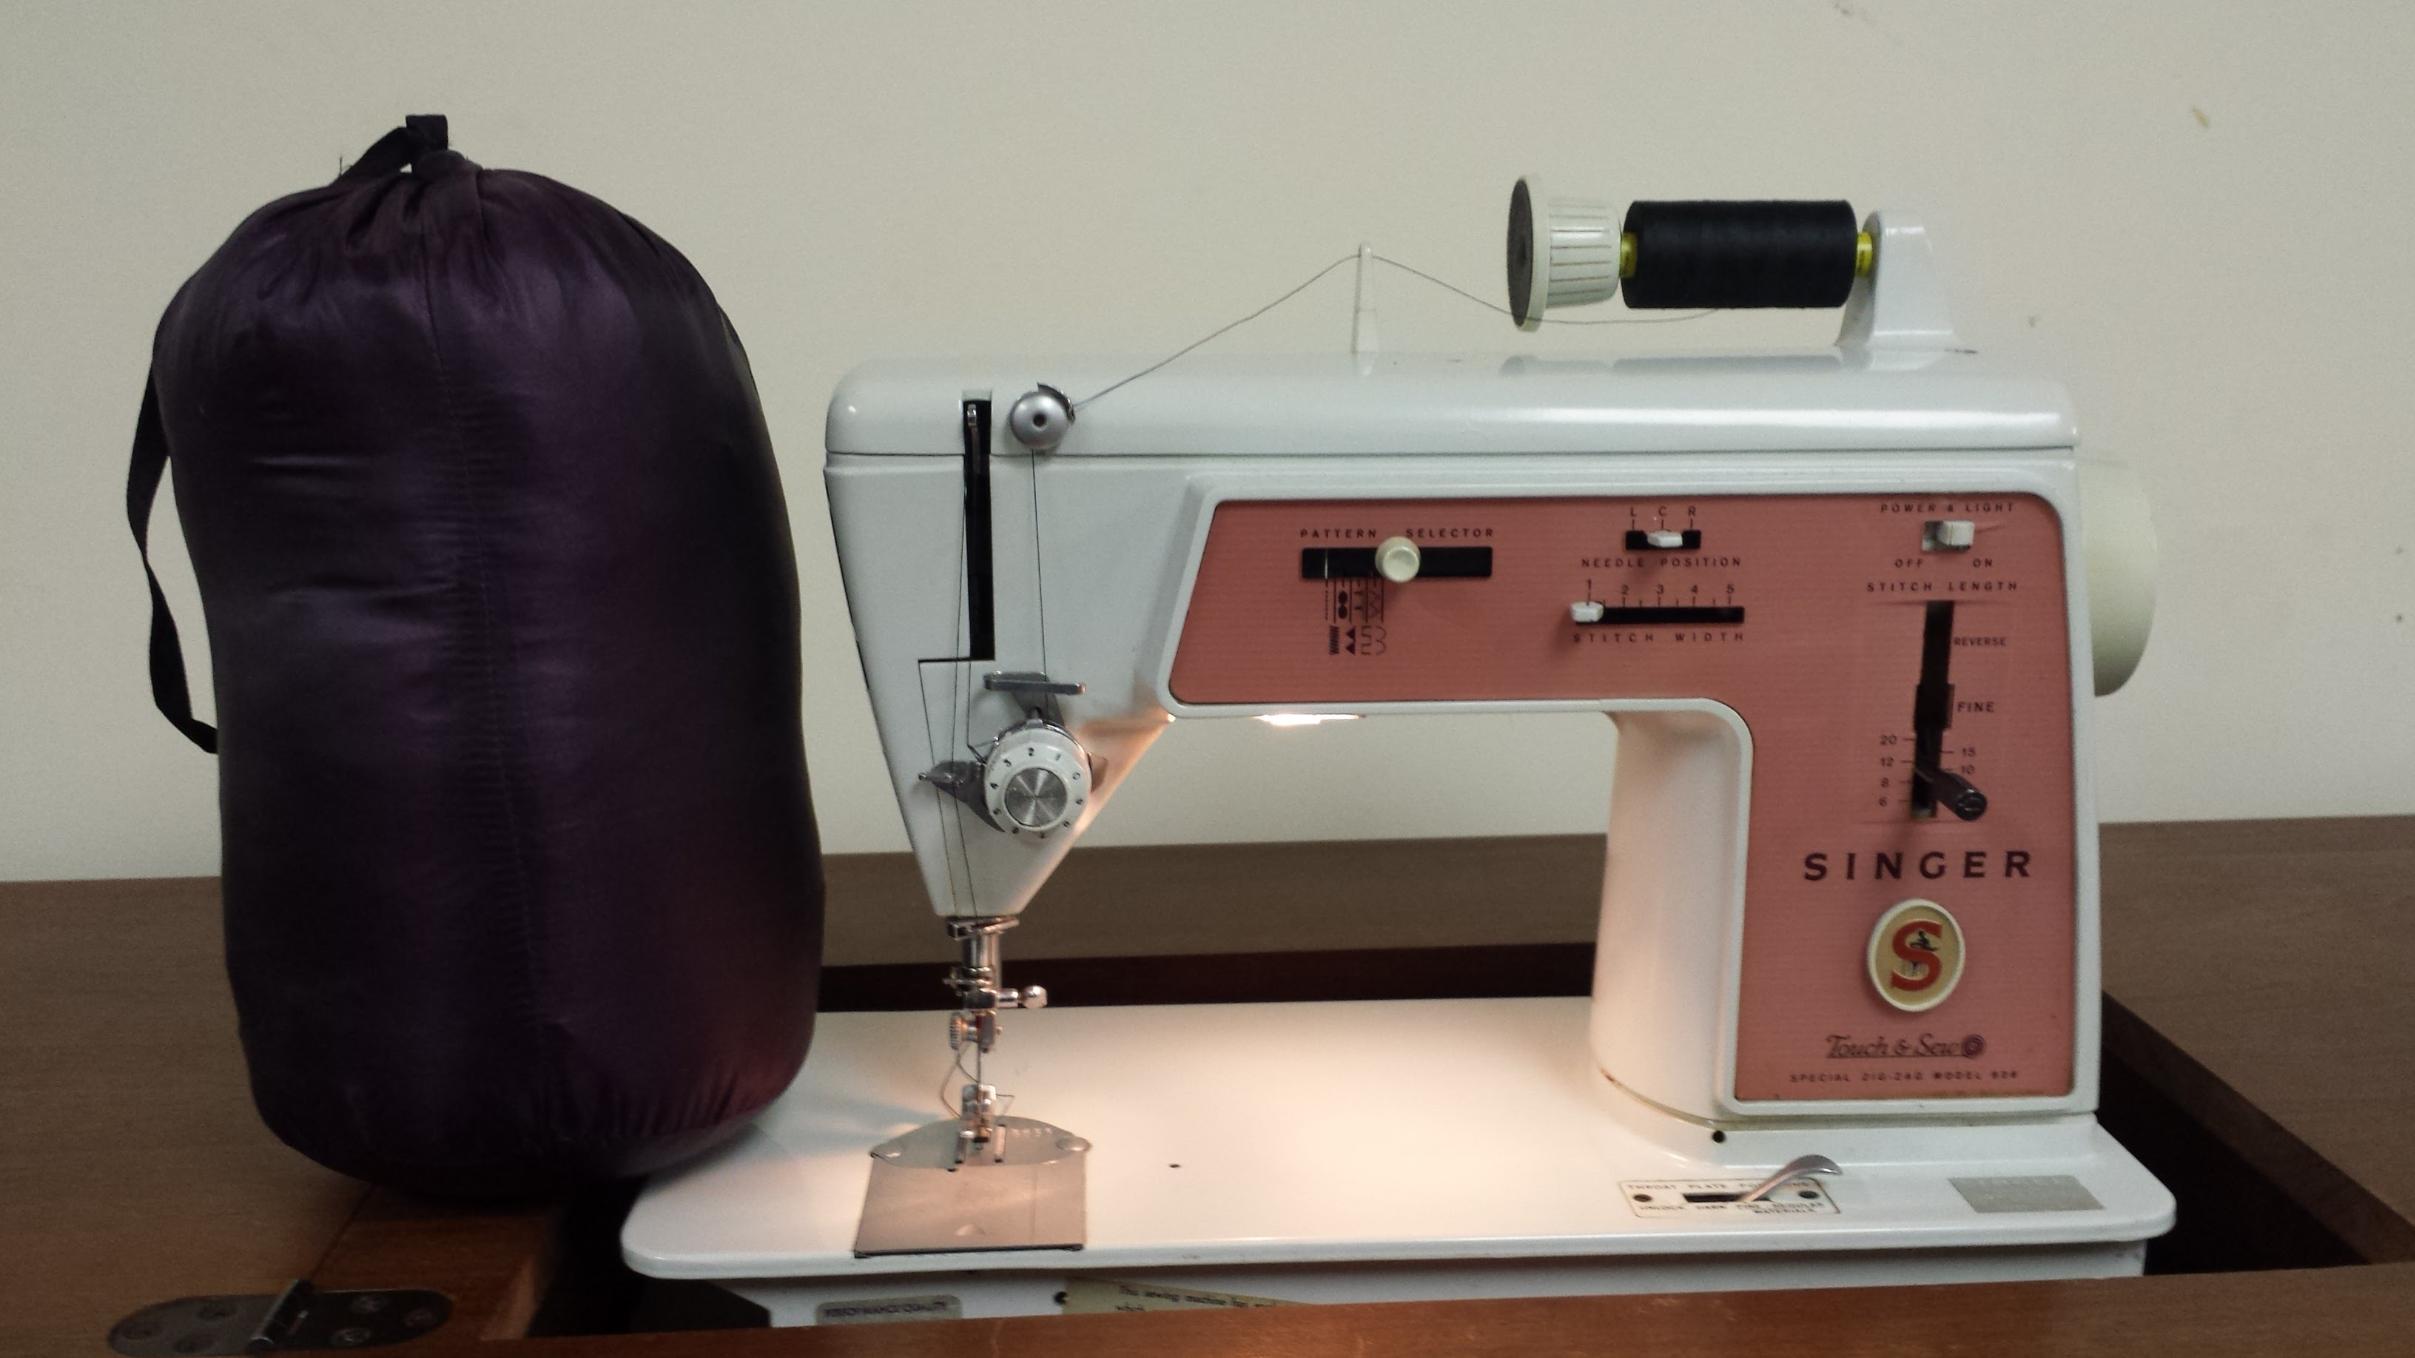
Here it is in the factory stuff sack. I figure it will compress to about softball size.

Next up - getting my daughter interested in doing the pillow she got for Christmas & completing the rain cover for my pack.
Here's the throw basically as sold from Costco. I've already hemmed off & detached a 2 column wide piece from the throw to be converted into the foot box and add an extra 10" of length in the quilt. The foot box was shortened to 2x4 squares then I removed the vertical stitching to create horizontal baffles & moved the down from the side squares into the middle. The side squares were then hemmed off & the now empty squares were removed and discarded
Here are the pieces laid out as they will be stitched together.
Top view of the finished quilt. I managed to save the factory care tags & thought it would be funny to keep them on the completed quilt to make it appear to be a retail item.
Back view of the finished quilt. I sewed the foot box closed about 25".
Here it is in the factory stuff sack. I figure it will compress to about softball size.
Next up - getting my daughter interested in doing the pillow she got for Christmas & completing the rain cover for my pack.
When a man is part of his canoe, he is part of all that canoes have ever known. - Sigurd F. Olson, "The Singing Wilderness"
01/08/2016 03:59PM
Looks great Mirth. What temp are you thinking this will be rated at?
Anyone planning any projects with GoreTex? I'm thinking it might be fun to try making some sort of mittens or bivy sack to see how tough it is to work with.
Anyone planning any projects with GoreTex? I'm thinking it might be fun to try making some sort of mittens or bivy sack to see how tough it is to work with.
"It's a dangerous business, Frodo, going out your door. You step onto the road, and if you don't keep your feet, there's no knowing where you might be swept off to." – Bilbo Baggins
01/08/2016 04:40PM
Thanks Grandma.
Vader - Seems like the consensus over at Hammock Forums is in the 40-50 degree range, but that depends on the user. I intend to use it as a liner inside my 20 degree EE quilt when camping in a week. We'll have lows around 10. I'm hoping for a more rigorous test in a month when we go to Northern WI to do a long weekend at our council's summer camp.
Vader - Seems like the consensus over at Hammock Forums is in the 40-50 degree range, but that depends on the user. I intend to use it as a liner inside my 20 degree EE quilt when camping in a week. We'll have lows around 10. I'm hoping for a more rigorous test in a month when we go to Northern WI to do a long weekend at our council's summer camp.
When a man is part of his canoe, he is part of all that canoes have ever known. - Sigurd F. Olson, "The Singing Wilderness"
01/08/2016 05:22PM
Great job! This is the kind of project I like the most... gaining a good piece of gear at a low cost.
No Costco's near me or I'd pick one or two up myself. I'd like to see if it'd be feasible to overfill one.
No Costco's near me or I'd pick one or two up myself. I'd like to see if it'd be feasible to overfill one.
“The more you know, the less you carry” Mors Kochanski
01/11/2016 09:32AM
I think overfilling would be no problem once you remove the two columns. Maybe baste it shut then remove the baste from each set of baffles as you go to fill them & seal up. There's a 1/8" thick piece of piping or something going around the perimeter of the throw, so the side you detach is going to be the best point of entry.
In the future if I make another, I think I'll use some grosgrain to finish the cut sides. I took a lighter along the seams to prevent any fraying of the fabric but for long term durability and aesthetics it would be better.
In the future if I make another, I think I'll use some grosgrain to finish the cut sides. I took a lighter along the seams to prevent any fraying of the fabric but for long term durability and aesthetics it would be better.
When a man is part of his canoe, he is part of all that canoes have ever known. - Sigurd F. Olson, "The Singing Wilderness"
Subscribe to Thread
Become a member of the bwca.com community to subscribe to thread and get email updates when new posts are added. Sign up Here
Community Links
 Search BWCA.com
 Donate
 Featured Sponsor