|
12/09/2020 08:49AM |
I enjoyed your last, and sure I'll enjoy this one ! Looking forward to more ! Thanks !
|
02/02/2021 12:40PM |
I use natural Watco oil, not teak oil, but I do add a little varnish to it to harden up the surface a bit. Not more than 20% varnish. Watco already has some varnish in it according to the can but adding a bit more is a compromise between using straight varnish or straight Watco.
On canoes, I don’t like putting varnish all over the canoe. The trim is the furniture of the boat and I feel that Watco brings out the rich beauty of the wood better than varnish but that's just me. Watco warms the wood tone and makes for a smooth, natural feeling of the wood. It also helps to water-proof it but it does require re-oiling every other year. The little extra varnish I add gives it a little more protection.
I have not used wax over my final finish but I have seen it used by others and it is spectacular. I have always worried about it turning white. Maybe it doesn’t do that but I don’t want to find out the hard way.
When I seal the outside of the canoe before the canvas, I use a mix of 50:50 watco and varnish for extra protection from absorbing water.
Tom
|
03/17/2021 09:07PM |
|
12/16/2020 08:52AM |
Mike
|
01/28/2021 09:02PM |
|
01/28/2021 06:36PM |

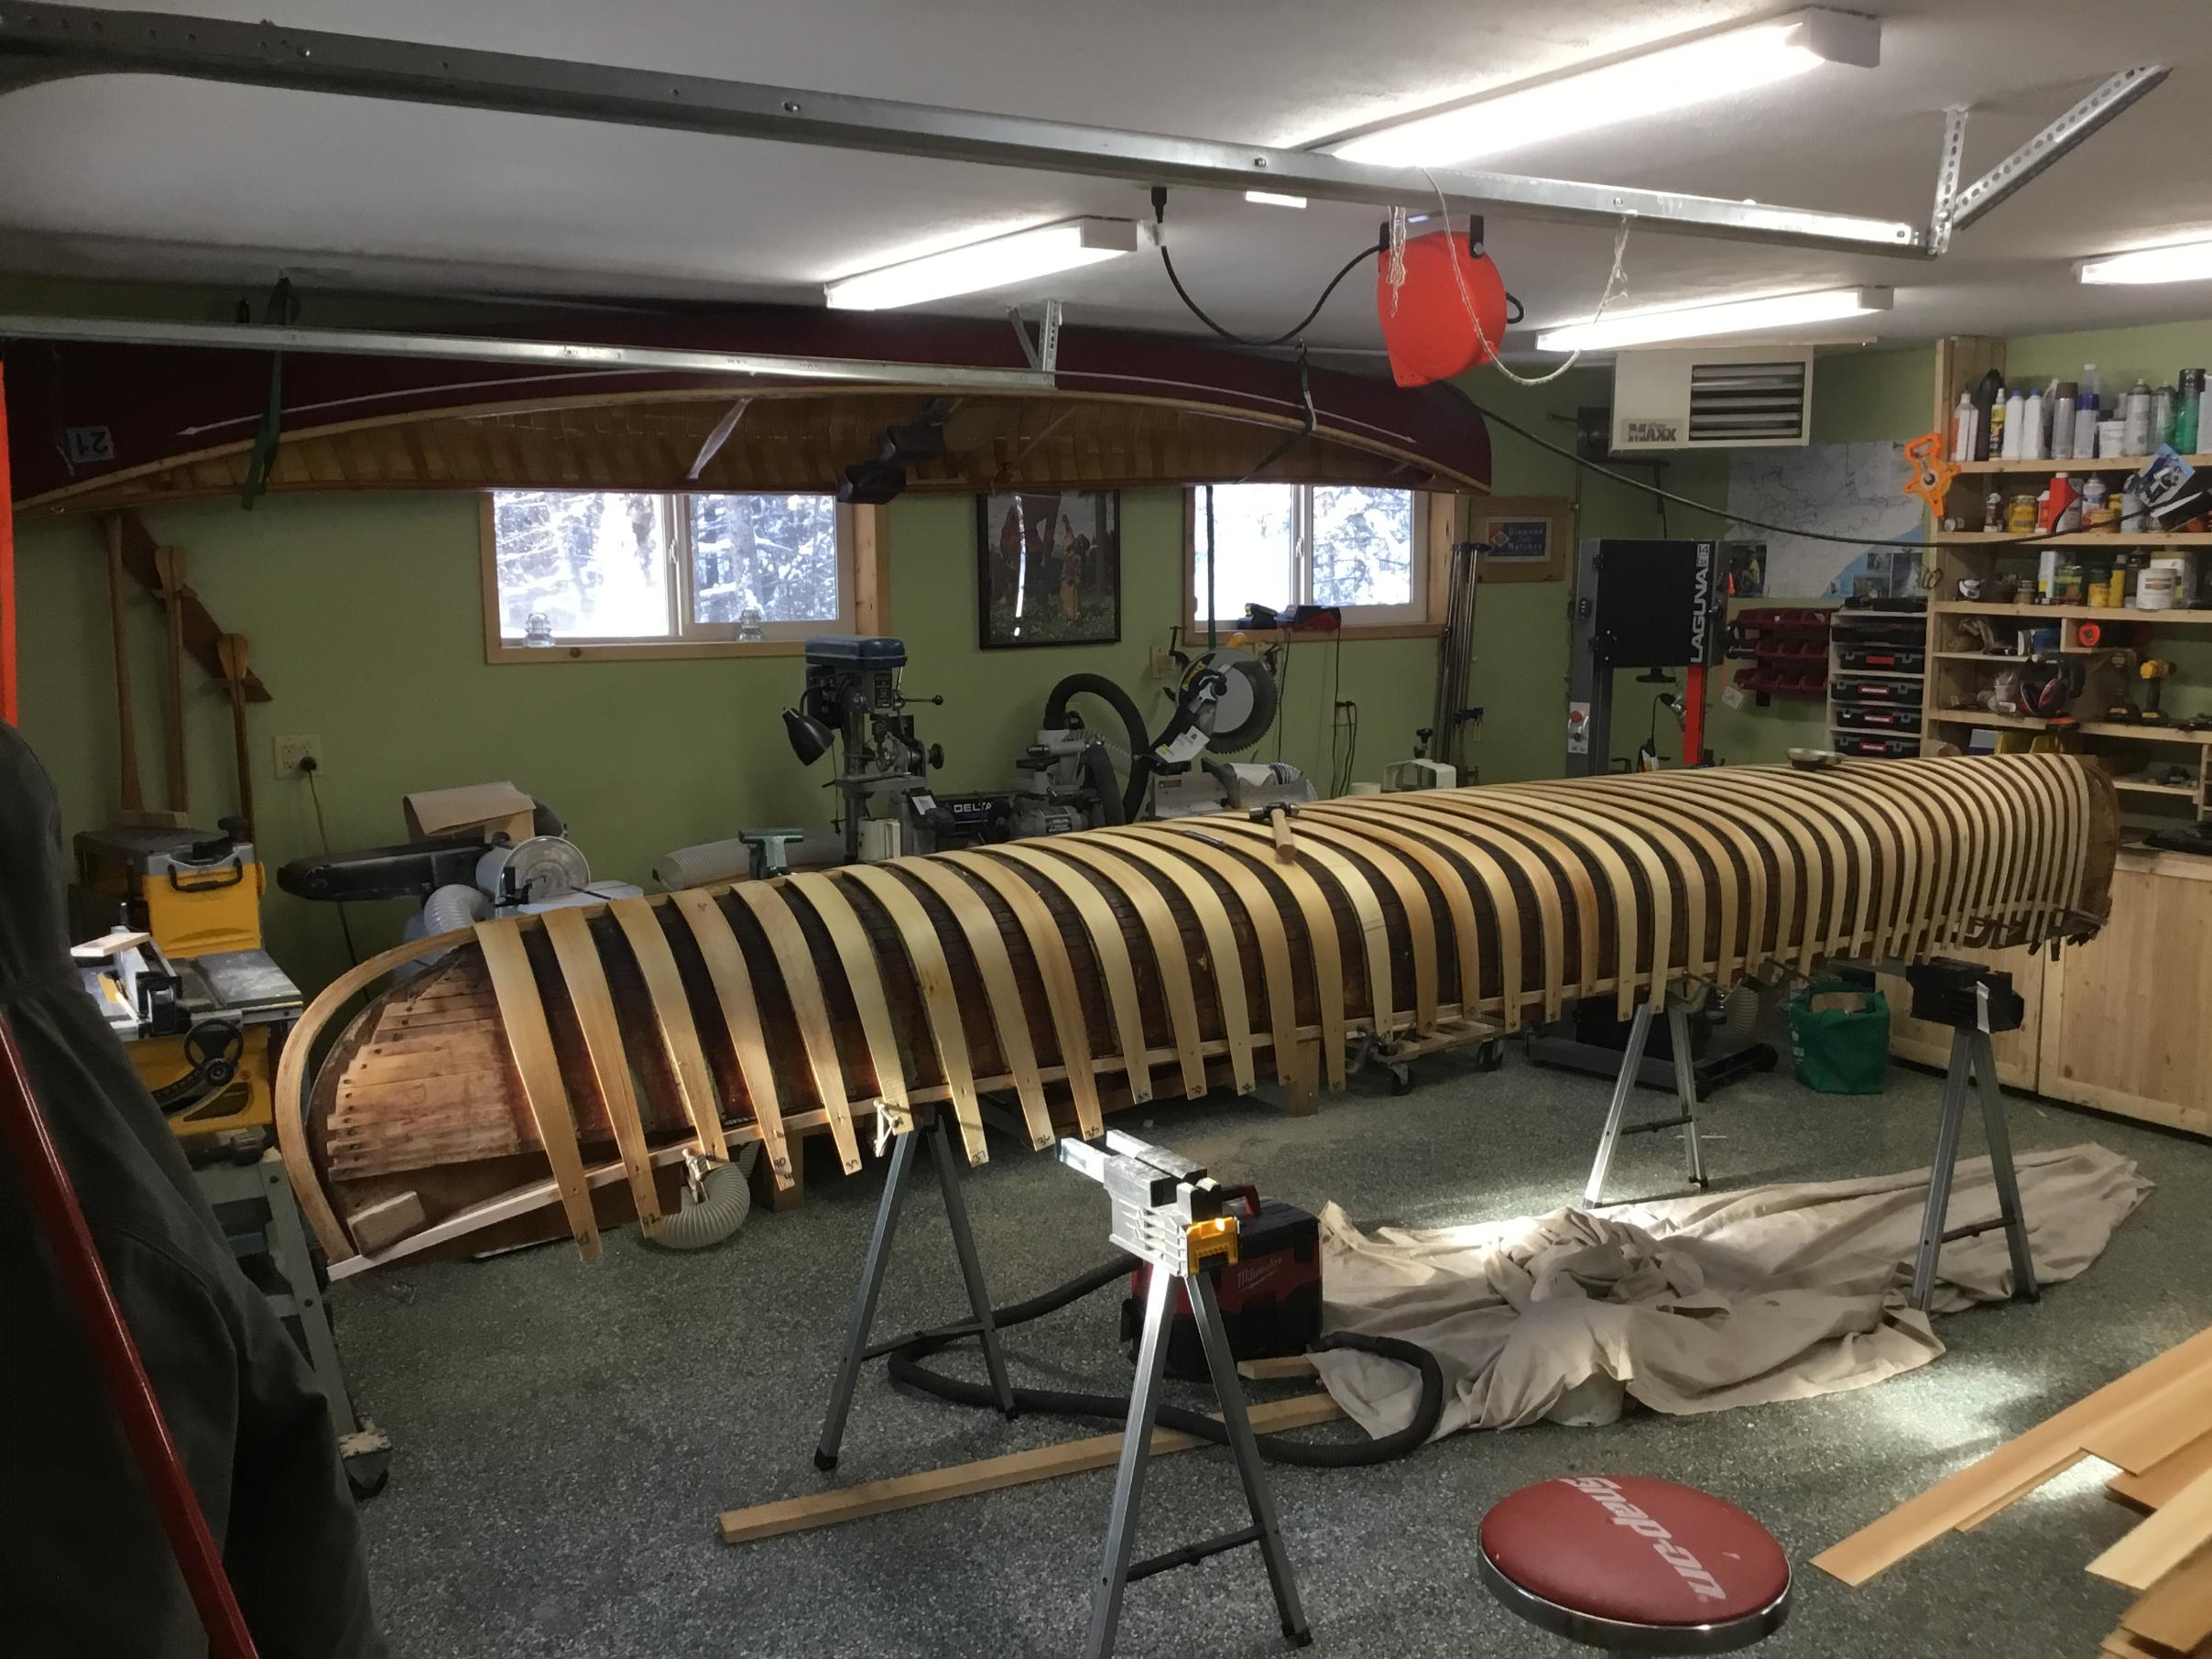
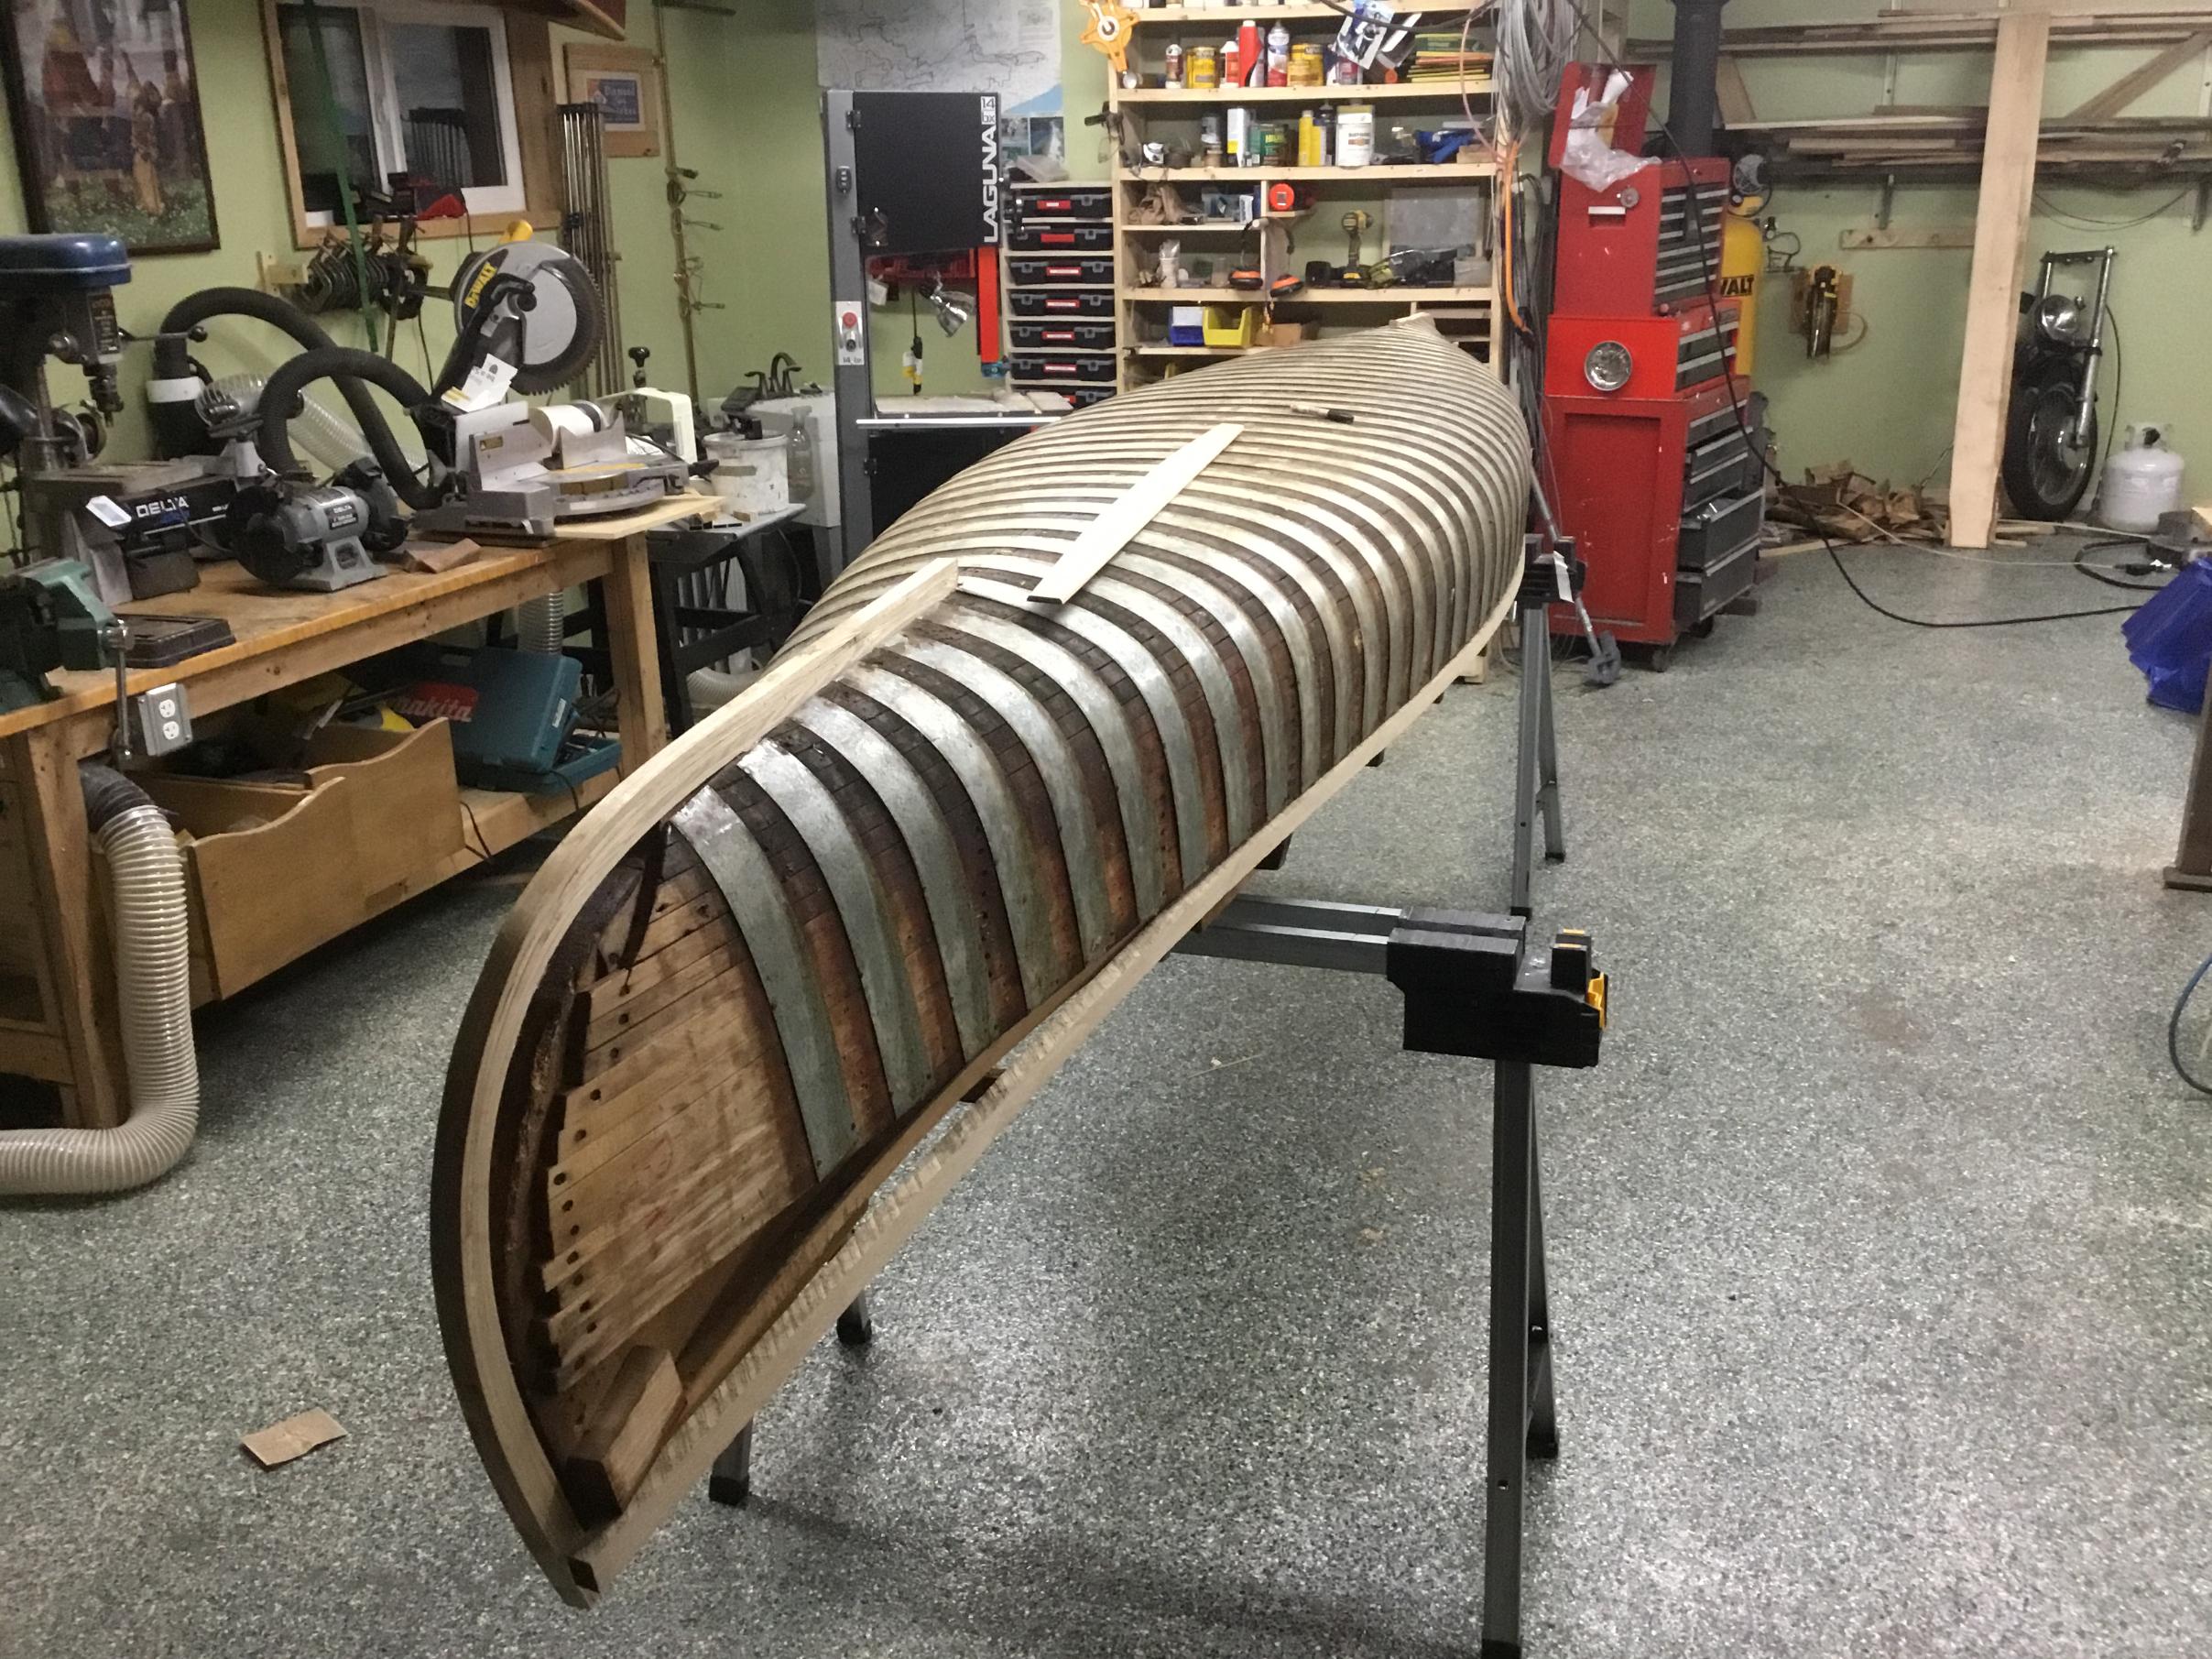
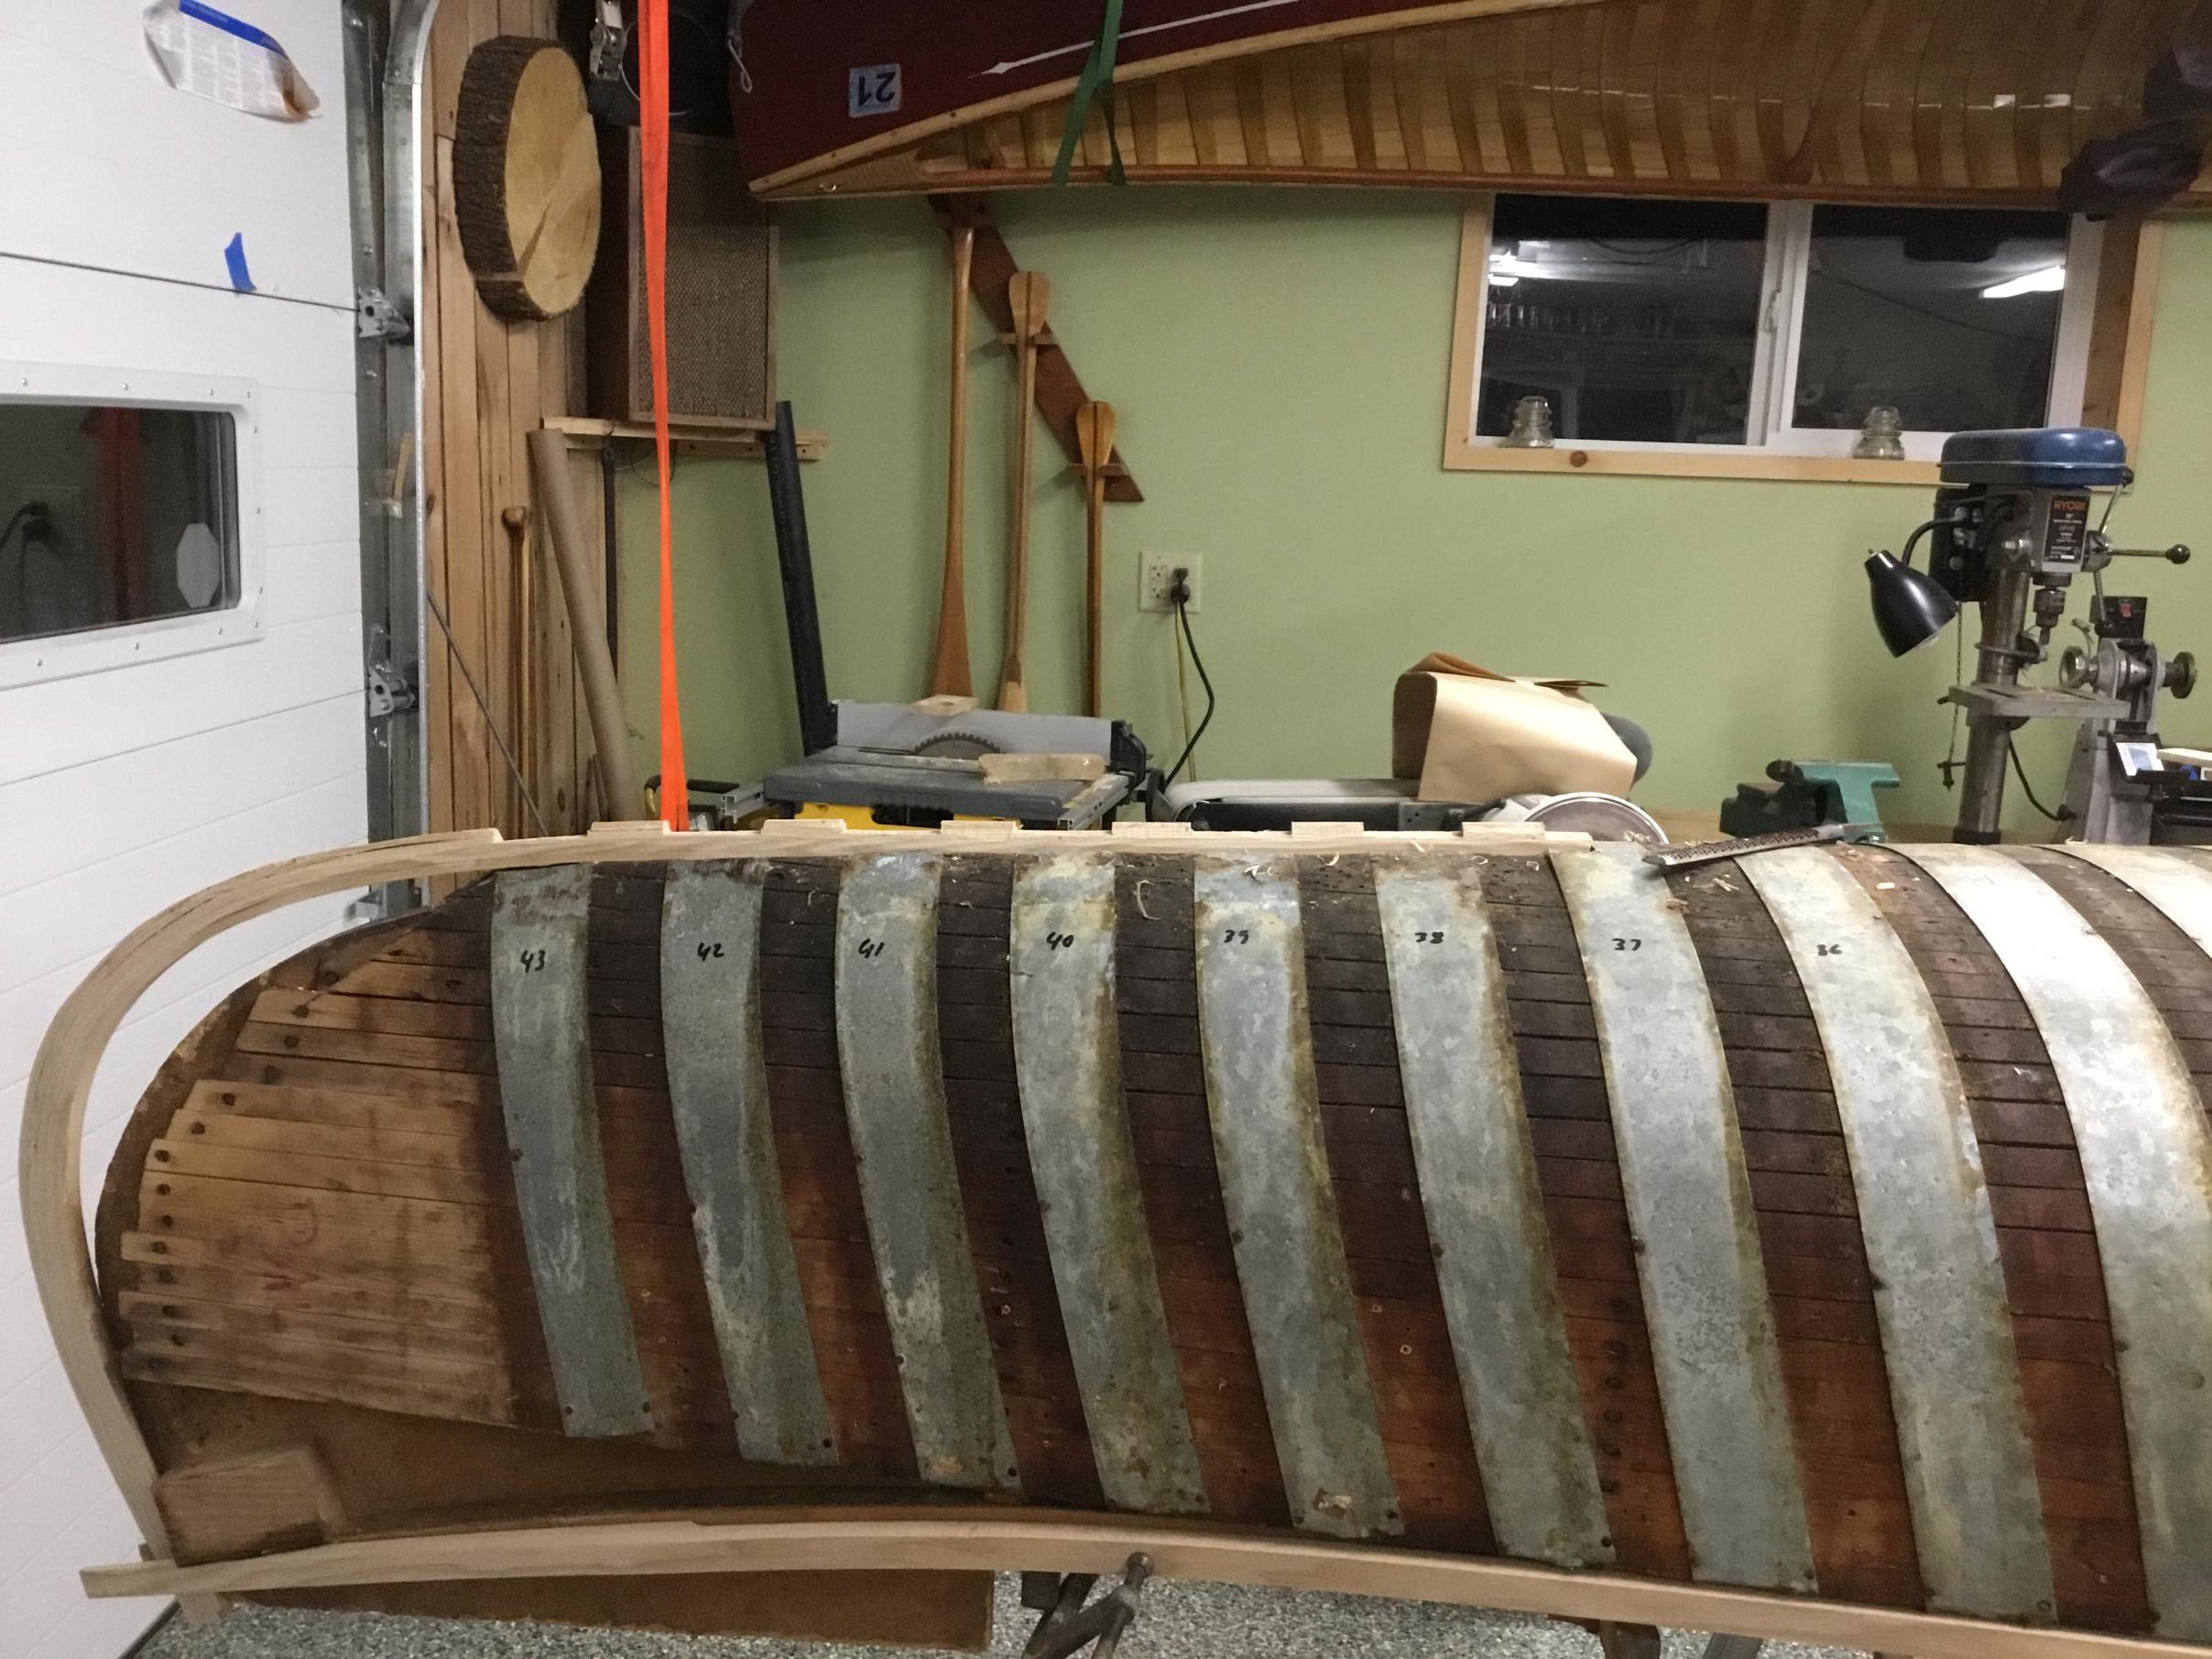
I’ve been cleaning up the hull and sanding quite a bit. I have a Japanese saw that has a nice, flexible blade which works well for cutting cleanly into the soft cedar ribs.

I also had a chance to get the planking screwed to the stem piece. The planks need to stay loose until coming off the form otherwise I can’t get the canoe off the form.

Once the planks are all attached, I sanded the ends to clean everything up and get the nice look of a traditional canoe.
I’ll post again this weekend. Canvas goes on next weekend.
Tom
|
01/03/2021 12:49PM |
Of course I will brush on 4 coats of spar varnish to the inside of the finished hull later.

Every nail must be flush or below the wood to prevent a noticeable bump in the finishe canoe. Using my hand like reading Braille, if I find a nail sticking above the wood, I sometimes use a punch to give the nail a little whack to push it down.


Except for the first strake I put down on the bottom of the canoe either side of center, the strakes are not nailed to the stem piece until after I take it off the form. There are two reasons for this. First and most important, the canoe would not be able to get pulled off if everything on the ends was nailed to the stem. And second, it allows me to make everything true and plum with the stem piece once it’s off the form while I nail the ends to the stems.

|
01/03/2021 07:13PM |
But I wonder, if after you pulled the hull off the form. Would a coat of Epoxy work, maybe even give a longer life to the wood ?
Jim
|
12/25/2020 03:39PM |
After letting the steamed ribs sit for a few days, I oiled the back side of them with a liberal coating of Watco oil. I mixed in about 20% spar varnish into the oil for a more durable permanent coating over the wood. Cedar loves to absorb water so the oil/varnish will help seal the wood.
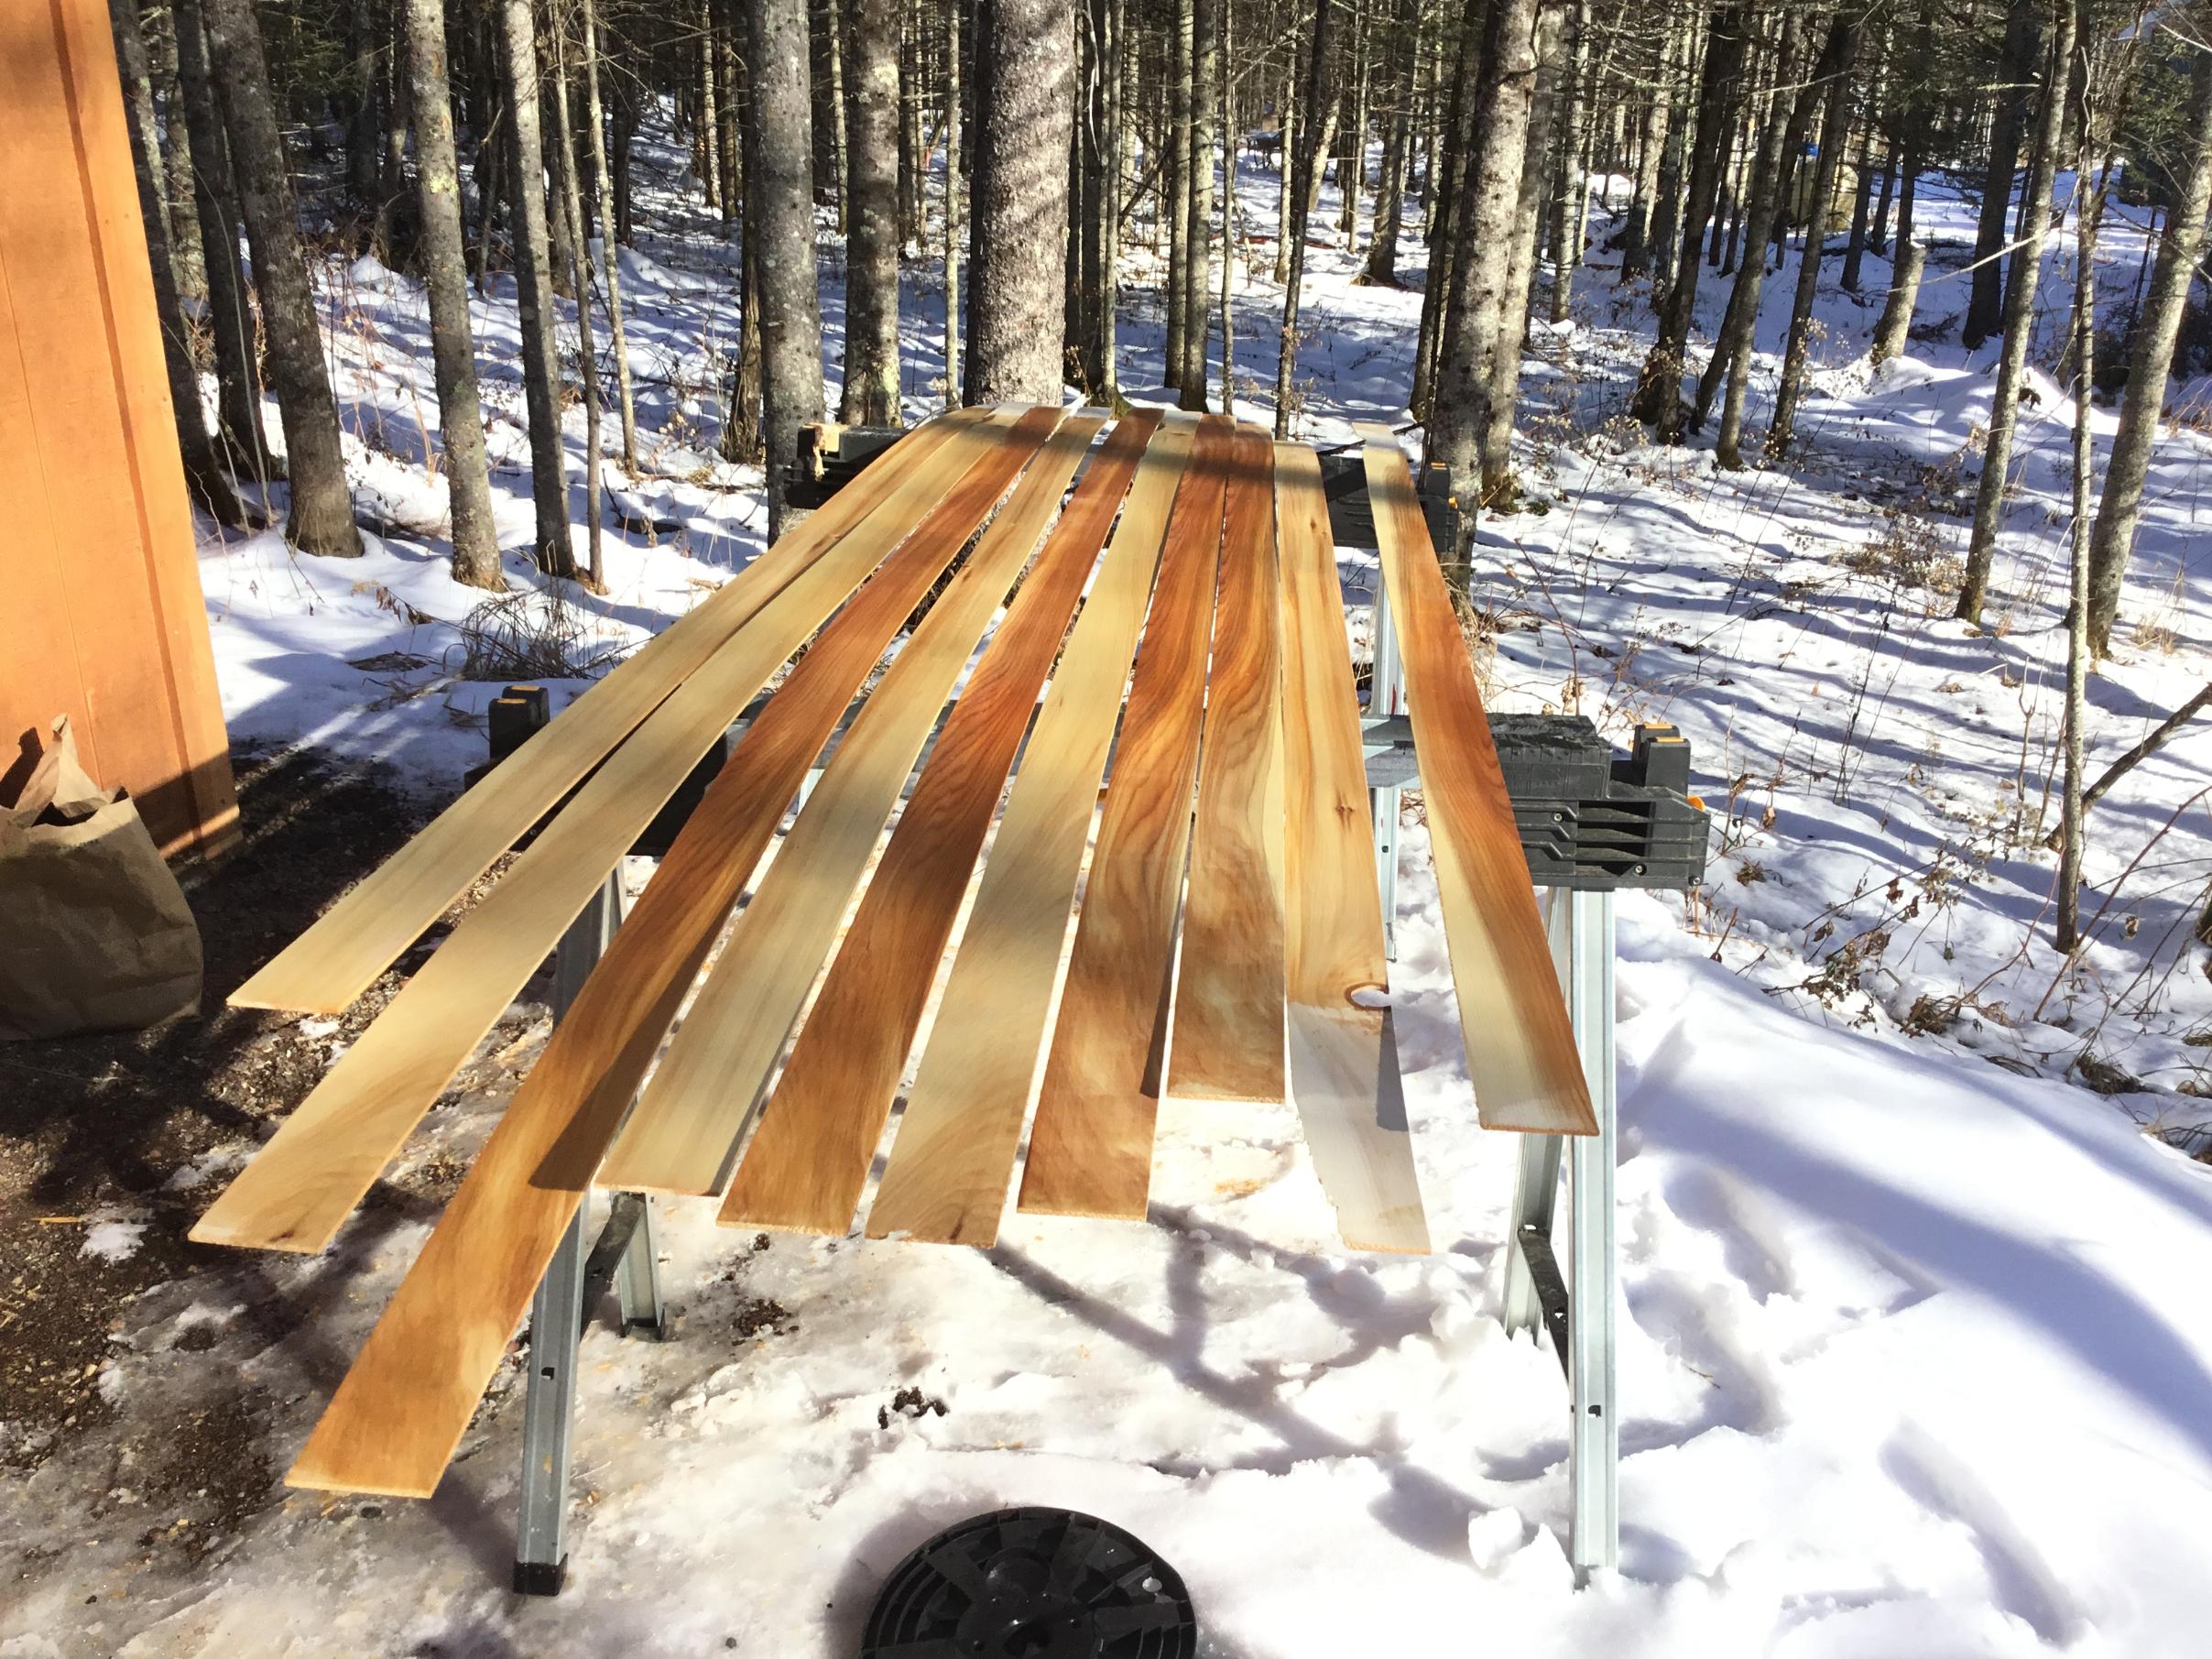
While I was waiting for the ribs to dry out, I finished up sanding a few extra planks just to be sure I have enough. The finished stock is about 5/32” thick which is just a bit over 1/8” thick.

Today I started planking the canoe. Where there is a lot of twisting of the planks, I use boiling water on them first to get them to bend without cracking.


In this picture, you can see the stem piece nested into the form with the planking being nailed/screwed over it. It’s looking good.

The discolored end rib is just some crud on the rib from steaming it. It won’t show up in the finished canoe and is actually a pristine A+ rib on the inside.
|
02/07/2021 02:24PM |
Today I was able to get the canvas on the canoe as well as the filler into and over the canvas. It weighs 36 pounds now before the canvas and filler. I am hoping to build it at a finished weight of less than 65 pounds and it looks I will easily beat that.
To start, the canvas is a length of 18’ long and 60” wide. I folded the canvas lengthwise like a taco. The canvas is then stretched using clamps and a come-a-long that was affixed to the wall with a bolt going all the way through. I then placed the canoe in the fold and continued tightening the canvas until it was almost banjo tight.


I put sand bags into the canoe to push it down otherwise it wants to pop out as tension is applied to the canvas. After it is stretched tight, I used a staple gun to staple the canvas along the sheer line.
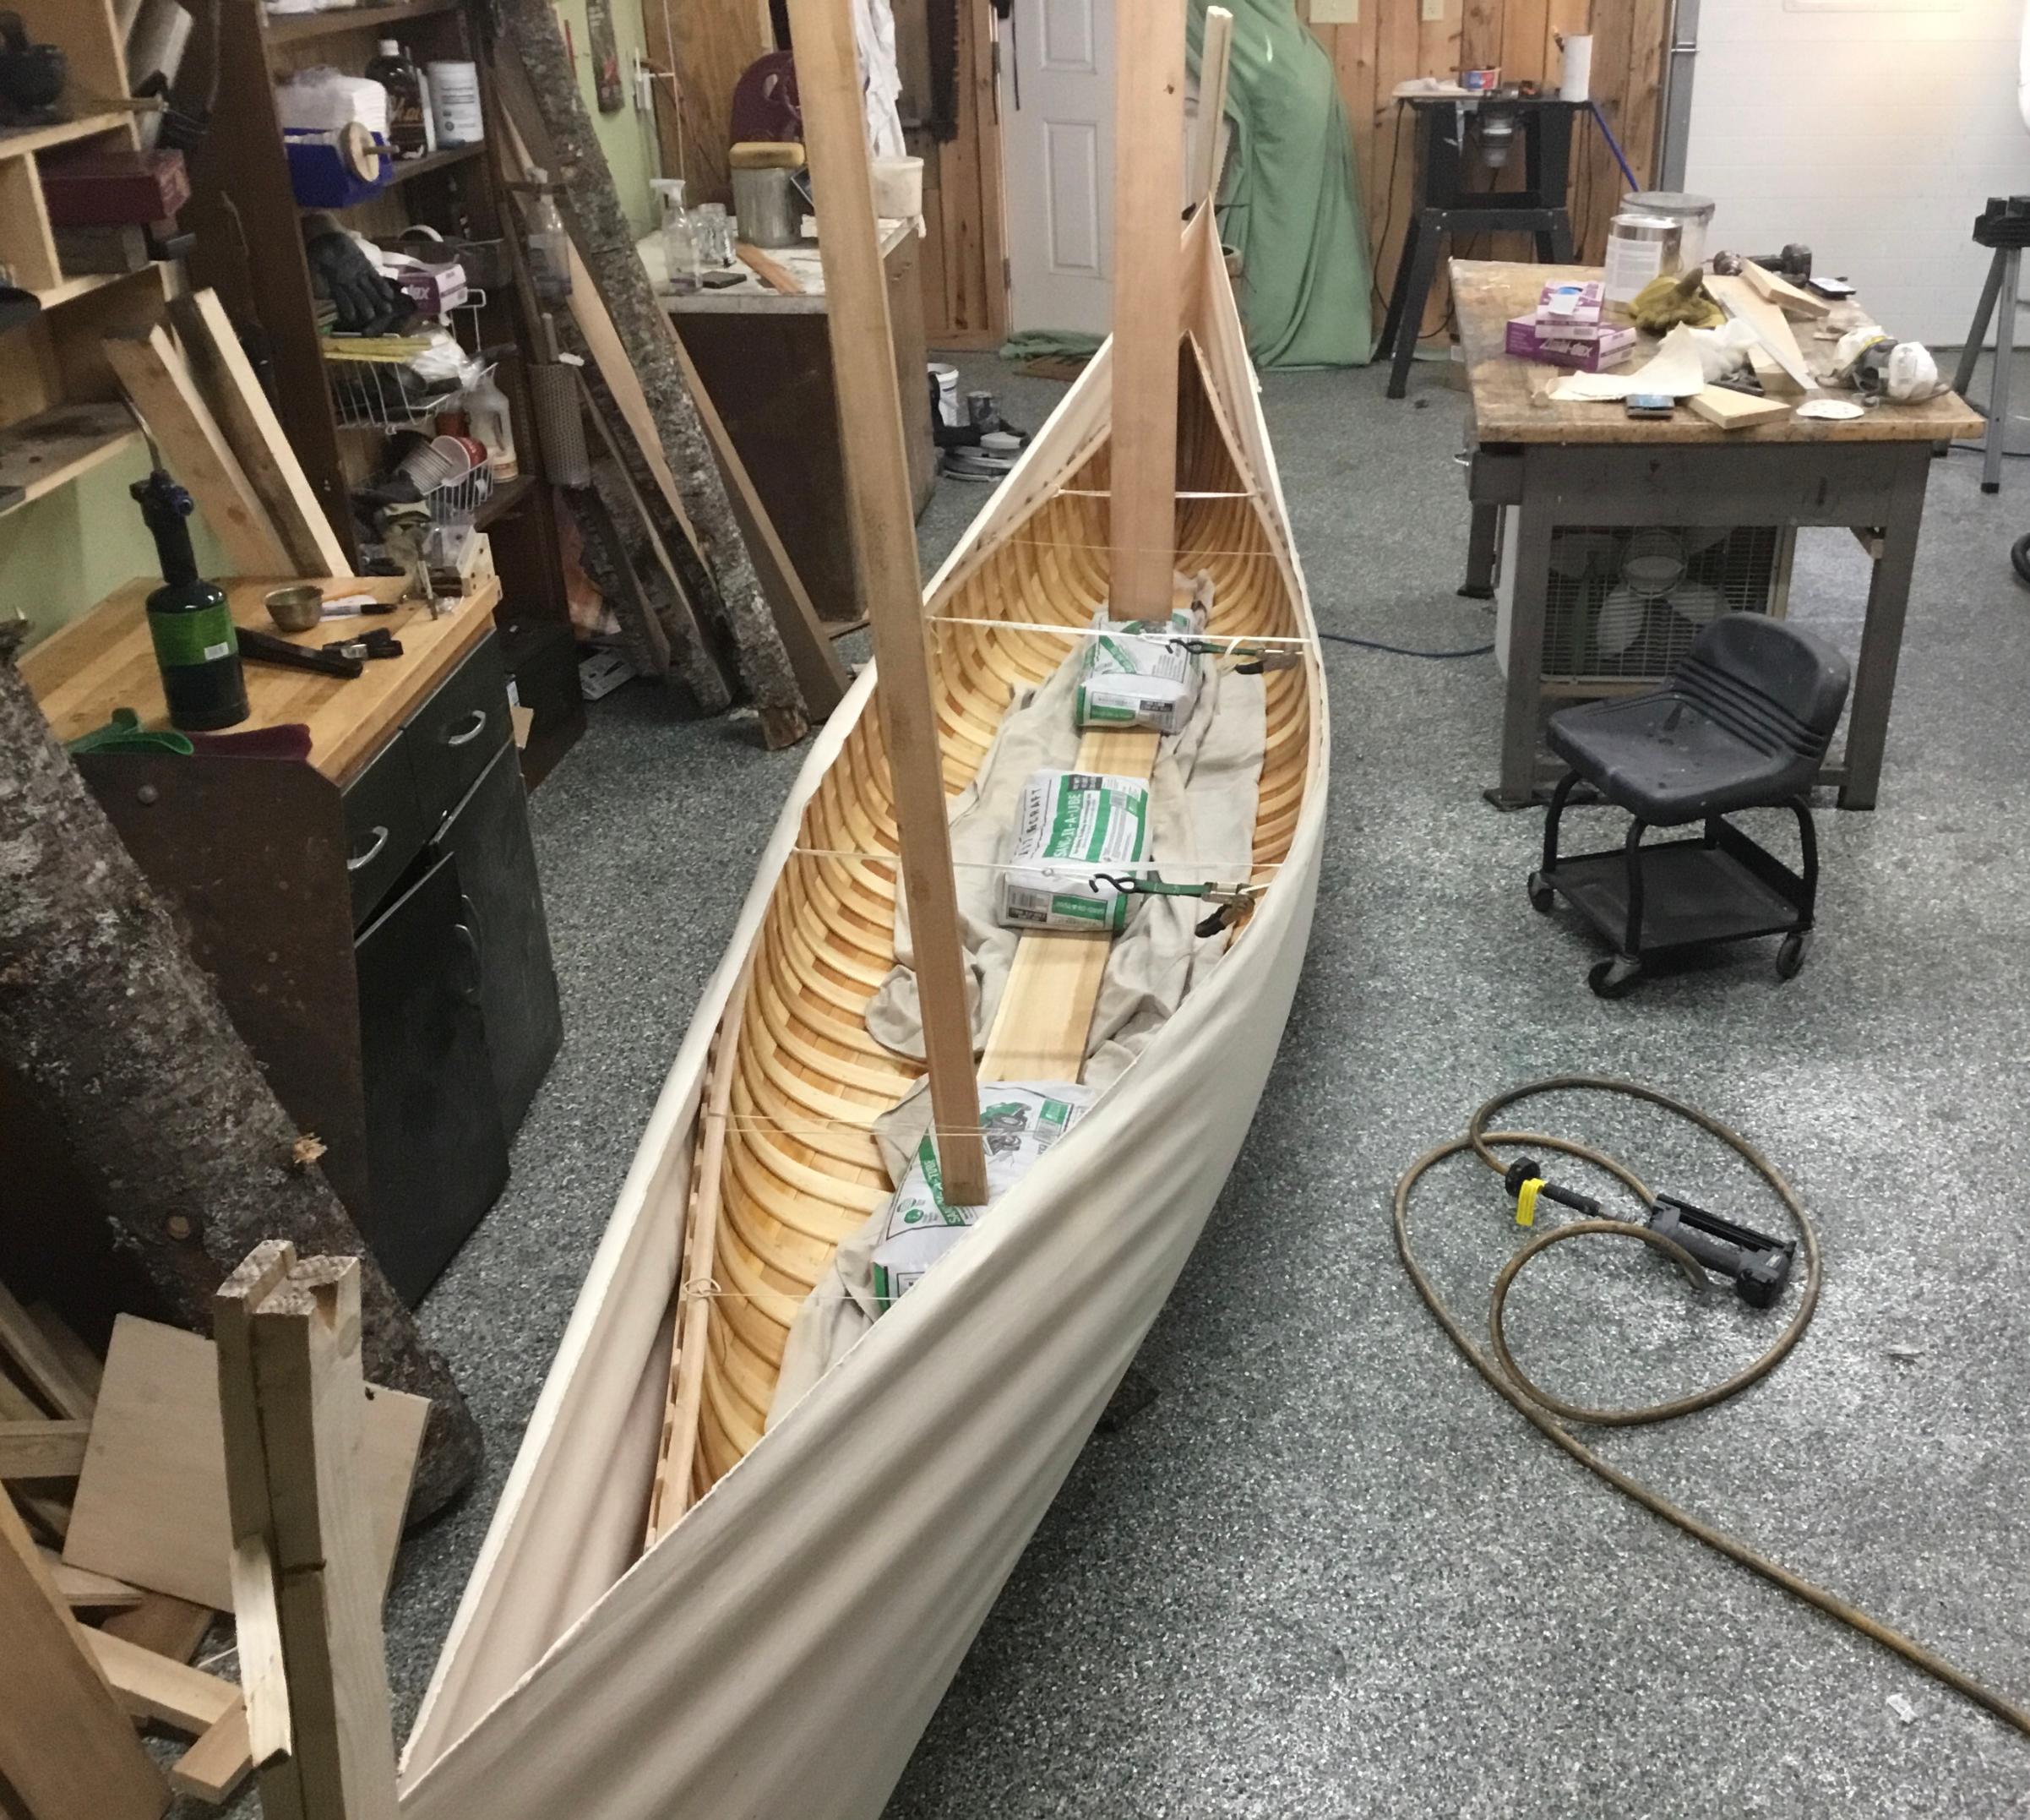

After about two hours of stretching, stapling, pulling and yanking, the canvas is on the canoe like a tight smooth skin.

And finally, I applied three coats of filler and now it sits for three weeks to dry/cure/

|
02/08/2021 08:40AM |
|
02/03/2021 07:00PM |

Here’s how it looks after they are fit in place. I use brass tacks to nail them to the planking just like the rest of the canoe

I also gave the inside its first coat of varnish. Now it’s lookin’ real pretty.
I will canvas the canoe this weekend.
Tom
|
02/03/2021 07:21PM |
MacCamper: ".............gunwales and decks of my stripper I am refinishing and applying tung followed by bee's/carnuba wax blend per ashes specs . Thoughts? Hope I didn't hijack this awesome build project. Thanks for your insights.
MacCamper"
I had a chance to visit Ash’s website. Thanks for the link. The owner of that site is very passionate about canoes and quite skillful at building a comprehensive website too.
Lots to read there. I love people that love canoes and all they bring us.
Once you finish building a canoe, it is part of you in every way and has a soul. Hard to explain until you’ve done it.
|
02/03/2021 08:52PM |
|
01/14/2021 10:17AM |

|
01/13/2021 01:12PM |
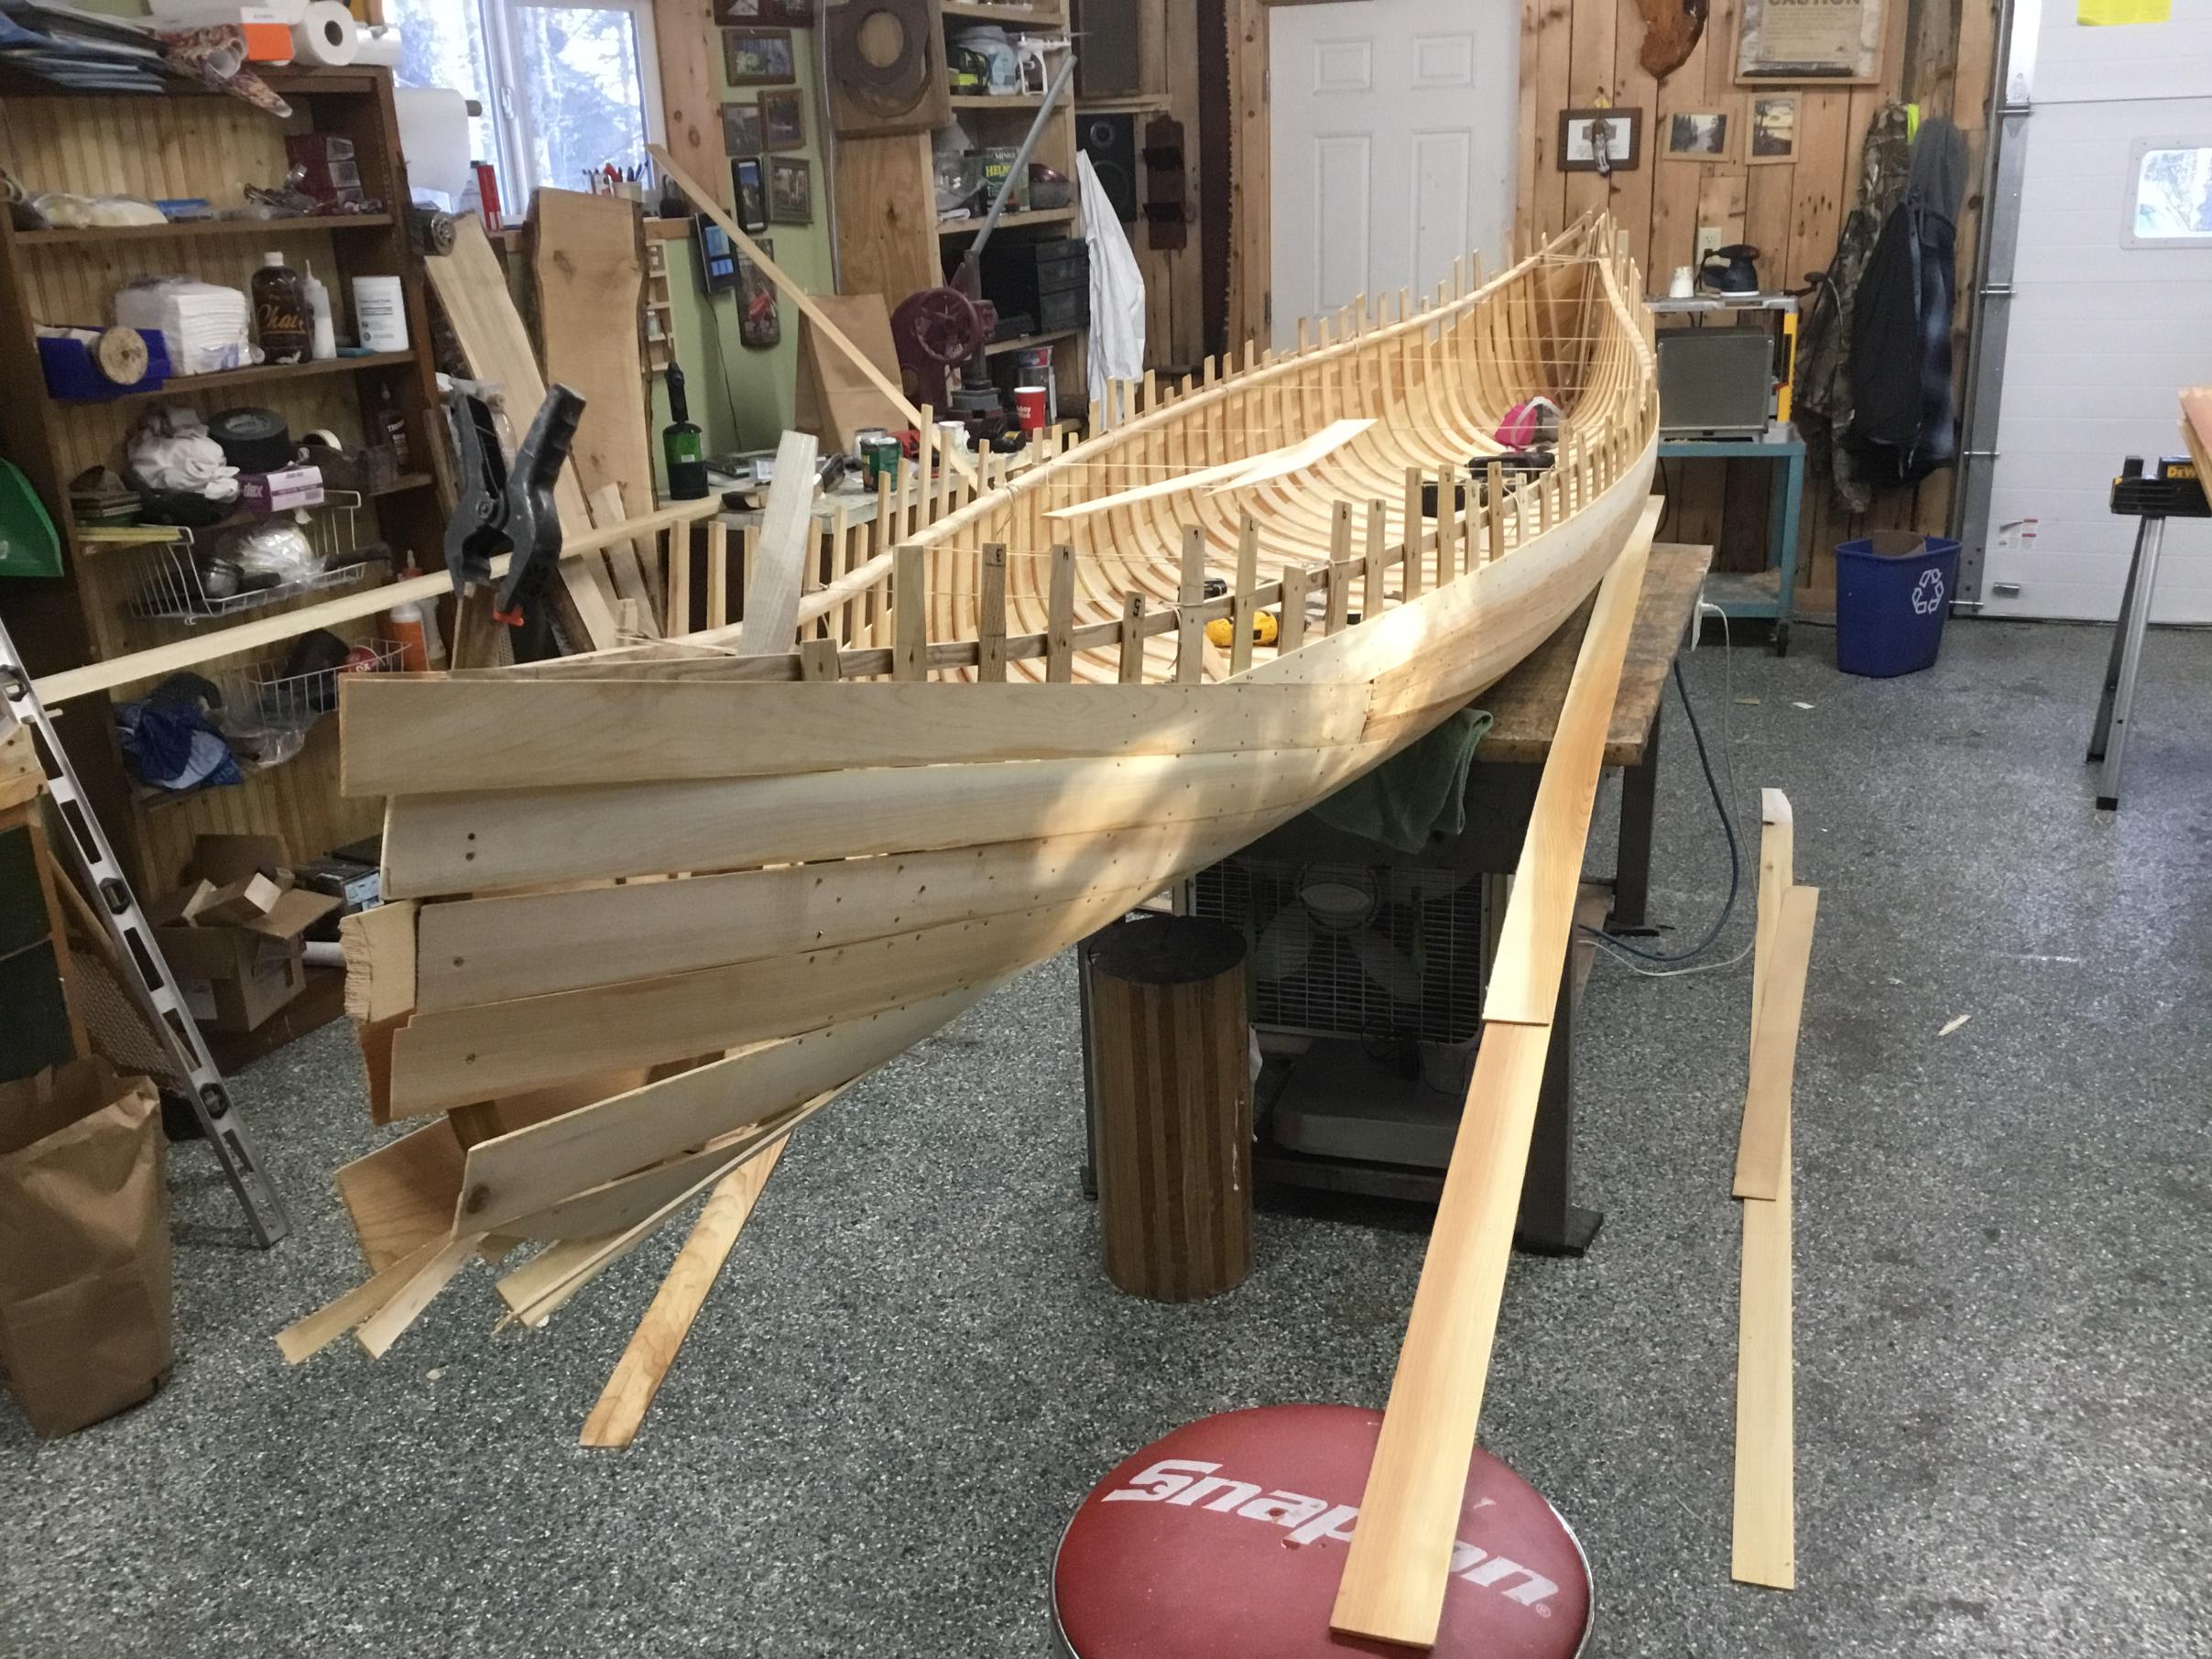
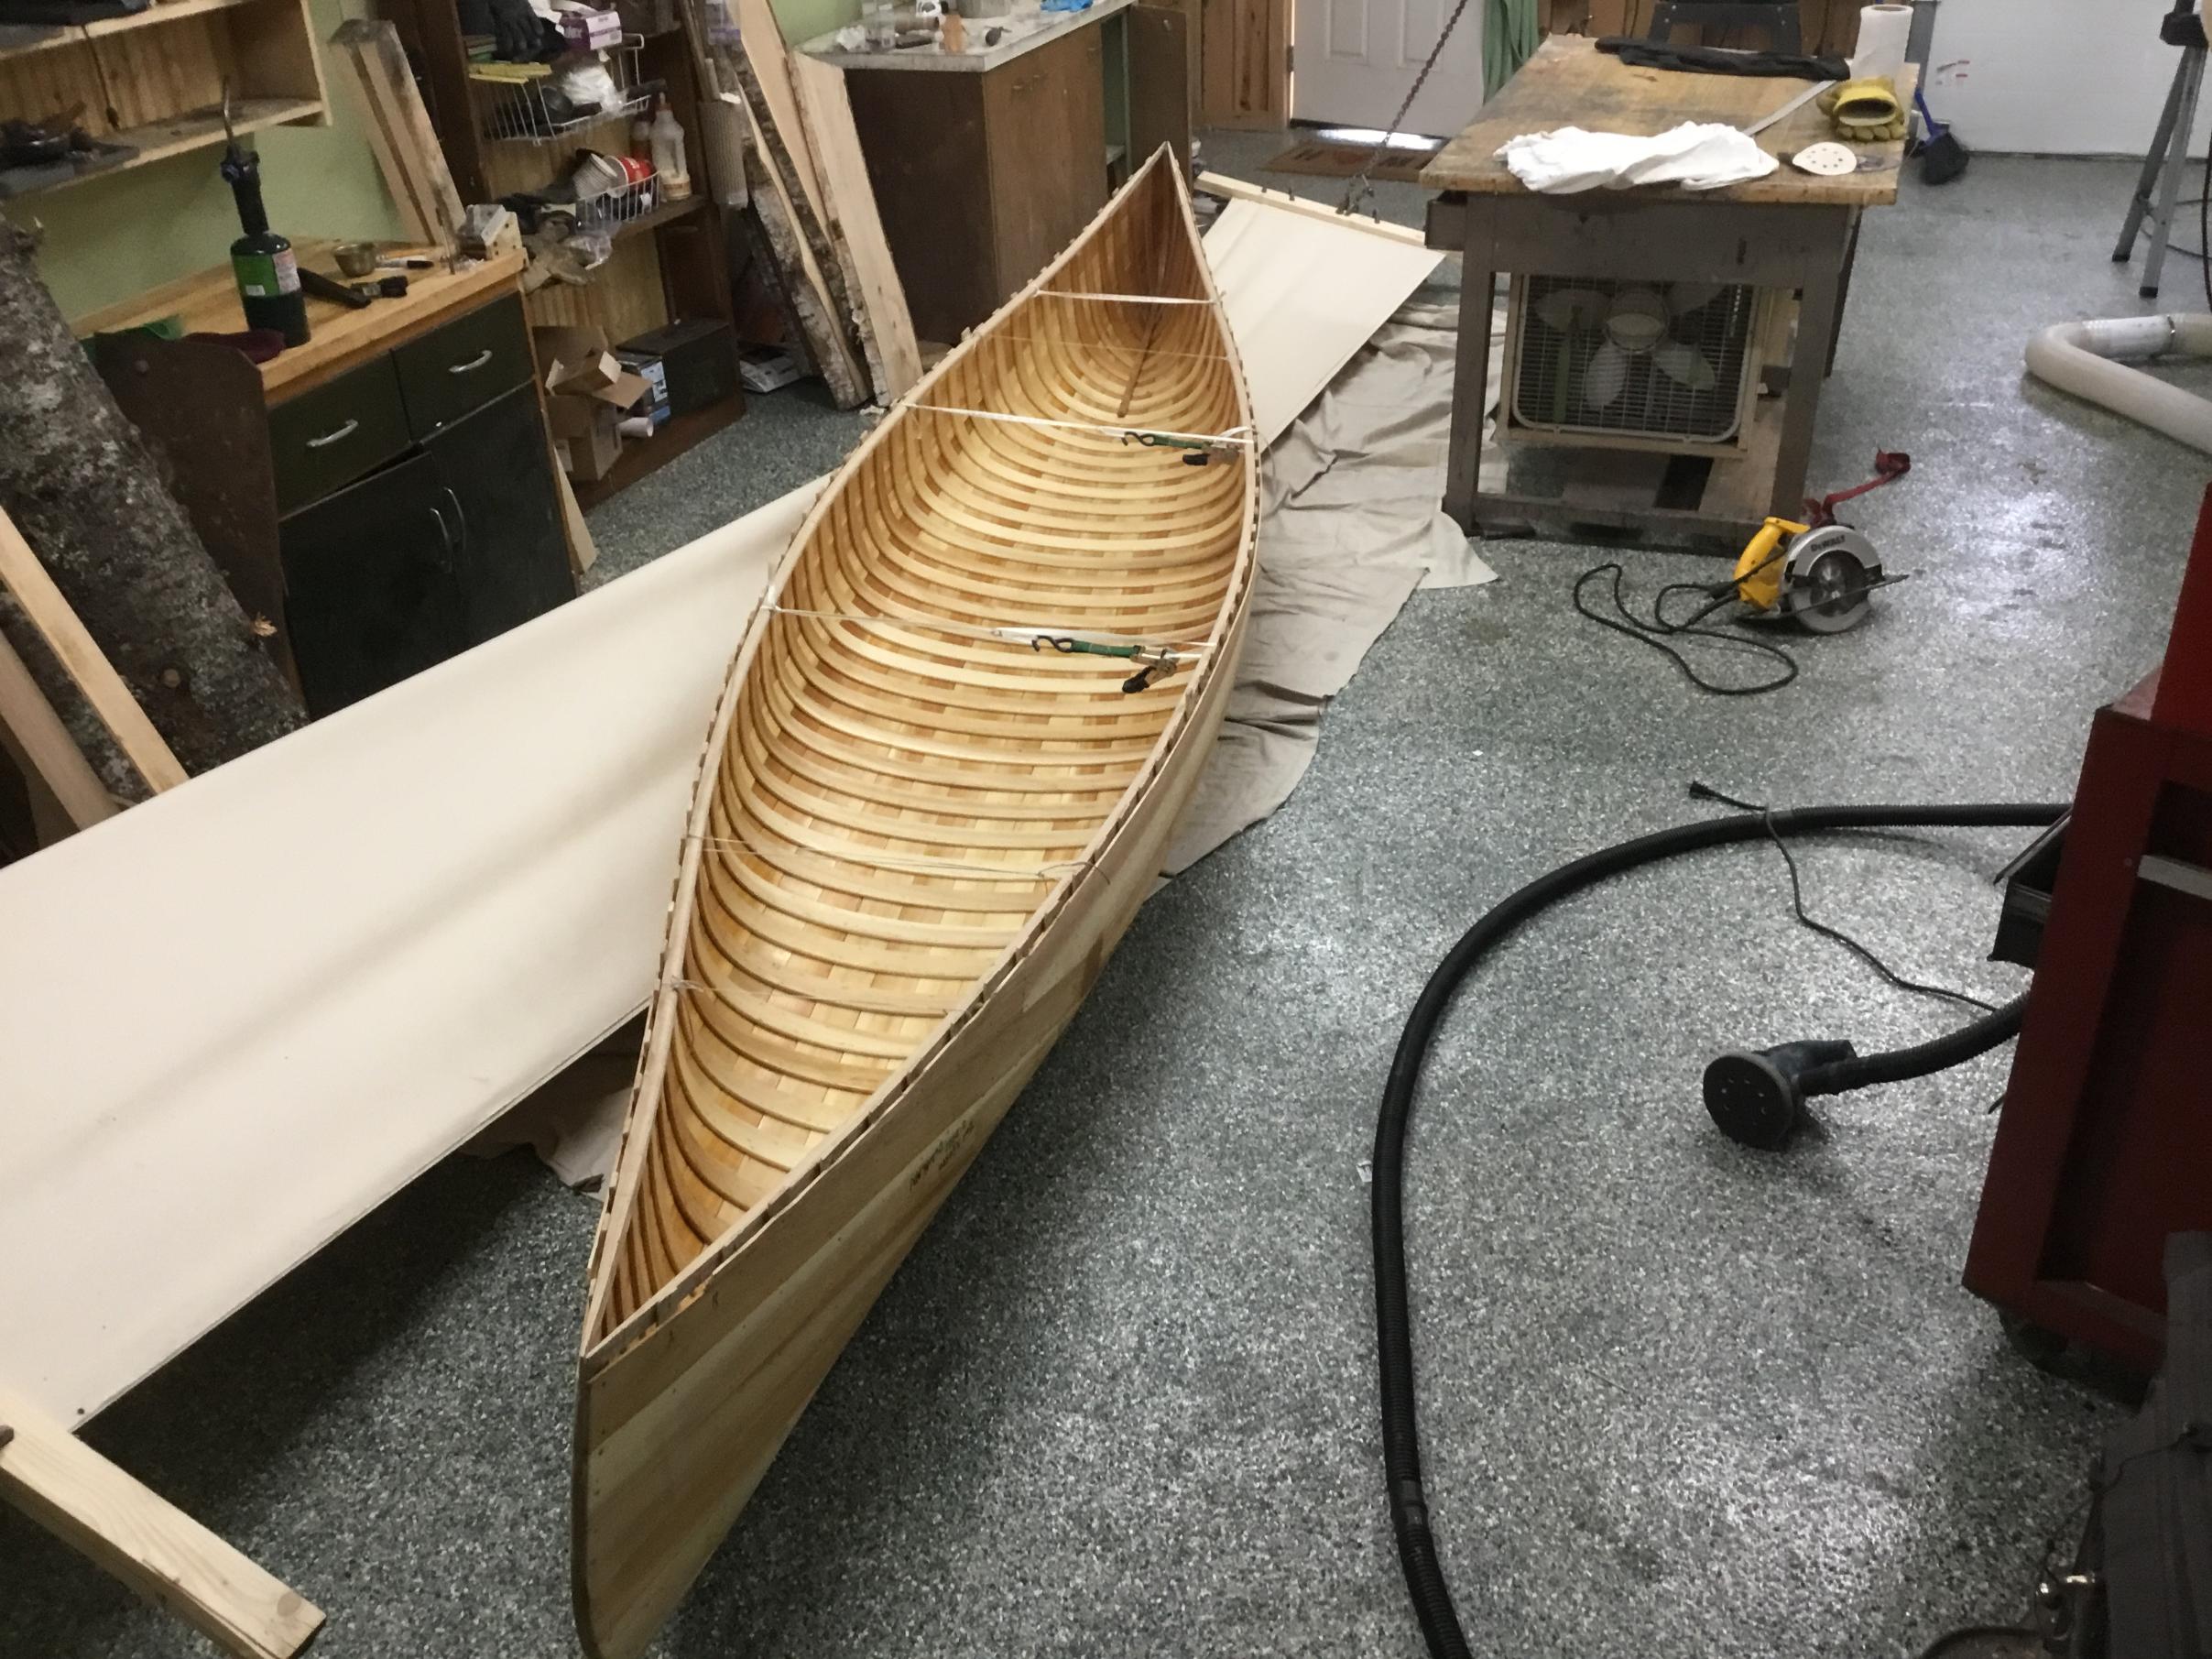
It is now time to plum up the stem pieces and attach the strakes to them. I also need to cut off the excess ribs sticking above the gunwales and finish a little planking right at the gunwale line.
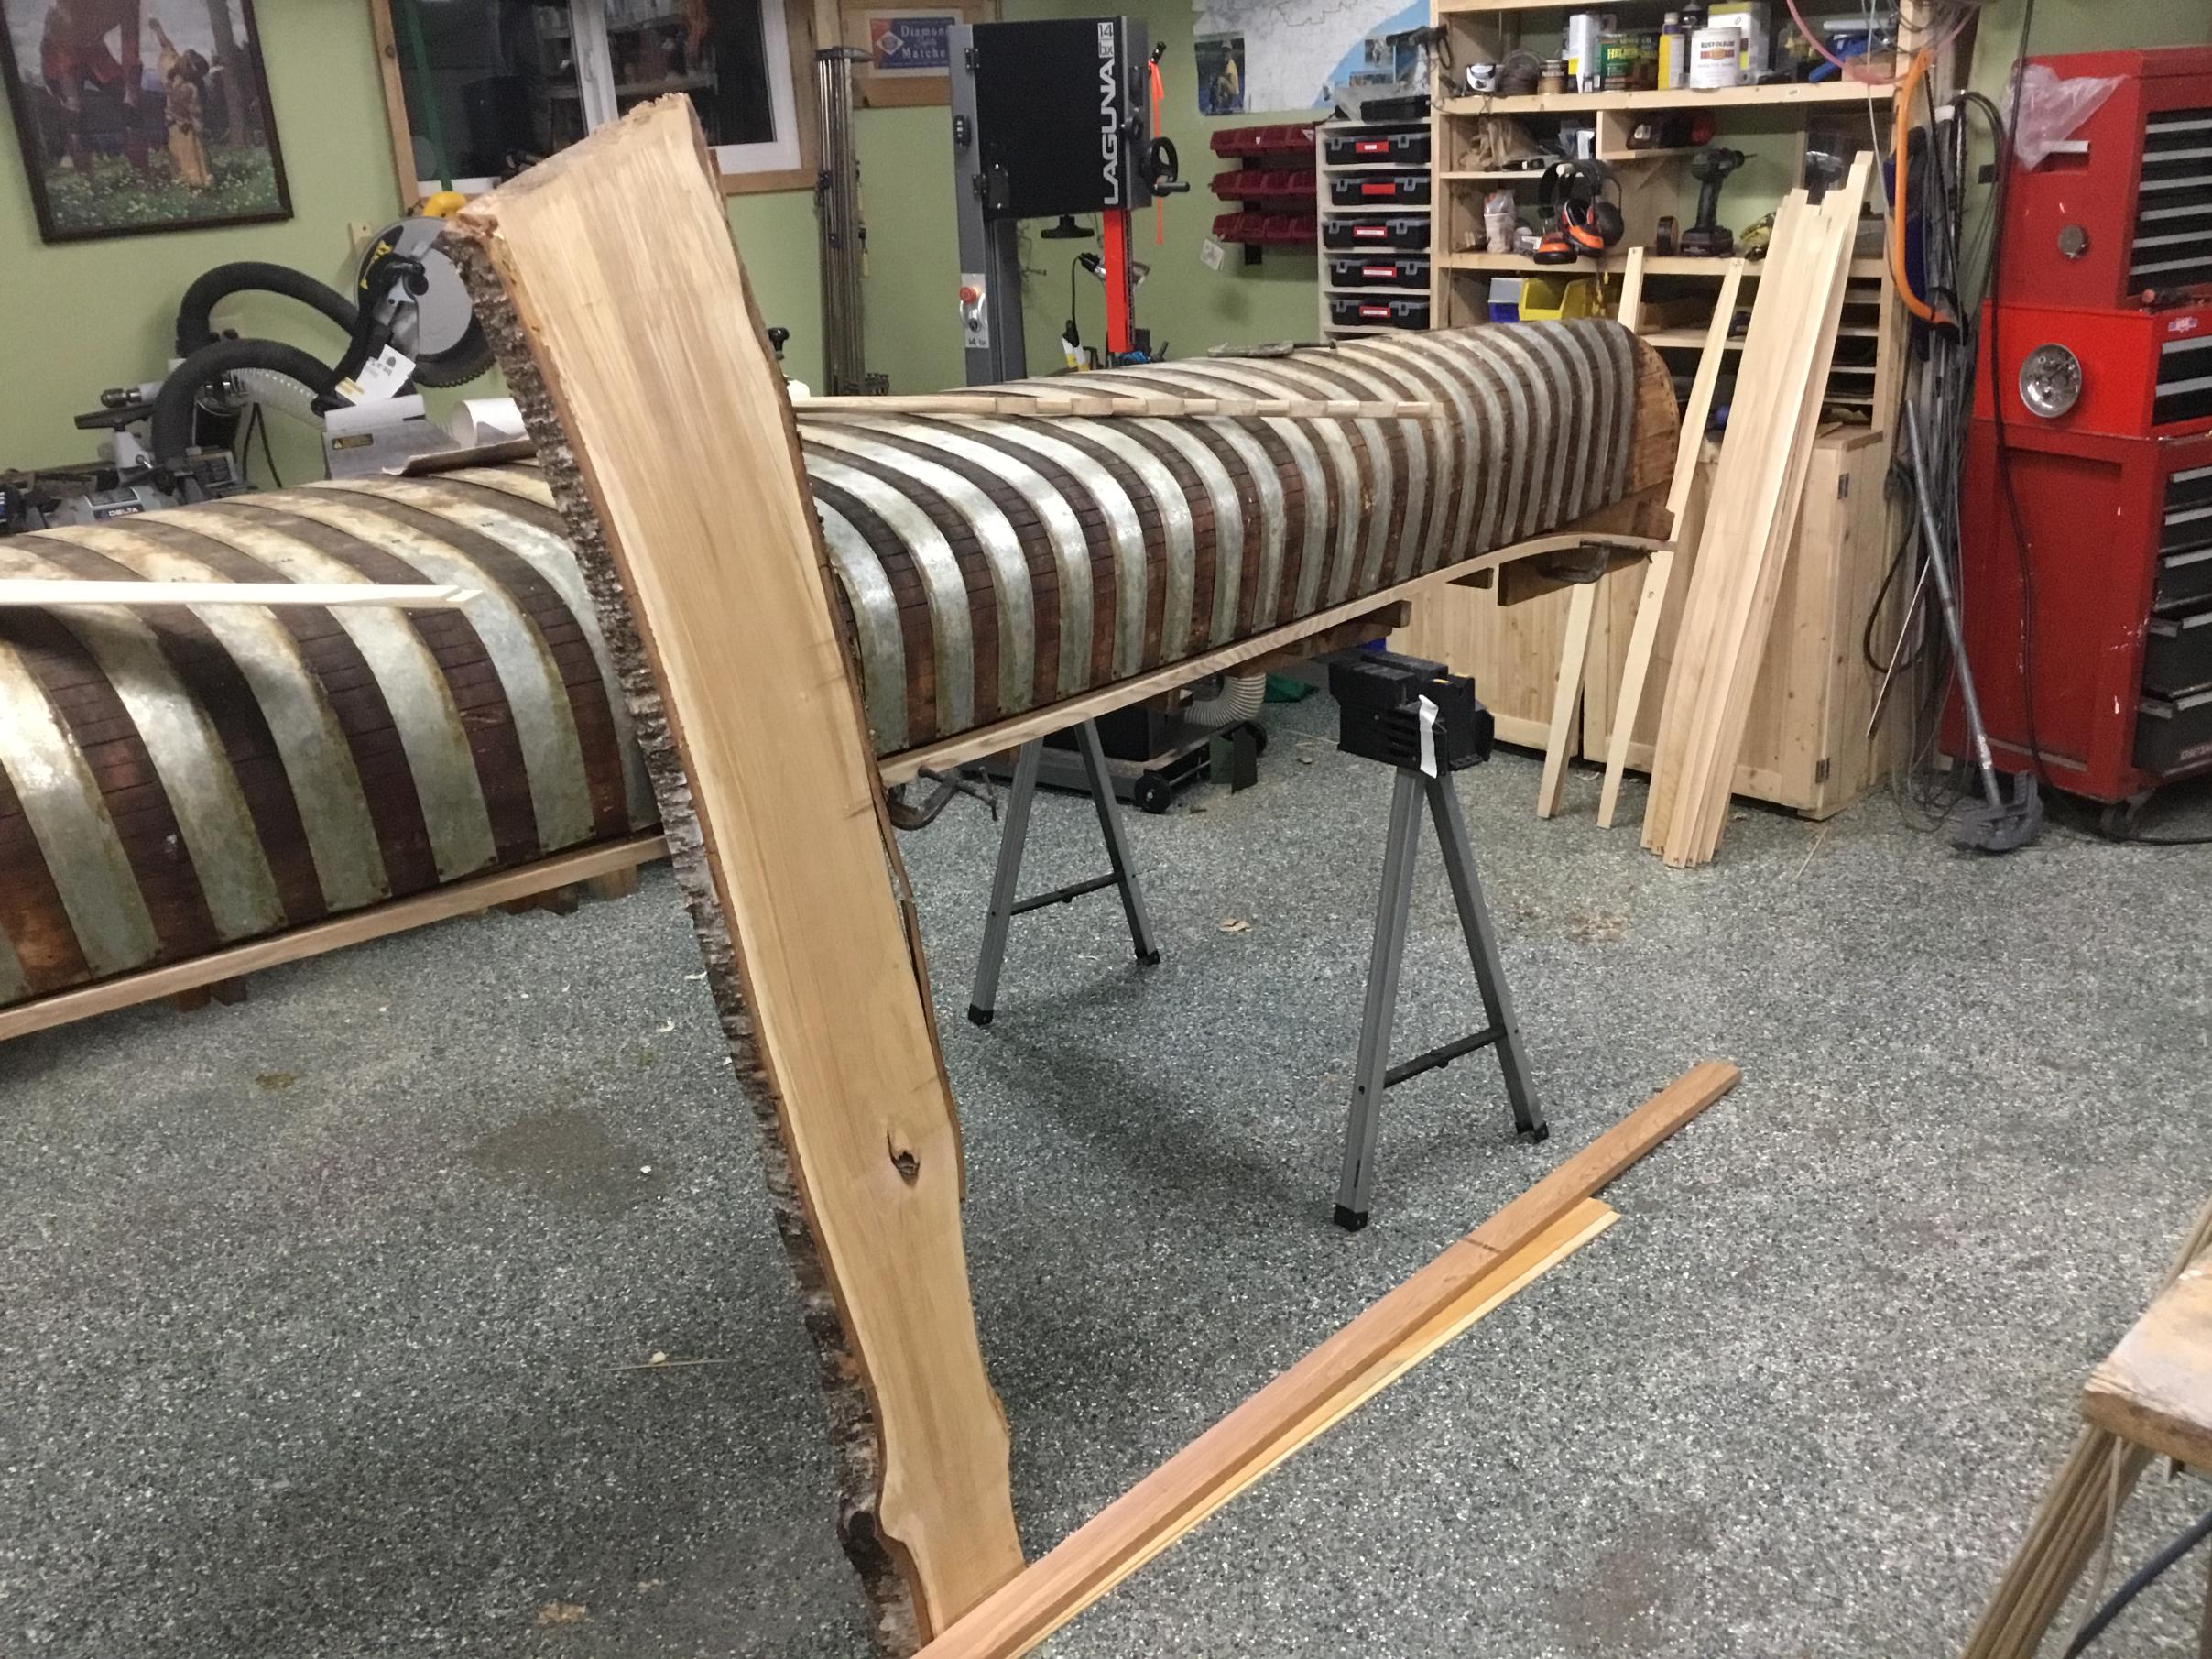
I cut a dying birch tree on my property and made some lumber out of it. I have a nice piece that I will use for the decks and thwarts for this canoe. There is a little fancy figuring in the grain so it will look real nice. With proper finishing of the birch, it will last a lifetime in this canoe.
I will post some more pix when I get all the planking cleaned up and the canoe looking proper. Next step is sanding the inside smooth, Installing decks and then get the canvas on the canoe. At that time I will be busy hand-caning the seats and working out some other details as I wait a month for the filler on the canvas to cure.
Tom
|
12/18/2020 07:37PM |
This week I set up the form in the shop. I’ve been busy finishing up the little touches on the 48 ribs needed for the canoe. The longest ribs in the center are about 56” long and the ribs on the ends are about 38”

The ribs in the center of the canoe are the standard 5/16” thick. As the ribs move out from the center, I make them a little thinner to shave ounces here and there off the weight. The last five ribs on the ends are only about 1/4” thick. It’s hard to see in this picture but the bottom rib is a center rib and the top rib is an end rib.
I’ve also been busy making the stems. I cut out the slots in the stem form for the ribs as seen in the pictures.
|
02/04/2021 12:05PM |
Mac
|
12/18/2020 09:33PM |
Where do you get rib material ? Locally ?
Sorry for all the questions, but these are things I've always wondered about .
Jim
|
02/21/2021 02:18PM |
Also, very cool you're hoping to give it away for a good cause.
As far as the canvas goes....if you just did layer upon layer of wood treatment could you go without? Or why are some wood/canvas and some just cedar strip where you can see cedar on the outside? Sorry for the beginner questions on the builder side of things...I've helped my dad a bit back in the day but not done anything myself really
|
02/21/2021 04:46PM |
cyclones30: "Very cool. You're just tying the sides together where a thwart would go to keep things stable? The taught canvas doesn't try and pinch it together too far?
Also, very cool you're hoping to give it away for a good cause.
As far as the canvas goes....if you just did layer upon layer of wood treatment could you go without? Or why are some wood/canvas and some just cedar strip where you can see cedar on the outside? Sorry for the beginner questions on the builder side of things...I've helped my dad a bit back in the day but not done anything myself really "
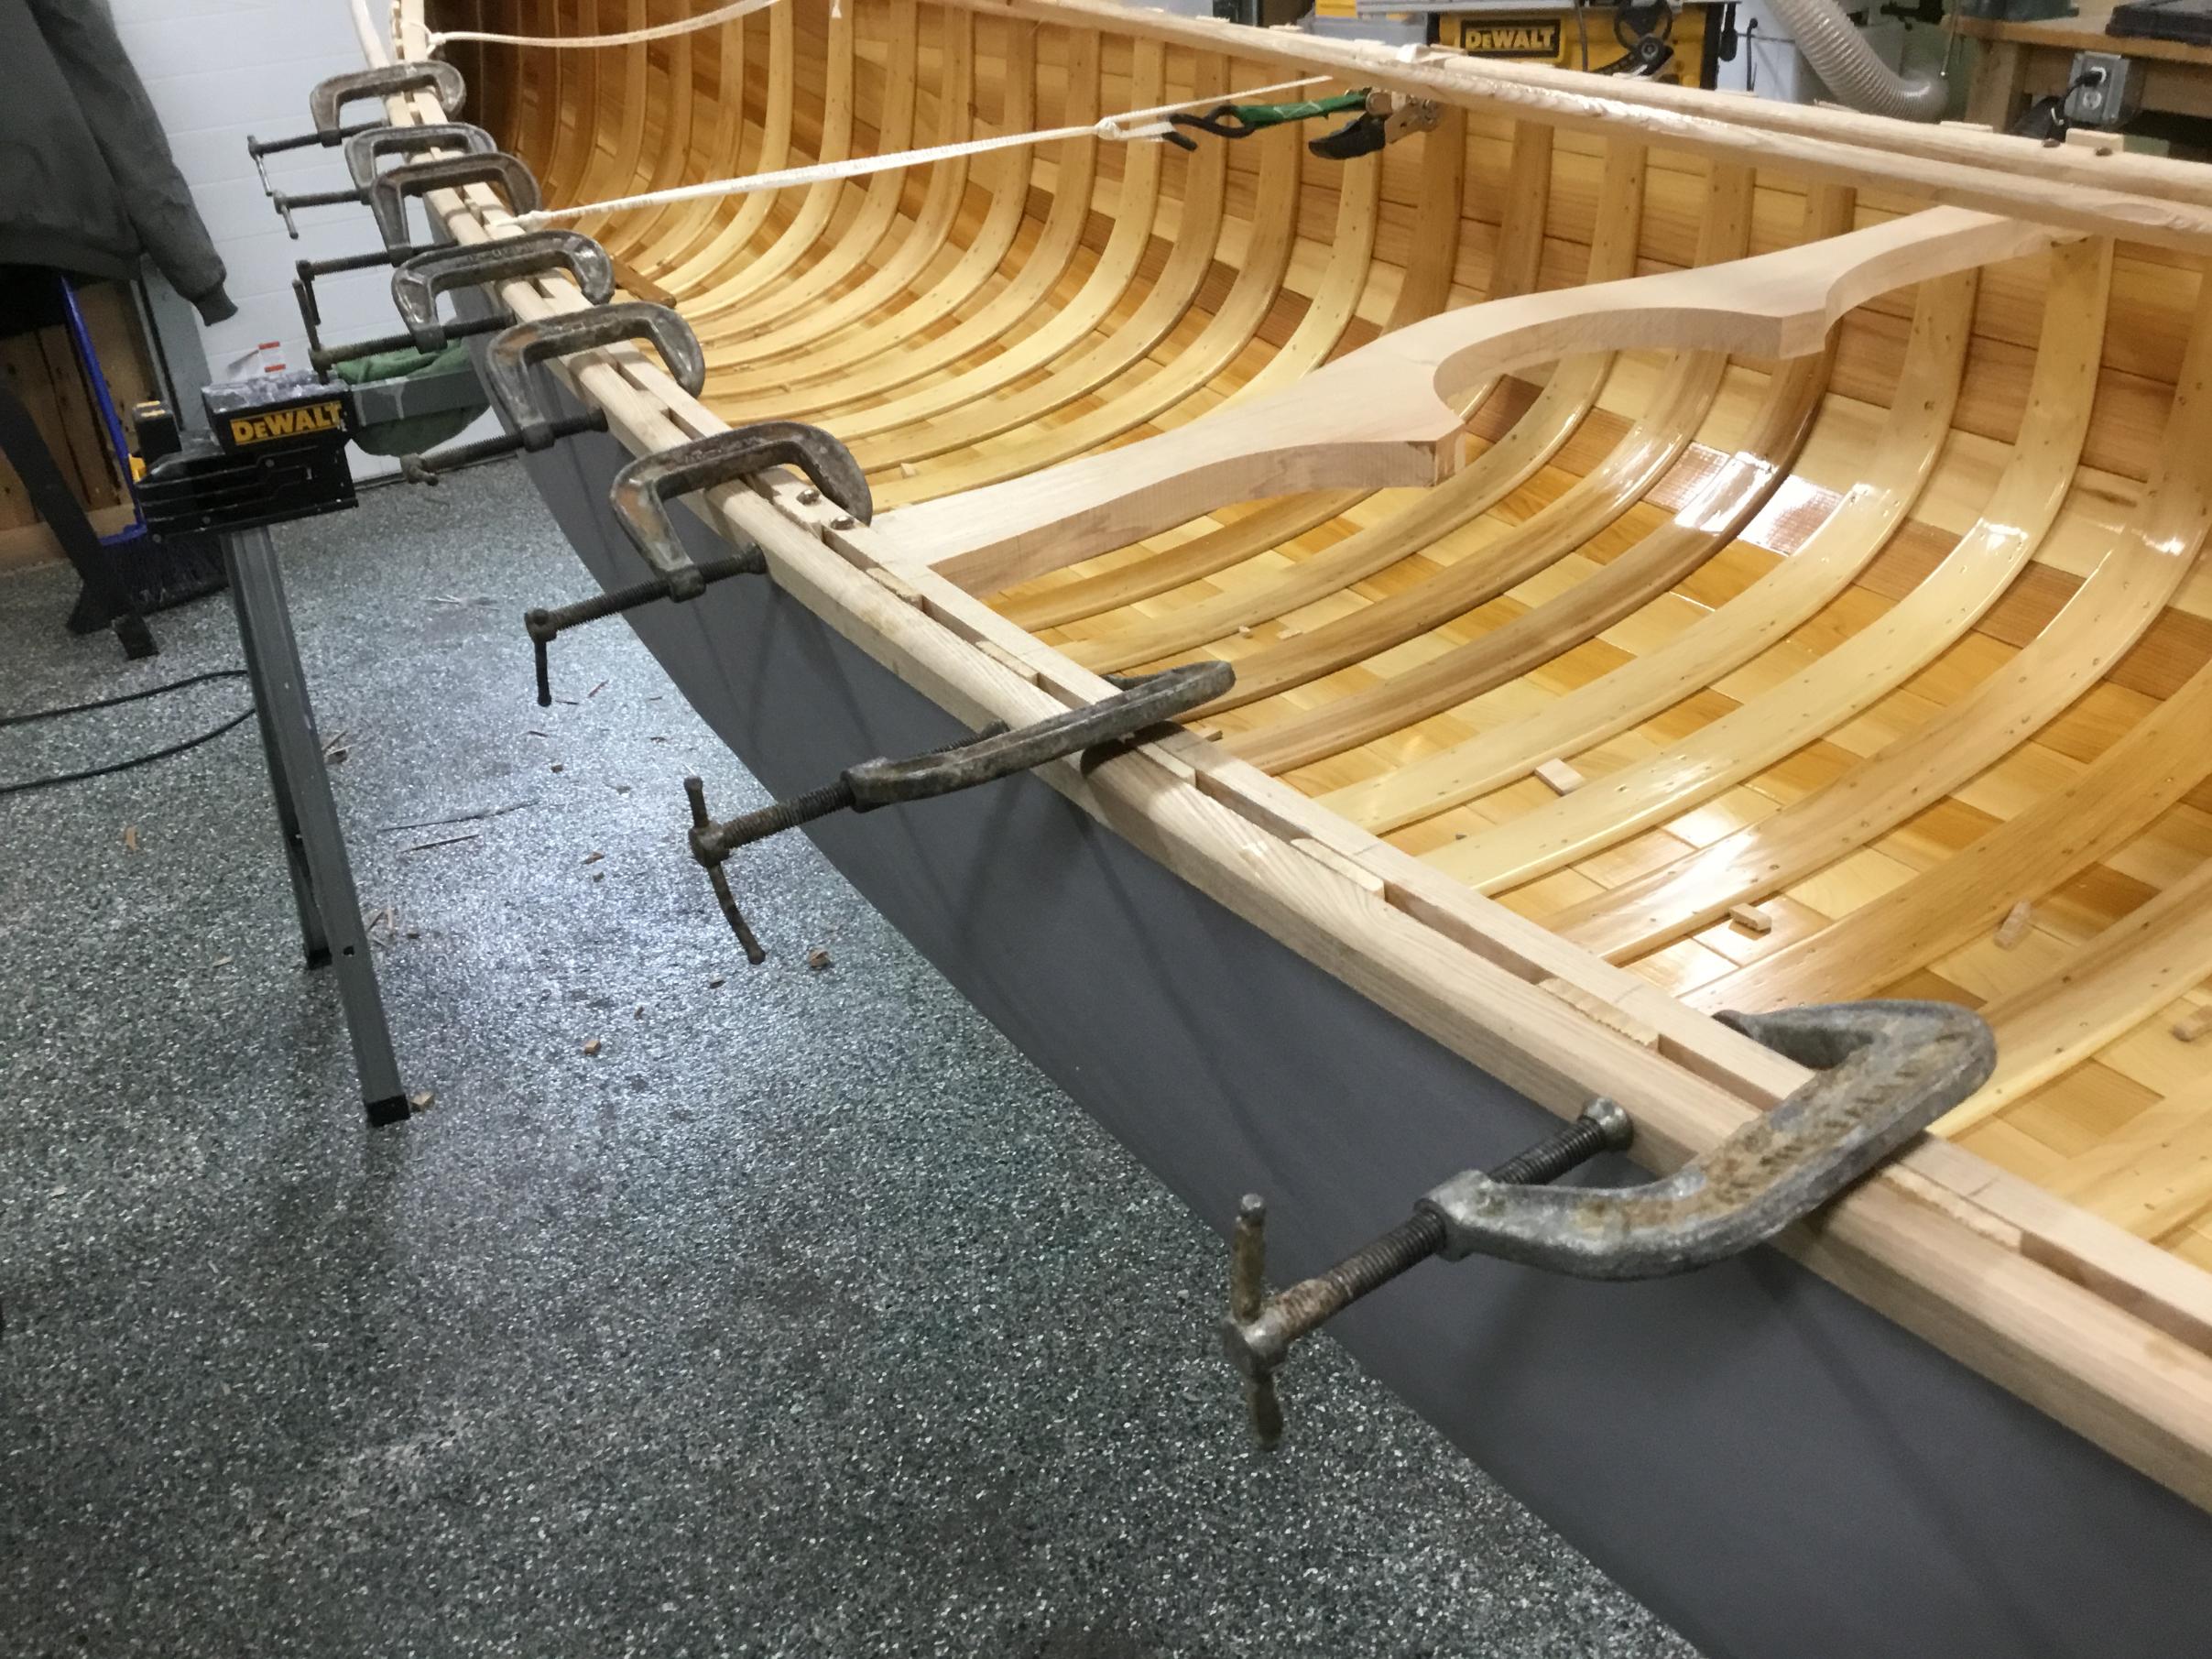
There is still a lot of resistance in the ribs and they want to spread the canoe open. I use straps to hold it into position until everything is installed.
Wood/canvas construction goes back to the late 1800’s or early 1900’s. There are still a few builders doing this today, like myself. Many teqniques developed many years ago are still in use today in many everyday things we use. And some of these techniques are superior to the fandangled ideas people are using today.
Wood/canvas construction is a very time proven method of construction. It is water-proof, resilient, easily repairable and allows a canoe to flex as needed.
Fiberglass and resins were developed later which is what you are seeing in the clear finish of some cedar canoes you mention. I was talking to another wood/canvas canoe builder recently and he said he used to build strippers but there is just too much plastic in them, referring to the epoxy used on both sides of the canoe to seal the wood.
I own a bunch of strippers and love them too but for now I’m into wood/canvas construction. Strippers are usually a bit lighter and require less maintenance but wood/canvas is about as pure in construction as you can get without going to birchbark. And.... I’ve build birchbark too. I love them all.
Tom
|
02/21/2021 06:20PM |
|
02/21/2021 04:58PM |
I’m still letting the filler fully cure. In the meantime, I’ve had a heck of a time keeping my shop warm though this extended cold spell. Overnight temps dropped to -26’ at least 10 of the last 14 days. I have a propane ceiling mounted furnace as well as a wood stove. Both got plenty of use. I need to keep the temp in the shop at least 55’ to keep everything happy.

I finished up varnishing the interior. It took four thin coats to get it where I want it.
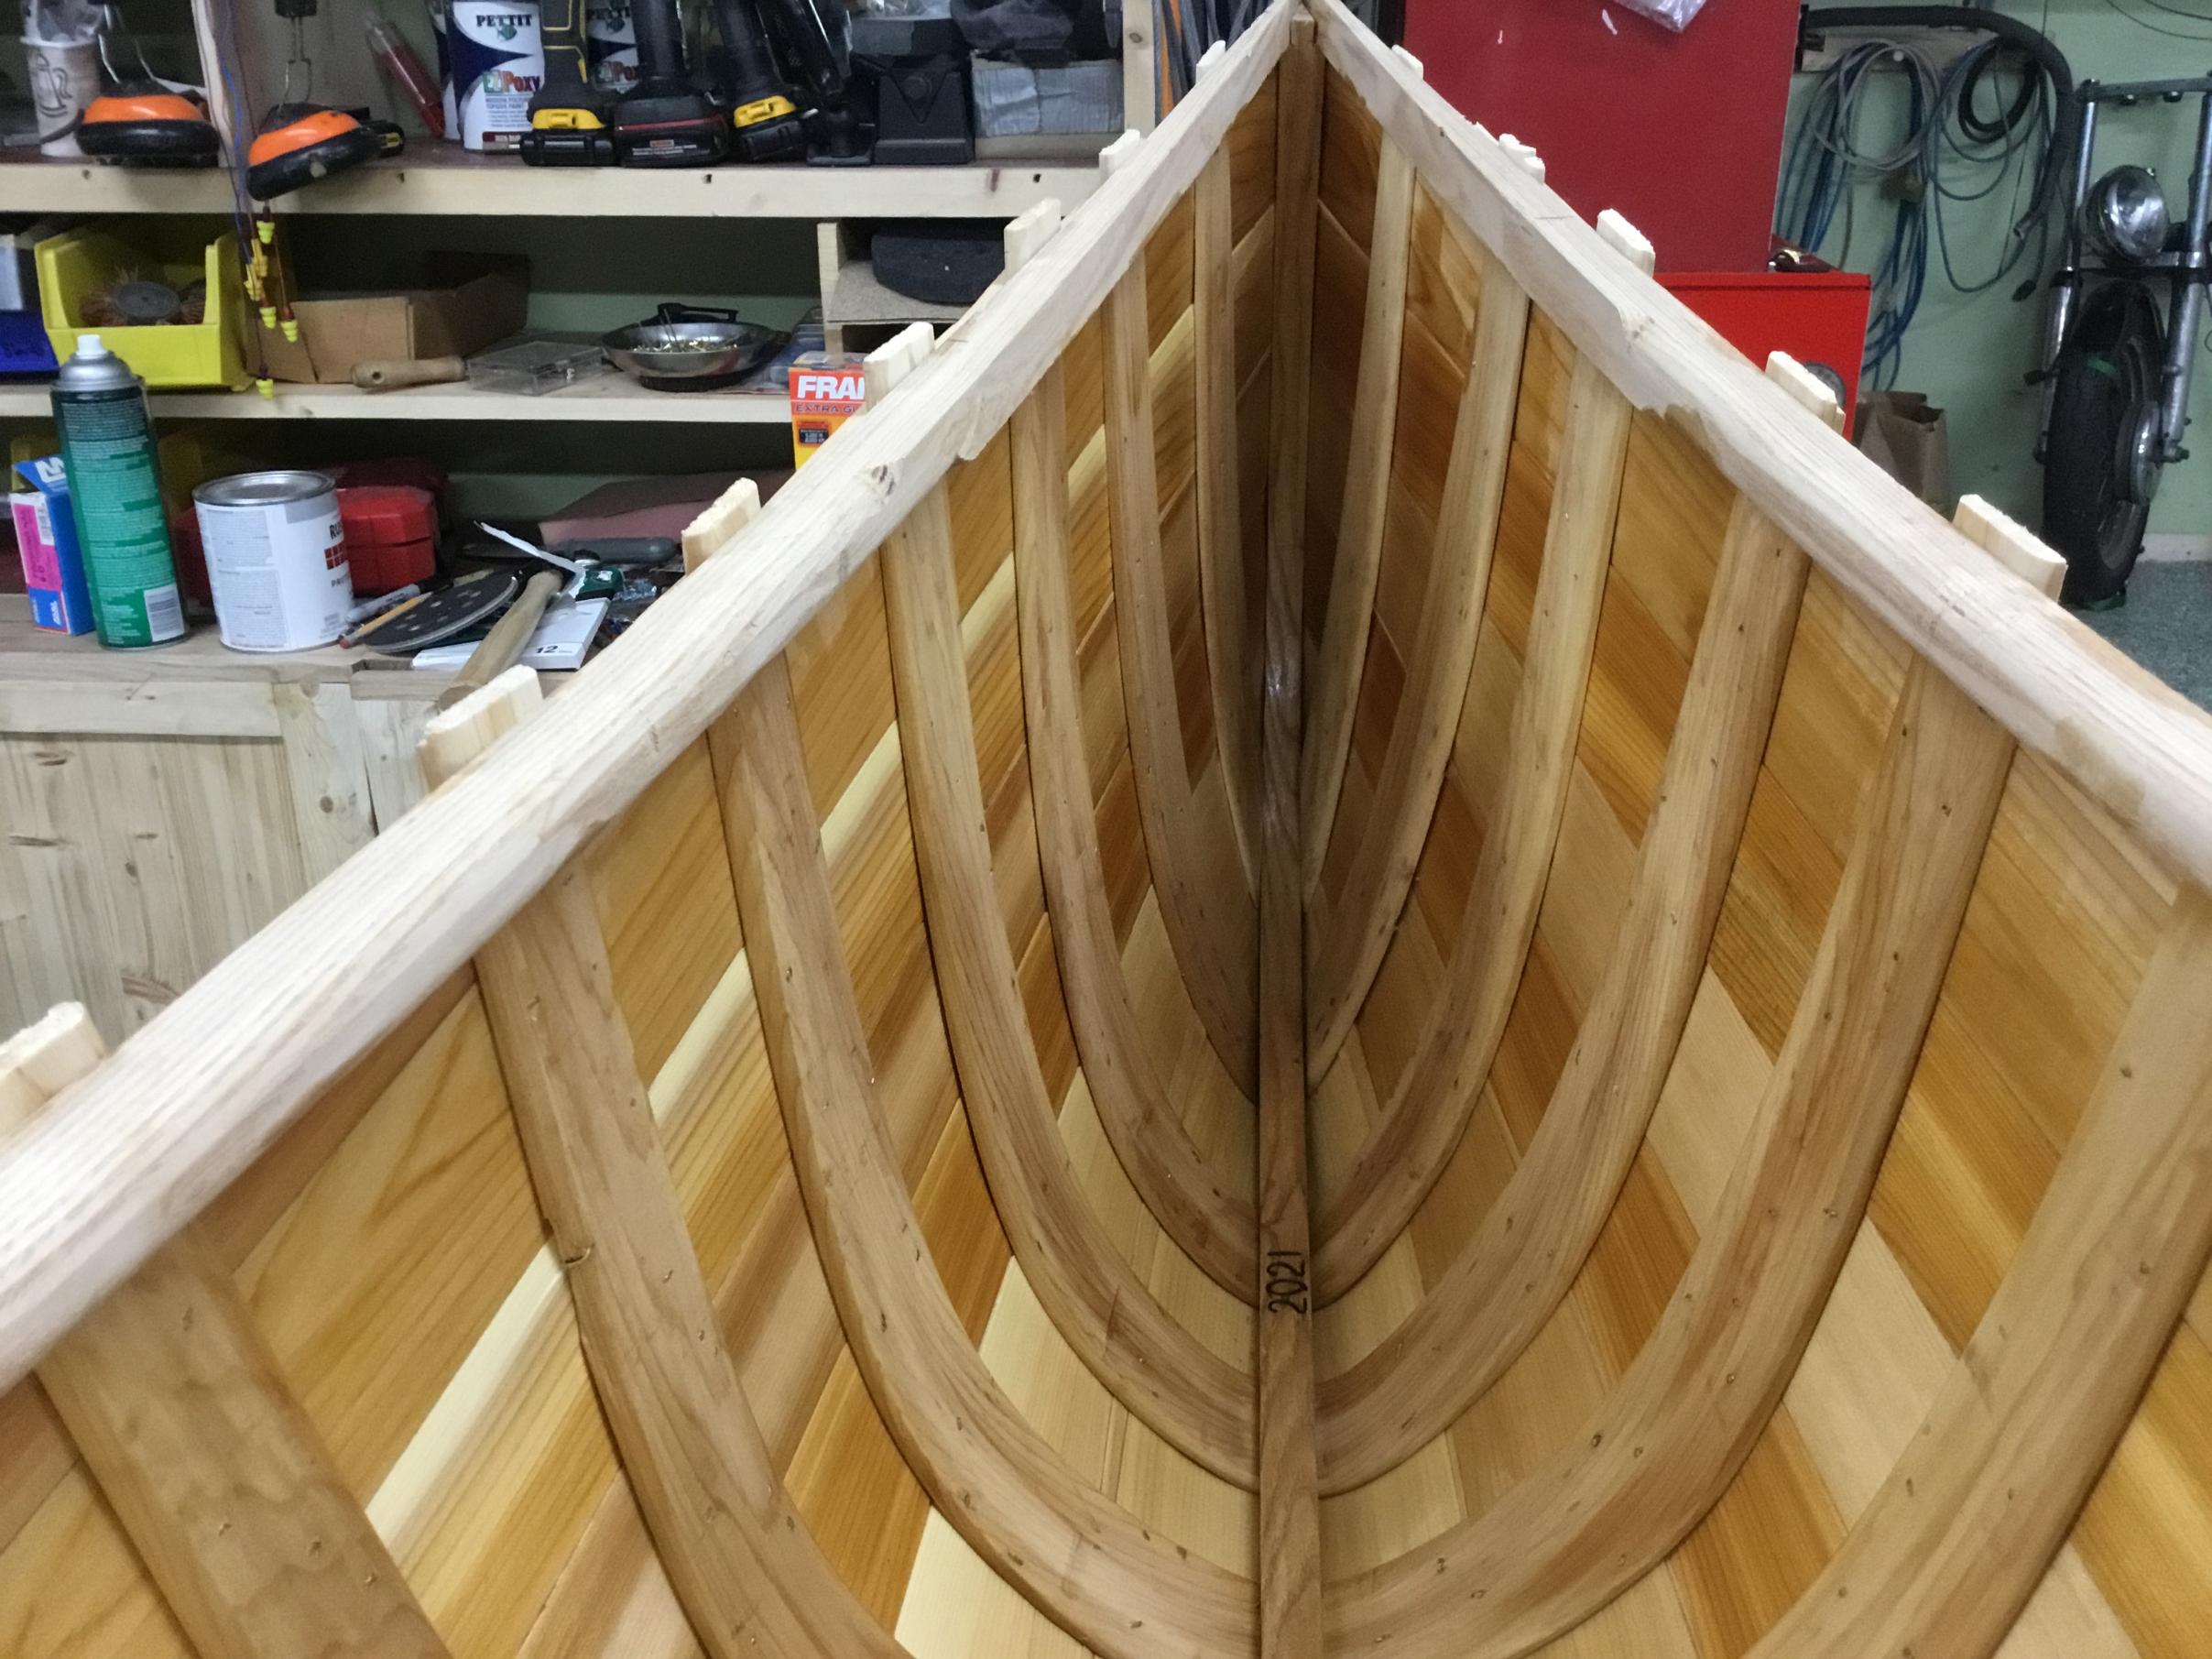
This weekend I made and installed the birch decks. I also installed the outwales which is also more of a chore than it should be.

They are made in a way that, when installed, cover up the edge of the planking. Here’s a cross-section of the outwale.

You can see in the following pictures where the planking is about 3/8” of an inch lower than the ‘top’ of the canoe, meaning it’s a bit lower than the top of the inwales. When installing the outwales, it covers the planking and makes it all look magic.


The next step is to sand the top of the gunwales so it’s all smooth. I will then install the seats and clean up the trim. Soon after I can paint.
Tom
|
01/04/2021 02:52PM |
A well cared for wood canvas canoe will last eternally.
Tom
|
03/09/2021 06:32PM |
I don’t have the details on how this canoe will be sold/auctioned/raffled yet.
We were talking about using it in an event in May at a venue in Duluth.
I do know that it will be May and the the Friends of the Boundary waters will be marketing it.
I am receiving no money for it. It’s my form of philanthropy.
Tom
|
02/21/2021 08:25PM |
Spring is on the way !
|
02/22/2021 07:03AM |
cyclones30: "Nice, how long until the ribs aren't trying to pull it apart? Or they're always going to try and do that to a degree I'd think? The latest one my dad made a couple years ago was also a strip/canvas that's now hanging from the ceiling in his office"
I’m not sure how long there is tension on the ribs. I’m guessing a long time, like years. However, with the gunwales, yoke, seats, and thwart, it’s all held together nicely.
I restored an old canoe some years back and the wood was quite stable. Old ribs didn’t change shape whatsoever when I cut them out.
I don’t have room in my house to hang a canoe but I did manage to hang one in my shop.
@Jim- Thanks. Yes spring is on the way! It was light outside before I left for work so we are spinning around the sun towards warmer air.
Tom
|
01/30/2021 08:55AM |
MacCamper
|
12/19/2020 06:38AM |
1JimD: " How do you cut your strakes ? Resaw on your Band saw ?
Where do you get rib material ? Locally ?
Sorry for all the questions, but these are things I've always wondered about .
Jim
"
Hi Jim,
I got rid of my absolutely worthless Grizzly bandsaw and bought a 2hp Laguna bandsaw.
I can resaw any size cedar or really any wood up to 14" This saw is a beast and the best tool I've ever bought. It's a fine piece of machinery.
You don't really need a Laguna to resaw but you need something more than a Sears 1/2 horse to resaw wood and it needs to be tuned well enough to cut straight and have enough muscle to not bog down. I buy my cedar anyway I can get it. I most certainly prefer quarter-sawn lumber but it's really tough to get that from a cedar tree with all the knots.

In this reference picture you can see that quarter-sawn lumber (AKA vertical grain) is a board cut through the years of rings in the tree. Almost all wood cut from a sawmill is flat sawn since it is easy to cut and yields the most usable lumber from a log. Quarter-sawn lumber is more stable in terms of less prone to warp and does not split when twisted. I am using quarter-sawn strakes across the bottom of the canoe below the waterline where the strongest wood is needed and some flat-sawn strakes on the sides which is quite common.
Anyone that has an appreciation for quarter-sawn oak knows the incredible beauty in that type of wood.
I live in northen MN and buying cedar is pretty easy to do up this way. There are a lot os small private saw mills that have cedar to sell. I used to go to Ontario when I was building a lot of canoes and would have a sawyer cut boards for me when I was at his place so I could pick the best wood. Those were the days
Tom
|
12/08/2020 05:23PM |
The Chestnut Canoe Company manufactured wood/canvas canoes for about ninety years in Canada. Chestnut Canoe Company
The late Bill Mason helped make the canoe famous with his love for the boat and his daring videos using the canoe in whitewater in his film Path Of The Paddle
While I suppose one could paddle class IV rapids in this canoe, it wouldn’t be my cup of tea. The Chesnut Pal is a well proportioned canoe for use in the wilderness as well a pleasure paddling on local lakes or rivers. It’s not too big that it can be paddled solo too.
I built a solo wood/canvas canoe this past spring in an earlier thread. With this canoe, I will try to provide different pictures of its construction to keep it unique from the previous build. For now I am busy making and shaping the ribs and cutting the planks (strakes) for the canoe.
I am building this canoe to give away. It will be donated to a non-profit to raise funds for wilderness protections of the BWCA. More to follow on this later. I anticipate finishing the canoe in March......
|
12/19/2020 09:23AM |
Here in Northwest Iowa, the only Cedar I find other than Menards, is Old Power line poles. I know a few mills, that can cut for me. One I really like ! I may have to start a quest for some poles ! Thanks ! Enjoying this very much !
|
12/20/2020 05:27PM |
A day before steaming the ribs, I made a bathtub in the shop and soaked the ribs for 24 hours. Combine a wet rib with hot steam and you can bend cedar almost in knots.
I set up the steam box outside this time to keep the clouds of hot steam from fogging up the shop.


|
12/20/2020 05:32PM |
1JimD: " I'm aware of the Laguna 14" Bandsaw, as we have one at our wood shop. yes a far cry from the old 12" Craftsman !
Here in Northwest Iowa, the only Cedar I find other than Menards, is Old Power line poles. I know a few mills, that can cut for me. One I really like ! I may have to start a quest for some poles ! Thanks ! Enjoying this very much !
"
My first bandsaw was a Sears. I tossed it in a dumpster some years later. I’m glad I didn’t buy the Laguna until I was older. With age comes respect and I didn’t respect tools back them. I just fought with them and they fought me back. Now we work as a team.
Cedar power poles are one way to find long wood but I wonder about getting clear material. I do not mind paying a premium for good lumber. Even though spending up to $4 or $5 a board foot for good wood gets expensive, it’s still only a very small part of the price to build a canoe.
Menards still sells a little bit of old-growth cedar and their 4x4 or 6x6 rough cut posts often have mostly clear material in them. Only problem is you might only get an 8’ or 10’ post so you still need to scarf joint them. You can PM me if you want some clear white cedar. I don’t sell it but I know people that do. You will need to make a drive.
Tom
|
12/20/2020 10:13PM |
That has always been a drawback, finding quality lumber.
I have to travel a ways, to find a Menard's that has enough Cedar to sort.
Like everything, Cedar is going up in price ! The days of a clear 1x12x16' for $25 are long gone.
I would first have to find a suitable form for Wood canvas hull !
Again enjoying your build and the insight you share !
Jim
|
01/16/2021 03:23PM |
Your picture is amazing and the canoe looks very beautiful! Especially this time of year when I haven't seen a sunny day in a week and we have more than a foot of snow on the ground.
I did not build the form, it was loaned to me. I'm thankful that I didn't have to build it since it is very time-consuming, somewhat costly, and then I have to store it. That said, I would not hesitate to build a form for a canoe if I had to for a different model. This is where the advantage comes to play of building a stripper. Easier form, less room to store, less expensive.
With that, Alex Comb of Stewart River Boatworks Sells the plans for the Wood/canvas Pal and is a terrific source of information and supplies for building this canoe.
Tom
|
01/30/2021 04:06PM |
MacCamper: "I am refinishing and applying tung followed by bee's/carnuba wax blend per ashes specs . Thoughts? "
One coat a day for a week
One coat a week for a month
One coat a year thereafter
Wow! a bit labor intensive from my perspective, but I am curious to see how the finish compares with the other things you've used.
Mark
|
02/04/2021 05:53PM |
PM sent.
Tom
|
02/08/2021 06:25PM |
Japan drier to speed up the drying of the filler
Mineral spirits
Linseed oil
enamel paint
powdered silica
After the filler is cured/dry, the hull is primed then three coats of brightside boat enamel.
Tom
|
02/13/2021 08:55PM |
|
02/27/2021 05:30PM |
I’m still waiting for the filler to fully cure. You might wonder why it takes so long for the filler to cure/dry. I sort of wonder too. I think it’s ready for paint since it feels as hard as slate. I do know that some of the solvents are slow to evaporate out so patience is needed. And I have plenty of that since there is no place to paddle anyway. Like fine wine, it just takes time.
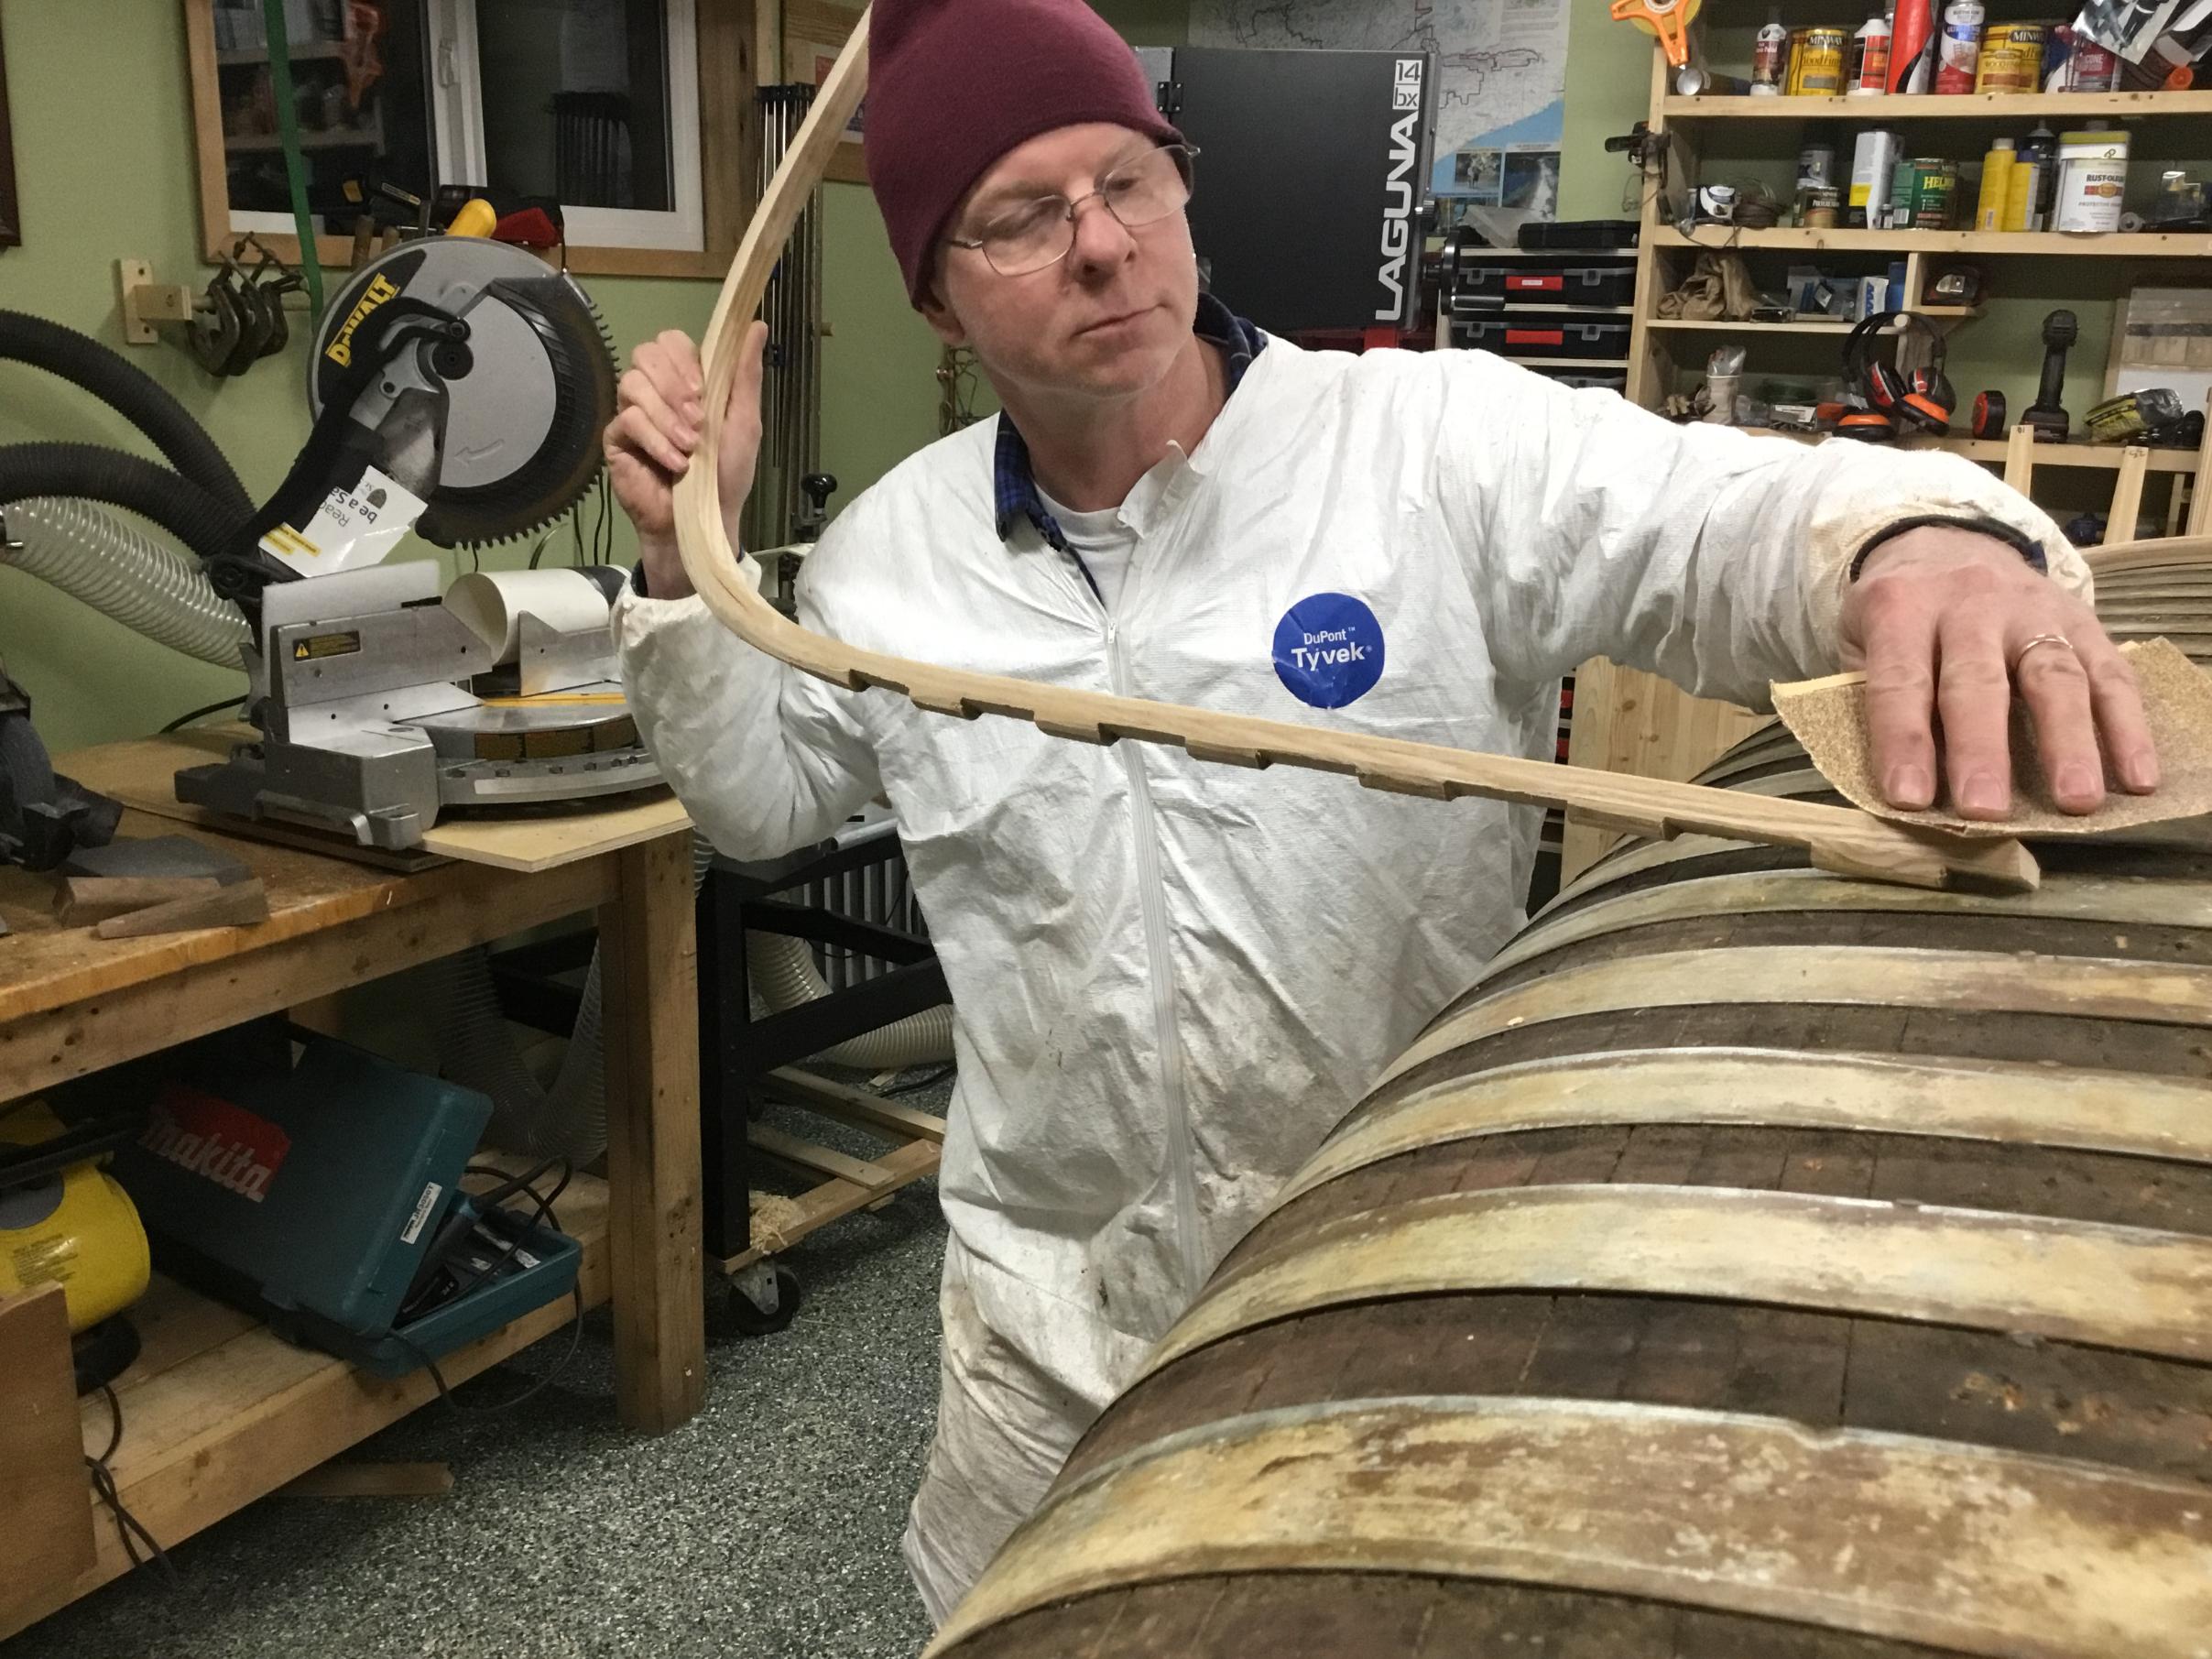
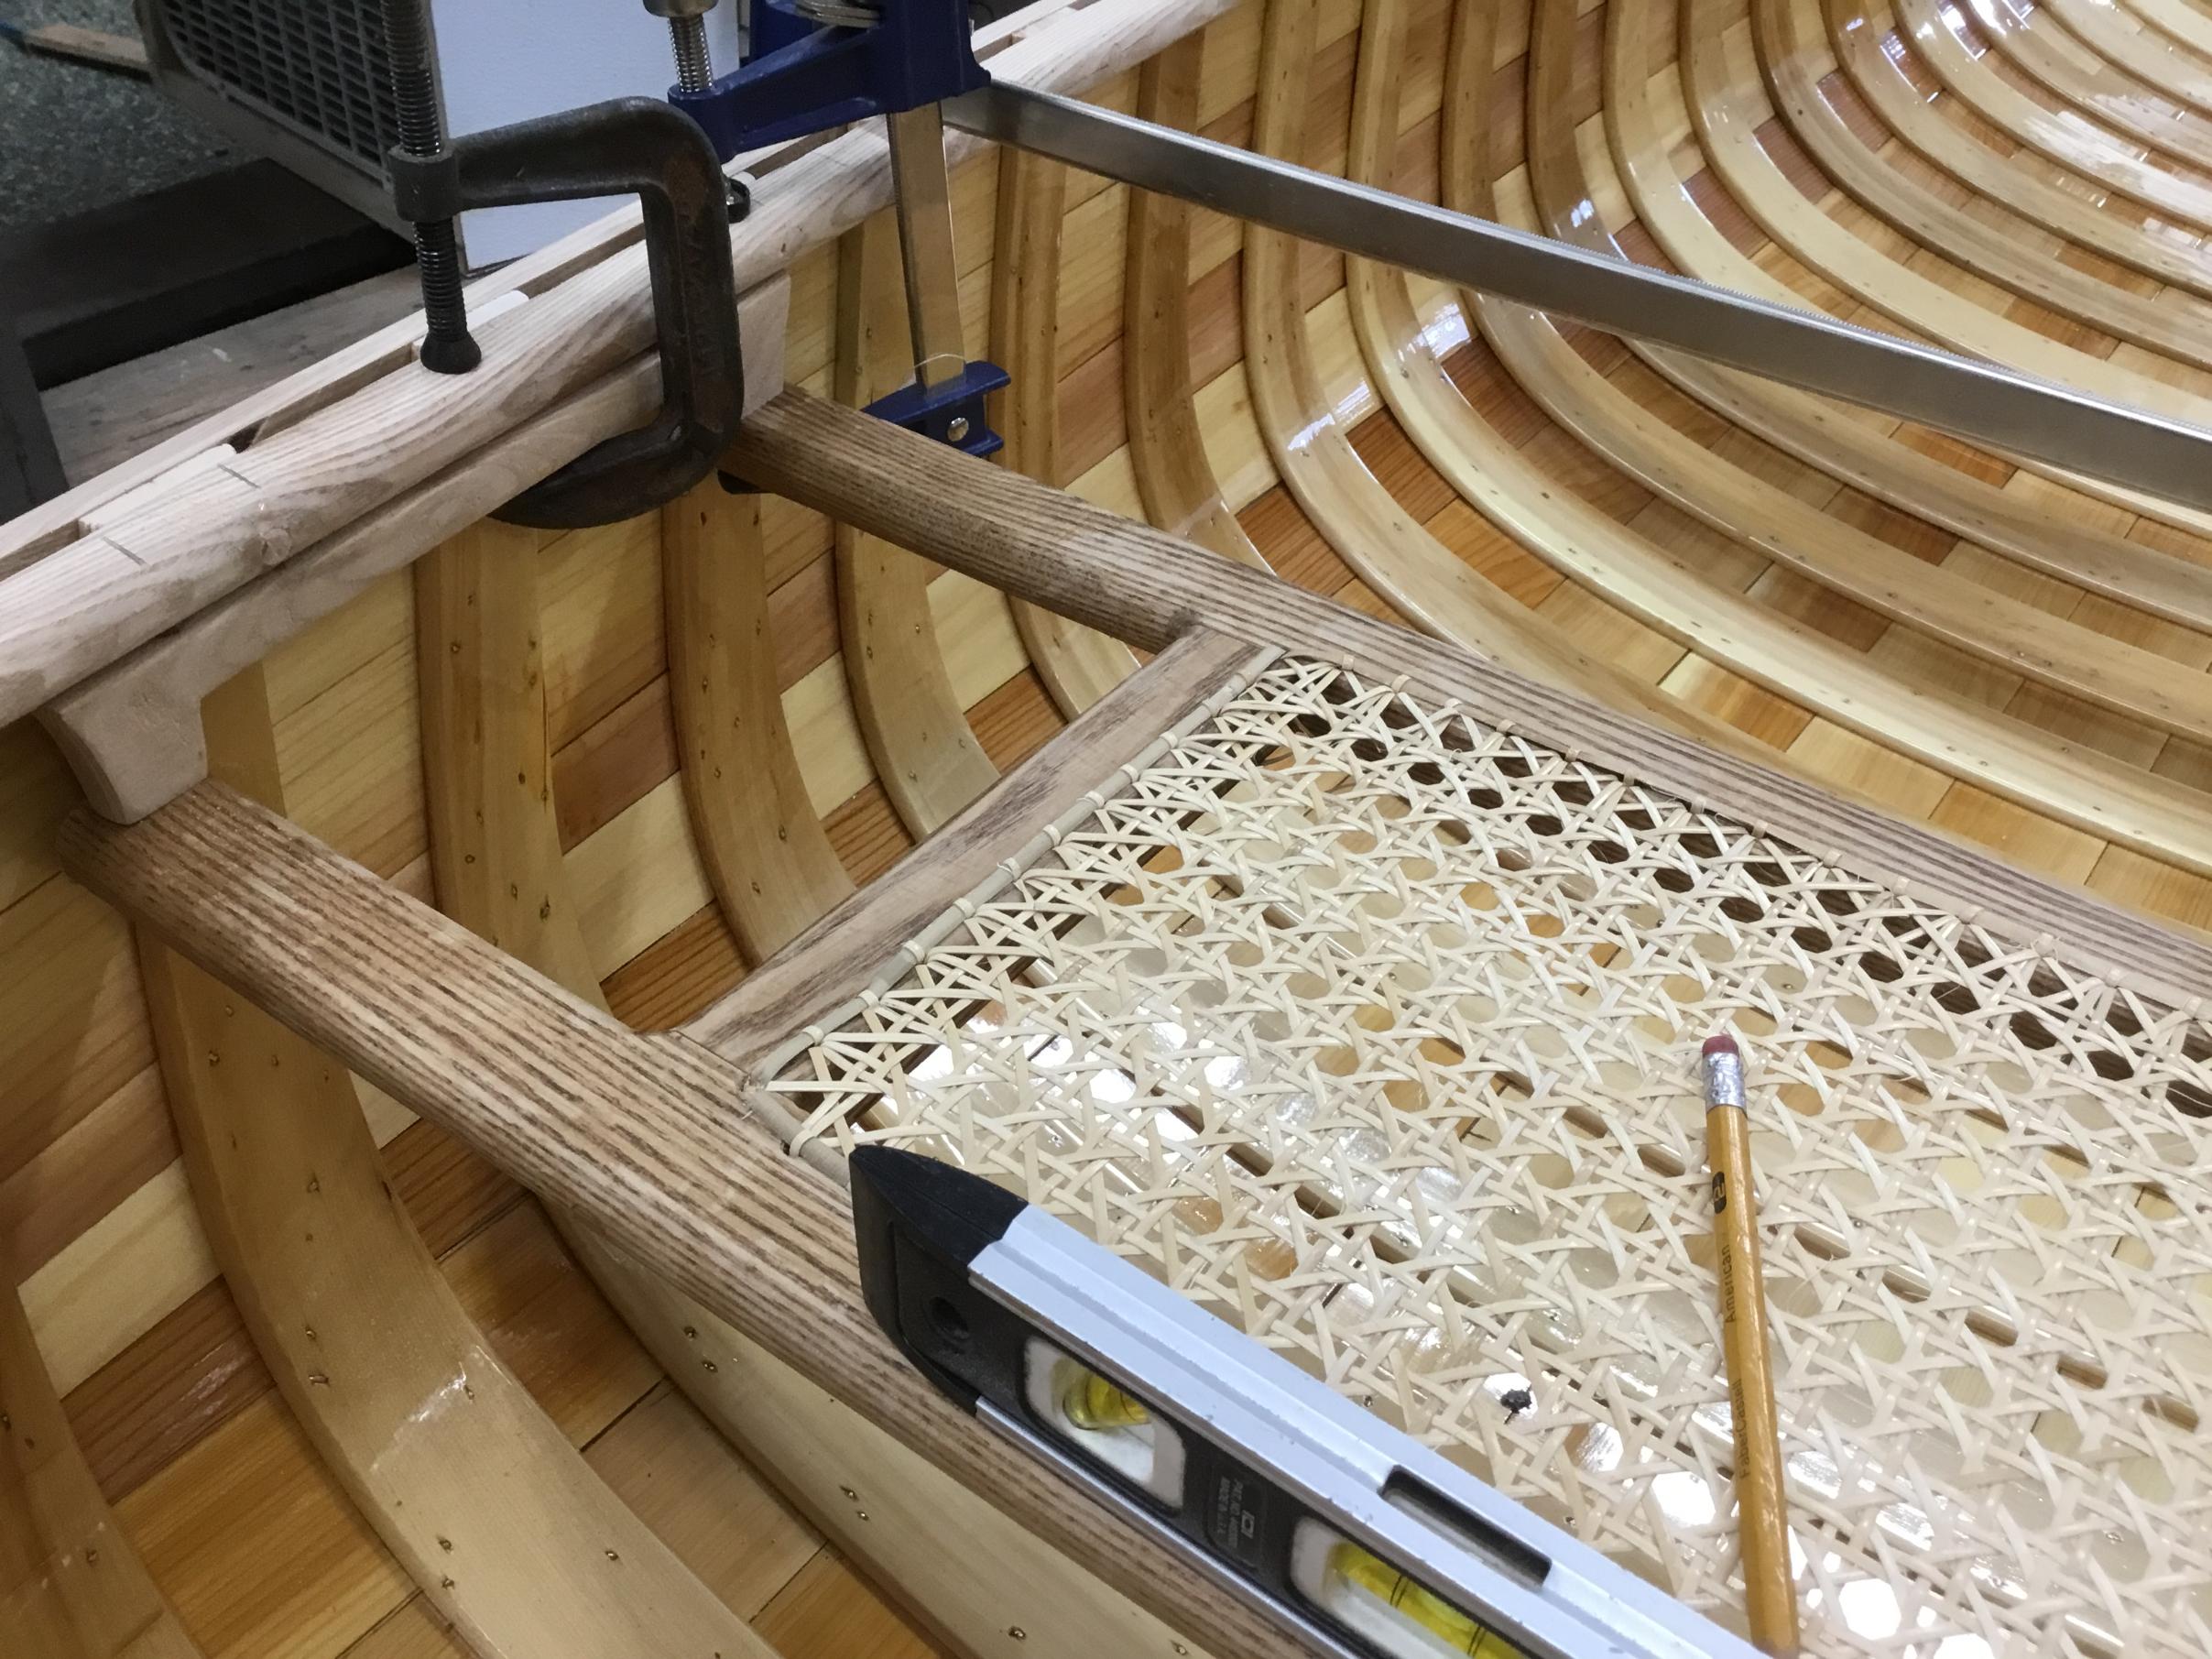
This week I was able to get the gunwales and decks rough sanded. They are looking good but still need some attention to get them perfect. The final sanding will be 220 grit sandpaper before I apply several coats of Watco linseed oil.
I also fit the hand-caned seats into place.

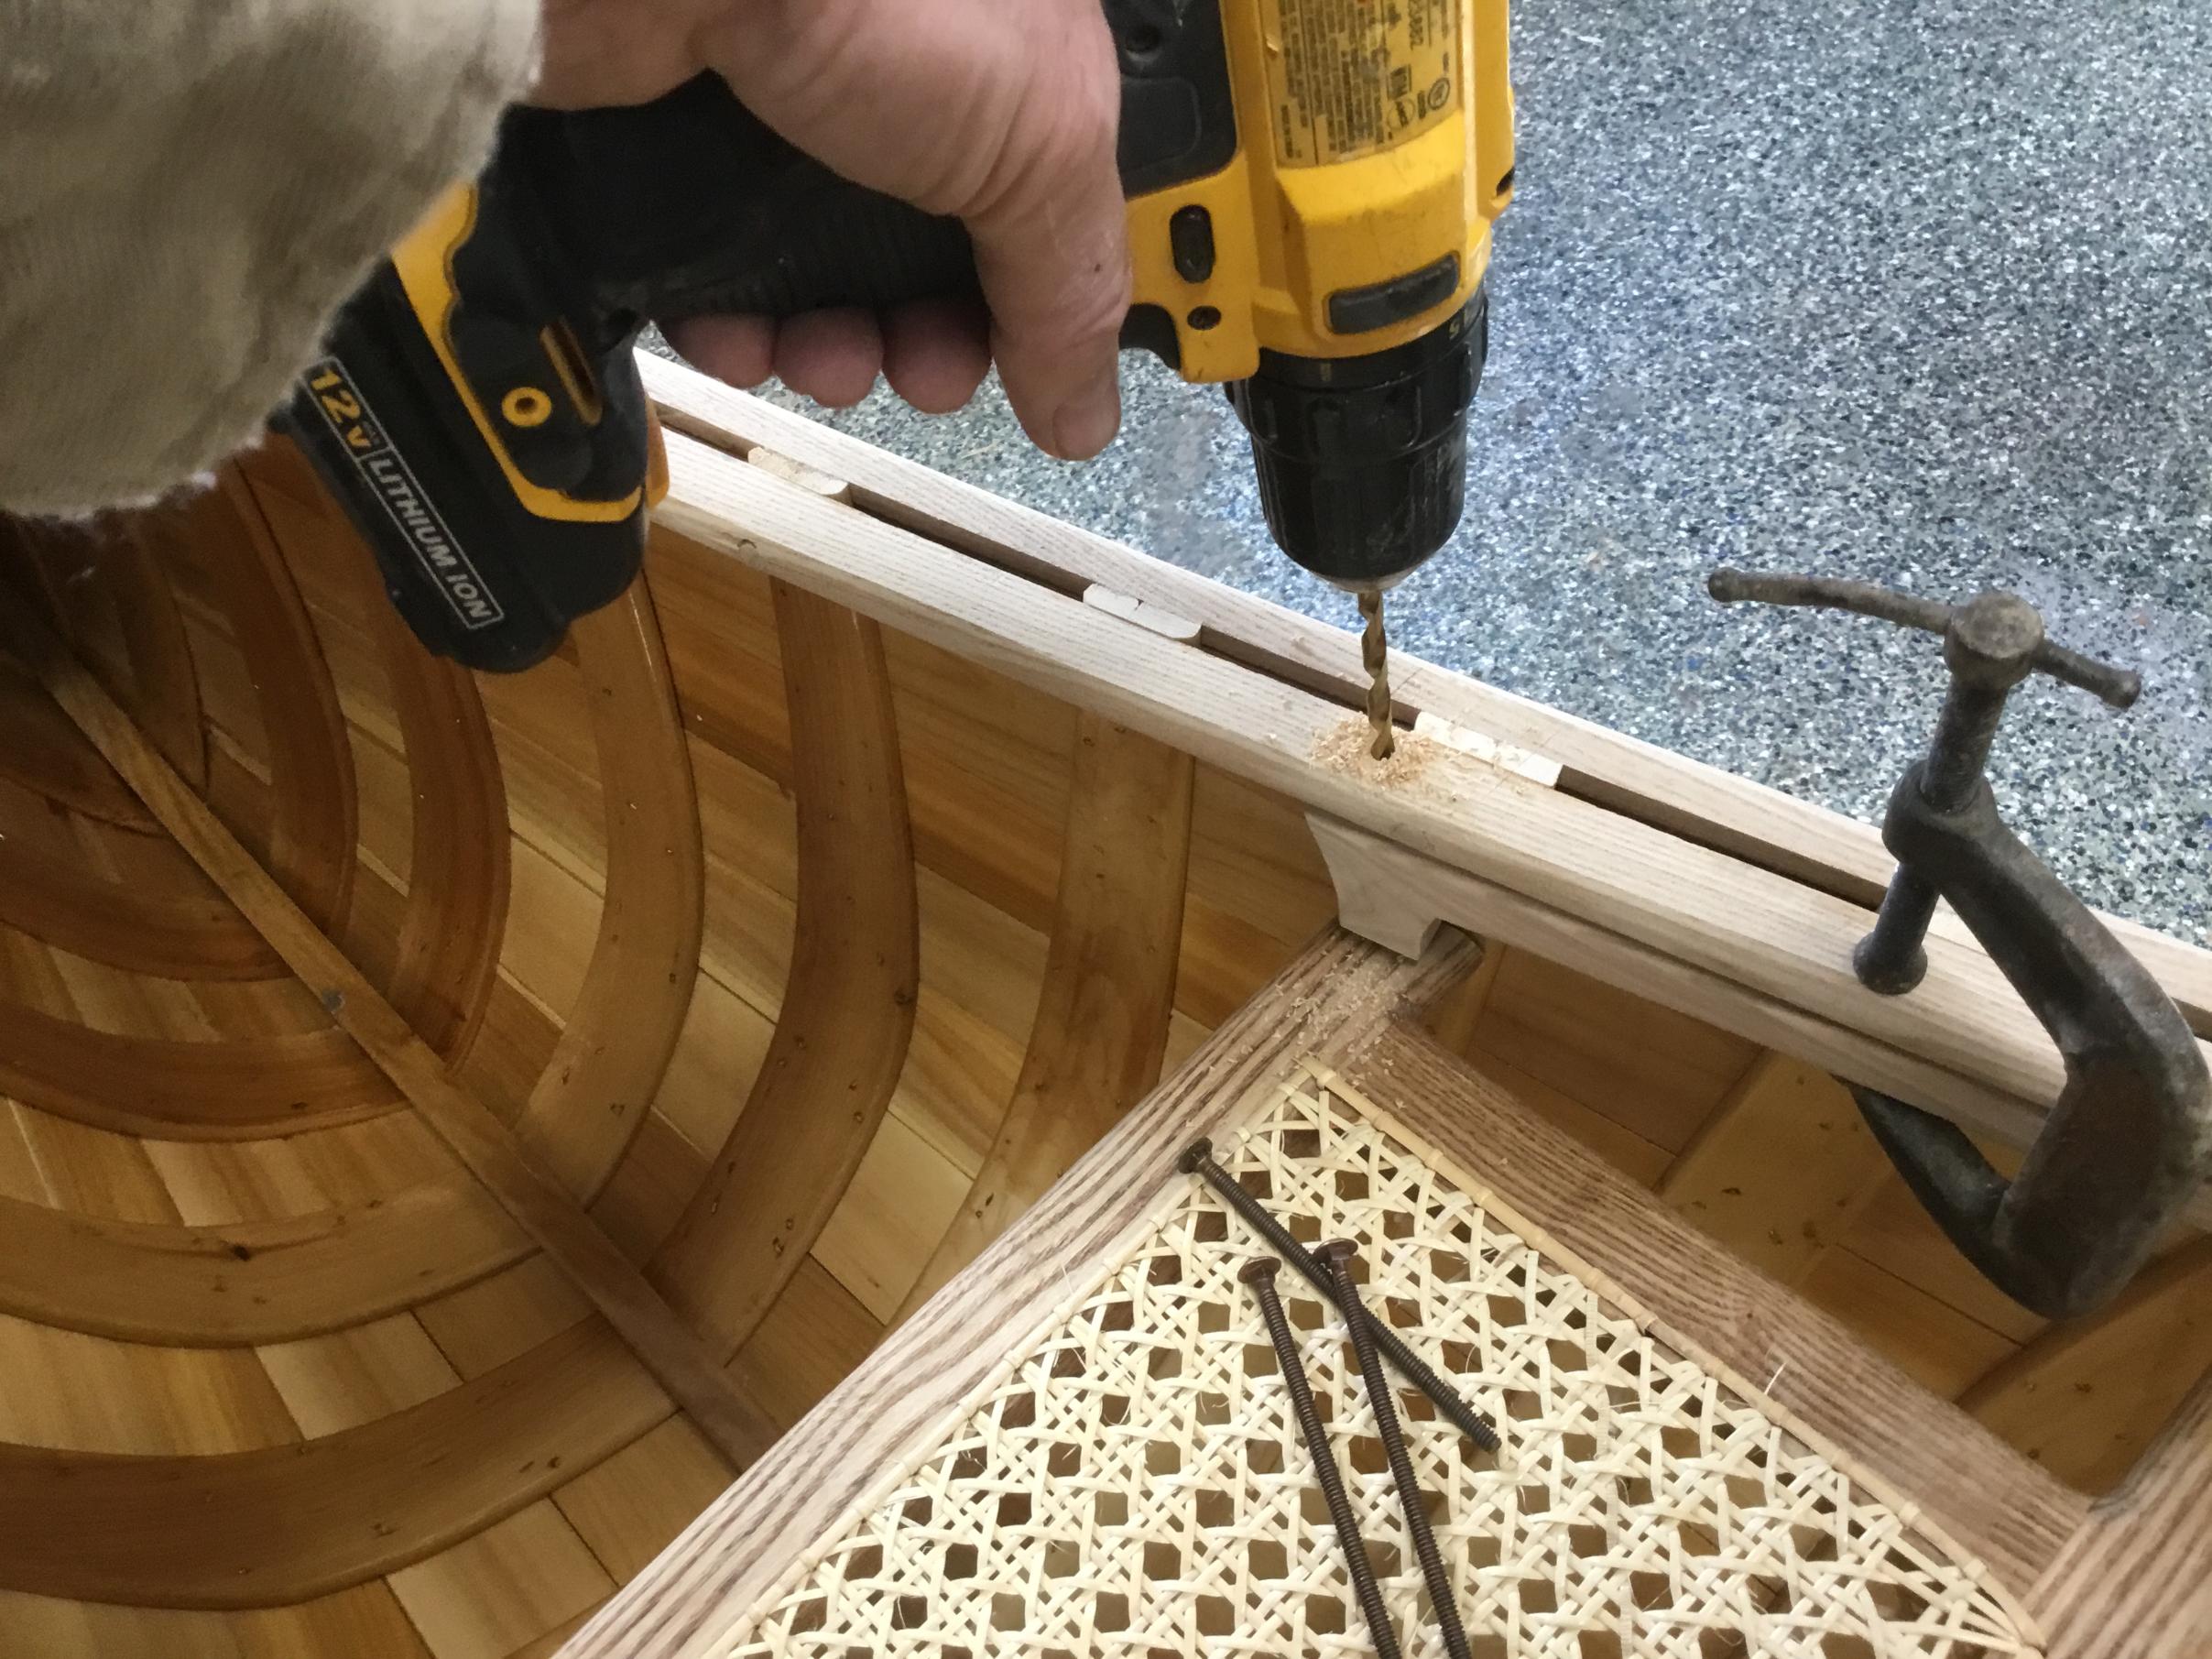

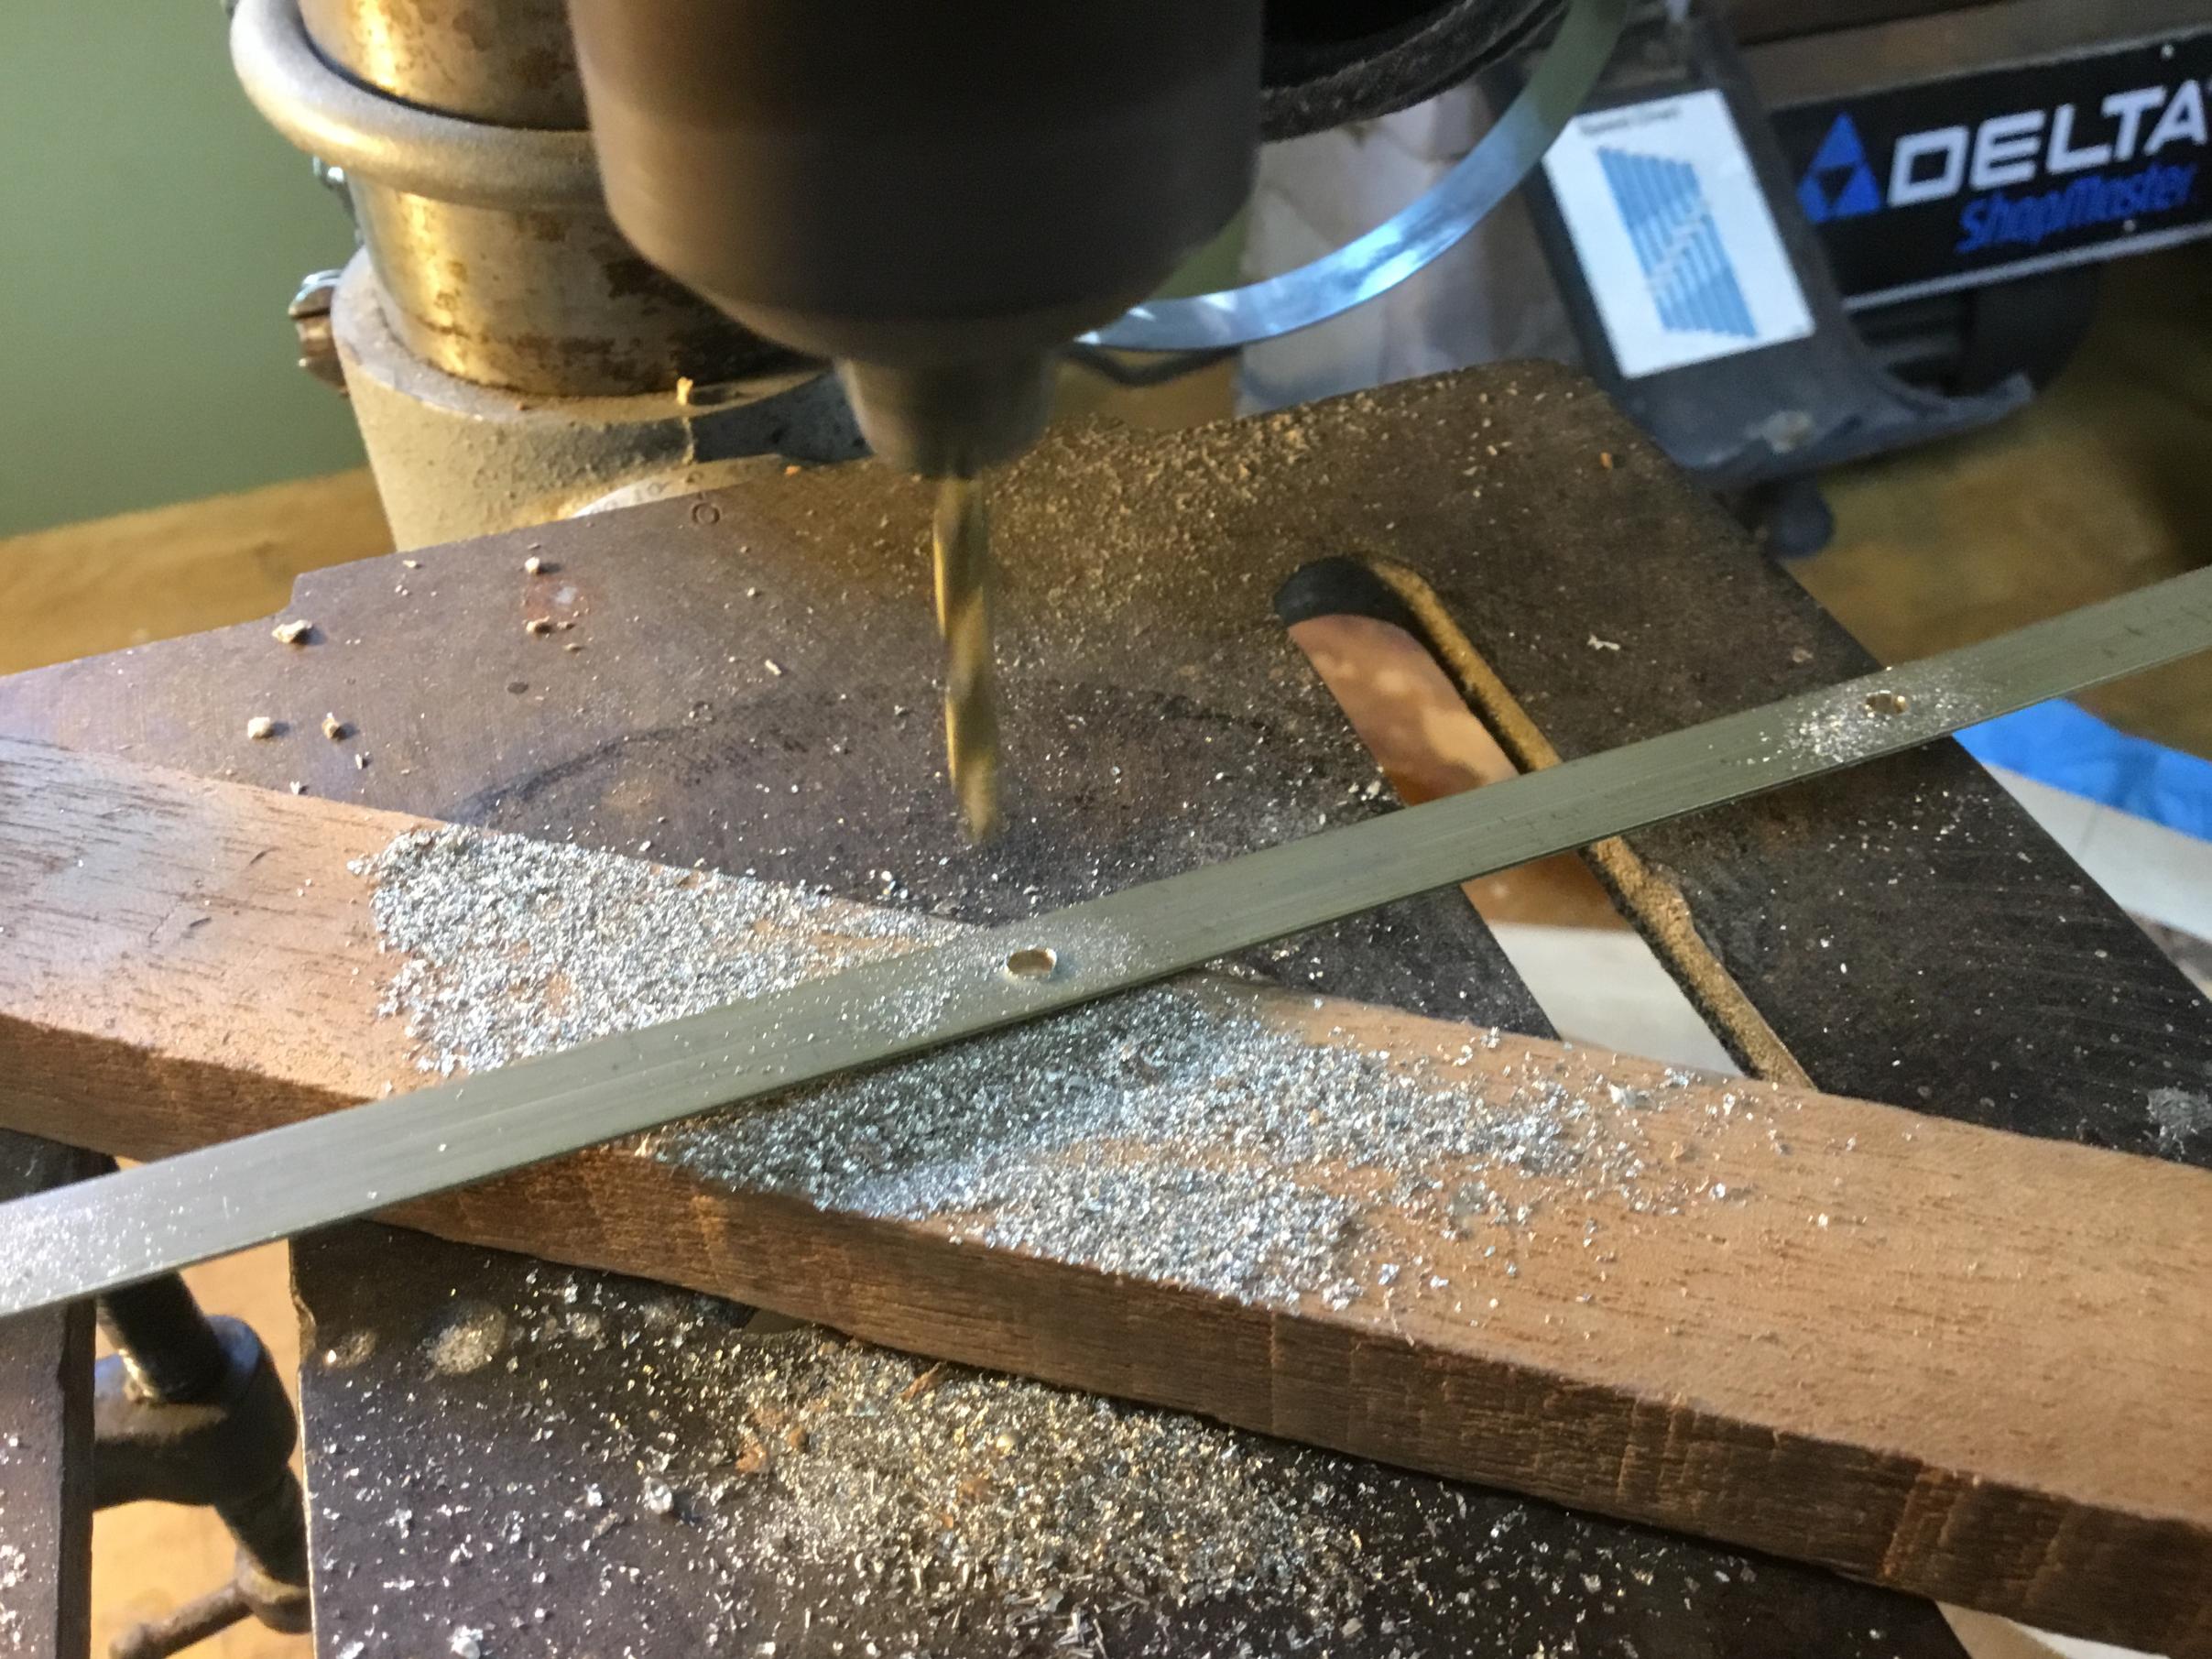
And I also had time to drill the holes in the stem bands that get installed at the very end. Since the stem band is oval on top, I drill the pilot hole through the brass on the flat side on the back of the stem band, this way, the drill bit will not wander on the curved top of the stem band. The countersink hole is then drilled through on the front side.
The stem band is rather brittle at this point and will break in half if I try to bend it on the holes. There is an easy trick to getting it installed on the canoe that keeps it all intact which I will show when it comes time to install it. Once it’s on the canoe it will last for decades.

I think I will get it painted by next week. It’s going to look bad-azz! And then just some final touches before I hand it off the the Friends of the Boundary Waters. Protecting the wilderness
I still have a Merlin that I want to re-glass on the outside after 20+ years of intense rugged use. And there is talk of another builder wanting to build an Atkinson Traveler wood canvas canoe that I want to observe during its construction.
|
03/02/2021 06:01AM |
tumblehome: "2-27-21
The stem band is rather brittle at this point and will break in half if I try to bend it on the holes. There is an easy trick to getting it installed on the canoe that keeps it all intact which I will show when it comes time to install it. Once it’s on the canoe it will last for decades "
Having broken one in my last build- I’d like to see how!;)
|
03/02/2021 09:57AM |
|
03/02/2021 12:07PM |
Then I put the first screw in the end of the stem band and pull it tight along the stem as I screw it to the canoe. By keeping it tight on the canoe, it won’t try to bend at the holes. If it starts to want to bend at a screw hole, I use finger pressure to bend it and not let the bend occurs at a hole, or snap...
I’ll post pictures when I put it on this weekend.
Tom
|
03/08/2021 07:52AM |
Lots of waiting for things to dry this week. The hull is painted. The gunwales are oiled. Trim is installed. I will get the brass stem band on this week. Lots of little things to clean up now. Little details. Almost there.


|
03/08/2021 06:47PM |
What are the auction details?
|
03/08/2021 05:02PM |
|
03/14/2021 03:36PM |
Great looking boat
|
03/12/2021 05:39PM |
It’s just about done. I’ll have pictures of the finished canoe this weekend.
I have the brass stem band on the canoe now. First I used channel locks on the spot where the brass bends from the deck down the hull. The stem band bends easily without breaking on the solid portion of the stem band. If I were to bend it where a screw hole is drilled, it will immediately snap.


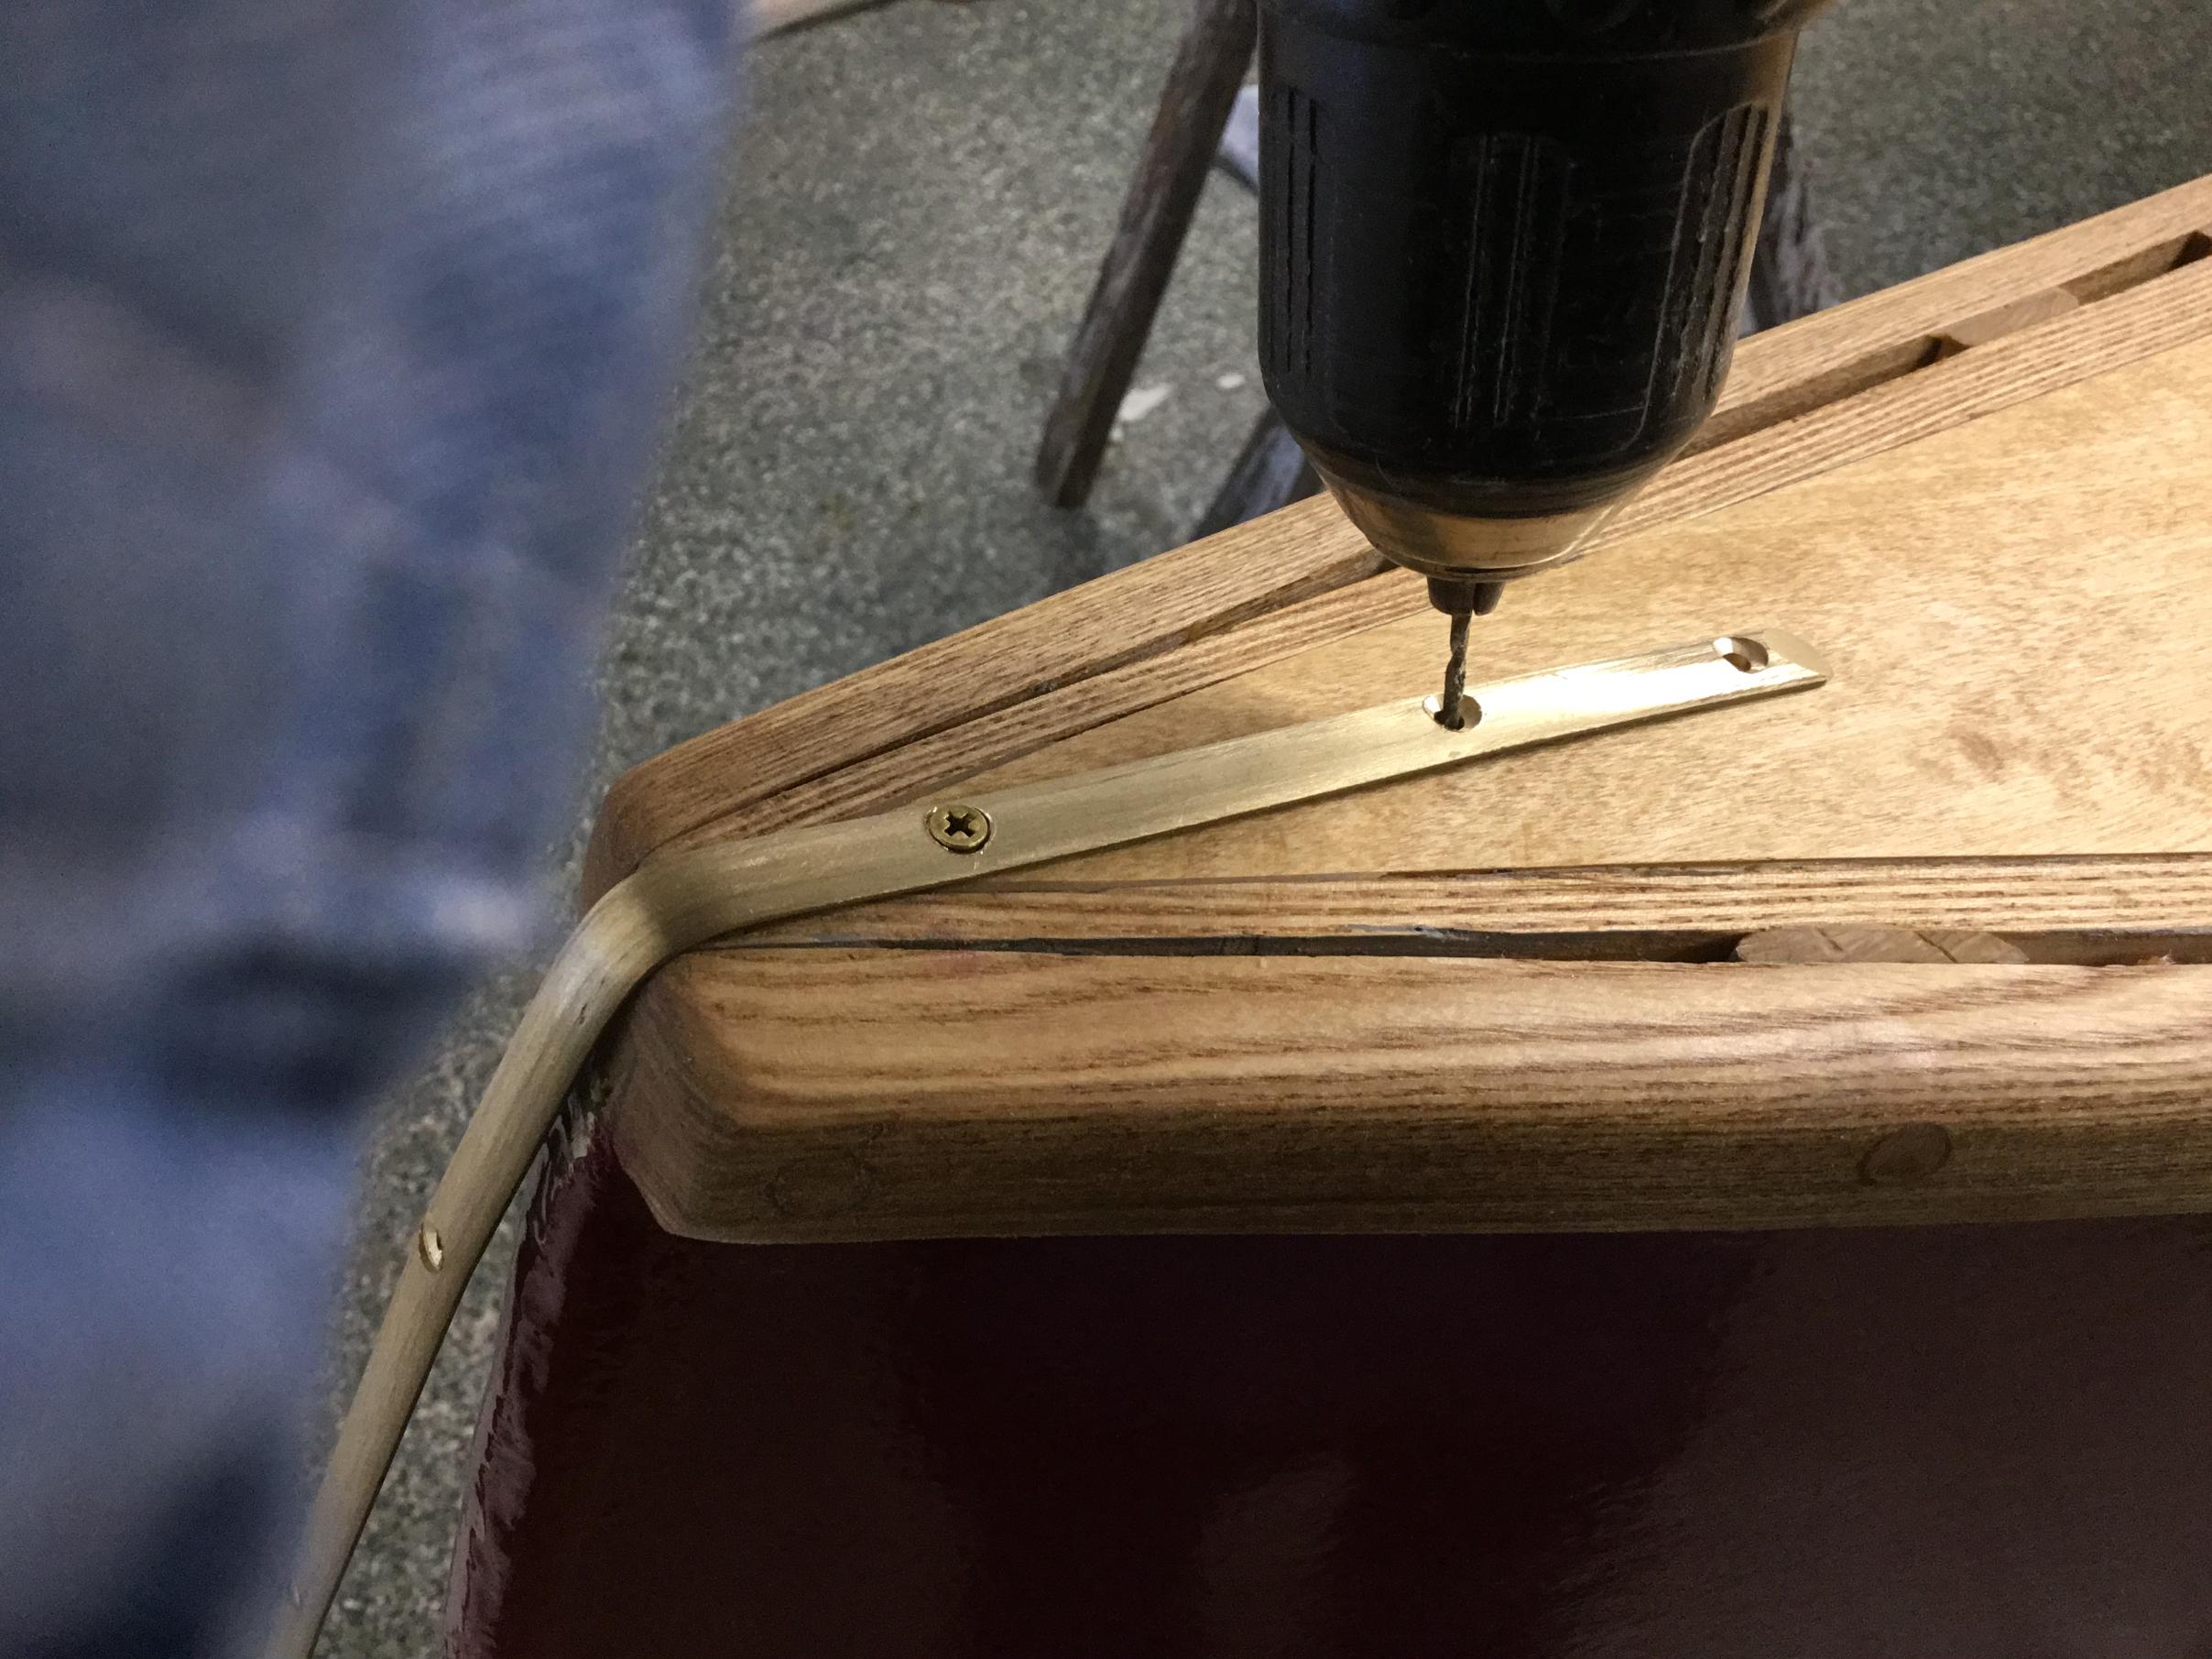
I am using #4 brass wood screws. I would prefer bronze screws since they are much harder but I can’t find them. So brass it is. A pilot bit is required and a gentle hand on the drill gets every screw in without breaking.
To prevent the stem band from breaking at a screw hole as it is installed, I pull hard on the stem band as I pull it down the curve of the hull never letting it bend on a screw hole. I drill one or two pilot holes at a time and install screws. I made up a little batch of West System epoxy mixed with some wood flour and smeared a little into the pilot hole as well as dabbed some on the threads of the screw. This ensures that the finished screw placement is forever water-proofed.


|
03/12/2021 07:18PM |
|
03/12/2021 09:41PM |
Thanks for taking us along on your journey of building such a nice canoe !
Looks great !
|
03/14/2021 08:50AM |


The canoe weighs 64 pounds.
I spent more than 100 hours building it.
Making and caning the seats was about 18 hours alone.
I Cut all the ribs and planking late last fall. That had to be 15 hours.
The actual cedar cost was less than $200. It is only a very small price of the overall canoe. Buying the best wood I could find meant waste was probably only 25% which is pretty good IMO. It made good kindling to start the wood stove.
I probably spent $1200 building it which includes all the consumables such as sand paper, gloves and all the stuff people don’t usually count when building a canoe. I spent a fair about on heat since it was built in the dead of winter. The wood stove was kept burning most of the time supplemented by the propane furnace.
Paint, hardware, vanish, oil. Other things that add up. Just the tacks on this canoe were about $140 and the bronze carriage bolts totaled $60. It all adds up!
The actual wood hull was 37 pounds before canvas and everything else.
I think the lines on this canoe are stunning and it is really pretty to look at. I hope to take it out on Lake Superior next week if the water is calm. There is no other open water in Northern MN right now.
I’m really glad I’m done building it. Time for my next project....whatever that might be.
Thanks for following me along on this project. I now have 10 wood canoes at the house. Sigh.
Tom
|
03/14/2021 10:51AM |
Tom !
If you, like me, had more Storage ? You'd have 10 more canoes ! Ha !
Hope you find open calm water soon !
Jim
|
03/14/2021 02:02PM |
1JimD: " Great Build Thread, and canoe
Tom !
If you, like me, had more Storage ? You'd have 10 more canoes ! Ha !
Hope you find open calm water soon !
Jim"
Thanks Jim for following along. It was fun to document the process.
I can fit more canoes in my basement/ heated and spacious crawl space so I ain’t done yet!!
Tom
|
03/14/2021 05:12PM |
There are some builders making this type of canoe either with the canvas or a clear outside with glass/epoxy. They are really pretty.
I would have to be more diligent in building the outside if I were to do that since I am allowed to hide mistakes under the canvas whereas with the the glass you can’t do that. All the tacks have to be orderly in neat rows :)
Tom