I finished a 'Fat Fifty, Ammo Can Stove' about a month back, and, because of the holidays, finally got to take it for a test burn now.
First, I decided to use the idea from
this youtube video , though I did take my time, and also made a few changes.
I used a 50 cal.
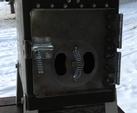
'Fat Fifty' ammo can, as the dimensions seemed right for my needs.
The existing spot welds on the can did not pop loose as they did in the video, so I left some of the extra metal on the can. Also, the double layered lid did not come apart, so I made a new top from 22-24 ga. steel. The new top seals better than the old one would have anyway. Not being able to separate the layers of the old lid would have made the stove less hot on the top, and more hot on the sides, with more heat being wasted to the stove pipe.
I used lighter, aluminum angle fold-up legs. The stove doesn't get hot enough at the bottom to hurt the aluminum legs,
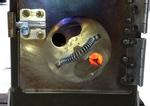
A short piece of 3" exhaust tube worked perfectly for the 3" stovepipe base.
I had a heavy piece of 1/4" aggregate screening mat'l that I used for a grate inside, to pro-long the life of the bottom of the stove.
I used 3/16" steel rivets for some of the work, since I didn't have the proper sized wire for my welder for that thin of metal. I sealed the holes in the rivets with an epoxy putty to keep the dabs of smoke from leaking through into the shelter.
The test burn went very well, and I was surprised at how much heat this little stove would put out. My intentions were to burn off some of the paint and zinc from the stove and stovepipe. I accomplished this, though it will still expel some fumes on future burns.
If I would have let it, the stove would have glowed red. I of course did not want it to warp badly on the first burn, so I kept it throttled back some. The sides bulged a little, and luckily the top warped only slightly downward, rather than upward, which would have meant an uneven cooking surface.
The cooking surface is large enough for a 9" pot or pan.
Sorry for the crappy, Iphone photo's which were taken in poor lighting.


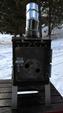
I did the test burn using one adjustable elbow, and regular 3" stovepipe, instead of using my telescoping stovepipe, as I was tesing the stove and not the pipe. My next test burn will be with the telescoping stovepipe, as there will most likely be different results using a pipe that narrows from 3" to 2" at the top.
I am planning to use this stove in a canvas tarp-shelter that I'll construct at a later date.
This stove probably cost me about $30 to make, but mostly was a joy to work on during these winter months.
 Boundary Waters Quetico Forum
")


 Search BWCA.com
 Donate