|
 Boundary Waters Quetico ForumGroup Forum: Do It Yourself GearFirst Ti Stove Build
|
 Forum Sponsor

Author
Text
")

12/25/2014 10:25PM
I've never worked with titanium before. It's not bad but you have to know which ti to use, and it's expensive so it will cost you if you screw up.
I built this ti stove lately and am pretty happy with the way it turned out. I wanted one that breaks down into pieces so it could be packed in a canoe pack and take along on those cold and wet shoulder season trips. I very briefly considered making one of the "foil" stoves but to be honest, those things scare the heck out of me.
I used a few ideas from other stove makers and changed some things to my liking. I bought a steel 4"-3" nesting stove pipe from Kni-co and made a tube type spark arrester as well.


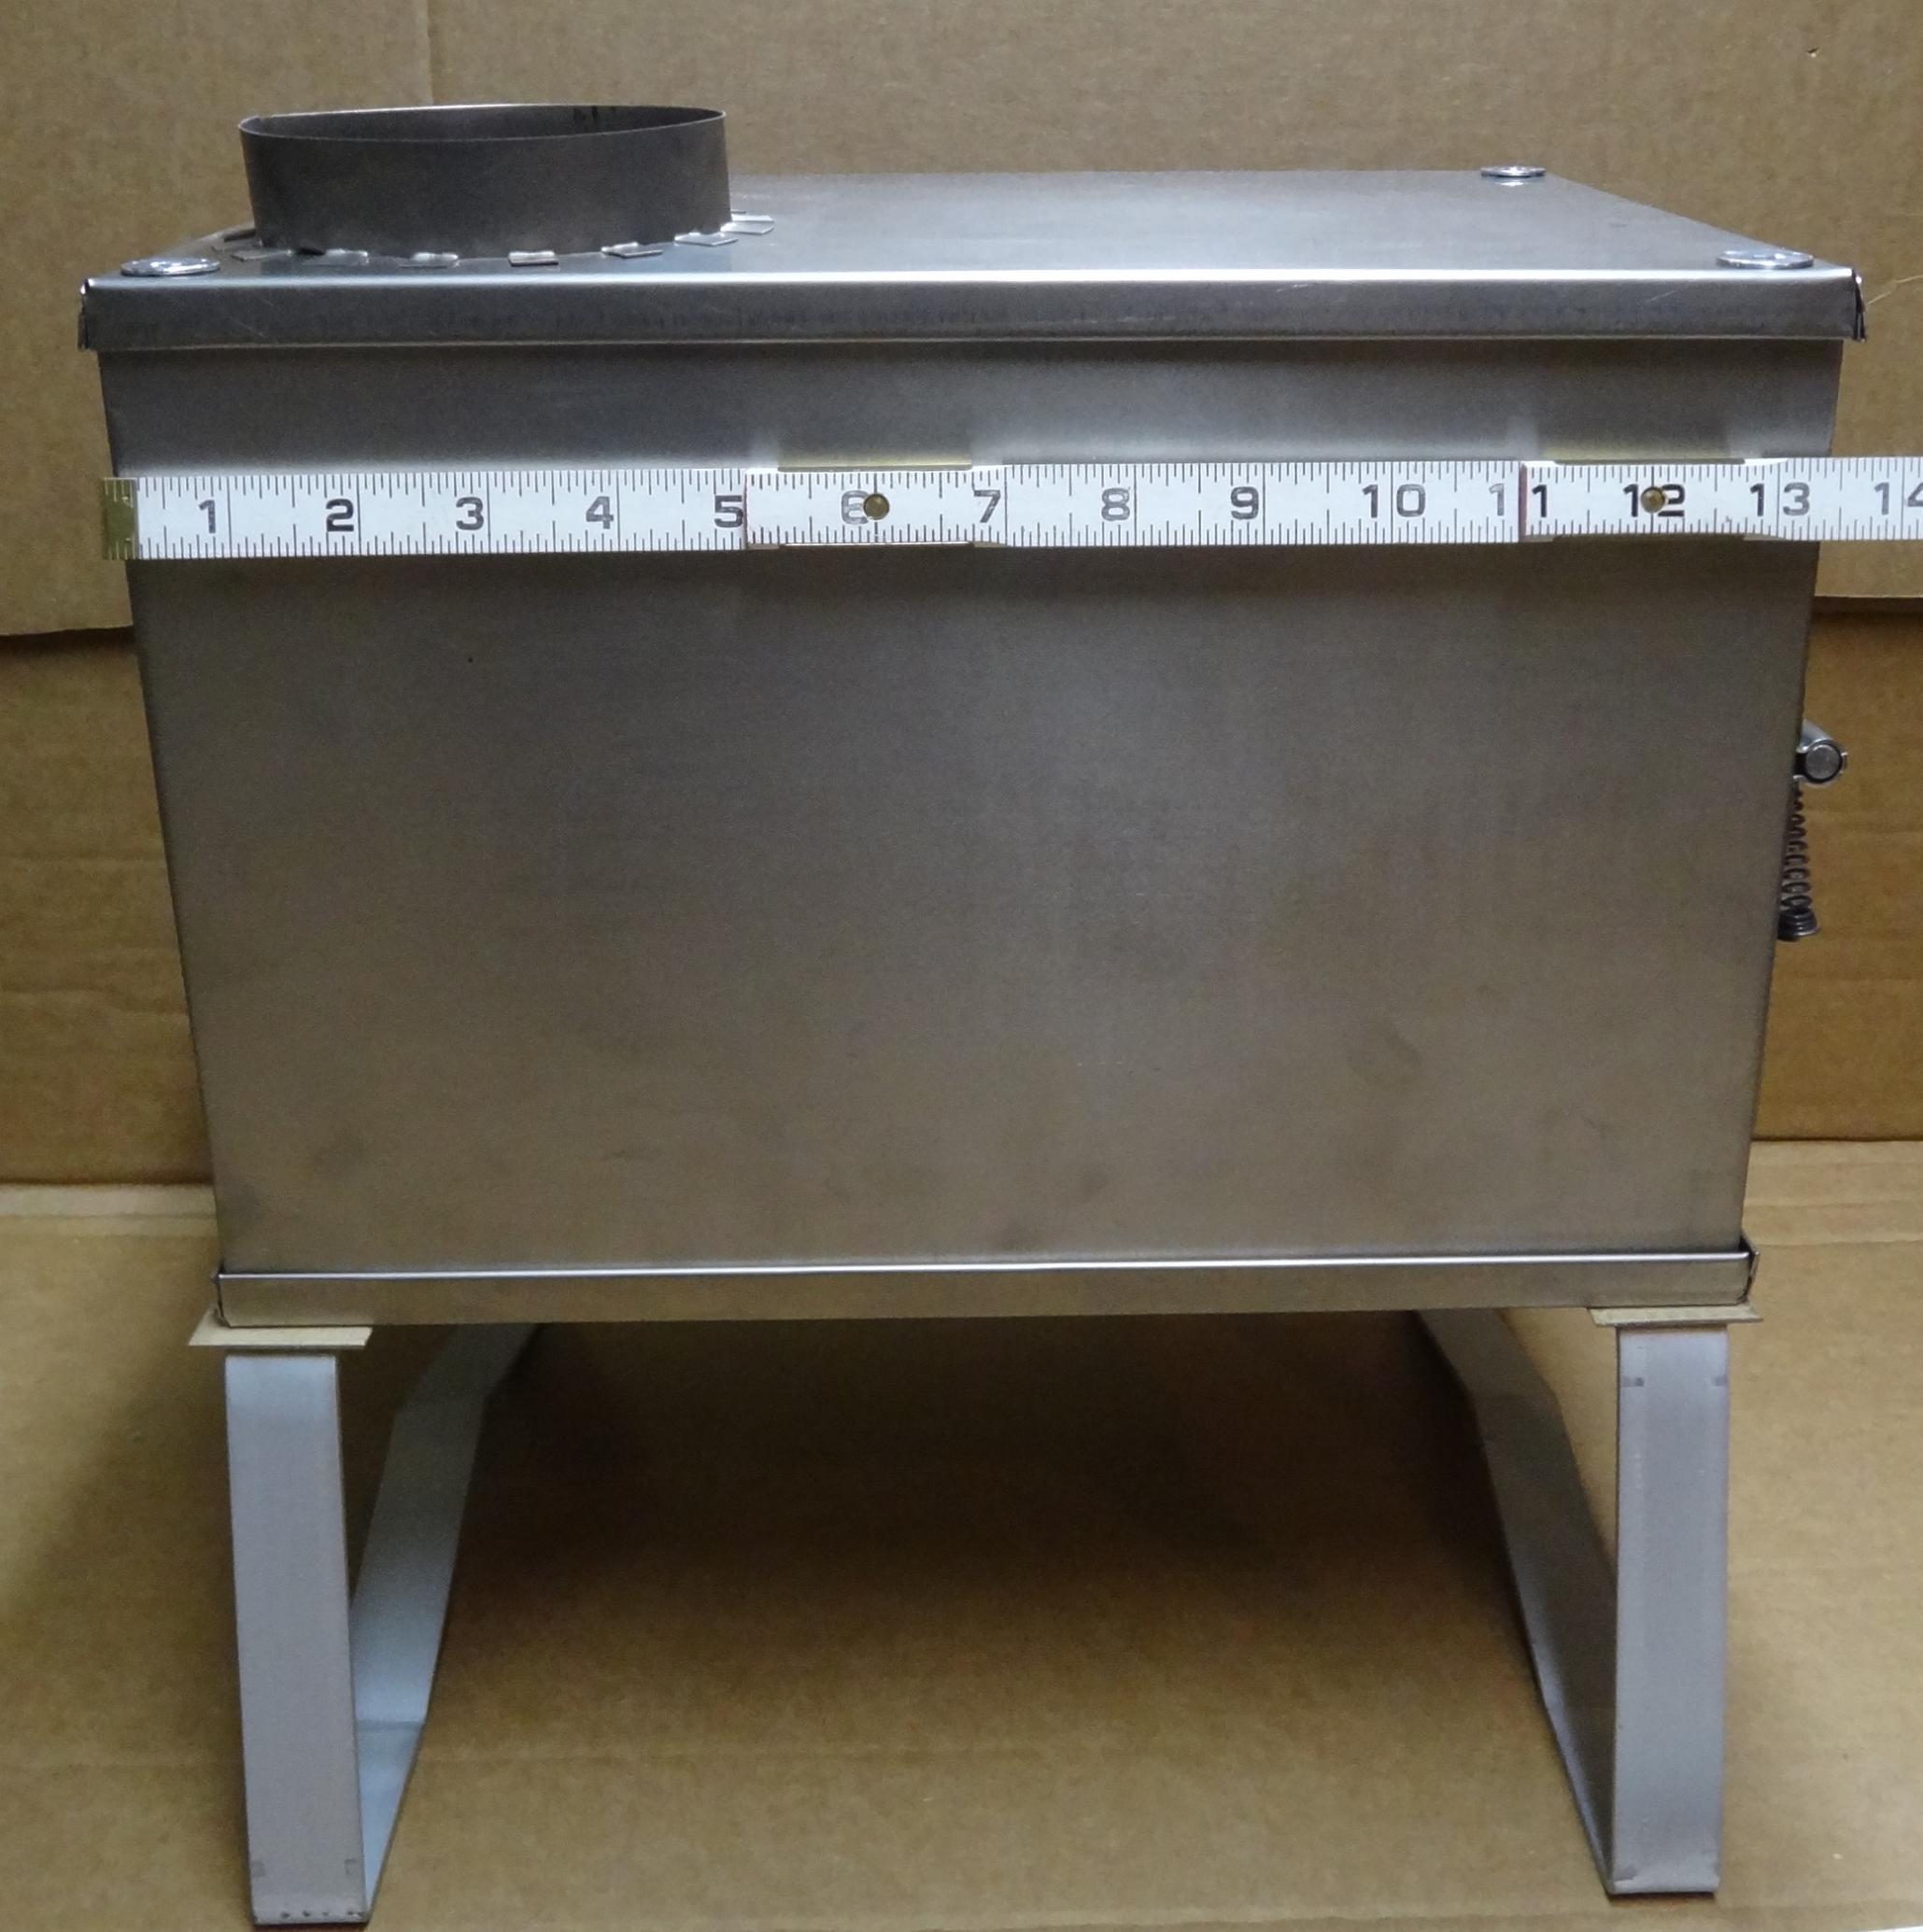
The fire box is 9.5" W, 9" H and 13.5" D
The legs are 5.25" high and made of aluminum. I used fireproof gasket mat'l between stove and legs, but will test it with a hard burn to be assured that they won't get too warm.
The entire stove weight is 4 lbs 15 oz.
I plan to make a case from pack mat'l to slide the pieces into for traveling.
I built this ti stove lately and am pretty happy with the way it turned out. I wanted one that breaks down into pieces so it could be packed in a canoe pack and take along on those cold and wet shoulder season trips. I very briefly considered making one of the "foil" stoves but to be honest, those things scare the heck out of me.
I used a few ideas from other stove makers and changed some things to my liking. I bought a steel 4"-3" nesting stove pipe from Kni-co and made a tube type spark arrester as well.


The fire box is 9.5" W, 9" H and 13.5" D
The legs are 5.25" high and made of aluminum. I used fireproof gasket mat'l between stove and legs, but will test it with a hard burn to be assured that they won't get too warm.
The entire stove weight is 4 lbs 15 oz.
I plan to make a case from pack mat'l to slide the pieces into for traveling.
“The more you know, the less you carry” Mors Kochanski
12/26/2014 07:59AM
quote wingnut: " Very nice work. What type of rivet did you use for attaching hinges and latch."
Thanks. I used countersunk brass rivets. A little time consuming, but they work well otherwise.
“The more you know, the less you carry” Mors Kochanski
12/26/2014 11:14AM
quote Ragged: "Very very nice! Any worries about bowing without ribs of some sort to keep it straight? "
Thanks.
I considered this but didn't recall other people having a problem with permanent warping on a ti stove. Not to say that it hasn't happened. Now is the time that I would like to hear about where I might need them though, as the metal is still straight.
Two other things that may be of concern are the brass rivets and the aluminum legs. I won't burn any stove cherry red either way, so I think that I'm ok with the brass rivets. I have tacked the bottom of a stove pipe at the seam and have never had it melt, so I really think that the rivets are fine, especially given their location. If however I include any ribs to curb warping, they may need to be attached with stainless rivets.
With the aluminum legs being underneath, and since I have fireproof gasket mat'l in between, I believe that I am safe there as well.
“The more you know, the less you carry” Mors Kochanski
12/26/2014 12:34PM
very nice
an advantage with SS rivets would be less galvanic action, but since it is something you assemble/take down you will be aware of that if it becomes a problem
IMO, the AL legs will become hot despite the insulation, convection, radiation. just as long as you are aware that it could get hot, shouldn't be a problem, just not something you'd want to sell to the public
let science, not politics decide, ... but whose science?
12/26/2014 01:20PM
I have to agree with legs getting hot, at least hot to the touch. Not a good plan if one doesn't shovel down to ground beforehand... a sinking stove is not good. I made the legs to accept logs for flotation, but there is no way to attach the logs to the legs. I may have to create a loop that the logs slide into. I thought of using a spring over the top of the log, but a spring is a spring and that would allow too much movement. I'll think of something.
I didn't go with SS rivets from the start because they would be so much harder to set. I'm just setting these with a hammer and rivet setting punch. Nothing technical here.
I didn't go with SS rivets from the start because they would be so much harder to set. I'm just setting these with a hammer and rivet setting punch. Nothing technical here.
“The more you know, the less you carry” Mors Kochanski
12/26/2014 04:00PM
Nice work.
For my home built stove, which is made from steel, I used legs that will perch on top of logs. I think the idea came from Winter Walkers Companion. I'll try to describe. They are pieces of steel approximately 22 inches long, bent into a 90 degree. Each leg of the 9 is 4 or 5 inches long. Then there is a notch cut out from the bend side where the stove perches. So the free end of each leg sits on the ground. If sinking into the snow is a concern, they will sit on top of a log, provided the log is large enough in diameter to prevent contact with the stove bottom.
Wouldn't pack down as small as your existing legs, but I think you could make them work in a pack. My stove isn't collapsible so they nest inside with the stove pipe.
The more you know, the less you need
12/27/2014 12:05AM
quote motdur: "Impressive! Where did you pick up the titanium? Can you share the total cost?"
Thanks.
I got a couple different pieces from two different sellers on ebay. One was CP grade one, and one was CP grade two. One was .020" and one was .025". They were both single pieces that sellers had as leftovers so I doubt they have more. The key was to keep watching 'til they show up. I think that I have about $160 into it... less than if I had bought new though. As I understand so far, CP grades 1-5 are malleable and 6AL 4V (which is more common) is not. If you try bending 6AL 4V at a sharp 90* it will fracture the metal.
“The more you know, the less you carry” Mors Kochanski

12/27/2014 04:08PM
Well, I test burned my stove and all went well. It's still cooling down, and I'm anxious to see how much permanent warp-age there'll be.
The legs got hot for an inch down from the stove but not so much to melt. Either way, I feel that I'll need to come up with a different leg design... something made from ti... maybe. Eventually it got hot right below the stove. I had it on a piece of plywood instead of on the ground. The plywood was quite hot to the touch. Might have to make a reflector pan or at least buy a fireproof mat. I suppose that it would help a lot to have a tray inside the stove. That would stop some of the heat from going down.
The legs got hot for an inch down from the stove but not so much to melt. Either way, I feel that I'll need to come up with a different leg design... something made from ti... maybe. Eventually it got hot right below the stove. I had it on a piece of plywood instead of on the ground. The plywood was quite hot to the touch. Might have to make a reflector pan or at least buy a fireproof mat. I suppose that it would help a lot to have a tray inside the stove. That would stop some of the heat from going down.
“The more you know, the less you carry” Mors Kochanski
12/28/2014 08:03PM
quote DanCooke: "Nice looking stove. I find the space under a stove extremely useful for drying and Warming the wood that will be going in the stove next. So to have adequate height to put the next split wood under is important to me."
Thanks! Sometimes keeping it simple solves the problem... good plan! I still need to come up with a non-aluminum leg because I'm still a little worried about too much heat for the aluminum to handle. I'm going to call a ti dealer to see how much ti flat bar costs ($$$).
“The more you know, the less you carry” Mors Kochanski
12/30/2014 12:22PM
quote BigZig: "Very nice job PK. Do you have a break press or how did you form such nice bends?"
Thanks.
I have a 5' brake, a 3' jump shear and some hand tools. I plan to add a 24" box and pan brake soon.
“The more you know, the less you carry” Mors Kochanski
12/30/2014 05:26PM
quote PortageKeeper: "quote DanCooke: "Nice looking stove. I find the space under a stove extremely useful for drying and Warming the wood that will be going in the stove next. So to have adequate height to put the next split wood under is important to me."
Thanks! Sometimes keeping it simple solves the problem... good plan! I still need to come up with a non-aluminum leg because I'm still a little worried about too much heat for the aluminum to handle. I'm going to call a ti dealer to see how much ti flat bar costs ($$$)."
SS wouldn't be a bad choice
anybody else go to these guys for metal?
metal supplier
maybe if the demand was there they'd stock Ti
let science, not politics decide, ... but whose science?
01/09/2015 04:47PM
Some changes that I made to my stove...
I got rid of the aluminum legs and made legs from 1/2" X 1/8" steel flat bar. It really only gained about another 1/2 pound and I am much more reassured about the 'hot legs' factor.
After a test burn, the stove bottom was the only panel that warped badly enough to be a concern. I cut the edges off that piece and turned it into a false bottom, then I made a new bottom panel. Now the new bottom panel shouldn't warp near as much.
I made a carry case with compartments for all the stove components that folds up to look like a briefcase. When packed, it measures 12"X15"X4". Of course after making the case I realized that I could have just bought some cheap canvas brief case on Ebay and saved some time. The new stove weight with steel legs, extra bottom panel and case now weighs 7 pounds.
I also made a sack for the nesting stove pipe.


“The more you know, the less you carry” Mors Kochanski

Subscribe to Thread
Become a member of the bwca.com community to subscribe to thread and get email updates when new posts are added. Sign up Here
Community Links
 Search BWCA.com
 Donate
 Featured Sponsor