|
 Boundary Waters Quetico Forum
 Group Forum: Do It Yourself Gear Group Forum: Do It Yourself Gear More Mayhem Molding Minicell (aka: the lightest Solo Yoke?) More Mayhem Molding Minicell (aka: the lightest Solo Yoke?)
|
Author
Text
01/02/2021 11:50AM
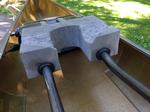
Thought I would document another of my little projects sure to make a traditionalist’s head explode: the Minicell Yoke
Need to give credit - my idea was seeded by this: Single-Carry Portage System
With roots in ultralight backpacking, I go very light on solos - reducing weight is always on my mind, so this concept got my attention. I primarily paddle with a single blade, but I do carry a 220cm Werner CF bent shaft double-blade. While I don’t use it much, when it’s really windy it makes a huge difference. So as it’s always coming on solos anyway - why not get an additional use from something I am already carrying?
I did one solo (& lots of local portaging) using the system outlined in the video and liked it, but I found that the pool noodles were not durable and not terribly comfortable for me.
So I let this stew in my mostly vacuous vertex for a while, and eventually had a concept I thought I could execute.
It relied on the Werner paddle, like the pool noodle concept, and minicell. I had leftover minicell from my Minicell Seat project: a spare 12x13x4 inch piece to work with.
I looked at yoke pad spacing on my tandem and took some measurements of…well, me.
The right outside dimensions seemed (certainly some guesswork here) to be 12.5” x 9”. The U-shaped cutout ended up being 5.75” wide and 6” deep at the top of the curve. For those wondering, my hat size would indicate a very average-sized noggin will need to fit in this yoke.


Next I did a little rough shaping for the top of the trapezius muscles.


Minicell drills pretty well, especially sharp spade bits. I pre-drilled a small pilot hole on each side with a very long & fairly narrow bit, then followed that with a 1 & 1/8th inch spade from each end, having to meet in the middle. This worked surprisingly well; a mistake here would have required a do-over on a new piece of foam. A good drill press would likely be the right tool to ensure accuracy...


Slots were cut into these ’tunnels' with a razor knife, and now the yoke can be mounted on the paddle-half shafts. The back end needed some angled grooves to seat the tops of the paddle blades; there was more trial-and error here than expected, but once done it is rock-solid.


And then…more shaping. Lots of shaping. The Stanley Surform Shaper is the tool. This gets messy fast so the shop vac was in use frequently. There were many test fittings and more shaping, and bit of lite work with a torch smooths the surfaces.


I even shaped it some more after my first solo with it when the Angleworm carries (see trip report DeWormed) revealed a few uncomfortable areas that needed to be filed down. After the second solo (see trip report ReWormed) I can say it is pretty close to perfect.
The yoke really grips the paddle well - it does not move. When on the water and not paddling with the double-blade, I just leave the three pieces assembled as a unit and set it in the back of the canoe.
It takes me about one minute to put the yoke on, and less to take it off. The part that takes the most time is messing with the Bungee Dealee Bobs that secure the butt ends of the paddle halves to the pool noodle sections that serve as mounts on the thwart. Another pool noodle on the rear thwart with a 32” gear tie/twist tie thingy duct-taped to it forms slots to both receive and grip the paddle blades.


One side effect - the canoe sits a few inches higher above me and allows for better visibility, compared to a clamp-on yoke.
A final note - this works with my Trillium (E6 gunwales & wood thwarts) as-is, stock. With my Magic in Aluminum trim, the thwarts were too far apart and I had to buy a new thwart, cutting it to fit a spot a few inches back of the front thwart’s stock position. If you look carefully you can see the holes from the stock location in the gunwales. I imagine Bear and Ted might raise an eyebrow at that modification, but I have seen no difference in any aspect of seating room, hull dynamics, hull integrity or performance.
Finished weight of the minicell yoke is 4.5 ounces.
Now I need to think about what other use I can get out of the yoke around camp…perhaps it can be a pillow in my hammock? :-)
Just yoking.
Need to give credit - my idea was seeded by this: Single-Carry Portage System
With roots in ultralight backpacking, I go very light on solos - reducing weight is always on my mind, so this concept got my attention. I primarily paddle with a single blade, but I do carry a 220cm Werner CF bent shaft double-blade. While I don’t use it much, when it’s really windy it makes a huge difference. So as it’s always coming on solos anyway - why not get an additional use from something I am already carrying?
I did one solo (& lots of local portaging) using the system outlined in the video and liked it, but I found that the pool noodles were not durable and not terribly comfortable for me.
So I let this stew in my mostly vacuous vertex for a while, and eventually had a concept I thought I could execute.
It relied on the Werner paddle, like the pool noodle concept, and minicell. I had leftover minicell from my Minicell Seat project: a spare 12x13x4 inch piece to work with.
I looked at yoke pad spacing on my tandem and took some measurements of…well, me.
The right outside dimensions seemed (certainly some guesswork here) to be 12.5” x 9”. The U-shaped cutout ended up being 5.75” wide and 6” deep at the top of the curve. For those wondering, my hat size would indicate a very average-sized noggin will need to fit in this yoke.


Next I did a little rough shaping for the top of the trapezius muscles.


Minicell drills pretty well, especially sharp spade bits. I pre-drilled a small pilot hole on each side with a very long & fairly narrow bit, then followed that with a 1 & 1/8th inch spade from each end, having to meet in the middle. This worked surprisingly well; a mistake here would have required a do-over on a new piece of foam. A good drill press would likely be the right tool to ensure accuracy...


Slots were cut into these ’tunnels' with a razor knife, and now the yoke can be mounted on the paddle-half shafts. The back end needed some angled grooves to seat the tops of the paddle blades; there was more trial-and error here than expected, but once done it is rock-solid.


And then…more shaping. Lots of shaping. The Stanley Surform Shaper is the tool. This gets messy fast so the shop vac was in use frequently. There were many test fittings and more shaping, and bit of lite work with a torch smooths the surfaces.


I even shaped it some more after my first solo with it when the Angleworm carries (see trip report DeWormed) revealed a few uncomfortable areas that needed to be filed down. After the second solo (see trip report ReWormed) I can say it is pretty close to perfect.
The yoke really grips the paddle well - it does not move. When on the water and not paddling with the double-blade, I just leave the three pieces assembled as a unit and set it in the back of the canoe.
It takes me about one minute to put the yoke on, and less to take it off. The part that takes the most time is messing with the Bungee Dealee Bobs that secure the butt ends of the paddle halves to the pool noodle sections that serve as mounts on the thwart. Another pool noodle on the rear thwart with a 32” gear tie/twist tie thingy duct-taped to it forms slots to both receive and grip the paddle blades.


One side effect - the canoe sits a few inches higher above me and allows for better visibility, compared to a clamp-on yoke.
A final note - this works with my Trillium (E6 gunwales & wood thwarts) as-is, stock. With my Magic in Aluminum trim, the thwarts were too far apart and I had to buy a new thwart, cutting it to fit a spot a few inches back of the front thwart’s stock position. If you look carefully you can see the holes from the stock location in the gunwales. I imagine Bear and Ted might raise an eyebrow at that modification, but I have seen no difference in any aspect of seating room, hull dynamics, hull integrity or performance.
Finished weight of the minicell yoke is 4.5 ounces.
Now I need to think about what other use I can get out of the yoke around camp…perhaps it can be a pillow in my hammock? :-)
Just yoking.
"I don't care what you believe. I care what you can prove." -Philosopher & Mathematician JJJ
02/15/2021 07:11PM
Grandma, a comparison of my work to Muddy feet's yoke is like comparing my kid & his kazoo to Mozart.
:-)
His yoke could be marketed, produced and sold! Mine, not so much...
Muddyfeet's canoe build is at another level...beyond impressive.
Regardless, thanks for the compliment, and here's to a short sublimation season.
:-)
His yoke could be marketed, produced and sold! Mine, not so much...
Muddyfeet's canoe build is at another level...beyond impressive.
Regardless, thanks for the compliment, and here's to a short sublimation season.
"I don't care what you believe. I care what you can prove." -Philosopher & Mathematician JJJ
02/15/2021 09:23PM
Can you leave the shaft end of the paddles attached and just swing them over to rest forward? That way just the paddle end needs messing with. If you are going ultralight your pack would be small enough to fit below it if you carry it in the front.
08/06/2021 03:48PM
SinglePortage: "It's nice to see that I am not the only one trying new things out there. The portage system I have been using on my magic is less than two ounces total. I'll post a picture of it when I get up to my cabin on a couple days."
Very interested to see this!
"I don't care what you believe. I care what you can prove." -Philosopher & Mathematician JJJ
Subscribe to Thread
Become a member of the bwca.com community to subscribe to thread and get email updates when new posts are added. Sign up Here


 Search BWCA.com
 Donate