|
 Boundary Waters Quetico ForumGroup Forum: Boat Builders and Repair38 Special Build
|
Author
Text
")

03/01/2012 11:52PM
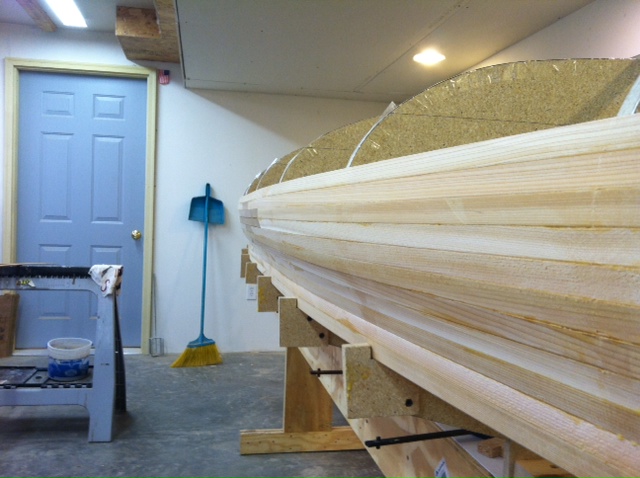
I guess it is about time I post my latest boat. I wasn't going to build one this year, but I had a bunch of strips and epoxy left from my last boats, and I was really torn between a 38 Special and a Bob's Special for my boat last winter. I decided that I needed to build the 38 that I didn't build last year, and this one was going to be cheap!
I decided to go with the Northwest Canoe design, even though HPD graciously supplied me with the original Merlin plans. I wanted the extra rocker for the type of canoeing I typically do. Unfortunately, I wanted to build it with the internal and external stems, so I needed to reprofile the stems and modify the end forms to suit. Lots more putzing around than I had expected! It turned out well, though, and progress is now being made.
Anyway, here is the latest picture. More to come!

"Hold on, I think I can get in without getting my feet wet."....SPLASH...

03/02/2012 07:48AM
OK, that shop is way to clean! How come my shop looks like a tornado went through it??
Your set-up looks nice. You will come to love that boat and she'll take good care of you. One thing about that model, it is amazingly stable in the roughest water. Truly unbelievable, you'll see.
Tom
Your set-up looks nice. You will come to love that boat and she'll take good care of you. One thing about that model, it is amazingly stable in the roughest water. Truly unbelievable, you'll see.
Tom
03/03/2012 09:13PM
Ben
How are you planning to plank the hull? Will you do as you did on your Freedom 17-9 or do you have something else in mind ?
I decided to plank the bottom of my Ranger (current project) using the style shown in Ted Moores book..... I'll call it planking along the contour (for lack of a better term).
On my Merlin, I planked on the contour up to the top of the stems and then planked parallel to the keel line (by starting from the center line and working toward the gunwales)......... twice as many angles to cut than contour planking
I am finding that bending the planks (especially as they become shorter near the center line a challenge).
I also wonder if there is a difference in hull strength depending on planking design ???
"Boredom, Tyler - that's what's wrong. And how do you beat boredom, Tyler?... Adventure...(Never Cry Wolf, 1983)
03/03/2012 10:49PM
quote HighPlainsDrifter: "
Ben
How are you planning to plank the hull? Will you do as you did on your Freedom 17-9 or do you have something else in mind ?
I decided to plank the bottom of my Ranger (current project) using the style shown in Ted Moores book..... I'll call it planking along the contour (for lack of a better term).
On my Merlin, I planked on the contour up to the top of the stems and then planked parallel to the keel line (by starting from the center line and working toward the gunwales)......... twice as many angles to cut than contour planking
I am finding that bending the planks (especially as they become shorter near the center line a challenge).
I also wonder if there is a difference in hull strength depending on planking design ???
"
HPD,
Here is what you are about to learn using the Moore method, or maybe you already have and someone else can learn from this ...:)
1) Cutting that line down the middle of the boat is going to be two of the most stressful hours of your life.
2) Make sure your chisels and planes are absolutely razor sharp. A rabbet plane really helps around the forms.
3) When you start filling in the second half of the football, the fit must be angled on both the wide and narrow sides of the planks, otherwise you get a gap on the outside of the hull. This is a PITA, but you will get the hang of it.
4) I hope you matched pairs for the second half of the football already. Do some test strips to get good at it first, because if you are like me, you probably don't have any back-ups to screw up.
5) If you had any errors on where the first strips started, any gaps in planks on one side and not the other, or your centerline is a hair off, your planks are not going to line up into nice "V's". Correct this as early as possible by ripping a plank narrow, making a wider one, etc. It doesn't take much to be off by a whole lot! Because of the angle, 1/16" of difference makes about 1/4" difference in lining them up.
6) When you are test fitting and final fitting, cut off the last 1/16" of the strip, the feathery, weak part at the end. If that piece cracks off when you are fitting, you are hosed. It will wedge in there and you cant get it out. Likewise, if you had a bit of glue squeeze out from the last joint, you will never see it because it is in the back/bottom of the cove, and you won't get it to fit all the way in. This cut-off part is buried in the cove, and nobody will know it is there except for you.
Because of the above reasons, I am planning on doing a hybrid approach. I am going to plank up to the last plank before I fall off the stem, and then I am going to run two planks down the centerline. They are beaded and coved on the centerline, and square on the other. This gets rid of issue #3 above so I can use a shooting board to cut the angles. It will also allow me to fill in both sides at the same time. This is huge since I build stapleless, and only get one strip on per evening. It will probably save 3 weeks of build time. It also gives me some cushion on issue #5, and I don't need to cut that darn centerline.
I just got the 5th plank glued on both sides. When I started I was very nervous about the tumblehome. The most extreme I have done was on the Bob's special, and it was only about 1" per side. I am now half way through it, and I am horrified for the next few planks. I already have a half stick of hot glue holding the strips to the forms. I am not ready to pull out the staple gun or heat gun yet, but I did make some 5/8" strips just in case. I just can't wait to get through the next 6 planks.
Good Luck!
"Hold on, I think I can get in without getting my feet wet."....SPLASH...
03/04/2012 09:47PM
Ben
Thank you for the words of wisdom. Appreciate them
I am just about finished planking one side to the keel line. Needless to say, I am apprehensive about planking the other side (for most of the reasons you outlined).
Yes, I have color matched planks of the port and stbd side. One set sits marked and waiting to be reunited with their mates. I do practice my angles before cutting the good stuff. Unfortunately, I usually find that I was more satisfied with the fit of my practice piece than the real deal.
I think this Ranger build is a bit trickier than the Merlin. I wanted to do the "Moore method" of stripping as something different from the Merlin.
I visited Ted's shop this past summer. He gave me a little gift of a 2 DVD video set called "Fine Wood Strip Canoe Building" with Nick Offerman. This is a really good CD and most of the things you discussed are shown on this video. Fun to watch Offerman in action too......
Cheers
"Boredom, Tyler - that's what's wrong. And how do you beat boredom, Tyler?... Adventure...(Never Cry Wolf, 1983)
03/04/2012 11:36PM
quote Naguethey: "Nice shop and set up. I really like your clamp method of doing away with the staples. Slick... look forward to seeing how she comes together."
Thanks! I built my shop in the basement specifically for building canoes. I dreamed of building boats for 6 years before I finally had a house that I could do it in. Ted Moores does a good job describing how to build without staples in Canoecraft. My method is a variant of his. The quick grip clamps are a gods send when working alone. I couldn't imagine getting c-clamps on fast or accurate enough when working alone, especially when trying to bend strips around stubborn curves.
"Hold on, I think I can get in without getting my feet wet."....SPLASH...
03/04/2012 11:40PM
quote HighPlainsDrifter: "
Ben
Thank you for the words of wisdom. Appreciate them
I am just about finished planking one side to the keel line. Needless to say, I am apprehensive about planking the other side (for most of the reasons you outlined).
Yes, I have color matched planks of the port and stbd side. One set sits marked and waiting to be reunited with their mates. I do practice my angles before cutting the good stuff. Unfortunately, I usually find that I was more satisfied with the fit of my practice piece than the real deal.
I think this Ranger build is a bit trickier than the Merlin. I wanted to do the "Moore method" of stripping as something different from the Merlin.
I visited Ted's shop this past summer. He gave me a little gift of a 2 DVD video set called "Fine Wood Strip Canoe Building" with Nick Offerman. This is a really good CD and most of the things you discussed are shown on this video. Fun to watch Offerman in action too......
Cheers"
My Bob's Special has a very similar hull design as the Ranger. Just a bit less rocker and lower sides on Bob's. Those last few strips in the football get a wicked curve to them, which lead to #4 in my last post. I shattered two of them trying to curve them in place for the final test fit. Thank heavens it didn't happen when I had the glue down.
I think that you are going to be happy with the finished product. Other than a basket weave pattern I saw a few years ago, Ted's method of finishing the centerline is my favorite...after it is done! I have been worried about having all of those joints causing a weak point in the center of the boat, but I have had zero issues to date. I would have done that method again, but I wanted to try something different on this boat.
"Hold on, I think I can get in without getting my feet wet."....SPLASH...
03/04/2012 11:46PM
I commend your patience no way I'd be able to handle it. But love the outcome.. I'm really interested in the ceramic staples that you don't have to pull though. (been pulling staples all afternoon lol) For a future build of mine. I'll definately be following your project. Excited to see it unfold.
You only live once/enjoy it while it last.
03/13/2012 08:08PM
Here is an update. The tumblehome sucked, and so did the the feature pieces, but they are done. I ended up breaking two feature strip pieces because of the serious bending, but everything ended up OK.


"Hold on, I think I can get in without getting my feet wet."....SPLASH...
03/15/2012 05:48PM
The feature looks good to me (only you will know the trouble spots).
I admire stapleless construction. If I do another (after my Ranger) I might give it a try.
Did you keep with 3/4 strips through the tumblehome or go with a narrower strip? The tumblehome on my Merlin was a troublesome spot for me also.
"Boredom, Tyler - that's what's wrong. And how do you beat boredom, Tyler?... Adventure...(Never Cry Wolf, 1983)
03/15/2012 08:09PM
quote HighPlainsDrifter: "
The feature looks good to me (only you will know the trouble spots).
I admire stapleless construction. If I do another (after my Ranger) I might give it a try.
Did you keep with 3/4 strips through the tumblehome or go with a narrower strip? The tumblehome on my Merlin was a troublesome spot for me also."
I planed a board to give me three 5/8" strips per side for the area between the gunwale and the tumblehome, but I ended up using the 3/4" for it. The majority of my pain has come from the twist required to get from the tumblehome to the ends. It ends up with about 45 degrees of twist in 2 feet on both the front and rear in the most extreme strips.
The stapleless works out well for me. Every night I glue a strip on one side, then scarf and glue a pair for the next night. I sit in the moaning chair for a beer, then glue the other side. It takes about an hour and a half per night. Great R&R! Knowing my personallity, I would have a boat stripped in two nights if I used staples, and I would regret the results. The slow pace gets me some "me" time before I need to check back in with work and the kids.
I would definitely recommend trying the stapleless technique, but stay away from the butt joints. I have a shooting board thread over at the bear mountain site if you aren't using full length boards. It is a simple method that gives great results and is much more repeatable than using a table saw.
BTW, I am very curious about how you did the seat on your solo. Can you send me some pictures and details? Thanks!
"Hold on, I think I can get in without getting my feet wet."....SPLASH...
03/16/2012 08:03PM
Ben
I had good intentions of doing my own......... BUT I found Edscanoe. I called and asked if they could do a contour in black walnut (my decks, scupper blocks, thwarts and handles are black walnut). They said sure. I said do it.
I intend to do my own on the Ranger. I like the seats that Gil Gilpatrick shows in his book
Edscanoe
"Boredom, Tyler - that's what's wrong. And how do you beat boredom, Tyler?... Adventure...(Never Cry Wolf, 1983)
03/24/2012 12:23AM
Here is the latest progress. I glued in the two center strips tonight. It was a PITA at the tips. This is my first venture at using center strips instead of cutting down the middle. Things look good so far!


"Hold on, I think I can get in without getting my feet wet."....SPLASH...
04/24/2012 11:50PM
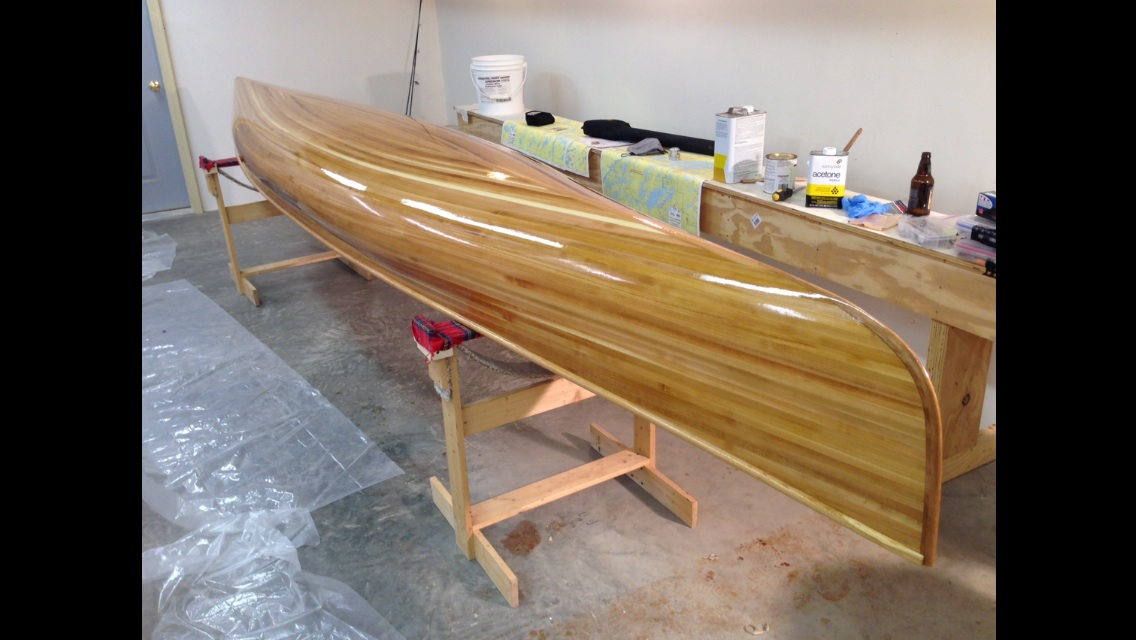
Here are the latest pictures. I finally got the football closed up tonight.
This has been an interesting boat to build. I had a lot of goals with this one, but one of them was to use up all of my scraps from my last two boats. I had about 120 8' to 12' strips left over, and all had been culled out for some reason or another. As a result, there are only 7 strips so far that do not have at least 1 scarf joint in them. Many have several. As a result, I could not get some of the cool patterns that I got on my last boat, but I have well under $100 invested so far, including the forms. I have already decided to burn my remaining strips when this is done, because while somewhat rewarding, the process of using crappy strips has pretty much sucked. :)


This has been an interesting boat to build. I had a lot of goals with this one, but one of them was to use up all of my scraps from my last two boats. I had about 120 8' to 12' strips left over, and all had been culled out for some reason or another. As a result, there are only 7 strips so far that do not have at least 1 scarf joint in them. Many have several. As a result, I could not get some of the cool patterns that I got on my last boat, but I have well under $100 invested so far, including the forms. I have already decided to burn my remaining strips when this is done, because while somewhat rewarding, the process of using crappy strips has pretty much sucked. :)


"Hold on, I think I can get in without getting my feet wet."....SPLASH...
04/25/2012 08:17PM
Ben
That is a very nice looking canoe..... pleasing to the eye and nice lines. The wood looks good regardless of what you say about working with your "left over" stock....... and that is a sign of a true craftsman.
Only one thing missing........ Staples :)
And is that a TV in your boat building room ?????
Cheers
"Boredom, Tyler - that's what's wrong. And how do you beat boredom, Tyler?... Adventure...(Never Cry Wolf, 1983)

05/24/2014 11:38PM
quote HighPlainsDrifter: "
Beautiful work. I am curious about one thing......... why are those maps draped over the strong back?"
The hull made a convenient Kawnipi planning table before I varnished it. That was the closest place to put them.
I can't say enough about this hull design. It is stable, fast, great load capacity, and with my bow and stern modifications, it tracks so well that I can paddle with a straight blade without switching sides. It ended up with a rocker half way between the original Marlin and the "new" NW Canoe version. If anyone is interested, I would be willing to part with the forms for a reasonable price...
"Hold on, I think I can get in without getting my feet wet."....SPLASH...
Subscribe to Thread
Become a member of the bwca.com community to subscribe to thread and get email updates when new posts are added. Sign up Here
Community Links
 Search BWCA.com
 Donate
 Featured Sponsor