|
 Boundary Waters Quetico ForumGear ForumNeed kevlar repair help
|
 Forum Sponsor

Author
Text
")

08/18/2022 01:17PM
I've got a Wenonah Boundary Waters I bought 3rd hand (from a member of this board). It had already lived a hard life when I bought it, spending its youth as a VNO rental boat. It could have used some repair when I bought it, but I used it as-is for several years and it has served me well.
I recently decided repairs couldn't wait and started to prep it. Based on advice from a friend (and reading on this board), I'm planning on using two layers of fiberglass (one smaller and one larger) with West System 105 resin with 206 (slow drying) hardener. He said to make sure you remove any loose kevlar before applying fiber and epoxy.
I had guessed that I would remove roughly an inch of loose kevlar from either side of any spot that needed repair, but once I got going, I found entire sections of the kevlar were loose. It seems that in the center section of the boat, large sections of the two layers of kevlar have separated. Maybe I should have stopped and asked this question earlier, but how far does one go in removing 'loose' pieces. Have I gone too far?
What I need to know is whether this canoe is shot or if epoxy and fiberglass can get her back to being a reliable tripping boat. I know many people on this board keep their canoes in perfect shape, but I need a boat that works, not one I can show off in a museum. I plan to continue to run it up on sand and bump rocks without worrying too much about it. But, looks aside, I need it to be sound and don't have any experience repairing boats. Lots of pictures below.
Here is a picture of the entire canoe.

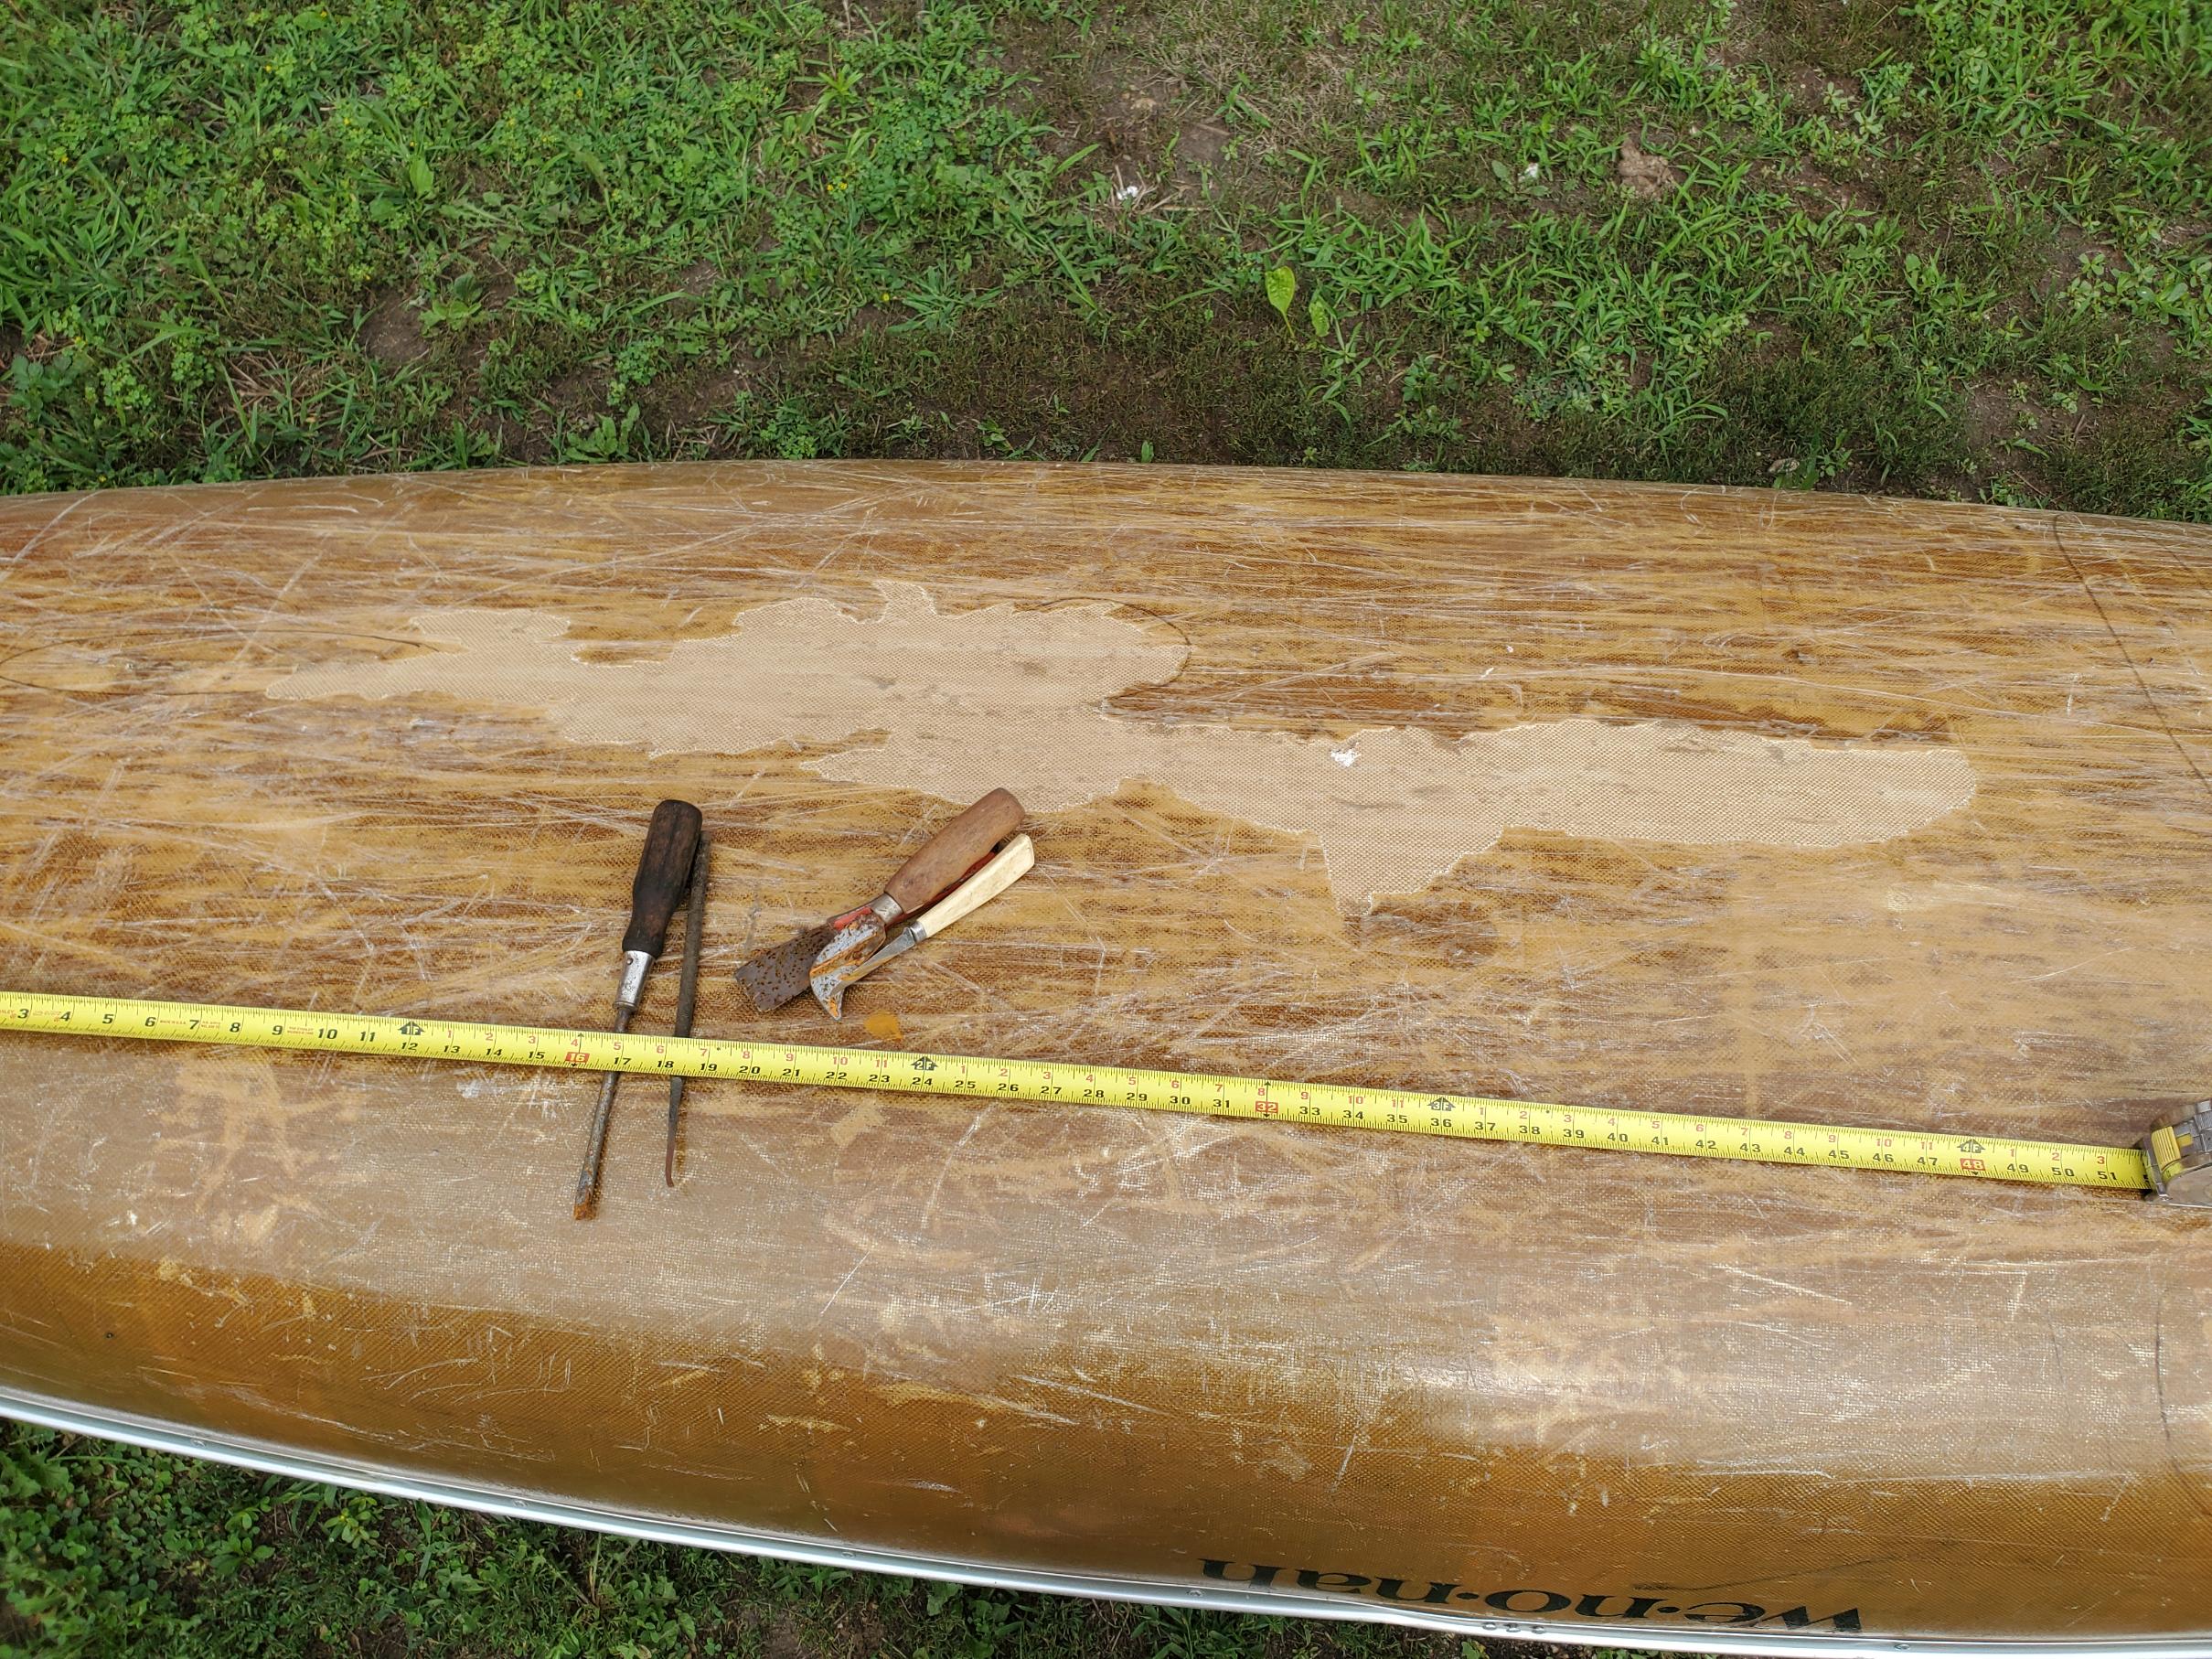
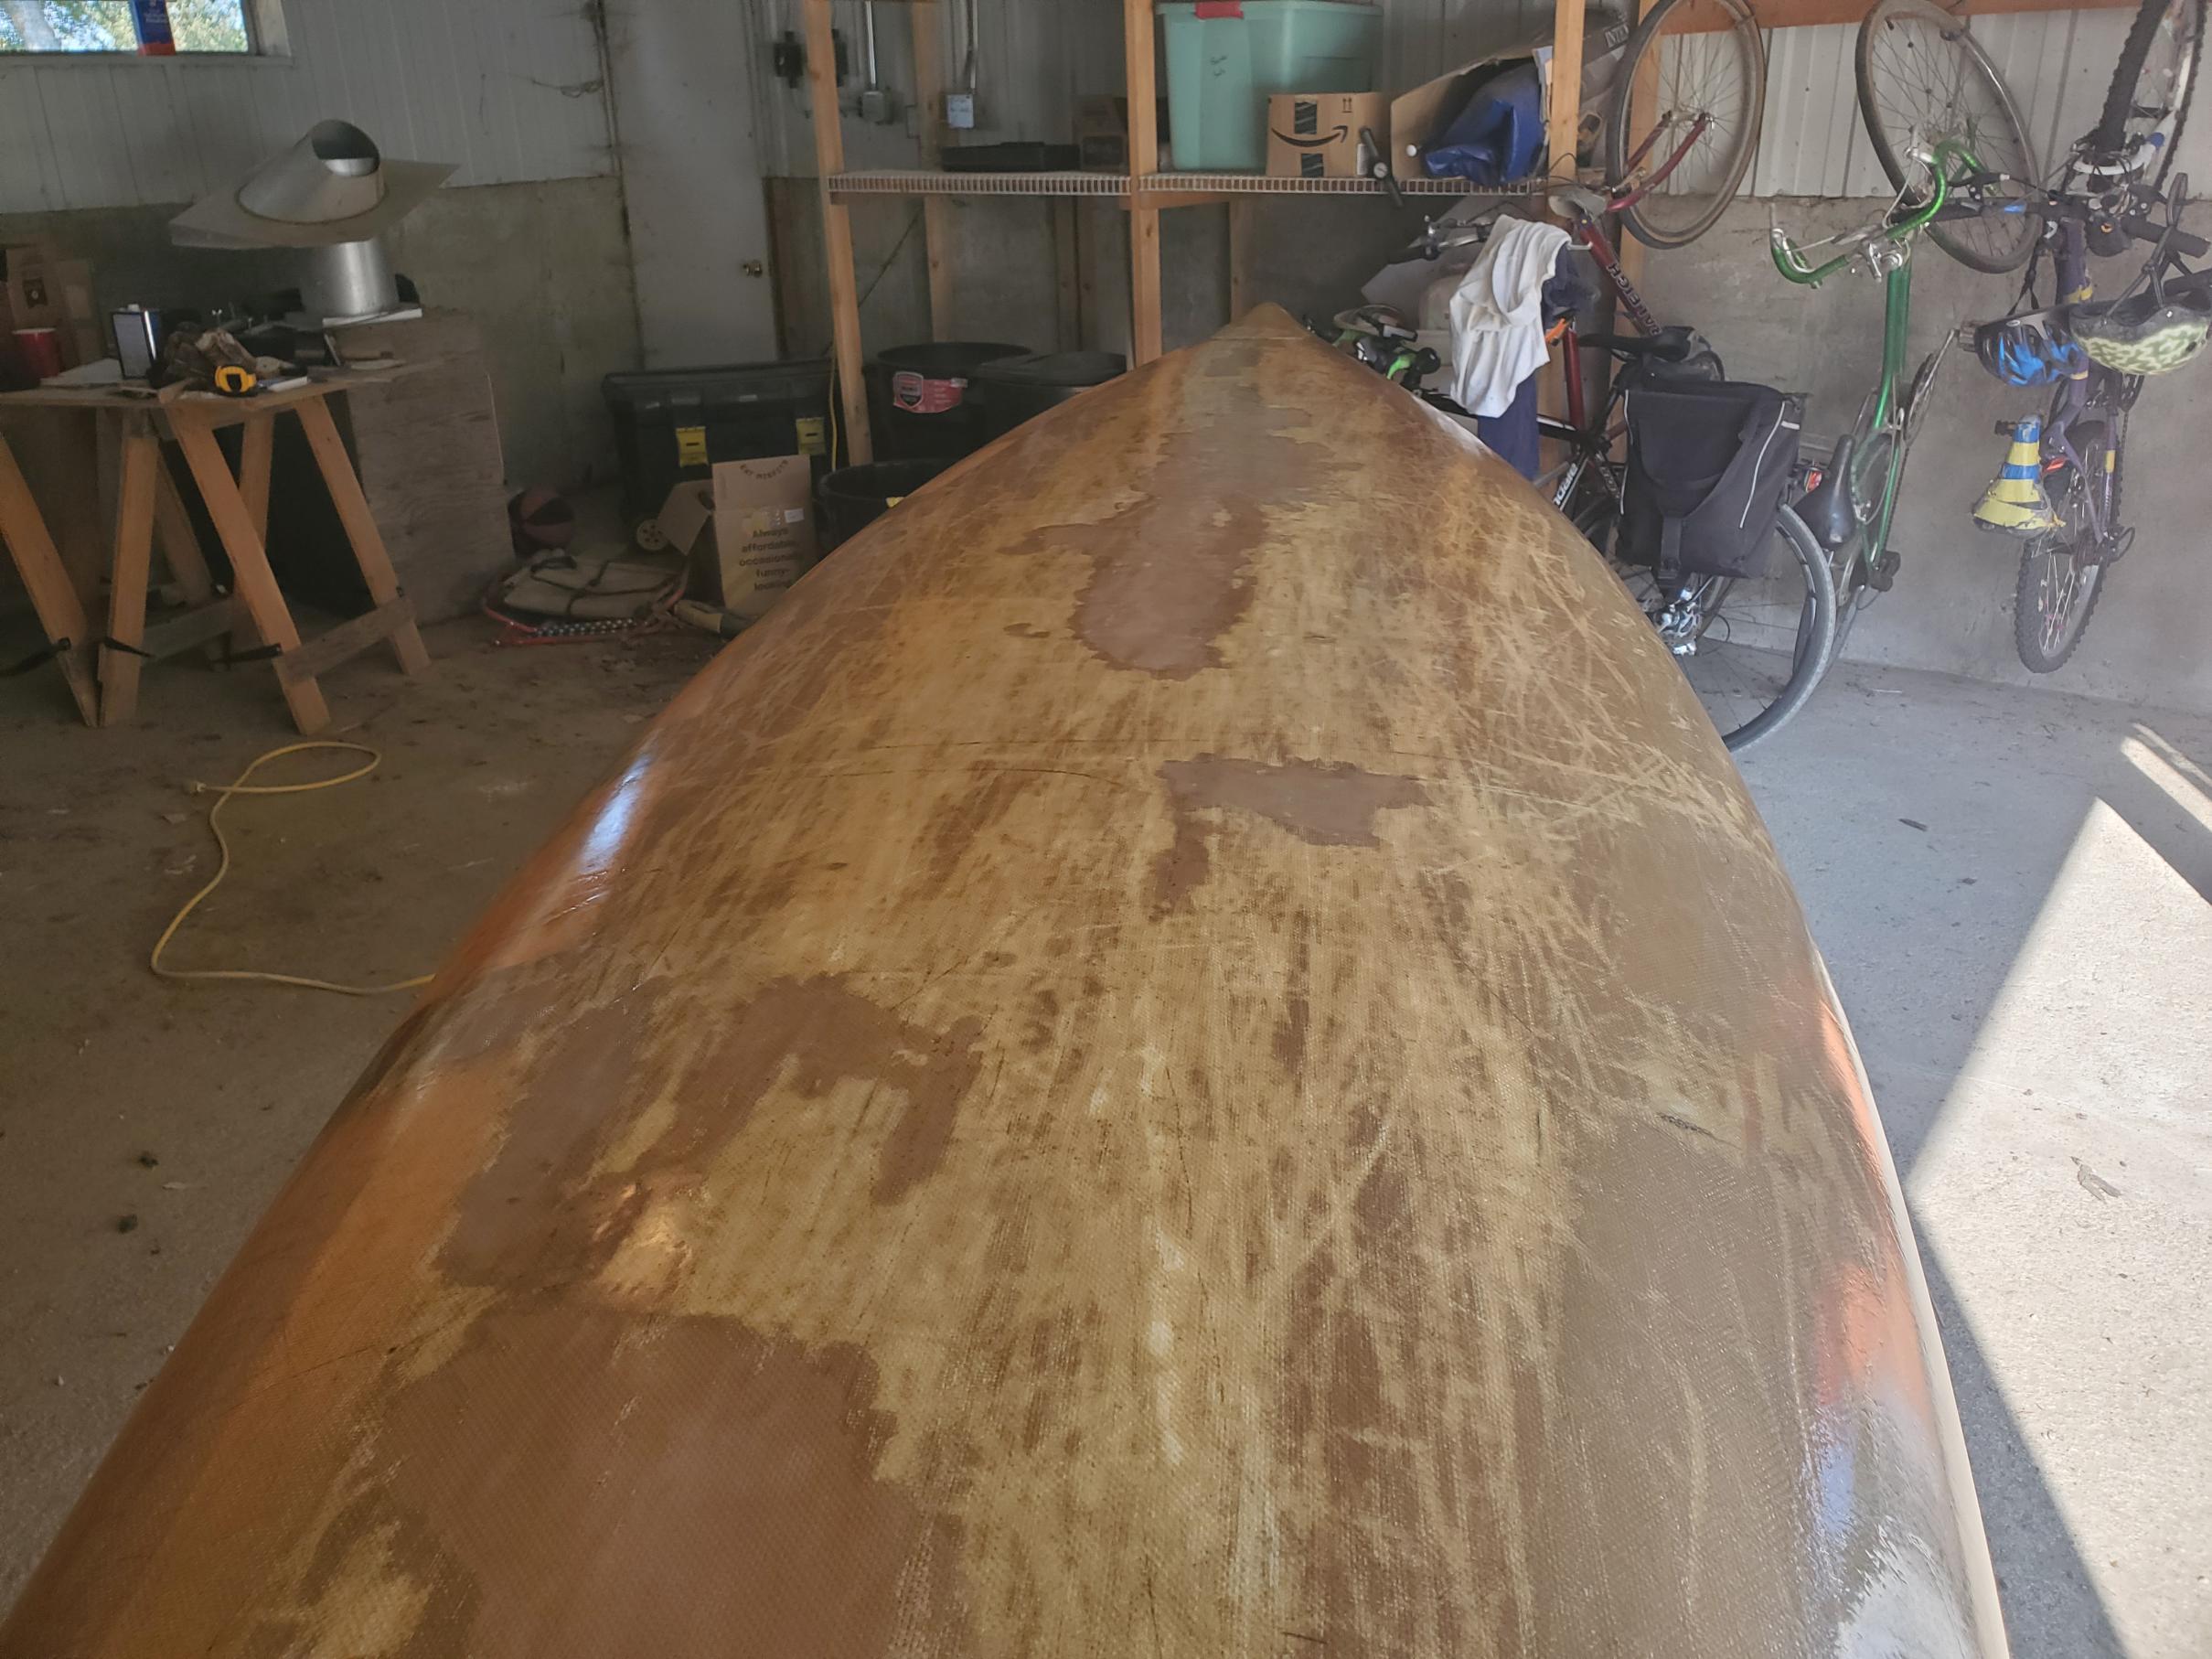
Note the roughly 3ft patch of kevlar I've removed in the photo below. The tape measure is showing 4 ft in the pic. If you look at the canoe there are three colors, one where I've removed the kevlar, this is the lightest color. There are two colors of kevlar left, the lighter patches and darker patches. The darker patches resemble the original color and the areas that I removed kevlar were all the lighter color, but were bubbled up. It is possible more of the lighter areas have kevlar layers that are no longer attached, but there are light areas where it is firmly bonded. I've removed everything that I can feel was bubbled up.
>
This is probably the second biggest spot.

Bad spot number 3:

The real reason I decided I NEEDED to repair it was some cracks that run the width of the canoe at the end of stiffening supports inside the canoe. There are two of these that happen to align closely with where I strap the canoe onto the car. Not sure if the straps have caused or worsened the problem. One is pictured below:

There are also a few other holes I plan on patching. This one is roughly the size of a dime, but deep. The kevlar around it isn't loose, I was planning on leaving it in place and covering with fiberglass.

And another one that is ~6 inches long. Again, there are no loose pieces, so my plan is to just patch over this.

There are also a few deep scratches you can see through the canoe. My plan was to patch these on the inside. The longest one is below:

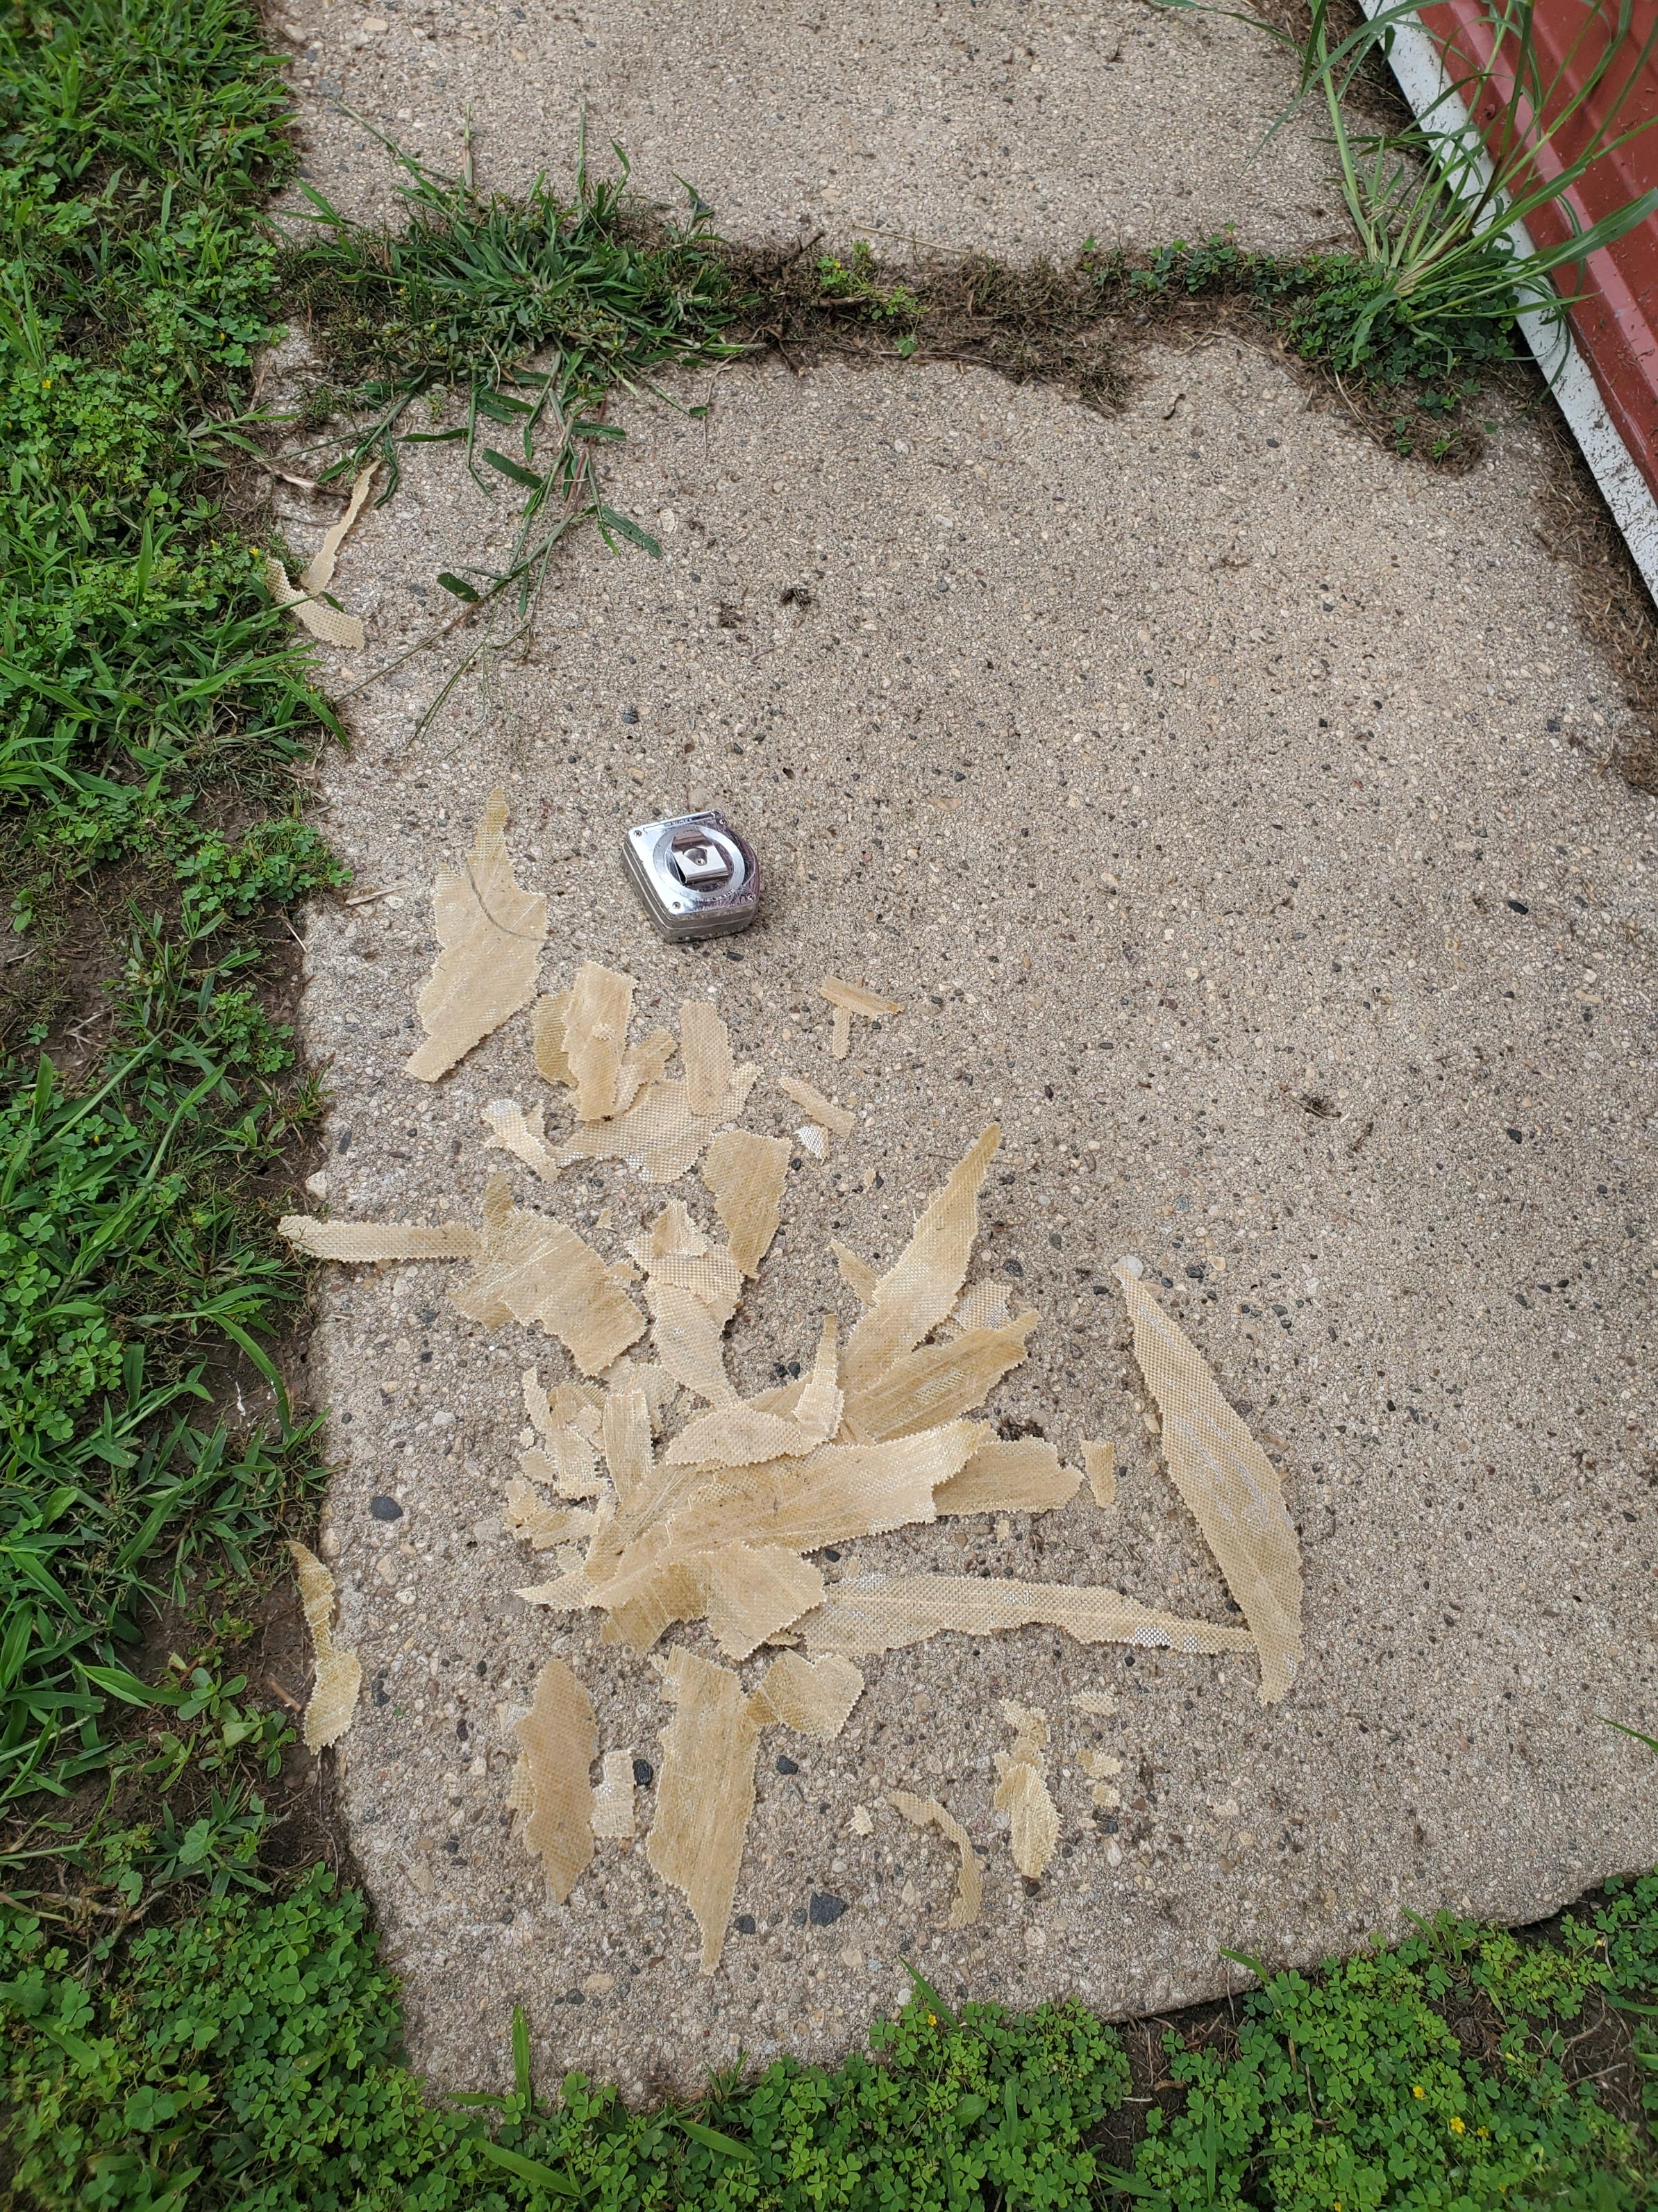
Perhaps the saddest picture of all. Here is the pile of kevlar pieces I peeled off. Just to be sure, I pulled everything off with my fingers, I had to use some tools to break into kevlar that was already separated, but it all came off very easily.

So I think my questions are:
1. Is this boat salvagable? I honestly don't care what it looks like, as long as it is sound.
2. Will my current plan (2x fiberglass with West epoxy) work?
3. Does someone know a good online source of fiberglass?
4. I found some videos that recommended 8 oz or 10 oz fiberglass and the narrator said it didn't really matter, is this correct?
5. I'm not planning on coating the entire boat when I'm done, just the places that need repair (which is pretty close to the whole thing). Is there any non-cosmetic reason to do a full re-coating? If so, what would it add for weight and what material would you recommend.
6. Is it wrong to leave broken, but still firmly attached pieces of kevlar and laminate or should I dig these out? My rule has been if I can't move it with my fingers, it stays, I'd like confirmation this makes sense.
7. Is there something I'm not thinking of?
I'm planning on taking this boat into the BWCA on the 13th of September and I want to have everything completed by then.
Thanks in advance for all your wisdom.
I recently decided repairs couldn't wait and started to prep it. Based on advice from a friend (and reading on this board), I'm planning on using two layers of fiberglass (one smaller and one larger) with West System 105 resin with 206 (slow drying) hardener. He said to make sure you remove any loose kevlar before applying fiber and epoxy.
I had guessed that I would remove roughly an inch of loose kevlar from either side of any spot that needed repair, but once I got going, I found entire sections of the kevlar were loose. It seems that in the center section of the boat, large sections of the two layers of kevlar have separated. Maybe I should have stopped and asked this question earlier, but how far does one go in removing 'loose' pieces. Have I gone too far?
What I need to know is whether this canoe is shot or if epoxy and fiberglass can get her back to being a reliable tripping boat. I know many people on this board keep their canoes in perfect shape, but I need a boat that works, not one I can show off in a museum. I plan to continue to run it up on sand and bump rocks without worrying too much about it. But, looks aside, I need it to be sound and don't have any experience repairing boats. Lots of pictures below.
Here is a picture of the entire canoe.

Note the roughly 3ft patch of kevlar I've removed in the photo below. The tape measure is showing 4 ft in the pic. If you look at the canoe there are three colors, one where I've removed the kevlar, this is the lightest color. There are two colors of kevlar left, the lighter patches and darker patches. The darker patches resemble the original color and the areas that I removed kevlar were all the lighter color, but were bubbled up. It is possible more of the lighter areas have kevlar layers that are no longer attached, but there are light areas where it is firmly bonded. I've removed everything that I can feel was bubbled up.
>
This is probably the second biggest spot.

Bad spot number 3:

The real reason I decided I NEEDED to repair it was some cracks that run the width of the canoe at the end of stiffening supports inside the canoe. There are two of these that happen to align closely with where I strap the canoe onto the car. Not sure if the straps have caused or worsened the problem. One is pictured below:

There are also a few other holes I plan on patching. This one is roughly the size of a dime, but deep. The kevlar around it isn't loose, I was planning on leaving it in place and covering with fiberglass.

And another one that is ~6 inches long. Again, there are no loose pieces, so my plan is to just patch over this.

There are also a few deep scratches you can see through the canoe. My plan was to patch these on the inside. The longest one is below:

Perhaps the saddest picture of all. Here is the pile of kevlar pieces I peeled off. Just to be sure, I pulled everything off with my fingers, I had to use some tools to break into kevlar that was already separated, but it all came off very easily.
So I think my questions are:
1. Is this boat salvagable? I honestly don't care what it looks like, as long as it is sound.
2. Will my current plan (2x fiberglass with West epoxy) work?
3. Does someone know a good online source of fiberglass?
4. I found some videos that recommended 8 oz or 10 oz fiberglass and the narrator said it didn't really matter, is this correct?
5. I'm not planning on coating the entire boat when I'm done, just the places that need repair (which is pretty close to the whole thing). Is there any non-cosmetic reason to do a full re-coating? If so, what would it add for weight and what material would you recommend.
6. Is it wrong to leave broken, but still firmly attached pieces of kevlar and laminate or should I dig these out? My rule has been if I can't move it with my fingers, it stays, I'd like confirmation this makes sense.
7. Is there something I'm not thinking of?
I'm planning on taking this boat into the BWCA on the 13th of September and I want to have everything completed by then.
Thanks in advance for all your wisdom.

08/18/2022 11:38PM
Your pics look more like missing gel coat or epoxy rather than kevlar. That pile of stuff you show is either epoxy or gel coat, not kevlar. Scraped kevlar would look more fuzzy than what I see in the pics. I good sanding of the existing finish and a recoat the entire boat with a suitable epoxy would probably suffice. Don't try to remove any of the kevlar fabric. If you have soft spots a fiberglass patch would be in order. When sanding, stay away from any bare kevlar areas.
08/19/2022 07:02AM
It looks like a layer of kevlar has been removed and it looks to me like a skin coat rather than gel coat. You can see bits of the fiber in the edges of the pieces that were removed. Assuming they were pretty much flaked off rather than scraped off? When I've had gel coat flake off it's been more translucent than those pieces and hasn't had the fibers sticking out from the edges.
Personally I'd consider adding back a thin layer of Kevlar if you have the tools to cut large asymmetrical pieces to fit. I'd go with a couple light/thin layers and size up 2-3 inches with the second layer. Lay over some plastic wrap (like the kind you use for cooking over the top of each layer while it cures and stretch it tight and work the bubbles and creases out gently by rolling your fingers over the plastic wrap. You'd be amazed how smooth the results will come out this way. You can add a layer or two of glass over the top as well if you want. I usually don't.
If you don't have the tools or aren't willing to mess with kevlar the same approach with glass will work with the added benefit that you can easily sand out any imperfections between layers (and at the end).
For a cloth supplier I've used fiberglass supply for both glass and kevlar material and have been pretty happy with them.
IMO it would take a lot for a composite boat not to be salvageable. You could pretty much wear it right down to the foam core and just lay some more cloth on and keep using it. As long as the boat keeps its shape repairs to the cloth will keep you going. They do tend to gain weight the more you repair them though... and they certainly aren't the prettiest boats out there. I have two that had previous lives as outfitter boats and I haven't been easy on them either. They have at least a dozen kevlar patches between the two of them and still going strong.
"Wilderness is not a luxury but a necessity of the human spirit."
08/19/2022 07:19AM
jhb8426: "Your pics look more like missing gel coat or epoxy rather than kevlar. That pile of stuff you show is either epoxy or gel coat, not kevlar. Scraped kevlar would look more fuzzy than what I see in the pics. I good sanding of the existing finish and a recoat the entire boat with a suitable epoxy would probably suffice. Don't try to remove any of the kevlar fabric. If you have soft spots a fiberglass patch would be in order. When sanding, stay away from any bare kevlar areas."
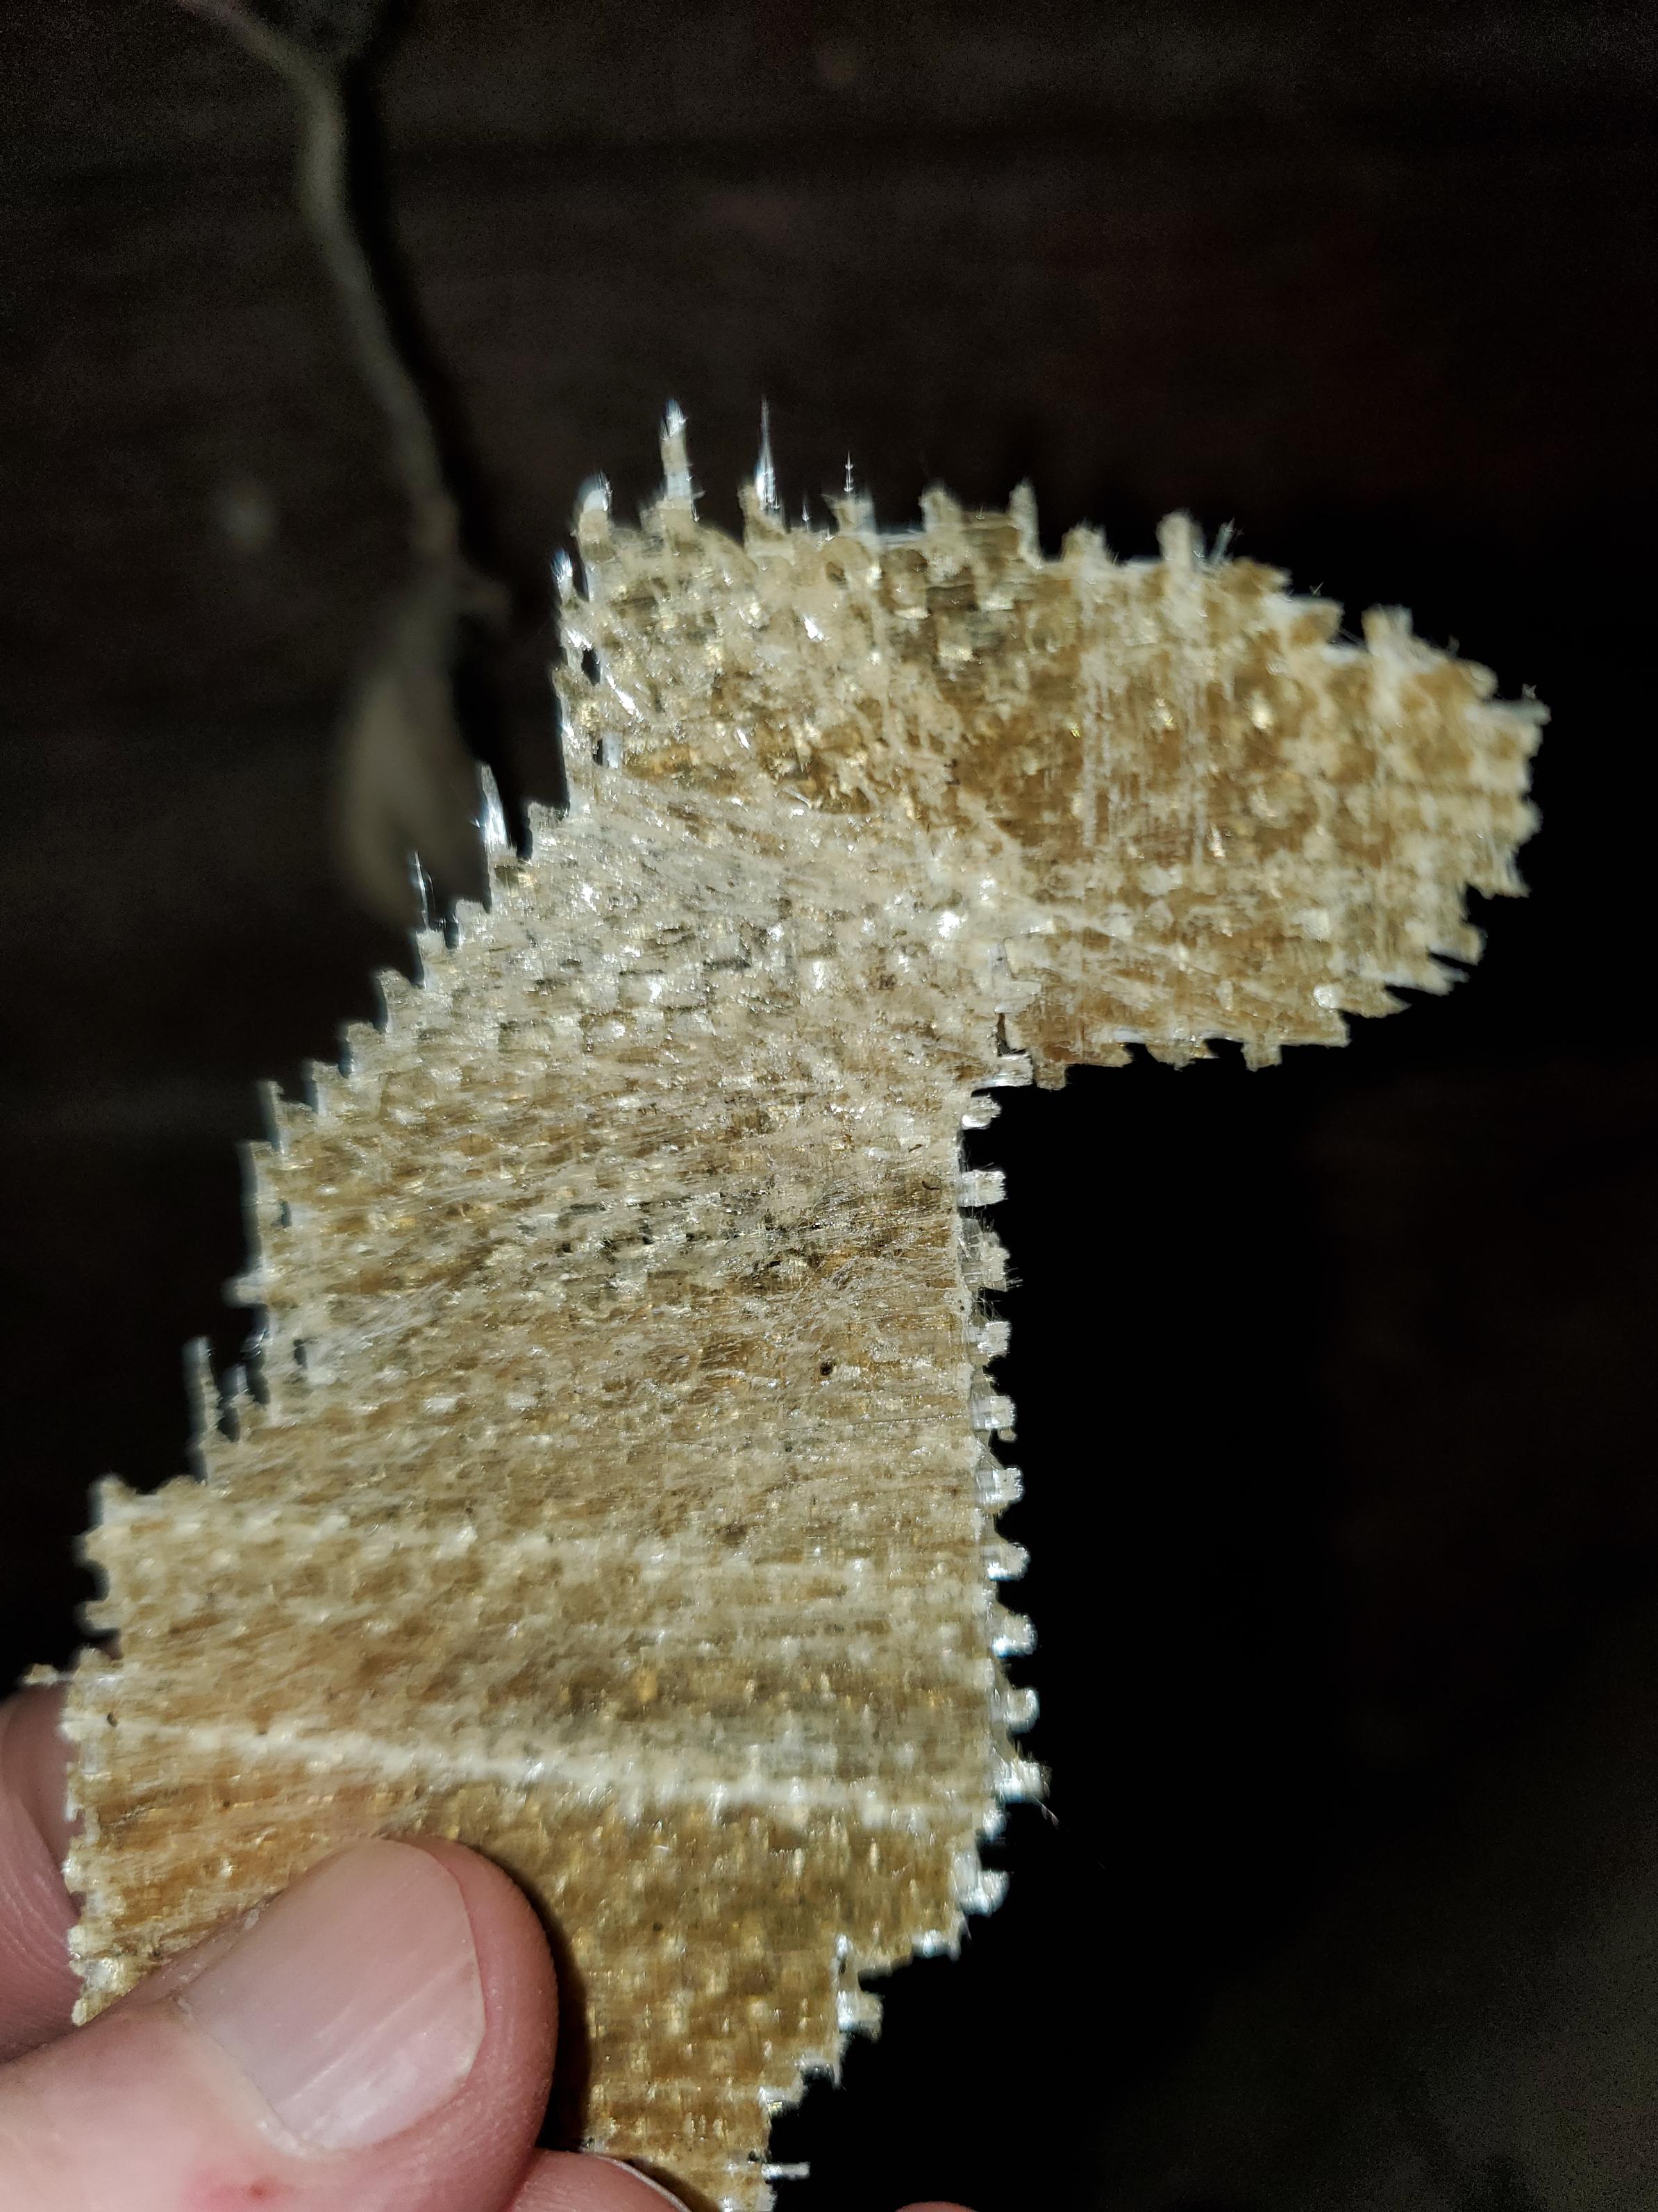
While removing gel coat only would be a dream, what I'm removing appears to have fibers that fray. See pics below.

08/19/2022 08:39AM
Chuckles: "jhb8426: "Your pics look more like missing gel coat or epoxy rather than kevlar. That pile of stuff you show is either epoxy or gel coat, not kevlar. Scraped kevlar would look more fuzzy than what I see in the pics. I good sanding of the existing finish and a recoat the entire boat with a suitable epoxy would probably suffice. Don't try to remove any of the kevlar fabric. If you have soft spots a fiberglass patch would be in order. When sanding, stay away from any bare kevlar areas."
While removing gel coat only would be a dream, what I'm removing appears to have fibers that fray. See pics below.
"
You may want to contact Wenonah and ask them about the amount of Kevlar they used on the canoe. My understanding is that they put an extra layer of Kevlar on the Outfitter Edition canoes on the bottom. If that’s indeed the case maybe you don’t need to add any fiberglass or Kevlar. Just sand and remove all loose resin/material. I believe they use a polyester resin for their canoes - not epoxy - though either should be fine for refinishing. They definitely will provide some good advice on how to refinish/repair.
Tell me the species of fish in my profile pic
08/19/2022 10:48AM
You may want to contact Wenonah and ask them about the amount of Kevlar they used on the canoe. My understanding is that they put an extra layer of Kevlar on the Outfitter Edition canoes on the bottom. If that’s indeed the case maybe you don’t need to add any fiberglass or Kevlar. Just sand and remove all loose resin/material. I believe they use a polyester resin for their canoes - not epoxy - though either should be fine for refinishing. They definitely will provide some good advice on how to refinish/repair. "
This is very helpful advice and would be great if I didn't need to add any extra material. There are almost certainly two layers of kevlar, the one I peeled off and another one that is intact. I've reached out to Wenonah and will see what they say.
08/19/2022 10:51AM
keth0601: "It looks like a layer of kevlar has been removed and it looks to me like a skin coat rather than gel coat. You can see bits of the fiber in the edges of the pieces that were removed. Assuming they were pretty much flaked off rather than scraped off? When I've had gel coat flake off it's been more translucent than those pieces and hasn't had the fibers sticking out from the edges.
Yes, this was flaked off, not scraped. I'm pretty sure it is kevlar.
Personally I'd consider adding back a thin layer of Kevlar if you have the tools to cut large asymmetrical pieces to fit. I'd go with a couple light/thin layers and size up 2-3 inches with the second layer. Lay over some plastic wrap (like the kind you use for cooking over the top of each layer while it cures and stretch it tight and work the bubbles and creases out gently by rolling your fingers over the plastic wrap. You'd be amazed how smooth the results will come out this way. You can add a layer or two of glass over the top as well if you want. I usually don't.
If you don't have the tools or aren't willing to mess with kevlar the same approach with glass will work with the added benefit that you can easily sand out any imperfections between layers (and at the end).
Unless Wenonah says I don't need it, I'll likely stick with glass. I'm enough of a novice at this that fiberglass is enough of a jump for me.
For a cloth supplier I've used fiberglass supply for both glass and kevlar material and have been pretty happy with them.
Very helpful. Thanks.
IMO it would take a lot for a composite boat not to be salvageable. You could pretty much wear it right down to the foam core and just lay some more cloth on and keep using it. As long as the boat keeps its shape repairs to the cloth will keep you going. They do tend to gain weight the more you repair them though... and they certainly aren't the prettiest boats out there. I have two that had previous lives as outfitter boats and I haven't been easy on them either. They have at least a dozen kevlar patches between the two of them and still going strong.
This is music to my ears and gives me confidence to keep going. Thanks.
08/19/2022 02:53PM
Chuckles: "Plander,
I just emailed Wenonah a bunch of pics and am awaiting their diagnosis. I appreciate the tip.
"
Please post on their advice, if you don't mind. Also, the link below to a refinish of an Wenonah might be of interest to you.
wenonah kevlar refinish project
Tell me the species of fish in my profile pic
08/19/2022 04:04PM
Just heard back from Wenonah:
"I got all of the photos, and had our repair guy look at them with me. He says that you're going to need to reinforce the entire hull, full layers of glass on the inside of the boat, and then resin (not epoxy, unless it was used in the past) on the outside to seal the deal.
He also says it would be more worth your time and money to get a new boat.
Have a great weekend!"
Pretty crushed right now. Wondering how likely it would be to fail catastrophically deep in the bush if I tried my original plan.
08/19/2022 04:19PM
Chuckles: "Just heard back from Wenonah:
"I got all of the photos, and had our repair guy look at them with me. He says that you're going to need to reinforce the entire hull, full layers of glass on the inside of the boat, and then resin (not epoxy, unless it was used in the past) on the outside to seal the deal.
He also says it would be more worth your time and money to get a new boat.
Have a great weekend!"
Pretty crushed right now. Wondering how likely it would be to fail catastrophically deep in the bush if I tried my original plan.
"
Ooofda, Chuckles, that's tough to take. Sorry to hear that. Hope you sort through your options and that something works out for the best.
08/19/2022 04:53PM
Chuckles: "Just heard back from Wenonah:
"I got all of the photos, and had our repair guy look at them with me. He says that you're going to need to reinforce the entire hull, full layers of glass on the inside of the boat, and then resin (not epoxy, unless it was used in the past) on the outside to seal the deal.
He also says it would be more worth your time and money to get a new boat.
Have a great weekend!"
Pretty crushed right now. Wondering how likely it would be to fail catastrophically deep in the bush if I tried my original plan.
"
I respectfully disagree with the repair guy. If you want to dispose of it let me know. :)
"Wilderness is not a luxury but a necessity of the human spirit."
08/19/2022 04:59PM
keth0601: "
I respectfully disagree with the repair guy. If you want to dispose of it let me know. :)"
I like your attitude. I like that boat and want to save it, but don't want to put two layers of glass on it. I'll shoot you an email; maybe we could find some time to talk on the phone? I need a pep talk.
08/19/2022 07:15PM
YetiJedi: "airmorse: "You have an easy repair. You can email me if you wish for additional encouragement. "
^We need more of this in the world today. Cool to see..."
Thanks to everyone on this board. I'll likely have additional questions. I'm forging ahead will all of your support.
08/19/2022 07:19PM
airmorse: "You have an easy repair. You can email me if you wish for additional encouragement. "
Thanks for the encouragement and the help. I read your repair journey and I'm glad for the insight. Your boat looks great. I've read a few other ones that are similar and am gaining confidence.
I'm happy to move the whole discussion to email or phone, but my questions now are:
1. Kevlar or glass and which exact kind? I'm inclined to stick with fiberglass because it is supposed to be so much easier to work with. If cutting the kevlar is the only real difficulty, I'm open to buying kevlar scissors if that is all it takes. I looked on fiberglasssupply, but there is a dizzying array of options. Could someone point me in the right direction? What weight cloth and
2. Epoxy or resin? Wenonah said use resin unless it has been epoxied. The boat was repaired by VNO before I got it and there are brown drip marks on the side of the canoe. The person I bought it from told me this was likely epoxy, but how do I know? An experienced canoeist and previous canoe builder saw the canoe and suggested west marine epoxy, but I don't know if he was thinking about the resin vs epoxy issue.
08/19/2022 07:31PM
Chuckles: "YetiJedi: "airmorse: "You have an easy repair. You can email me if you wish for additional encouragement. "
^We need more of this in the world today. Cool to see..."
Thanks to everyone on this board. I'll likely have additional questions. I'm forging ahead will all of your support.
"
You can get fiberglass cloth of various sizes on Amazon. As well as the epoxy and resin kit.
"In wilderness is the salvation of mankind." Thoreau.
08/19/2022 07:32PM
When you go to epoxy your canoe remember that the cloth and boat breathe. You will want to epoxy when the air temperature is stable and/or cooling sucking the epoxy into the cloth/boat. If you choose to epoxy when the temp is warming you will end up with lots and lots and lots and lots of tiny bubbles. And you will cuss like a sailor. This holds true when you go to varnish your boat too.
"In wilderness is the salvation of mankind." Thoreau.
08/19/2022 07:53PM
"In wilderness is the salvation of mankind." Thoreau.
08/20/2022 07:16AM
Chuckles: "airmorse: "You have an easy repair. You can email me if you wish for additional encouragement. "
Thanks for the encouragement and the help. I read your repair journey and I'm glad for the insight. Your boat looks great. I've read a few other ones that are similar and am gaining confidence.
I'm happy to move the whole discussion to email or phone, but my questions now are:
1. Kevlar or glass and which exact kind? I'm inclined to stick with fiberglass because it is supposed to be so much easier to work with. If cutting the kevlar is the only real difficulty, I'm open to buying kevlar scissors if that is all it takes. I looked on fiberglasssupply, but there is a dizzying array of options. Could someone point me in the right direction? What weight cloth and
2. Epoxy or resin? Wenonah said use resin unless it has been epoxied. The boat was repaired by VNO before I got it and there are brown drip marks on the side of the canoe. The person I bought it from told me this was likely epoxy, but how do I know? An experienced canoeist and previous canoe builder saw the canoe and suggested west marine epoxy, but I don't know if he was thinking about the resin vs epoxy issue. "
You have the right attitude - just forge ahead with your plan. It will work out fine. If you think at all that the boat has had epoxy resin applied previously then go with the epoxy.
I would definitely put a coat of epifanes or other marine varnish on at the end - help protect it from UV light (sunlight). Epoxy resin by itself is not very stable to UV whereas polyester resins are reasonably stable to UV light (FYI...Wenonah and Northstar both use polyester vinyl resins to make their boats; Souris River uses epoxy resin).
When storing the boat at home store it indoors or cover with a thick tarp if storing outside. Over time, light is its biggest enemy.
Tell me the species of fish in my profile pic
08/20/2022 08:41AM
airmorse: " Fiber glass
Epoxy kit
Applicators "
Awesome! Thanks, this is exactly the specifics I needed.
08/20/2022 09:39AM
Sanding...
If you have a random orbital sander this will make sanding easier. While sanding use a mask.
Let the sander do the work.
Not actually seeing your canoe, only from pictures, i would start with something like 100gt sandpaper then go to 150 then 220.
After each sanding use a microfiber cloth and acetone to clean the dust off. Just enough acetone to dampen the cloth. Not soaking.
Tape off the gunnels with aluminum tape if you wish. When you are ready to fiberglass lay the cloth on the boat. Mix the epoxy then pour on the cloth use the roller to move the epoxy around. You can cut the cloth after the epoxy hardens. Important to note that the fiberglass will only soak up so much epoxy so most likely will not need a second coat.
Then start sanding again. 150gt then 220.
If you feel comfortable you can also add a keel strip of fiberglass along the whole length of the canoe following the same process.
How is the inside of the boat?
"In wilderness is the salvation of mankind." Thoreau.
08/24/2022 12:51PM
Just a quick update on my progress (or lack thereof). I've ordered everything I need. Got rollers and varnish, fiberglass is supposed to arrive today and varnish on Friday. Life has prevented me from doing any work, but hoping to get going on it this weekend. Many thanks to all, but especially airmorse, for continued support.
08/24/2022 01:26PM
Most canoes aren't beyond salvaging, it often comes down to what one's end goal with the boat will be. There's often no better learning canvas than an old, beaten up hull.
Resist the urge to go heavy on the resin when you apply the epoxy. You want to wet out the surface until it's transparent, then gently squeegee the excess onto an area you've already prepared. Once this has green cured you can come back and do a second light coat of resin to fill the weave.
Don't be surprised if you find the hull is somewhat of an ongoing project. UV from the sun is exceptionally hard on most everything, and areas of loose fabric are symptomatic of delamination between the layers in the layup. For best strength you will want to replace as many layers with cloth as you remove.
Good luck! Lots of info out there. If you're on Facebook, there are groups dedicated to canoe maintenance & repair.
When a man is part of his canoe, he is part of all that canoes have ever known. - Sigurd F. Olson, "The Singing Wilderness"
08/25/2022 07:31AM
mirth: "Most canoes aren't beyond salvaging, it often comes down to what one's end goal with the boat will be. There's often no better learning canvas than an old, beaten up hull.
Resist the urge to go heavy on the resin when you apply the epoxy. You want to wet out the surface until it's transparent, then gently squeegee the excess onto an area you've already prepared. Once this has green cured you can come back and do a second light coat of resin to fill the weave.
Don't be surprised if you find the hull is somewhat of an ongoing project. UV from the sun is exceptionally hard on most everything, and areas of loose fabric are symptomatic of delamination between the layers in the layup. For best strength you will want to replace as many layers with cloth as you remove.
Good luck! Lots of info out there. If you're on Facebook, there are groups dedicated to canoe maintenance & repair."
Good advice here.
"In wilderness is the salvation of mankind." Thoreau.
08/26/2022 04:15PM
airmorse: "mirth: " Once this has green cured you can come back and do a second light coat of resin to fill the weave.
"
Good advice here."
How long does it take to green cure? I'm using the 206, slow curing, epoxy. West says working time is 90-110 minutes and maximum hardness is 1-4 days. Is green cure 110 minutes? A few hours? An overnight?
I'm planning on starting this weekend.
08/29/2022 10:29AM
Ok, real progress. Baby steps, but progress.
I put my first patch on yesterday. See pictures below. This was just a bad scratch, no missing or exposed kevlar. I sanded the area with 100 then 150 paper. I wet the area, put on a small patch, wet that and added a second patch. Then a bit more epozy. I used just enough epozy to wet both layers of fiberglass until transparent, then covered with saran wrap and smoothed it. it is very smooth except for a little bit on one edge that I could sand and re-epoxy.
My first question is: does this look right? This looks whitish to me in a few places when dry, but it was transparent when I put it on. I'm very happy about everything else, but I'd like some confirmation that the color isn't a sign I should have used more epoxy. I _think_ this is the stressed kevlar showing through the transparent fiberglass. Does this sound correct?

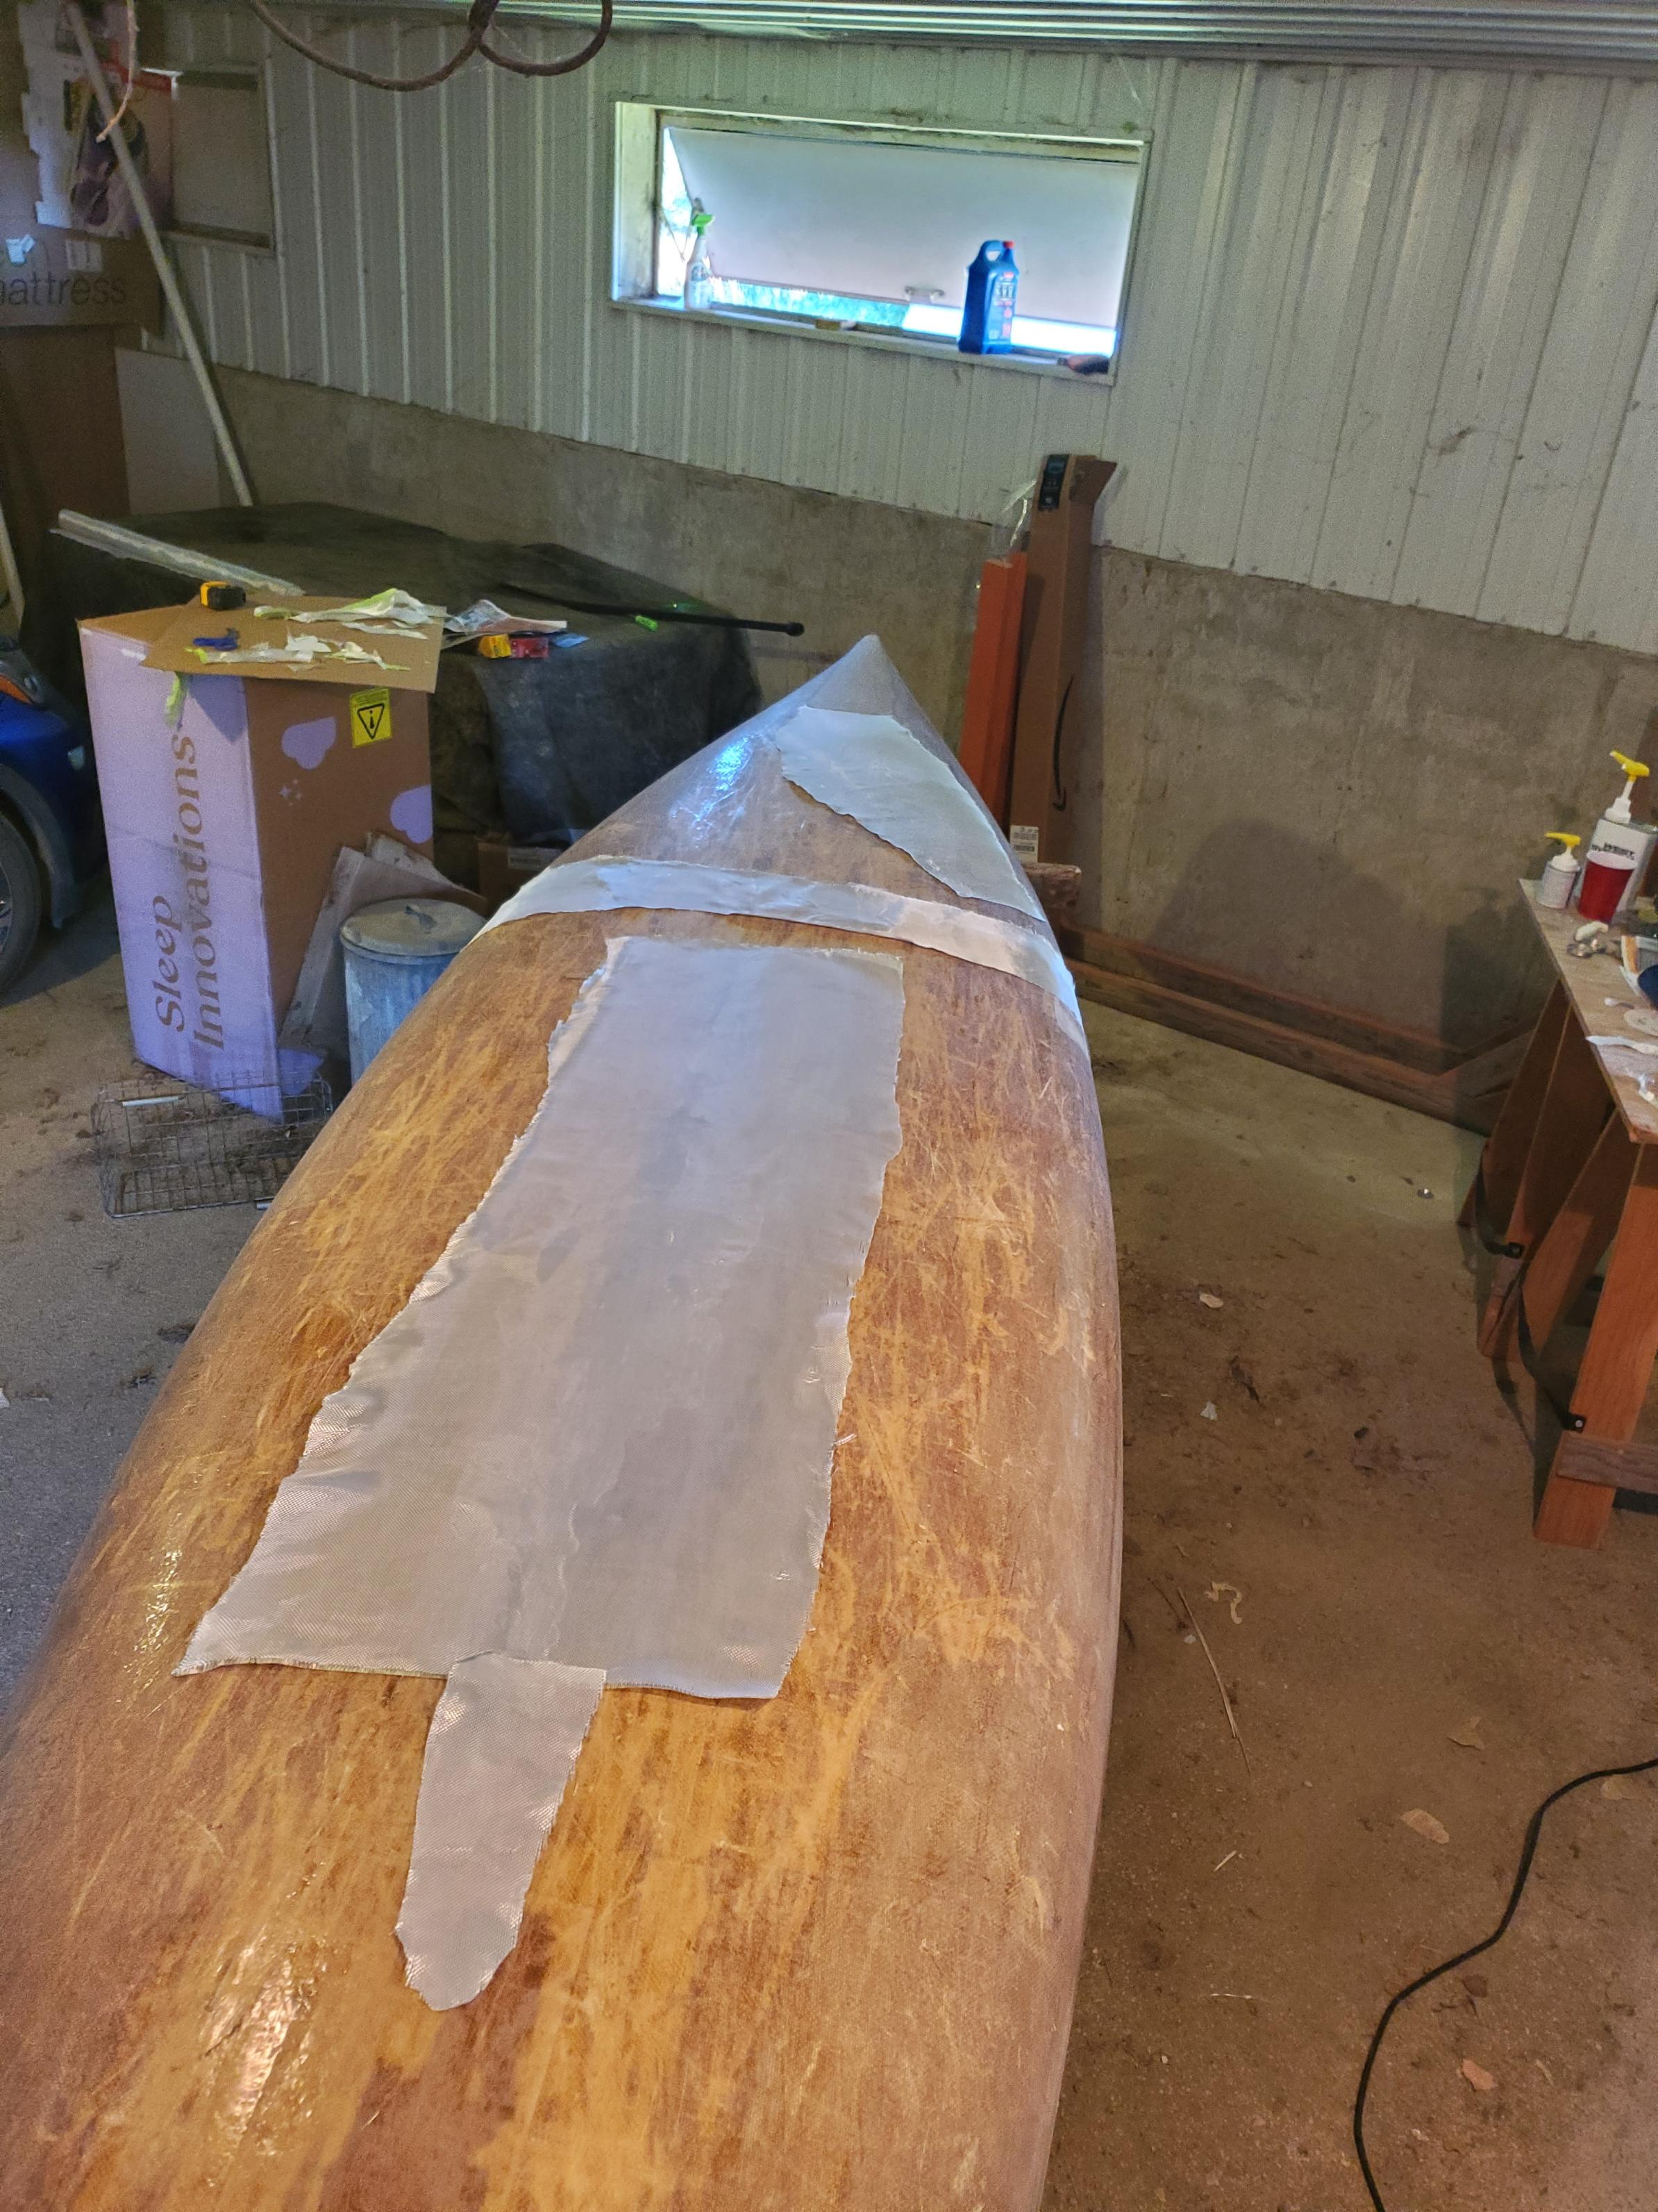
My second question is about how to patch the spots where there is a missing layer of kevlar. My original plan is to cut pieces of fiber to match the shape of the missing kevlar for the first layer. These pieces would fit into the existing holes like puzzle pieces. My second layer would extend ~2" past the first one. For the second layer, I'd likely cover many holes with one big piece. In some areas I'll have extra, but it will be much easier than cutting irregular shapes twice. I have a lot of large and irregular shaped holes; it will be a lot of work to match the crazy shapes, but I'm willing if that is reasonable. Here is an example of two patches and their corresponding holes:

Here is an example of one of the stranger patches I'd have to cut.

It would be much easier to make two larger layers that cover all the holes, but there would probably be divots in the patch where the existing holes are and it might not adhere as well. What does everyone think of this plan? It would reduce the work by half. I'm hoping someone tells me this plan will work just fine.
I put my first patch on yesterday. See pictures below. This was just a bad scratch, no missing or exposed kevlar. I sanded the area with 100 then 150 paper. I wet the area, put on a small patch, wet that and added a second patch. Then a bit more epozy. I used just enough epozy to wet both layers of fiberglass until transparent, then covered with saran wrap and smoothed it. it is very smooth except for a little bit on one edge that I could sand and re-epoxy.
My first question is: does this look right? This looks whitish to me in a few places when dry, but it was transparent when I put it on. I'm very happy about everything else, but I'd like some confirmation that the color isn't a sign I should have used more epoxy. I _think_ this is the stressed kevlar showing through the transparent fiberglass. Does this sound correct?

My second question is about how to patch the spots where there is a missing layer of kevlar. My original plan is to cut pieces of fiber to match the shape of the missing kevlar for the first layer. These pieces would fit into the existing holes like puzzle pieces. My second layer would extend ~2" past the first one. For the second layer, I'd likely cover many holes with one big piece. In some areas I'll have extra, but it will be much easier than cutting irregular shapes twice. I have a lot of large and irregular shaped holes; it will be a lot of work to match the crazy shapes, but I'm willing if that is reasonable. Here is an example of two patches and their corresponding holes:

Here is an example of one of the stranger patches I'd have to cut.

It would be much easier to make two larger layers that cover all the holes, but there would probably be divots in the patch where the existing holes are and it might not adhere as well. What does everyone think of this plan? It would reduce the work by half. I'm hoping someone tells me this plan will work just fine.
08/30/2022 09:19AM
I think your idea of replacing the missing cloth areas first (puzzle pieces) would probably be best, but it's also a question about how much work you're willing to put into it. You could just throw a couple layers over the whole shebang and be done with it, but I suspect it will add more weight that way and won't looks as nice.
Also it looks like maybe there were some bubbles in that first patch? Could try going just a bit heavier on the epoxy next time and don't forget to massage those out, or put another thin layer over top to fill in those holes if it bothers you? Depending on what type of glass you used the lighter "glazed" look could be expected.
Another tip on those bare areas. I actually try to fuzz the bare kevlar up a bit by sanding before applying the patch as I think it helps adhere the new patch by giving you more surface area and allows the epoxy to get into the kevlar fibers a bit more. Not so much that you break up/disrupt the weave, just enough that it gets a little fuzzy. You're covering it up now anyways to the fuzz won't be an issue.
"Wilderness is not a luxury but a necessity of the human spirit."
08/30/2022 10:15AM
Keth0601, thanks for the reply.
keth0601: "I think your idea of replacing the missing cloth areas first (puzzle pieces) would probably be best, but it's also a question about how much work you're willing to put into it. You could just throw a couple layers over the whole shebang and be done with it, but I suspect it will add more weight that way and won't looks as nice.
Ok, so it will work either way, but one is a bit more elegant. Got it. My latest plan is to epoxy puzzle pieces in that are a bit too big and then cut/sand off any excess. I think this is the best of both worlds. It is easier than trying to cut perfectly shaped patches AND it should actually fill the holes better because my patches wouldn't fit perfectly.Also it looks like maybe there were some bubbles in that first patch? Could try going just a bit heavier on the epoxy next time and don't forget to massage those out, or put another thin layer over top to fill in those holes if it bothers you? Depending on what type of glass you used the lighter "glazed" look could be expected.
When you say there are bubbles, where exactly are you seeing them? Do you mean at the surface or under the glass? The surface isn't completely filled in with epoxy yet. I'm planning on a thin coat of epoxy over the entire patched area once I'm done, which should fill in any tiny holes at the top.
The potential bubbles I'm worried about are the white spots that make up most of the patched area. I think I've convinced myself this is the layer underneath showing through. If you see other bubbles or think these white spots are bubbles, please let me know. It feels very solid, you can't feel any bubbles.Another tip on those bare areas. I actually try to fuzz the bare kevlar up a bit by sanding before applying the patch as I think it helps adhere the new patch by giving you more surface area and allows the epoxy to get into the kevlar fibers a bit more. Not so much that you break up/disrupt the weave, just enough that it gets a little fuzzy. You're covering it up now anyways to the fuzz won't be an issue."
This is excellent advice; I wondered about this. Thanks.
08/30/2022 03:50PM
Sorry, away for a couple days.
I think your first patch looks ok. Definitely need additional resin to fill into those voids. Big enough voids you could use an oral medication syringe to insert the resin directly where you need it.
The white is a combination of un-filled, wetted out cloth refracting light as well as underlying stripes from the canoe. The fiberglass should continue to become transparent as you continue to fill the weave with 1-2 additional light coats.
Puzzle piece idea may work. You will need to ensure that all the loose stuff on the edges is removed, and ideally try to bevel the edges in towards the patch. That way, when you get to layer 2-3 you've built back up to the same elevation as the surrounding area. Many boat repair guides will tell you to start with your largest patch first, then layer on top of it. Your approach is basically the opposite, or maybe somewhat in between with small/big/small.
Ultimately, you want to build up higher than previously and then sand it back down to fair. If you're going to varnish the whole thing when you're done for UV protection, then I wouldn't bother trying to polish away the sanding marks from the skin coat. Instead, gently sand the whole hull with 120-150 grit and give it 2 coats of a high quality spar varnish.
When a man is part of his canoe, he is part of all that canoes have ever known. - Sigurd F. Olson, "The Singing Wilderness"
09/06/2022 02:13PM
airmorse: "So how goes it?"
Generally, very good. Did a lot this weekend.
I had cut 3 small puzzle-piece patches before deciding I'd just use big patches. I put those three in, then covered those smaller patches and all the other unfilled holes with four big pieces of fiberglass. Then a coat of epoxy over those patches. Let it dry.
I was happy with it, but there were some bubbles. I thought I had waited until late enough in the day that the temp wasn't rising, but I got bubbles none the less. Then I sanded and put a coat of epoxy over the entire canoe. I got more bubbles, even though I'm positive the temp was dropping this time, but I used a torch to run over them and got 95% of the bubbles to disappear this way. It was both effective and satisfying. The only drama was that I ran out of epoxy when 80% of the way through. Had to frantically run to my brother-in-laws (100 yards away) and get some of his. Together we _barely_ had enough to cover it. Let it dry overnight.
This looked amazing. There are two places probably 5 square inches where the fiberglass weave didn't get 100% filled in with epoxy. I also used your quarter trick to test for any spots that weren't well bonded. Everywhere I patched is well bonded (ie. sounds the same when you bounce a quarter off it as the unpatched area that is nearby). But, I did find a few tiny spots (size of a nickel?) that I should have patched, there are small delaminated 'bubbles'. These will get fixed the next time I get into it.
One more touch-up coat of epoxy would have helped, but this is as good as it is going to get, for now. I sanded and put on a coat of varnish. I glanced at it this morning and it looks great, but haven't really looked or taken pictures.
I may put another coat of varnish on or I might call it good enough. I'm running out of time before trip and I still need to re-varnish and re-install my yoke.
I'll try to take some pics tonight and post them. I took a lot during the process, but I head out of town at 5 am tomorrow morning and my family is (rightfully) wondering who I love more, them or my canoe.
Huge thanks to this entire board, but especially to you, Airmorse, for all the support. I've gained a ton of skill, but more importantly, I've gained the confidence needed to fix boats for years to come.
Pic of the big patches I was about to epoxy down:
09/07/2022 10:26AM
Chuckles: "airmorse: "So how goes it?"
Generally, very good. Did a lot this weekend.
I had cut 3 small puzzle-piece patches before deciding I'd just use big patches. I put those three in, then covered those smaller patches and all the other unfilled holes with four big pieces of fiberglass. Then a coat of epoxy over those patches. Let it dry.
I was happy with it, but there were some bubbles. I thought I had waited until late enough in the day that the temp wasn't rising, but I got bubbles none the less. Then I sanded and put a coat of epoxy over the entire canoe. I got more bubbles, even though I'm positive the temp was dropping this time, but I used a torch to run over them and got 95% of the bubbles to disappear this way. It was both effective and satisfying. The only drama was that I ran out of epoxy when 80% of the way through. Had to frantically run to my brother-in-laws (100 yards away) and get some of his. Together we _barely_ had enough to cover it. Let it dry overnight.
This looked amazing. There are two places probably 5 square inches where the fiberglass weave didn't get 100% filled in with epoxy. I also used your quarter trick to test for any spots that weren't well bonded. Everywhere I patched is well bonded (ie. sounds the same when you bounce a quarter off it as the unpatched area that is nearby). But, I did find a few tiny spots (size of a nickel?) that I should have patched, there are small delaminated 'bubbles'. These will get fixed the next time I get into it.
One more touch-up coat of epoxy would have helped, but this is as good as it is going to get, for now. I sanded and put on a coat of varnish. I glanced at it this morning and it looks great, but haven't really looked or taken pictures.
I may put another coat of varnish on or I might call it good enough. I'm running out of time before trip and I still need to re-varnish and re-install my yoke.
I'll try to take some pics tonight and post them. I took a lot during the process, but I head out of town at 5 am tomorrow morning and my family is (rightfully) wondering who I love more, them or my canoe.
Huge thanks to this entire board, but especially to you, Airmorse, for all the support. I've gained a ton of skill, but more importantly, I've gained the confidence needed to fix boats for years to come.
Pic of the big patches I was about to epoxy down:
"
Glad to hear things worked out mostly ok. Bummer about the bubbles. Safe travels.
"In wilderness is the salvation of mankind." Thoreau.
09/07/2022 11:17PM
No worries about the bubbles; a little sanding and they were gone. Torch worked great on second coat. Here are some pics of the (maybe) final product. She reminds me of the lyric from Springsteen's Thunder Road, 'You ain't a beauty, but hey you're alright. And that's alright with me."
Not sure if this qualifies as canoe porn, but whatever floats your....boat. :) To me, she shines like the top of the Chrysler building.


Not sure if this qualifies as canoe porn, but whatever floats your....boat. :) To me, she shines like the top of the Chrysler building.


Subscribe to Thread
Become a member of the bwca.com community to subscribe to thread and get email updates when new posts are added. Sign up Here
Community Links
 Search BWCA.com
 Donate
 Featured Sponsor