|
 Boundary Waters Quetico Forum
 Gear Forum Gear Forum New paddle for the wilderness New paddle for the wilderness
|
Author
Text
09/07/2024 06:46AM
It's been a while since I have posted and I am getting ready to make the annual voyage to the north woods. I just finished up my latest canoe paddle and thought I'd show it off a bit (I hope that's okay). I spent a lot of time in my shop making man glitter and shaping this one out, so I call this one the Mistress. Can't wait to baptize it at Mudro Lake!
I am curious what you think of it.
5 degree bent shaft with a slight s-blade. Made from curly maple and sapele.


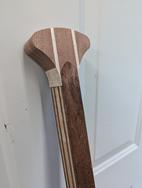
This was taken before wet sanding and polishing, but shows the rock guard and signature panel.


I am curious what you think of it.
5 degree bent shaft with a slight s-blade. Made from curly maple and sapele.


This was taken before wet sanding and polishing, but shows the rock guard and signature panel.


09/17/2024 07:14AM
Nelsonone,
Your paddle looks fantastic!
As I've glued up a few basic paddles (5, made from 2x6's) with some success, I recognize some of my limits. I'm interested in your process from start to finish or any direction for understanding that you may pass along.
I'm interested in what kind of glue you use to adhere your wood together. Also, I'd like to know what material you are using on bottom as a rock guard. Clamping? Sanding?
Finally, I recently canoed with a partner for a brief morning warmup at a retreat. At the last minute, we decided to use the kayak paddles. I have to say, we moved quickly across the lake. So, have you ever made or considered making a kayak paddle?
Thank you,
boatmaninc
09/17/2024 08:05AM
First of all, thank you for all of the kind words.
boatmaninc,
Type of Glue: Titebond 3 is all I used because of the extra working time and properties that help with bonding in wet environments. Now that I say that I have also used, on a recent paddle West Marine epoxy. That was a walnut and birch experimental paddle and the epoxy held up just fine and bonded the wood nicely. Titebond 3 my go to though.
My process for making a paddle is, well, the hard way I guess you would say. I started this paddle in March and finished it just a few weeks ago now. It is a hobby for me so, when I can steal some time to play in my shop I do.
1.) Because this one is a 5 degree bent shaft with a slight s-bend in the blade (think kayak paddle) I built a press to glue up the shaft (thanks to Woodsong Canoes for that idear). The shaft is eight layers laminated in the press.
2.) I spent quite a bit of time in Illustrator designing this blade before I bought the wood even. I bought the wood to match my vision. I didn't book match this blade so I built each side of the blade separately. The key to the intricate (at least for me) laminations like this is to do one at a time and let the glue set then cut the next and so on. This blade was four days of glue ups.

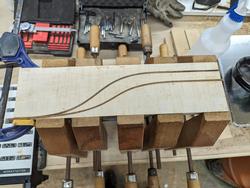

I just use parallel clamps for these and they work very nice. You could as easy use spring clamps as well. The "river" strips in the blade are .125" thick and to get the curves in them I had to spray them down with water and let them sit before glue up. I used a table saw to rip the strips and then hand sanded them with 220 grit to get nice glue lines. Tedious but I don't have a drum sander. Here is where I cheat, cutting each curve I used my Shaper handheld CNC router with a bit that removes .125" of material. That is key if you want the curves to glue up without gaps. Whatever you remove will cutting your joints is how thick your insert needs to be. I no insert is planned than you need to cut the curves for each side of the joint separately or use and extremely thin curf bandsaw blade (I have done this as well). I cut one curve at a time and glue it up and then wait.
3.) Once the "billet" is built with all of the curves I cut the sides of the blade to the shape of the blade and glue them to the shaft. Again, I use parallel clamps for this. Because of the 5 degree bend and the s-blade shape you do have to pay attention to your alignment of each of the wings when gluing them to the shaft.


4.) I cut s-shape into the blade with my bandsaw by turning the paddle on end and very carefully cutting the sides of the blade to the shape of the formed shaft. Only on the power face though. This is important as you use the final shape of the power face to mirror for the opposite side by using a pencil and tracing the power face shape on the edge of the blade all of the way around. This gives you a guide to follow on that side of the blade. Once I am happy with the power face shape I go back to the band saw and make a couple of initial cuts to start to shape the other side of the blade. This is not how bandsaws were designed to be used, but it works.
5.) Attaching the Grip: This paddle is unique because I didn't just want to glue a block of wood to the shaft. So, created the cone shape on the top of the shaft so that there would be a flow of wood color/grain. I glued up each side of the grip "billet" and then attached them to the shaft. I cut the reverse cone shape in that billet to mate with the shaft. Parallel clamps were used for this as well. Once the glue dried, I went back to the bandsaw and cut the ruff shape of the grip. The rest is sanding to get to the final shape.

6.) To shape the shaft I start out drawing lines top to bottom on all sides, I think I used .25" from each edge on this one. I also tapered this shaft so it is skinnier at the grip then at the blade. With the lines drawn I started sanding at 45 degree angles to knock of the edges. You end up with and octagon when your done sanding the four edges. Then I go back and sand each of those eight edges until I end up with a smooth egg shape shaft. Very time consuming and I know there are faster ways to do this, but sanding the shape into my paddles is very therapeutic for me.
7.) Now I spend a lot of time sanding until I am happy with the shape and all of the blend points. I typically don't sand above 220 grit at this point.
8.) When I am done sanding the blade is about .25" thick so I reinforce it with 3oz. fiberglass. So, the blade gets glassed on both sides using West Marine epoxy. I take the fiberglass about 4" up the shaft when I do this. I apply a total of four coats of epoxy to the blade on each side to ensure the fiberglass is filled in. Once that is dry I go back to sanding smooth and blending the fiberglass into the shaft. I will sand this up to 600 git. I wipe down the paddle to remove dust and then tack it off and apply four coats of epoxy to the rest of the paddle. Once dry, back to sanding smooth and blending it all together. Lots of sanding!


9.) Finish Coats: Once I have sanded the entire paddle up to 600 grit I wipe down the paddle with a damp cloth and wait for it to dry. Then I tack it off a couple of times to ensure it is absolutely clean. I use Clear Diamond Coat (water clear and pricey) and I opt to spray it on in hopes of getting a smooth finish. I apply four coats back-to-back and let it dry.
10.) To remove any orange peel or runs I may have created in the spraying process I start wet sanding the clear coat at 800 gritt and go up to 3000 grit. Sand and sand some more and then sand some more. I do all of this sanding by hand and don't use any sanders, mostly because I don't want to introduce those nasty little pig tails they can create. The other reason is I am merely wanting to smooth the finish out and not take off material. Once I am happy at the 3000 grit level I go to the polishing discs and used two polishing compounds. One for cutting and the other for the high gloss finish. Then the best moment of all is when you wipe that all off and apply a final coat of ceramic car wax.
Okay, so I typed all of that and forgot to tell you about the rock guard. The rock guard is made from West Marine epoxy and I added some metallic color for this blade. I put the rock guard on before I fiberglass the blade. I use wax paper and play-doh to create a form that mirrors the shape of the end of the blade. Then just pour the epoxy in and let dry. If you use color or don't mind a slight yellowing you can use 5 min epoxy for this as well. I have done it, and it works well.
Sorry for the long post. I hope this was helpful.
boatmaninc,
Type of Glue: Titebond 3 is all I used because of the extra working time and properties that help with bonding in wet environments. Now that I say that I have also used, on a recent paddle West Marine epoxy. That was a walnut and birch experimental paddle and the epoxy held up just fine and bonded the wood nicely. Titebond 3 my go to though.
My process for making a paddle is, well, the hard way I guess you would say. I started this paddle in March and finished it just a few weeks ago now. It is a hobby for me so, when I can steal some time to play in my shop I do.
1.) Because this one is a 5 degree bent shaft with a slight s-bend in the blade (think kayak paddle) I built a press to glue up the shaft (thanks to Woodsong Canoes for that idear). The shaft is eight layers laminated in the press.
2.) I spent quite a bit of time in Illustrator designing this blade before I bought the wood even. I bought the wood to match my vision. I didn't book match this blade so I built each side of the blade separately. The key to the intricate (at least for me) laminations like this is to do one at a time and let the glue set then cut the next and so on. This blade was four days of glue ups.


I just use parallel clamps for these and they work very nice. You could as easy use spring clamps as well. The "river" strips in the blade are .125" thick and to get the curves in them I had to spray them down with water and let them sit before glue up. I used a table saw to rip the strips and then hand sanded them with 220 grit to get nice glue lines. Tedious but I don't have a drum sander. Here is where I cheat, cutting each curve I used my Shaper handheld CNC router with a bit that removes .125" of material. That is key if you want the curves to glue up without gaps. Whatever you remove will cutting your joints is how thick your insert needs to be. I no insert is planned than you need to cut the curves for each side of the joint separately or use and extremely thin curf bandsaw blade (I have done this as well). I cut one curve at a time and glue it up and then wait.
3.) Once the "billet" is built with all of the curves I cut the sides of the blade to the shape of the blade and glue them to the shaft. Again, I use parallel clamps for this. Because of the 5 degree bend and the s-blade shape you do have to pay attention to your alignment of each of the wings when gluing them to the shaft.


4.) I cut s-shape into the blade with my bandsaw by turning the paddle on end and very carefully cutting the sides of the blade to the shape of the formed shaft. Only on the power face though. This is important as you use the final shape of the power face to mirror for the opposite side by using a pencil and tracing the power face shape on the edge of the blade all of the way around. This gives you a guide to follow on that side of the blade. Once I am happy with the power face shape I go back to the band saw and make a couple of initial cuts to start to shape the other side of the blade. This is not how bandsaws were designed to be used, but it works.
5.) Attaching the Grip: This paddle is unique because I didn't just want to glue a block of wood to the shaft. So, created the cone shape on the top of the shaft so that there would be a flow of wood color/grain. I glued up each side of the grip "billet" and then attached them to the shaft. I cut the reverse cone shape in that billet to mate with the shaft. Parallel clamps were used for this as well. Once the glue dried, I went back to the bandsaw and cut the ruff shape of the grip. The rest is sanding to get to the final shape.


6.) To shape the shaft I start out drawing lines top to bottom on all sides, I think I used .25" from each edge on this one. I also tapered this shaft so it is skinnier at the grip then at the blade. With the lines drawn I started sanding at 45 degree angles to knock of the edges. You end up with and octagon when your done sanding the four edges. Then I go back and sand each of those eight edges until I end up with a smooth egg shape shaft. Very time consuming and I know there are faster ways to do this, but sanding the shape into my paddles is very therapeutic for me.
7.) Now I spend a lot of time sanding until I am happy with the shape and all of the blend points. I typically don't sand above 220 grit at this point.
8.) When I am done sanding the blade is about .25" thick so I reinforce it with 3oz. fiberglass. So, the blade gets glassed on both sides using West Marine epoxy. I take the fiberglass about 4" up the shaft when I do this. I apply a total of four coats of epoxy to the blade on each side to ensure the fiberglass is filled in. Once that is dry I go back to sanding smooth and blending the fiberglass into the shaft. I will sand this up to 600 git. I wipe down the paddle to remove dust and then tack it off and apply four coats of epoxy to the rest of the paddle. Once dry, back to sanding smooth and blending it all together. Lots of sanding!


9.) Finish Coats: Once I have sanded the entire paddle up to 600 grit I wipe down the paddle with a damp cloth and wait for it to dry. Then I tack it off a couple of times to ensure it is absolutely clean. I use Clear Diamond Coat (water clear and pricey) and I opt to spray it on in hopes of getting a smooth finish. I apply four coats back-to-back and let it dry.
10.) To remove any orange peel or runs I may have created in the spraying process I start wet sanding the clear coat at 800 gritt and go up to 3000 grit. Sand and sand some more and then sand some more. I do all of this sanding by hand and don't use any sanders, mostly because I don't want to introduce those nasty little pig tails they can create. The other reason is I am merely wanting to smooth the finish out and not take off material. Once I am happy at the 3000 grit level I go to the polishing discs and used two polishing compounds. One for cutting and the other for the high gloss finish. Then the best moment of all is when you wipe that all off and apply a final coat of ceramic car wax.
Okay, so I typed all of that and forgot to tell you about the rock guard. The rock guard is made from West Marine epoxy and I added some metallic color for this blade. I put the rock guard on before I fiberglass the blade. I use wax paper and play-doh to create a form that mirrors the shape of the end of the blade. Then just pour the epoxy in and let dry. If you use color or don't mind a slight yellowing you can use 5 min epoxy for this as well. I have done it, and it works well.
Sorry for the long post. I hope this was helpful.
09/17/2024 09:17AM
Here is the experimental paddle that I spoke about above:
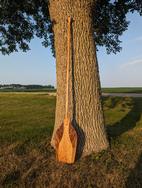
I used West Systems to glue this one up. In my last post I kept calling the epoxy West Marine, it's not that (dumb, dumb), but rather West Systems
West Systems 105 resin
West Sytems 207 hardener
Tapered hollow shaft paddle made with Walnut and Birch.

I used West Systems to glue this one up. In my last post I kept calling the epoxy West Marine, it's not that (dumb, dumb), but rather West Systems
West Systems 105 resin
West Sytems 207 hardener
Tapered hollow shaft paddle made with Walnut and Birch.
09/17/2024 01:11PM
Wow, that was a great response. I learned a lot in reading and plan to revisit. I'm still a little lost in some areas like when you use the CNC, when you create the s curve, inlay work. But, like I said, I need to just reread and visualize. I would love to see more of the materials/tools you use. Hand sanding, I get. Glassing....that is still fairly new. I find the top grip/handle to be more difficult than I would expect. If I were to go to the shop after reading this, today, I would try to make a kayak paddle for canoeing using some of your techniques learned/shared and maybe incorporate some color design into the blades as well (like some blue, green, white translucent stain). All in all, thank you for sharing, it's a beautiful paddle. Also, have you ever considered baking some soft woods like basswood in an effort to make them less absorbing of water? Thanks again!
Subscribe to Thread
Become a member of the bwca.com community to subscribe to thread and get email updates when new posts are added. Sign up Here


 Search BWCA.com
 Donate