|
 Boundary Waters Quetico ForumGroup Forum: Boat Builders and RepairLet's see some paddles!
|
Author
Text
")
12/09/2012 07:59PM
I'm looking to build my first paddle, and am interested in seeing some different designs. Since this will be my first paddle, I'm going to stick to a straight shaft design, and then graduate to bent shaft paddles from there. I picked up a copy of "Canoe Paddles: A Complete Guide to Making Your Own," but I'd like to see some of your guys' paddles to get an Idea of what I'd like to use for wood.
Thanks for any pictures/advice.
Thanks for any pictures/advice.

01/26/2013 08:47PM
I am also in the process of doing my first. I too have the book by Warren and Gidmark. This book is a nice reference, but I elected to use the simple method shown by Gil Gilpatrick in his 2nd edition book..... a method that uses scraps of cedar and ash left over from my canoe building.
I am in the process of shaping right now. The paddle weighs in a 1 lb 7 oz at this point. I have a bit more material to remove, but I doubt it will get lighter with epoxy work in front of me.
Pictures show grip and blade. I am not really happy with the way I shaped my spines and the way they lay on the blade. But for now I will live with it and later build another


"Boredom, Tyler - that's what's wrong. And how do you beat boredom, Tyler?... Adventure...(Never Cry Wolf, 1983)


02/02/2013 10:45AM
Hey Joe, sorry I'm a bit slow.
After shaping the blade I square cut the end and removed about 1/4"-3/8" (I can't remember). I used epoxy mixed with sanding dust to create a thick paste and added back in 1/4" or so to the bottom of the blade. I then prettied it up by overlaying a piece of aniegre (sp?) veneer and then reshaped the end of the paddle. I glued the veneer by laying down some epoxy, then clamping the veneer down using some wax paper and a couple blocks of wood as cauls. If you use thin enough wood as a caul it will still distribute the pressure of the clamps out while allowing it to contour to the paddle if it isn't perfectly flat. After that I protected everything with a layer of 4 oz glass and epoxy.
With a round tip like your paddle I think I'd make a router jig I could clamp to the blade and use a flush trim bit to evenly and cleanly remove the area you want to add the rock guard to. FYI, you can completely skip the veneer step, but I would recommend glassing the blade to make sure the rockguard stays in place.
We do not inherit the earth from our ancestors; we borrow it from our children -Chief Seattle
02/02/2013 10:54AM
Oh, and to create the form to hold the thickened epoxy at the end of the paddle I used foil tape. The foil type used to seal ductwork. I applied it to one side of the blade and then just bent up the edges to hold the epoxy, creating a bit of a mold for it. I then sanded it down flush with the blade before veneering.
We do not inherit the earth from our ancestors; we borrow it from our children -Chief Seattle
02/02/2013 09:01PM
Mark
Thanks for the tip on the tip. Actually I was thinking of doing something like that with thickened epoxy. I will try that on my next.
I have been following the methods of Gilpatrick. He suggests a length of 1/8" or 1/4" braided nylon rope (fit to the tip and sides of the blade).
I followed his suggestion using 3/16 solid braid. I put a cove on the edge of the blade and laid the epoxy-saturated rope into the cove. That worked nice, but it did not turn out as nice as my "practice piece". Shaping nylon rope after epoxy has set is rough at best (literally rough). Most of the rough will be covered with epoxy when I glass the blade. It will be ok, but...........
I know the foil that you speak of. I used it making my pot cozy.
"Boredom, Tyler - that's what's wrong. And how do you beat boredom, Tyler?... Adventure...(Never Cry Wolf, 1983)
03/04/2013 08:23PM
My first paddle hangs completed, and now I am building a second just like it....... my son liked the look and dropped a hint. Paddle making is addictive and a lot easier on the pocket book than canoe making. So far I am using "parts" left over from the canoes. I did seek out a light 3.7 oz cloth for the blade.


"Boredom, Tyler - that's what's wrong. And how do you beat boredom, Tyler?... Adventure...(Never Cry Wolf, 1983)
03/31/2013 09:43PM
Paddles are finished as is the Prospector Ranger 15. I am anxious to see how this canoe handles....... just as anxious to have one of those paddles in my hand. I think winter is on the run and I will soon have soft water.

"Boredom, Tyler - that's what's wrong. And how do you beat boredom, Tyler?... Adventure...(Never Cry Wolf, 1983)
04/02/2013 08:43PM
Mark
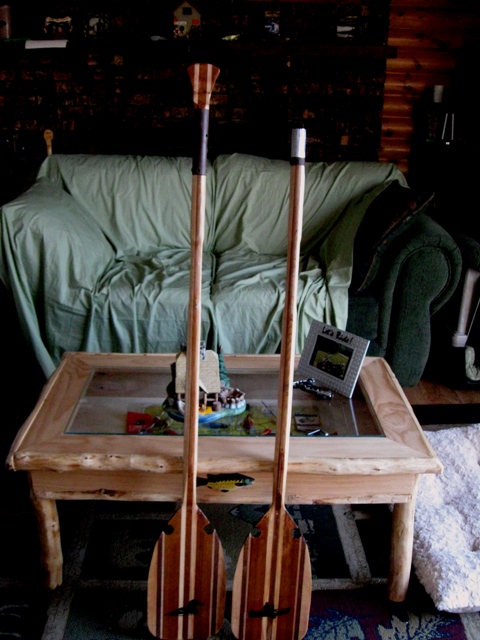
Thanks for the "attaboy" on my wood work. Your work on those paddles was really nice. I am curious about how you laid up those paddles. I noticed a guitar in your picture. Did you build that too? capo on 5 or 6....... what kinda music do you play?
Do you have any experience in "fuming" wood. I have a piece of 1/4 sawn white oak (I think white oak). A quick stab at measuring the density puts it at about 57 lb/cu ft. I think that is a bit high for white oak. I found the wood along the curb during city clean-up days. People have no idea what they are throwing out of old house remodels.... so I scrounge for scraps. I ran the wood through my planer and uncovered a beautiful medulary ray fleck pattern and decided to use it in a paddle rack for my son.
I want to bring out that grain and thus the interest in fuming
The unknown wood is on the right in this picture. Does it look about right for white oak?

"Boredom, Tyler - that's what's wrong. And how do you beat boredom, Tyler?... Adventure...(Never Cry Wolf, 1983)
04/11/2013 09:36AM
Okay so I thought I would post pics of a couple new paddles I'm making. I made 5 paddles so far, starting last winter (one bent shaft and 4 straights). This year, I am making another straight and trying a double bent.
This pic is the beginning of the straight blade construction. The blade is cedar, with an outline of dark cedar and spruce. Here you see the strips cut out.


Here I am gluing up the strips to the rest of the blade

Here the assembled blade 'wings' are being glues up to the shaft


Here is the paddle shaped, sanded with the first coat of epoxy and fiberglass on the blade:


And here is the grip:

On to the bent shaft. I just started it last night. After ripping some spruce, I made a mold to bend them. Here they are clamped and glued up:

This paddle will have a 14 degree bend on the blade, with a smaller bend back along the grip - maybe 6-7 degrees? I just winged it for the main reverse bend in the middle of the shaft, just looking at pics of various major brands, including the double whiskey jack and the Bending branches Viper.
Anyway, I will try and keep posting pics as I move along and complete these.
Moonman.
04/11/2013 02:54PM
Hey HPD,
Slow on the reply again:) I did make that guitar in the background. I used to run a side business building acoustics. Not sure what I have the capo on, but I play mostly fingerstyle guitar, often in alternate tunings. I also play a fair amount of two hand tapping technique as well as percussive strikes on the guitar. Think Michael Hedges but not as good:)
No experience in fuming, but that does indeed appear to be a nice piece of white oak.
Nice work Moonman!
We do not inherit the earth from our ancestors; we borrow it from our children -Chief Seattle
04/11/2013 10:28PM
Mark
anything resembling Hedges would be pretty darn good. I too fingerpick...... a work in progress. I decided to learn to play a guitar the year I turned 60........ should not have waited so long. Difficult to teach old fingers new tricks. I like the traditional old blues style alternate base picking. Currently working my way through Mark Hanson's "The Art of solo fingerpicking"
Moonman
Beautiful work. Keep posting your progress. Do you have a close-up showing the rough lay up in the area of the neck/blade?
"Boredom, Tyler - that's what's wrong. And how do you beat boredom, Tyler?... Adventure...(Never Cry Wolf, 1983)
04/12/2013 06:29AM
quote HighPlainsDrifter: "
Mark
anything resembling Hedges would be pretty darn good. I too fingerpick...... a work in progress. I decided to learn to play a guitar the year I turned 60........ should not have waited so long. Difficult to teach old fingers new tricks. I like the traditional old blues style alternate base picking. Currently working my way through Mark Hanson's "The Art of solo fingerpicking"
Moonman
Beautiful work. Keep posting your progress. Do you have a close-up showing the rough lay up in the area of the neck/blade?
"
I'll check and see what pics I have.
04/12/2013 07:44AM
Hey HPD,
I checked the pics I have and no close up of that area. I could take a pic of it now but that may not help. I'd be more than happy to answer any questions that you might have though, that area is the trickiest part of the build in my opinion.
Moonman.
I checked the pics I have and no close up of that area. I could take a pic of it now but that may not help. I'd be more than happy to answer any questions that you might have though, that area is the trickiest part of the build in my opinion.
Moonman.
04/12/2013 08:49AM
Moonman
With a picture in the rough, I thought I could get an idea of what you are doing to get the seamless taper (in 2 dimensions) of handle to blade.
It looks like the thickness of your handle stock is carried right into the blade. What thickness are you starting with? Also what is the thickness of the cedar (blade, not trim) that you are starting with?
Seems like stock grain direction would be a major concern in the lay-up
I followed a method shown by Gil Gilpatrick (my first paddle building attempt). His method is quick and relatively easy, but the elegance of the throat-to-blade taper is too massive....... the lines do not flow.
I have plenty of time these days and would now like to step into a build that is a bit more technical.
Thanks
joe
"Boredom, Tyler - that's what's wrong. And how do you beat boredom, Tyler?... Adventure...(Never Cry Wolf, 1983)
04/12/2013 10:12AM
Hi Joe,
Firstly, as a resource, the Graham Warren David Gilpatrick book 'Canoe Paddles, A Complete Guide to Making Your Own' is a fantastic resource. The reason is that the book breaks down every step quite well, including nice pictures. You might already have the book, but if you don't its a great read, and has patterns and info to make several paddles. The authors also have a nice website: Moosehead Paddles
The main templates can also be found online - I saw them on a home builders sight - a guy from Italy I believe. Not sure about the legality etc of using them though, as really you should buy the book to use them....
Anyway, the throat area is one where using templates as carving guidelines is extremely useful. The main template used in this area is the side profile taper from shaft to blade. You can make this more long and sweeping, or shorter and more abrupt, simply by moving that template lower towards the blade, or higher, upwards along the shaft. Also, you can lengthen this profile as well.
The dimensions of the shaft in my paddle are 1 1/8" wide by 1 1/4" high. This will create an elliptical cross section. On laminated paddles, I carry the same dimensions all the way from grip to end of the blade, then just plane down. Beside the throat side profile, the other important area here is the spine. On my first paddles, I didn't pay enough attention to it. A Nice spine or dihedral cross section from the shaft down to about a third of the blade length makes a much more elegant paddle and adds a great deal of strength as well. The Warren/Gidmark book covers this as well. Its a difficult area to get to and you need very sharp tools. A spokeshave worked on an angle is the best I've found, especially for hard wood paddles. For softwood paddles (like the pics I posted), I used a round section of pvc, with thick foam backing some sand paper. This worked very well. I just sanded at the transition area between the blade 'wings' and the shaft. Speaking of blades, the thickness of mine were 5/8" - standard for cedar planks from big box stores. I get some really nice boards from Lowes and Home depot, just go through the planks and you'll find the odd clear one, or one with only a few knots. Another tip is using a wood rasp. One caution, its probably best to add a strip of wood along the shaft of the same shaft dimensions as to widen it before adding the blade wings. This makes carving it down easier, as the transition is not so great. The other thing you mentioned, grain direction is indeed very important. Not only for maximum strength and carving ease etc, but also for maximum glue up strength between different types of wood (expansion). The Gidmark/Warren book discusses this in depth with diagrams and great info.
Hope this helps.
Moonman.
04/12/2013 06:55PM
Moonman
Yes, your information helps a lot and has caused me to reopen the Warren and Gidmark book. I have that resource.
I wanted to get a couple of paddles made before the paddling season and thus I followed Gilpatrick's methods because the woodworking looked simpler and the materials were on hand. I believe I need to study the Warren Gidmark book a bit more.
Thanks for the link to their site. Some very good historical information lies there. I did not particularly like the wood/canvas canoe shown in the opening picture of their site. It is odd that these craftsmen used hex head bolts (above the gunwales) to mount a thwart.
"Boredom, Tyler - that's what's wrong. And how do you beat boredom, Tyler?... Adventure...(Never Cry Wolf, 1983)
04/15/2013 09:45AM
HPD,
You might want to find a paddle you like and just replicate it. That's how I approached my build. I had a mitchell that I really liked so I studied it and was able to figure out how they laminated and shaped it.
On the bent shafts, I scarf jointed the angle to the blade, but I alternated the scarfs with each lamination so I didn't have all my seams on the same plane. This seemed a whole lot easier than bending. On the blade, from the center out, I started with wood as thick as the shaft, then kept gluing up thinner pieces to make the blade. I then went at it with an angle grinder with 36 grit on it to rough it out, then progressed to planes,rasps, and sandpaper. I more or less copied the profile of the mitchell paddle as I went.
We do not inherit the earth from our ancestors; we borrow it from our children -Chief Seattle
04/15/2013 06:34PM
MWD1976
Your technique. How simple:
"On the blade, from the center out, I started with wood as thick as the shaft, then kept gluing up thinner pieces to make the blade. I then went at it with an angle grinder with 36 grit on it to rough it out, then progressed to planes,rasps, and sandpaper."
Thanks. I probably will do just that on my next attempt.
I am at a point of not wanting to start a building project right now...... by the calendar, spring should be here. Time to do outside stuff. But looking out the window suggests that winter arrived again, and again, and again. Starting to think that I will have to build a canoe with a special ice breaking bow.
"Boredom, Tyler - that's what's wrong. And how do you beat boredom, Tyler?... Adventure...(Never Cry Wolf, 1983)
04/21/2013 08:56PM
So here are a couple progress pics of my double bent shaft paddle
The shaft turned out well, here I am gluing up the blade. I had previously glued up an outer strip of dark cedar and spruce to the inner blade of lighter cedar. I then trimmed flush along the center line and glued each whole complete blade 'wing' to the shaft:

Here is another shot, you can see the double bend in the shaft clearly here:

Blade glue up complete:

Here it is with the grip glue up complete:

Close up of the grip:

And here it is ready to commence carving out:

Because of the bending shaft, I couldn't use my usual method for marking out the shaft for rounding. This time I had to make a spar gauge. Boy, I sure wish I had done this on my first paddle. Marked out the shaft in literally one minute. Used to take a lot longer than that...anyway, hopefully I'll have the blade and grip done in a couple days, then on to the shaft. More pics to follow.
Moonman.
04/22/2013 08:00PM
I learned something new tonight. Spar Gauge. I had no idea what you were talking about. So, rather than ask, I went off to UTube and sure enough, you can get anything you want on UTUBE...... kinda like Alice's Restaurant.
Thanks Moonman....... you do nice work
Making a Spar Gauge
"Boredom, Tyler - that's what's wrong. And how do you beat boredom, Tyler?... Adventure...(Never Cry Wolf, 1983)
04/22/2013 09:20PM
quote HighPlainsDrifter: "
I learned something new tonight. Spar Gauge. I had no idea what you were talking about. So, rather than ask, I went off to UTube and sure enough, you can get anything you want on UTUBE...... kinda like Alice's Restaurant.
Thanks Moonman....... you do nice work
Making a Spar Gauge "
Thanks HPD,
Managed to get most of the carving and sanding done tonight. Just final sanding on grip and shaft remain, then on to fiberglassing. Its looking pretty good so far. Will post some pics tomorrow. BTW there is some info on making/using a spar gauge in that Gidmark/Warren paddle book.
Moonman.
04/23/2013 05:05PM
Marc Ornstein has a few good images on his site showing blade shaping. I like the little "rocking router" fixture he made for shaping the blade.
dog paddle canoe
dog paddle canoe
We do not inherit the earth from our ancestors; we borrow it from our children -Chief Seattle
04/23/2013 07:42PM
quote mwd1976: "Marc Ornstein has a few good images on his site showing blade shaping. I like the little "rocking router" fixture he made for shaping the blade.
dog paddle canoe "
Yeah, Marc sure makes awesome paddles and pretty too! There is a builder who makes some prototypes/plugs for Hemlock Canoe called Conk who has the exact same set up for his paddles. BTW, Conk is an awesome builder of all things canoes, and has a cool Picasa web account with all kinds of pics and building steps. Worth a visit.
Moonman.
Subscribe to Thread
Become a member of the bwca.com community to subscribe to thread and get email updates when new posts are added. Sign up Here
Community Links
 Search BWCA.com
 Donate
 Featured Sponsor