|
 Boundary Waters Quetico ForumGroup Forum: Boat Builders and RepairNew Build: The Saganaga
|
 Forum Sponsor

Author
Text
")

11/15/2017 03:24PM
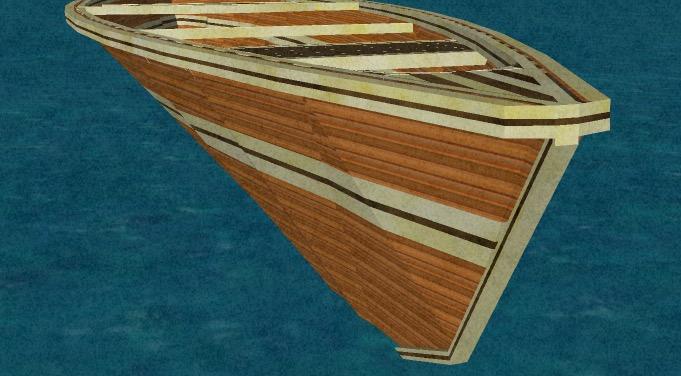
I'm pulling the trigger and building a new boat this winter. I decided to build my own from scratch- from nothing. No plans- nothin. I mentioned in another thread I used Delftship to draft my own boat : The Saganana. So titled as I believe it is a boat I would want to paddle on big water and for a big family trip. I'm going to use the program to generate an offset table which I can then loft into reality.
Here's the specs:

The design is a conglomeration of other boats I like, and things I'd want to change.
The ends are "redbird" like for that classic canoe look. It's asymmetrical in a similar way to the freedom, but more freeboard as that's one thing I don't like about my freedom. It's got a large beam to hold a lot like the prospector, yet still sleek w/ a low prismatic coefficient since it's longer. I added a decent amount of tumblehome for solo paddling from the center. The waterline is a good shape for stability all the way through various drafts, so I'm not envisioning it being tippy (shouldn't be at 36"+). I also think the program underestimates the draft due to my less than perfect 3D skills.
For all intents and purposes this should be a big trip boat.
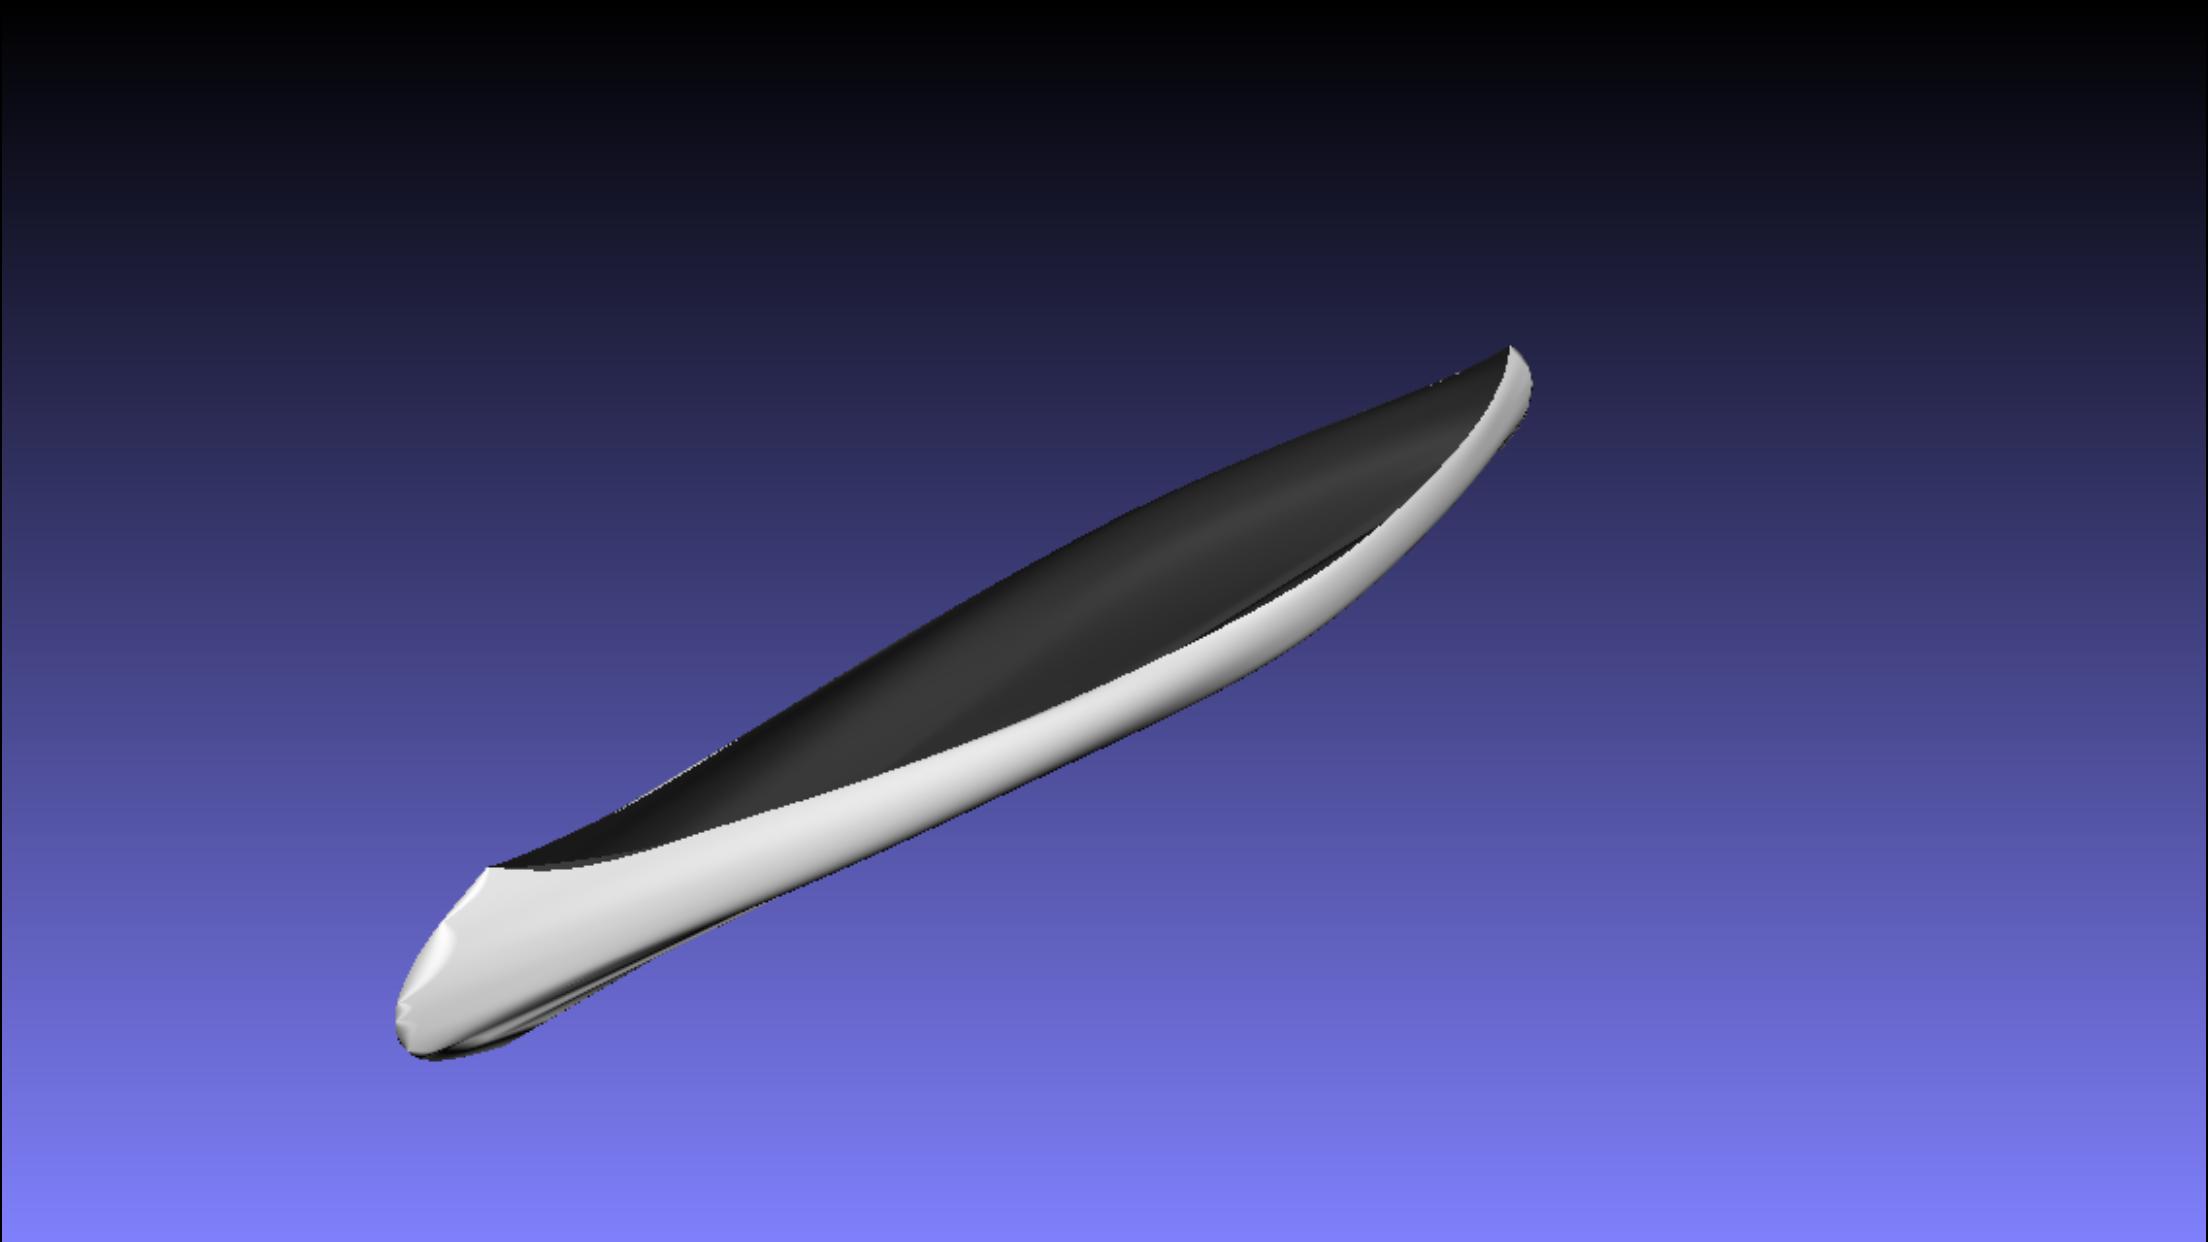
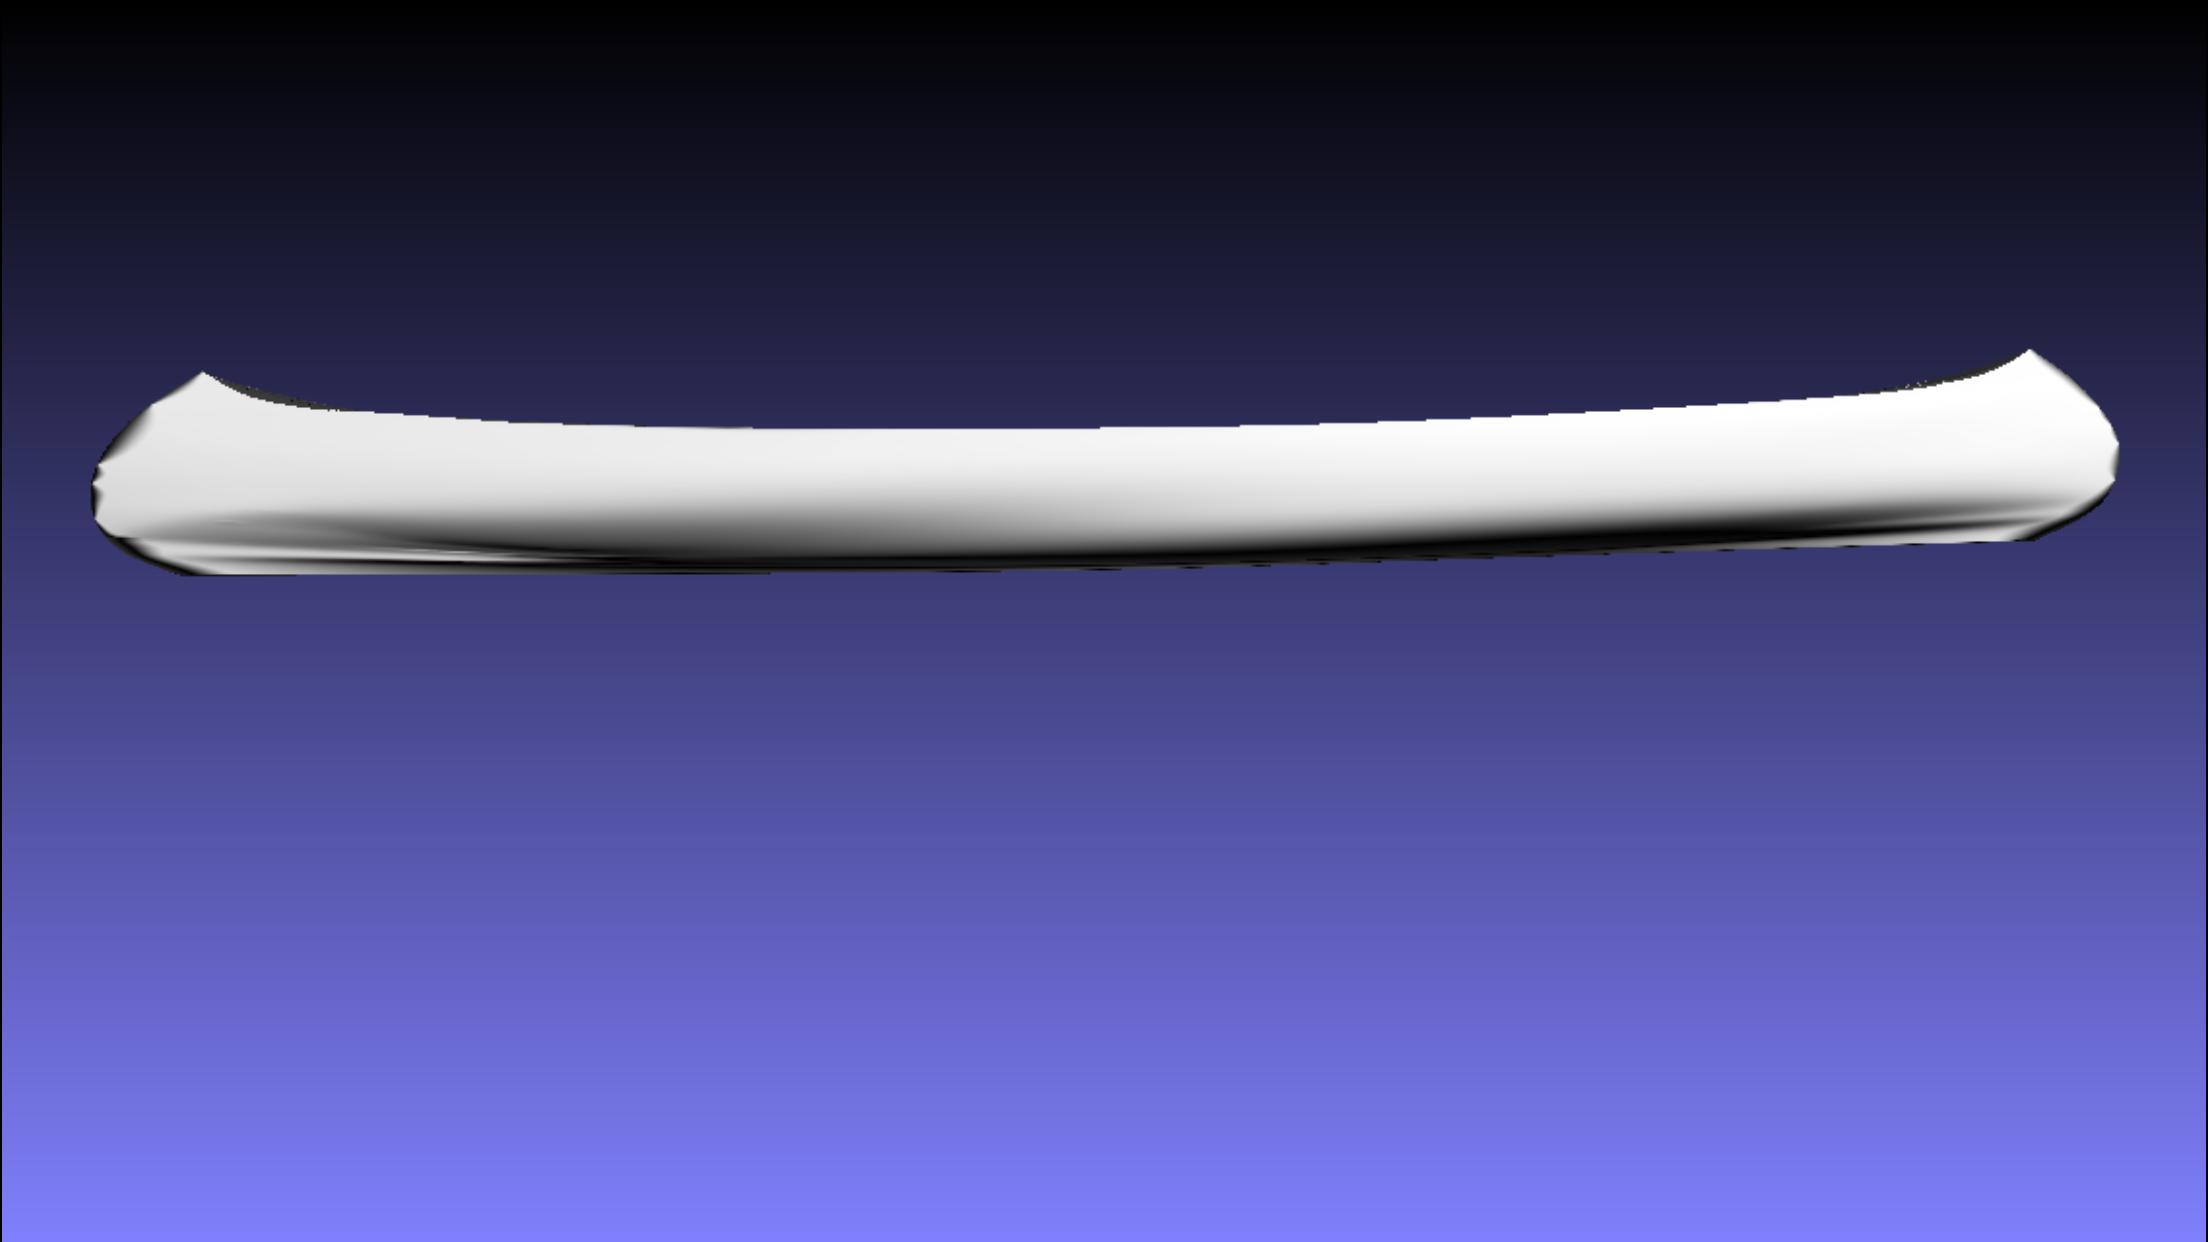
Delftship allows export to 3D object files which can then be viewed with certain apps on an iPhone. Here's a photo shoot I did. :)
( I am not a 100% expert on 3D modeling so forgive the folds near the bow/stern. I will straighten that out with the actual build and loft-but couldn't quite make it work on the delftship. )


I may widen the ends slightly when I get the forms mocked up to reality so there's not such a sharp entrance, but other than that I am pretty happy with my design and have put a lot of work into it. We'll just have to see how it looks when I get the forms done and mounted. I will adjust.
I will update the group as the build progresses!
Here's the specs:

The design is a conglomeration of other boats I like, and things I'd want to change.
The ends are "redbird" like for that classic canoe look. It's asymmetrical in a similar way to the freedom, but more freeboard as that's one thing I don't like about my freedom. It's got a large beam to hold a lot like the prospector, yet still sleek w/ a low prismatic coefficient since it's longer. I added a decent amount of tumblehome for solo paddling from the center. The waterline is a good shape for stability all the way through various drafts, so I'm not envisioning it being tippy (shouldn't be at 36"+). I also think the program underestimates the draft due to my less than perfect 3D skills.
For all intents and purposes this should be a big trip boat.
Delftship allows export to 3D object files which can then be viewed with certain apps on an iPhone. Here's a photo shoot I did. :)
( I am not a 100% expert on 3D modeling so forgive the folds near the bow/stern. I will straighten that out with the actual build and loft-but couldn't quite make it work on the delftship. )


I may widen the ends slightly when I get the forms mocked up to reality so there's not such a sharp entrance, but other than that I am pretty happy with my design and have put a lot of work into it. We'll just have to see how it looks when I get the forms done and mounted. I will adjust.
I will update the group as the build progresses!

11/16/2017 08:01AM
Very interesting Grizzlyman!
Soloing any 18 1/2' will be a challenge in wind, or current.
First off, I'm by No means an expert !!!!!
I've done the Old School method of shifting forms to resemble Asymetrical hulls. after building a couple, I really saw no gain in speed, and actually a slight loss in tracking.
Again I'm No expert, and just presenting my observations ! My methods were questionable, but none the less, that's my observation !
Others ?
Keep your paddle wet and your seat dry!
11/18/2017 05:12PM
Man, those swept recurve ends with the tumblehome looks awesome! Sort of a traditional element meeting a sleek modern design.
It will be exciting to see the hull take shape. I'm curious about lofting from an offset table: It seems like delftship users will usually print a full-size linesplan of stations and trace them directly onto the wood.
Does the vee stay fairly sharp amidships?
It will be exciting to see the hull take shape. I'm curious about lofting from an offset table: It seems like delftship users will usually print a full-size linesplan of stations and trace them directly onto the wood.
Does the vee stay fairly sharp amidships?
"Everybody needs beauty as well as bread; places to play in and pray in, where nature may heal and give strength to body and soul" -John Muir
11/18/2017 06:42PM
quote muddyfeet: "Man, those swept recurve ends with the tumblehome looks awesome! Sort of a traditional element meeting a sleek modern design.
It will be exciting to see the hull take shape. I'm curious about lofting from an offset table: It seems like delftship users will usually print a full-size linesplan of stations and trace them directly onto the wood.
Does the vee stay fairly sharp amidships? "
Thanks. I'm pretty happy with the aesthetics. The v disappears as the beam "fills out" to 36". I would classify the bottom as a shallow v or a shallow arch, more on the shallow arch side.
As far as lofting goes, you're correct. I could export to a cad file then just print using delftship, but I figured what the heck, I'm doing this from scratch anyways so I might as well loft and make it *really from scratch.
It adds sex appeal to the build I think. I lifted my last canoe too.
12/01/2017 10:55PM
For obvious reasons - I'm starting to really like this canoe.
And it's kinda my style too, nice and big, so I can bring all the stuff I usually bring with me on a canoe trip.
How tippy do you think she'll be? On Sag that would be important. I've been in the teeth of waves on that lake and have heard some horror stories.
And it's kinda my style too, nice and big, so I can bring all the stuff I usually bring with me on a canoe trip.
How tippy do you think she'll be? On Sag that would be important. I've been in the teeth of waves on that lake and have heard some horror stories.
aka HermitThrush "Such sights as this are reserved for those who will suffer to behold them." -Eric Sevareid
12/04/2017 01:52PM
quote Arcola: "Canoes aren't tippy, people are. :) I like the term responsive."
Nice!
Regarding "tippy"... that's the unknown. Most bigger beam boats aren't tippy at all so I think that should be ok.. I "feel" this design isn't tippy... but who knows.
As far as I can tell the best "scientific" measurement of tippiness is metacentric height- but from what I understand that is a questionable measurement at best. Also I believe the shape of the waterline at various depths would make quite a difference as well-especially with an assymetrical canoe.
Bear mountain created a formula that uses metacentric height as its primary factor in calculating their "stability" factors on their website. Based on this, my stability factor is higher than a freedom 17'9... but I take that with a huge boulder of salt... :)
12/05/2017 08:15PM
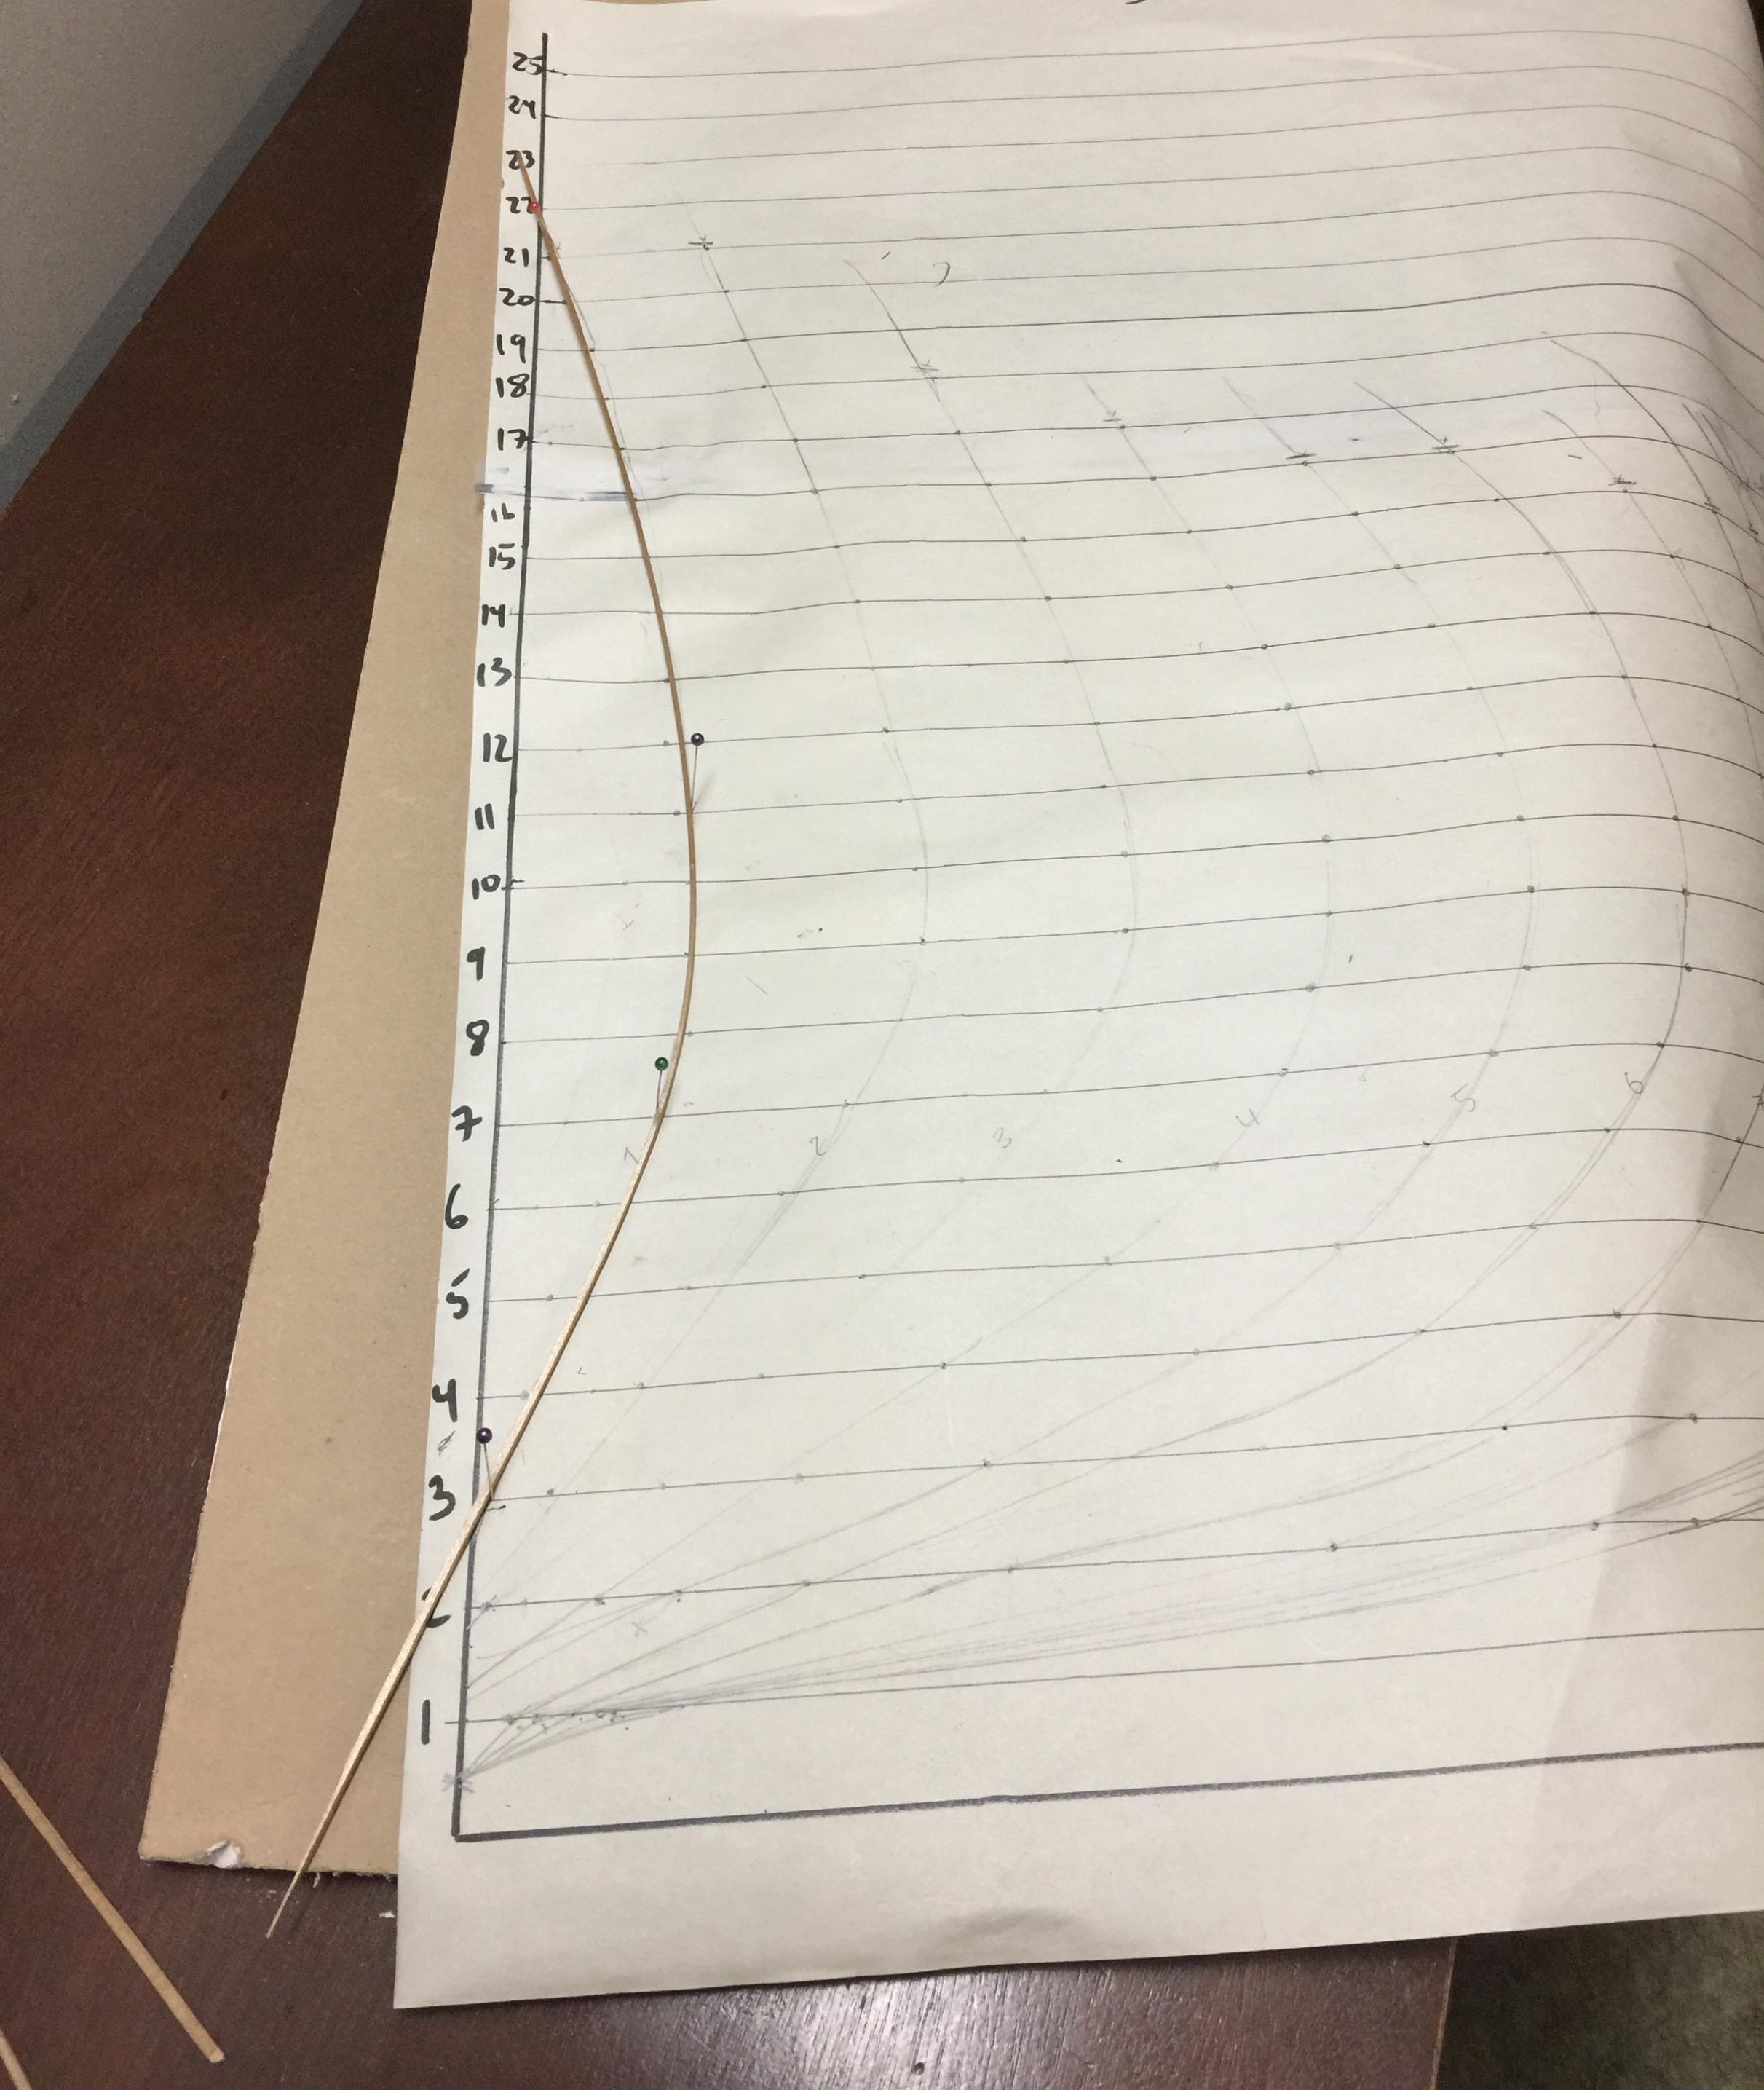
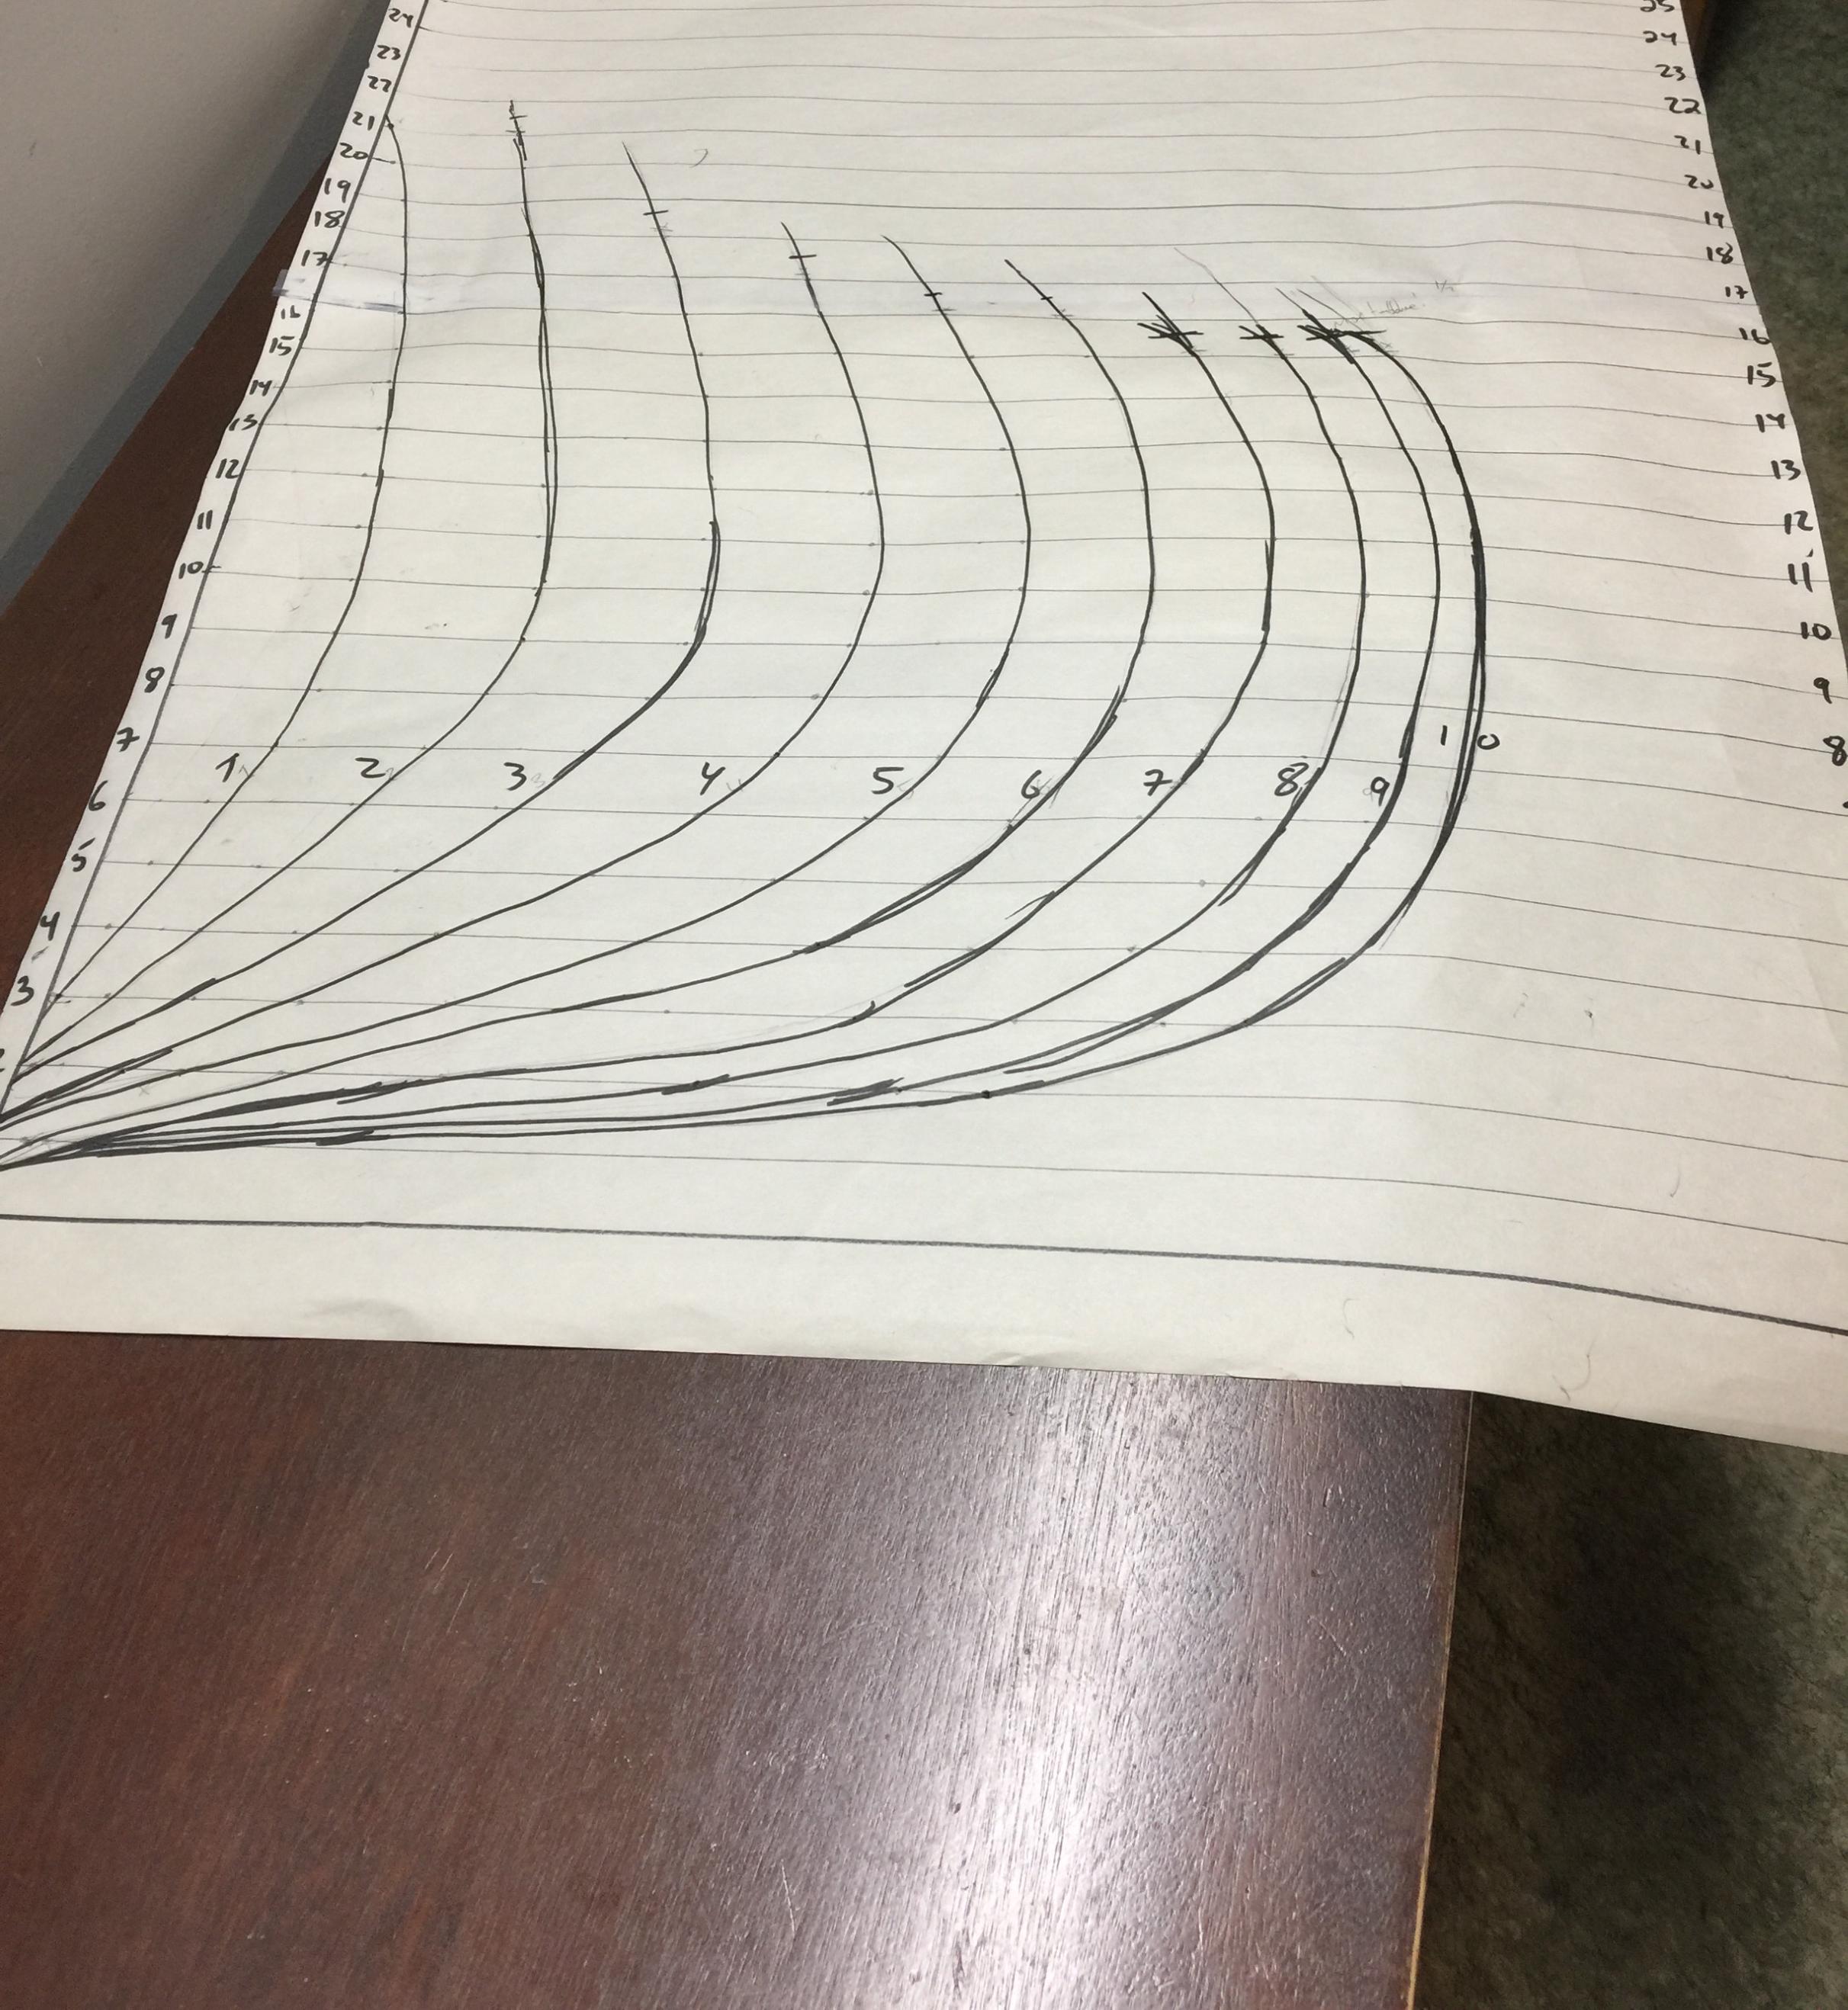
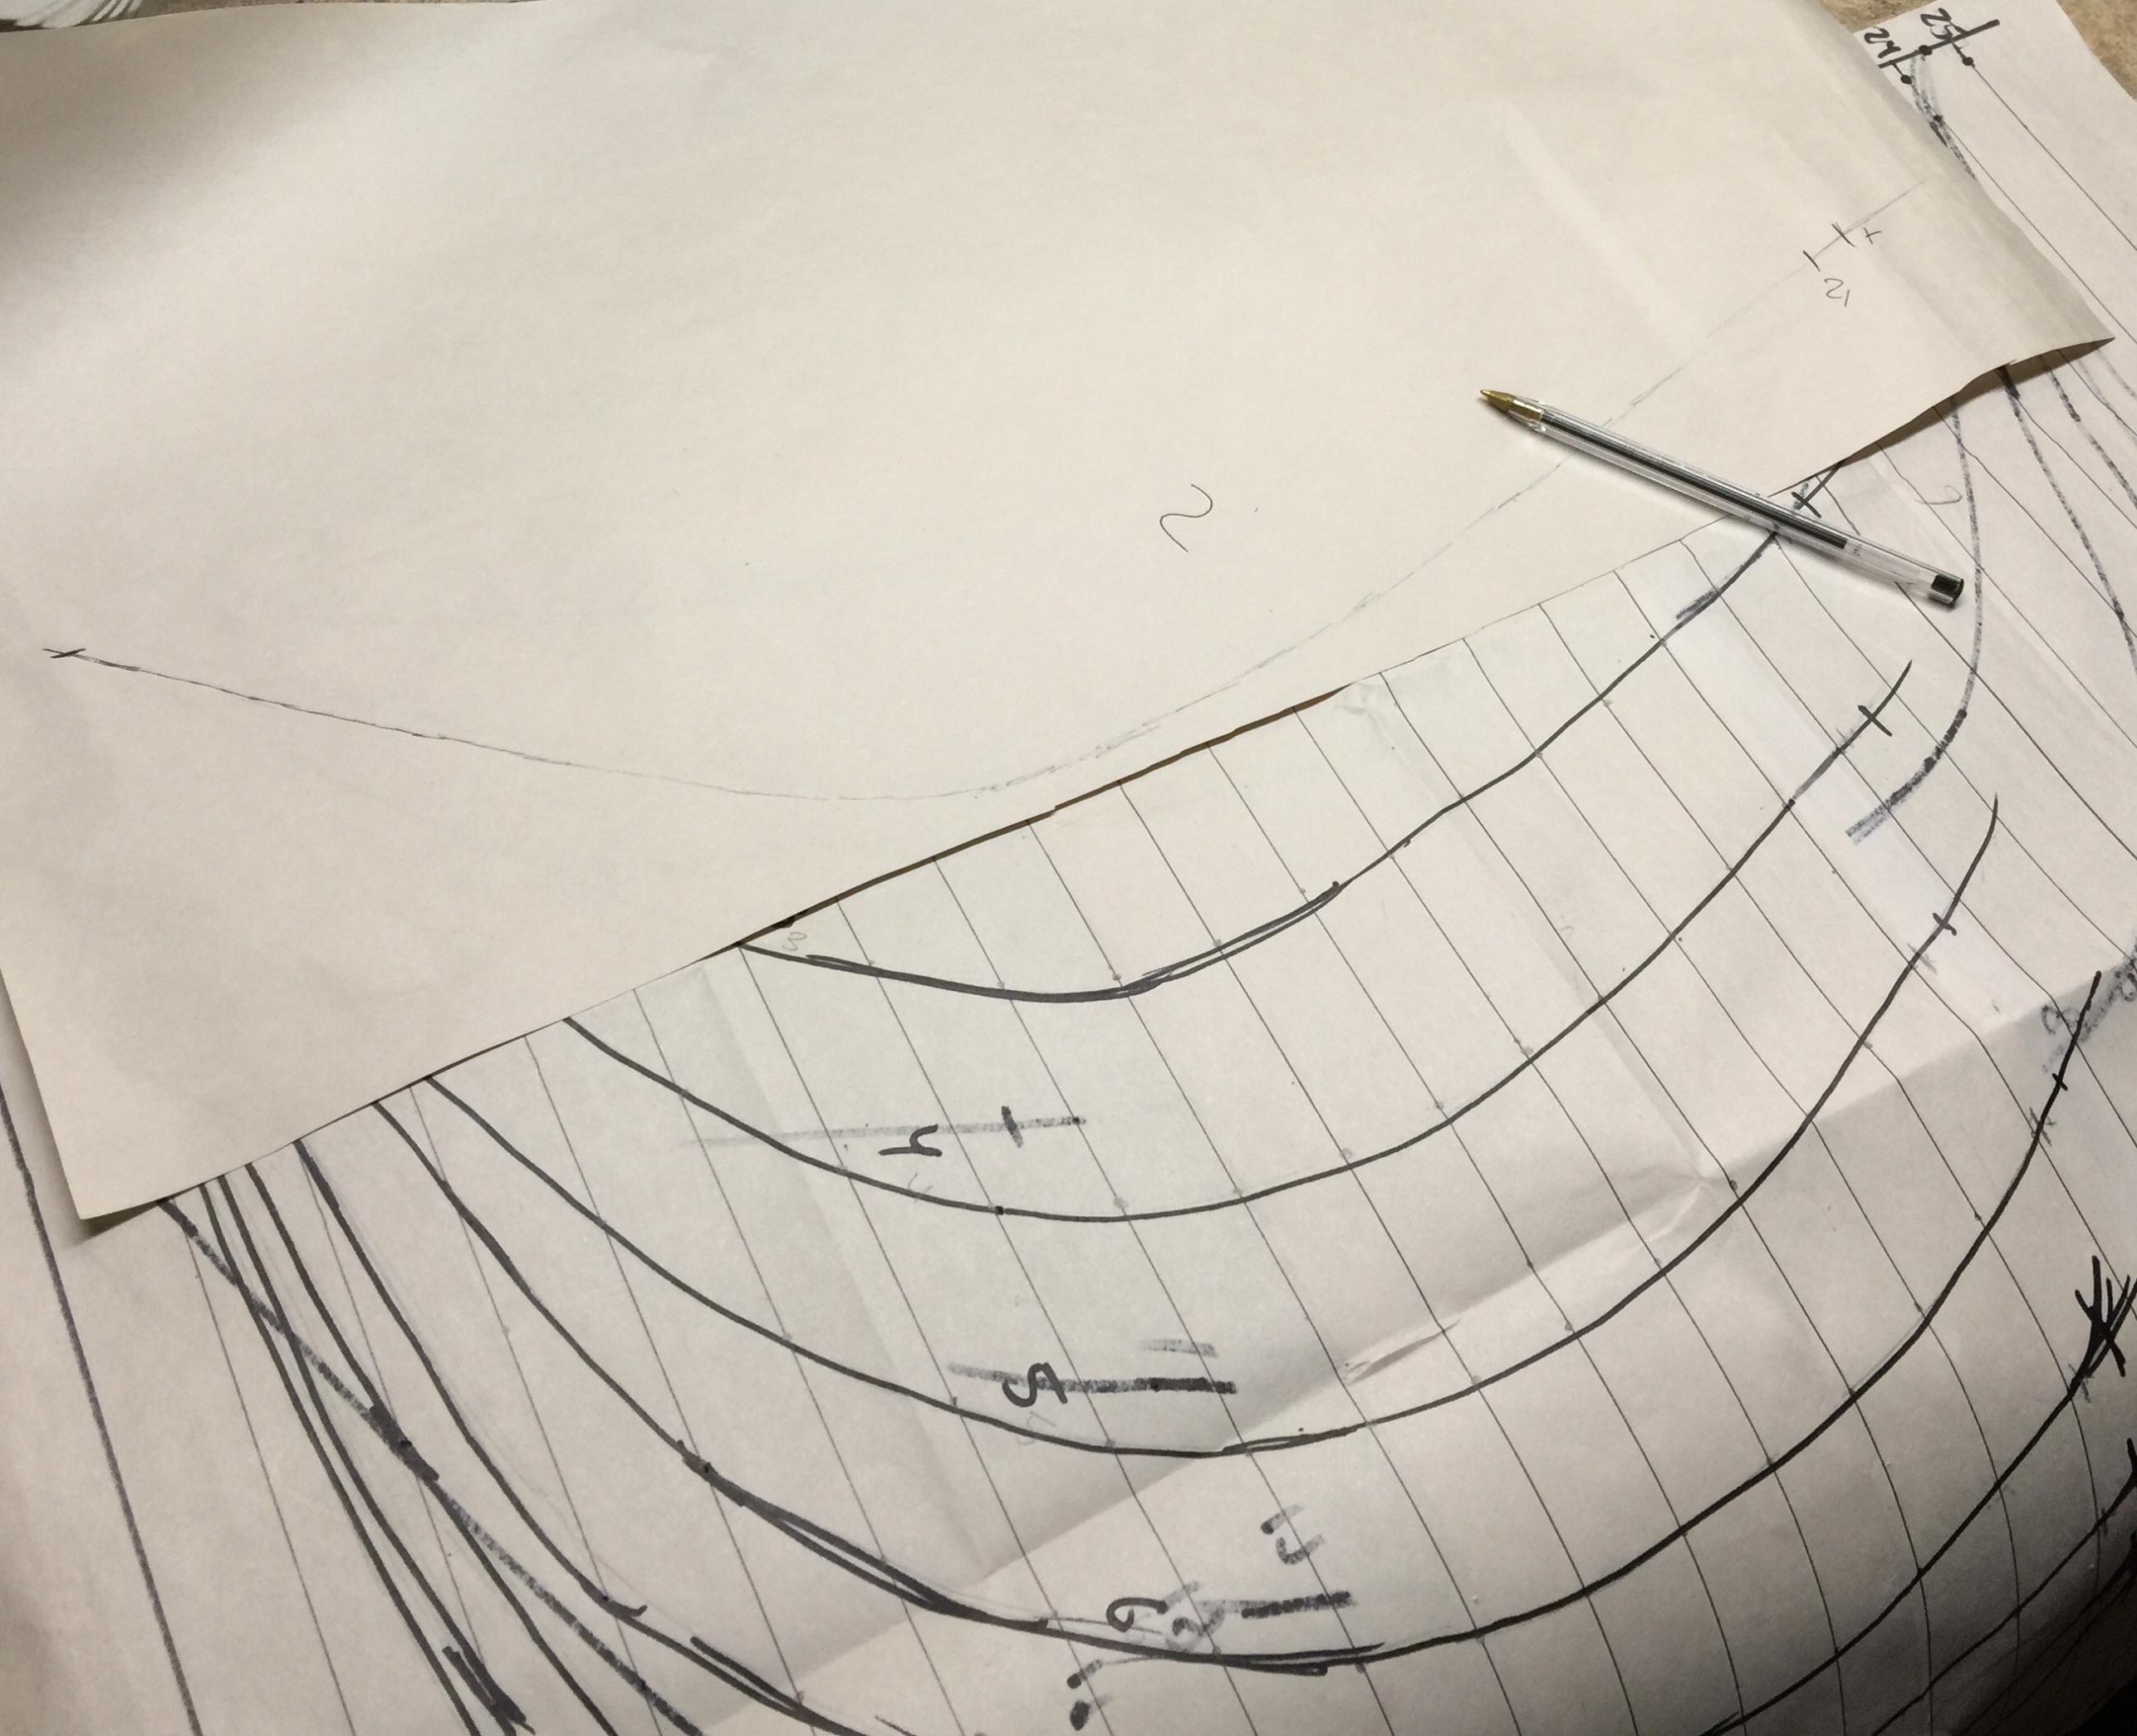
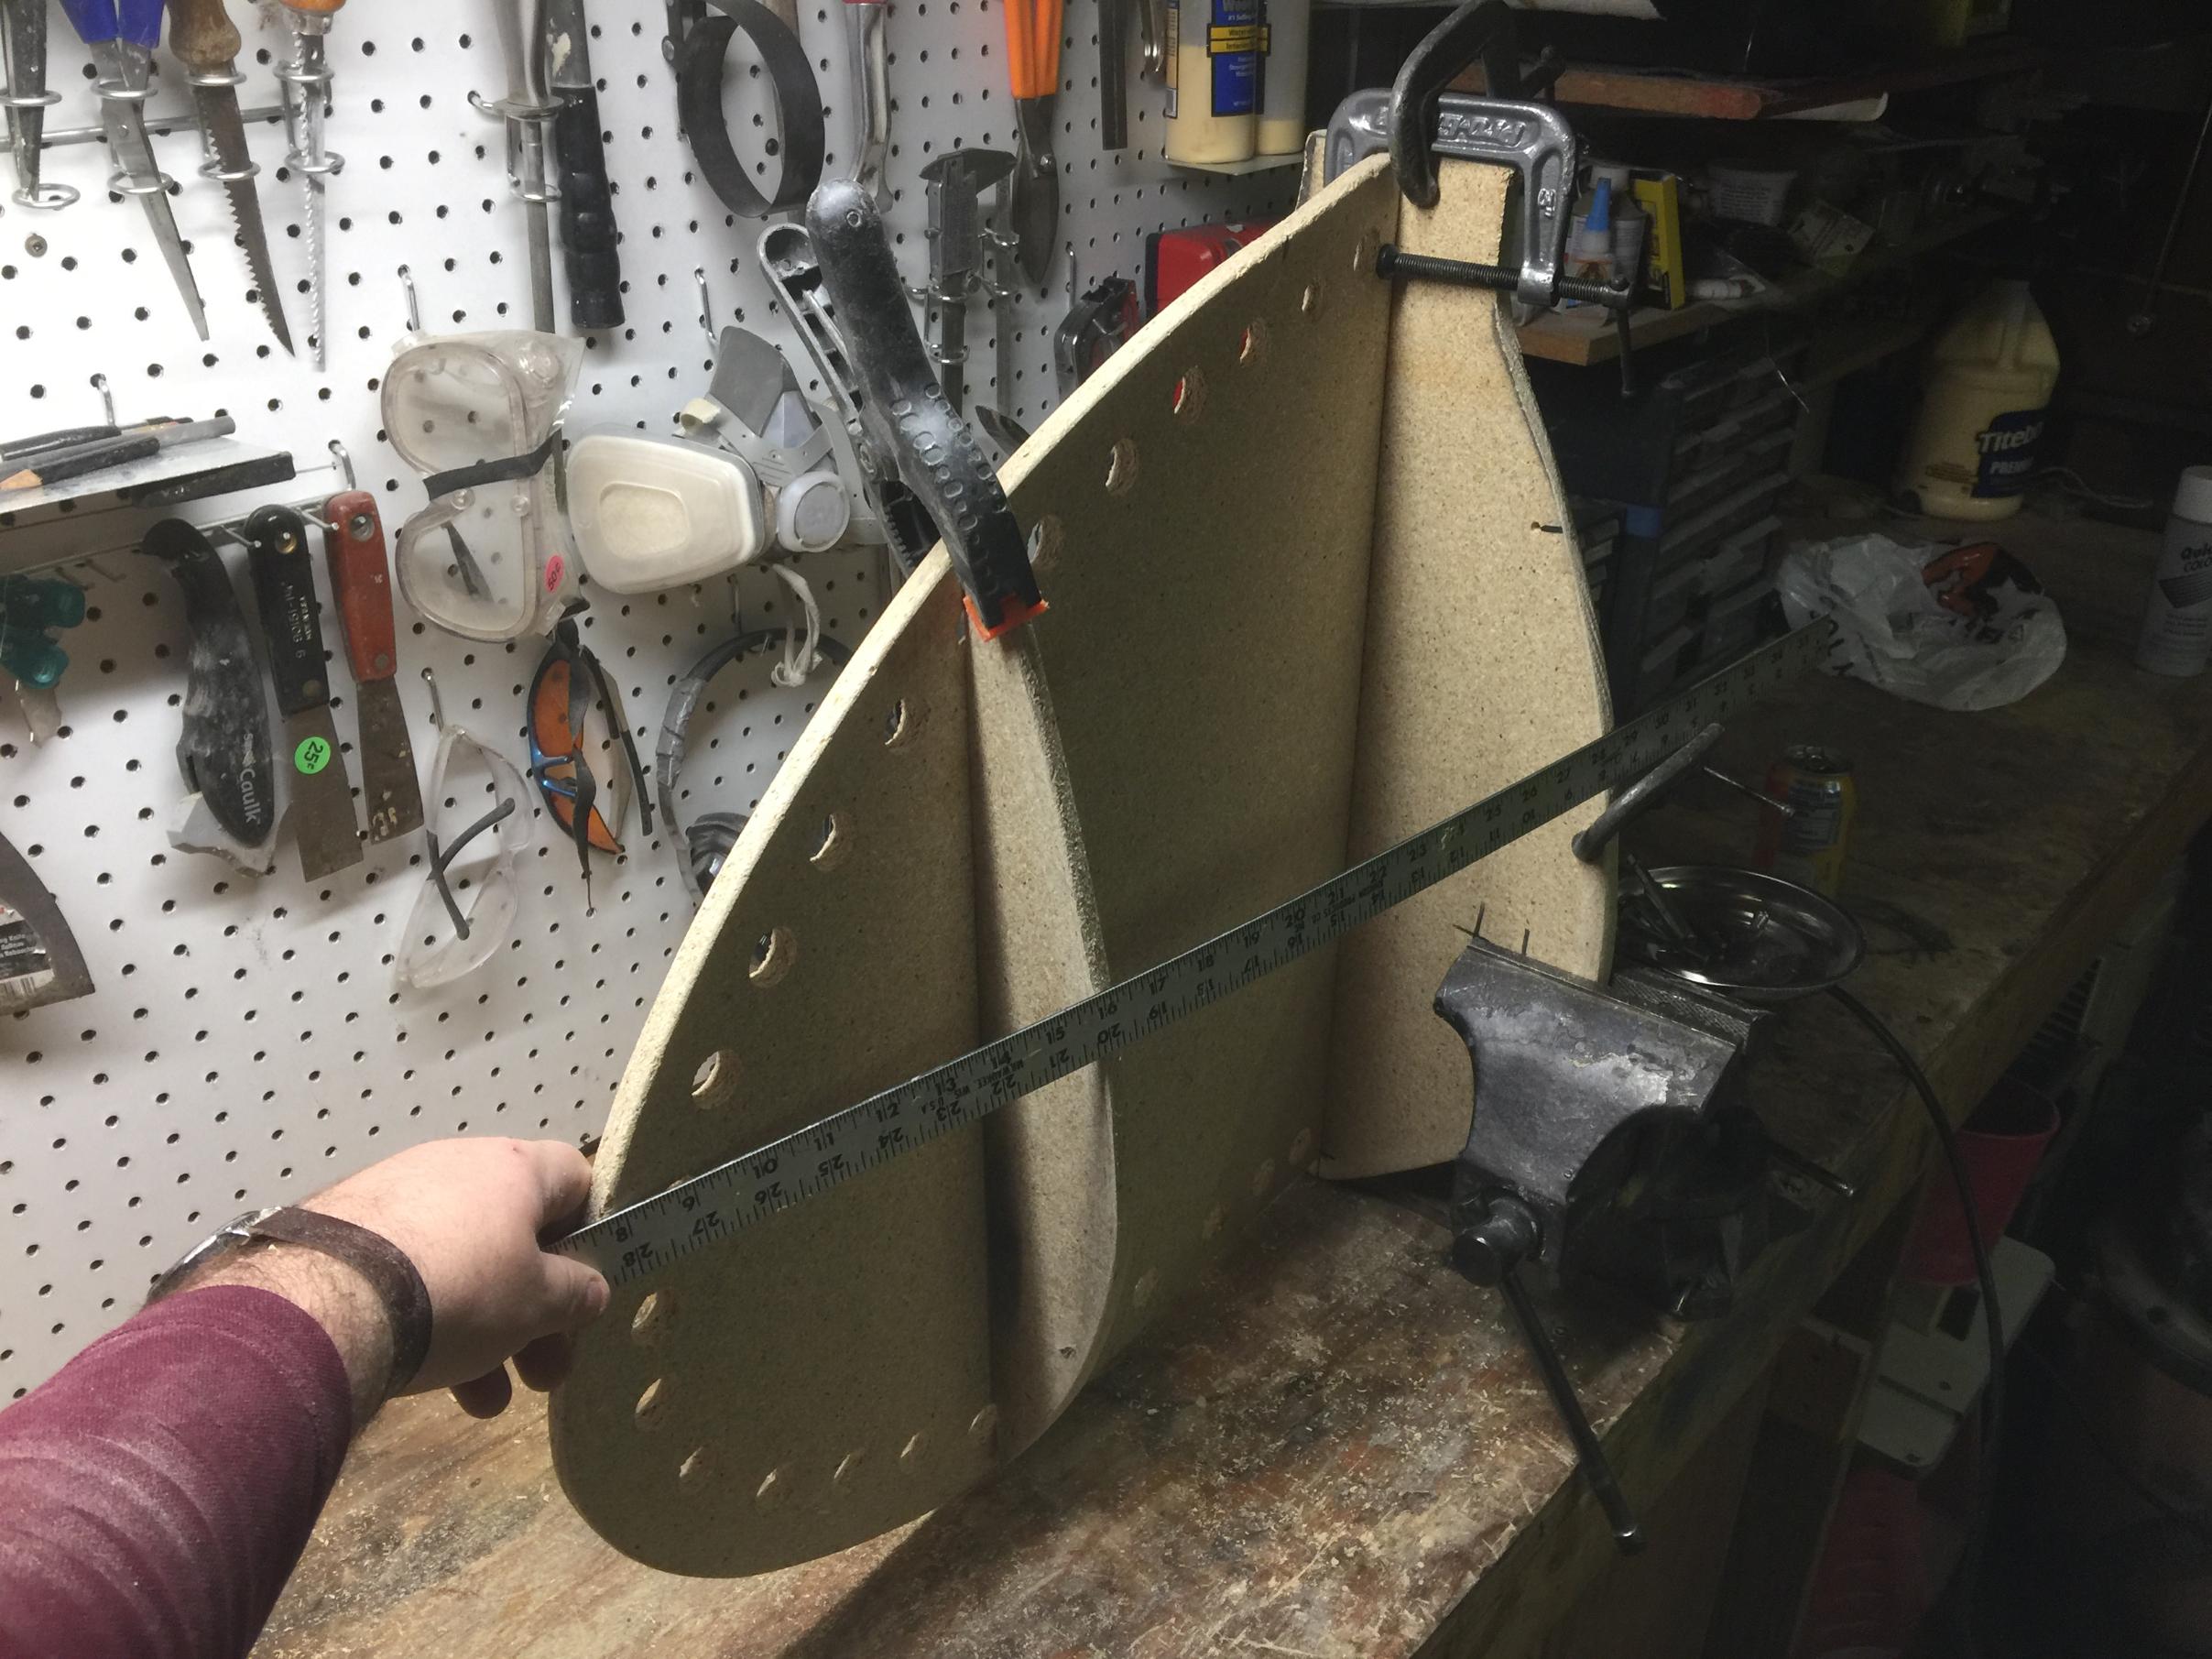
I finally got around to doing something on this after a few weeks of nothing. I was able to loft out my stations.
Rather than doing both waterlines and half breadths, Delftship is nice because you can simply added more lines to get the same amount of points on only one axis. This made it a lot easier and less confusing this time around. Rather than having 12 x's and 12 y's I just had 24 y's.
I plotted my points out and then used a thin cedar baton and push pins to fair curves on my plot. I used a piece of Sheetrock underneath for the pushpins. The sheerline is messy and just an approximation as I'll clean that up nice when actually building- it doesn't need to be exact here.
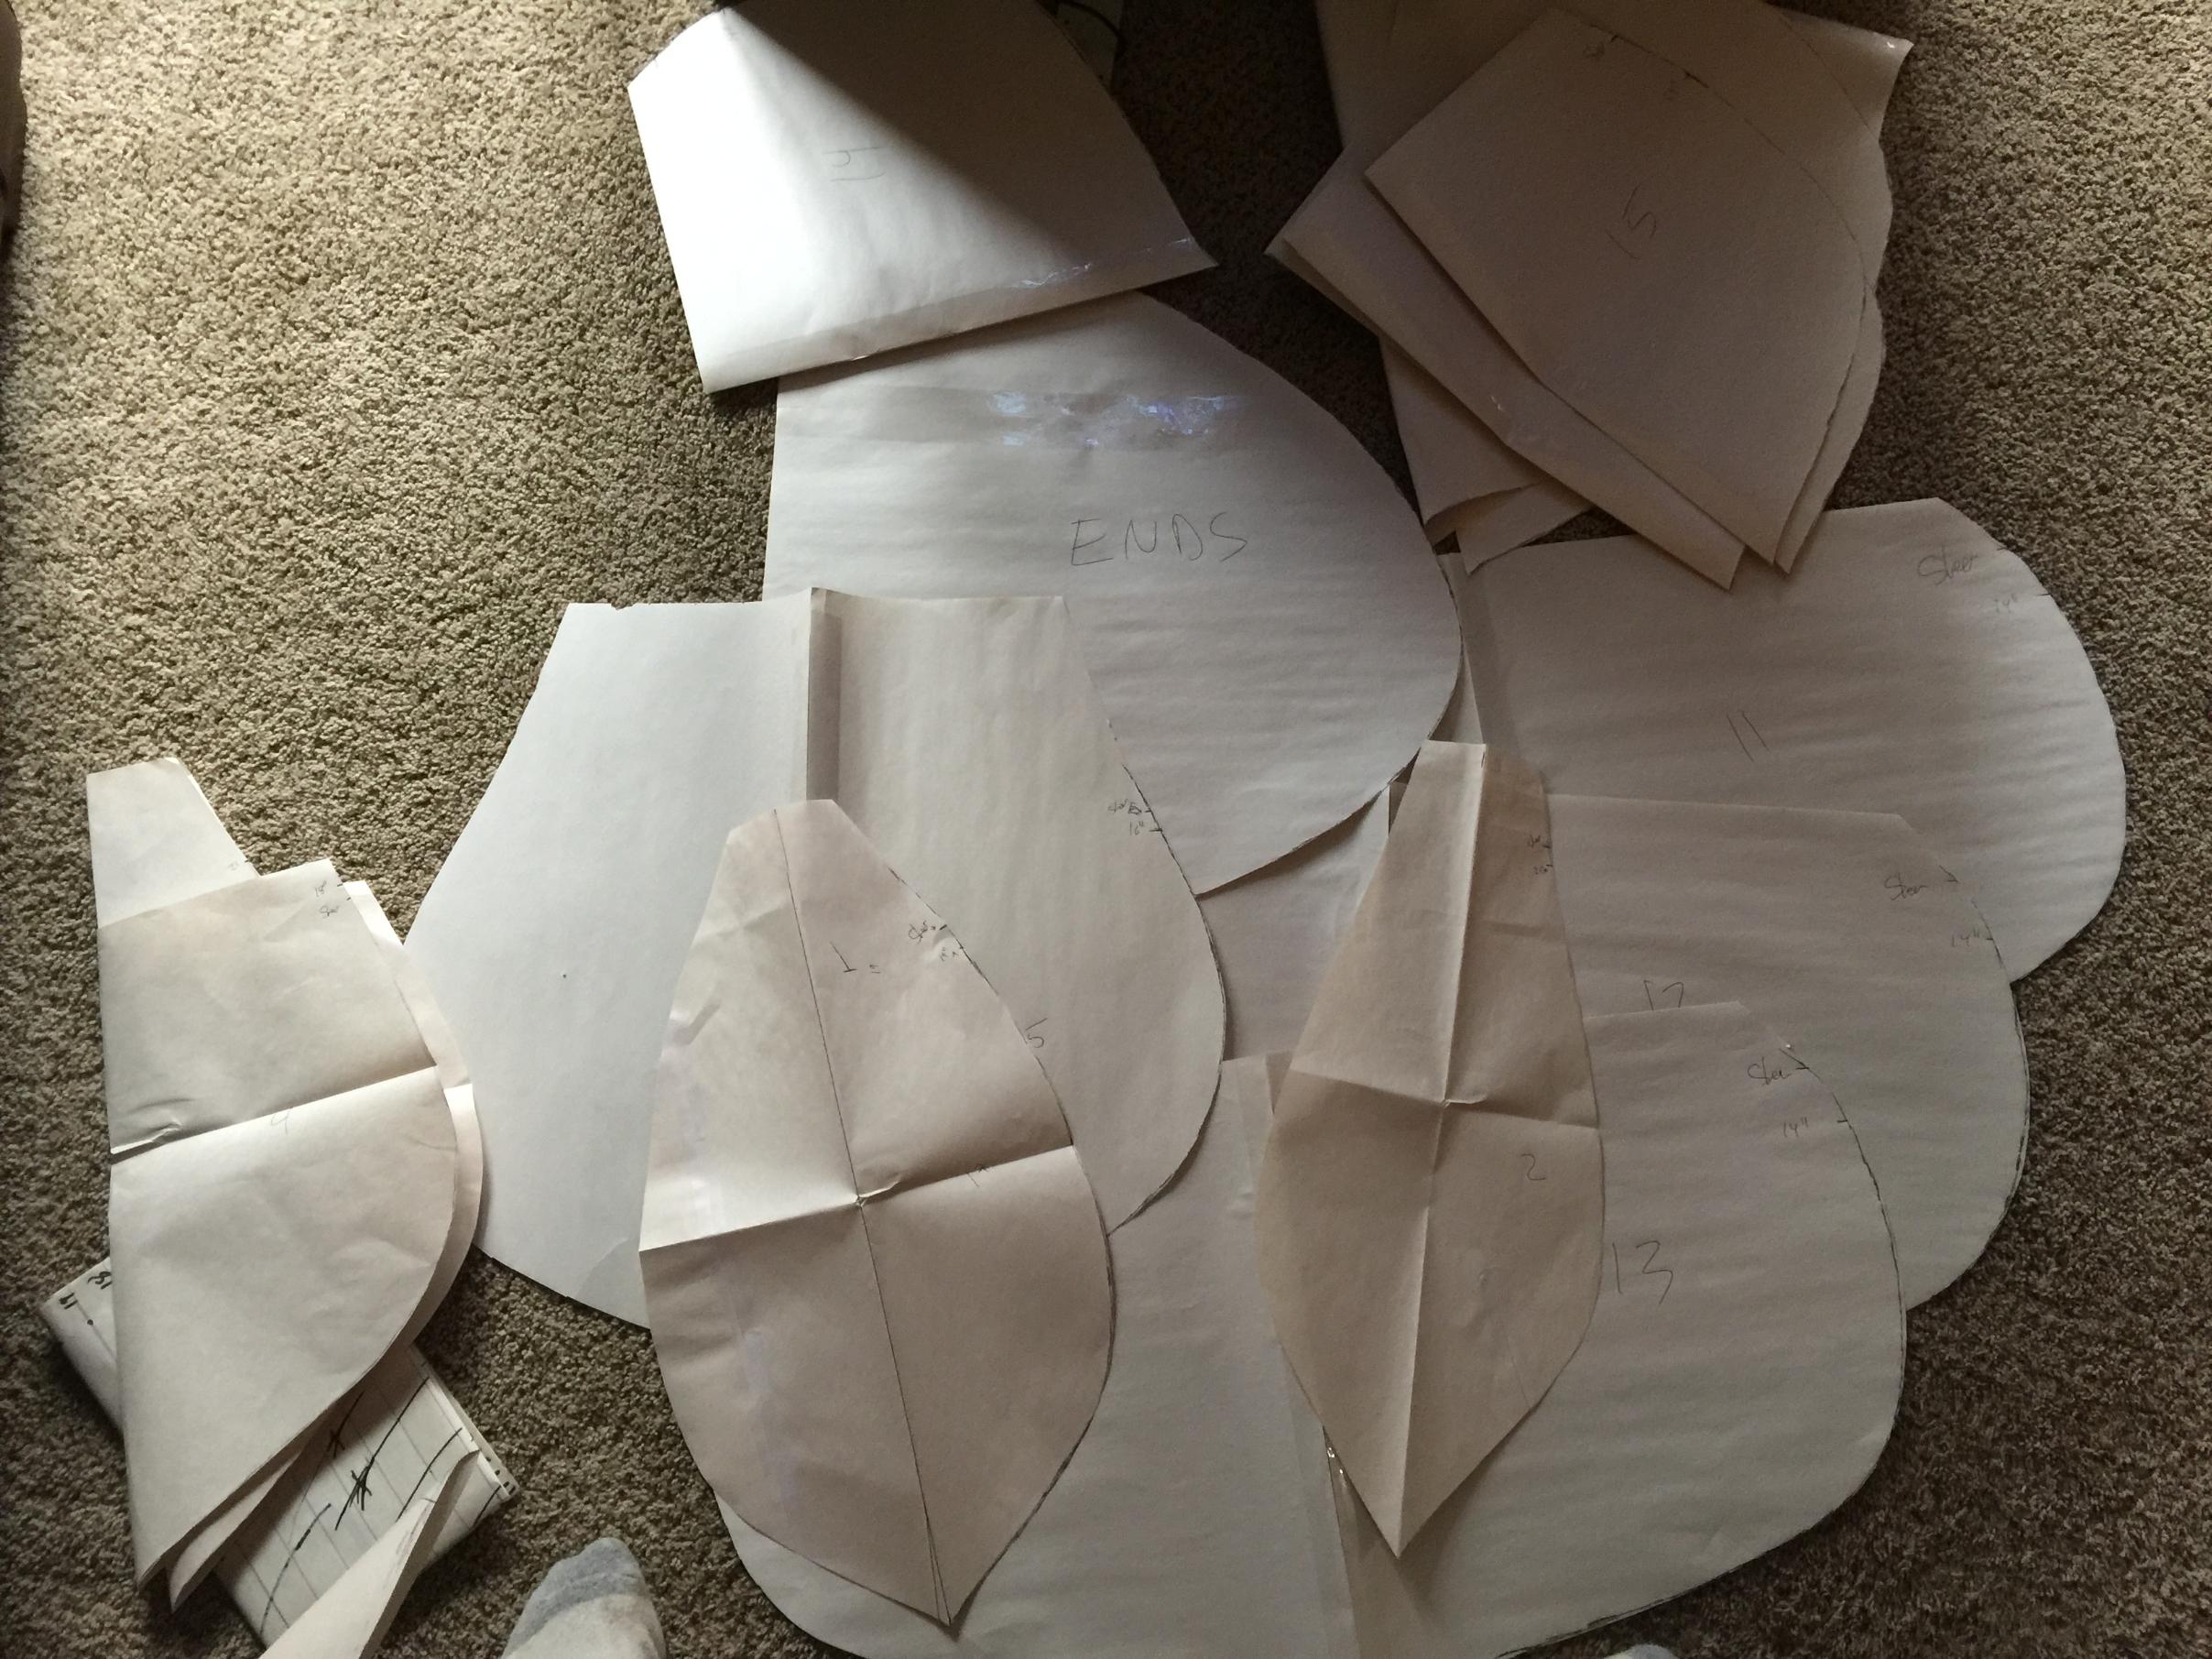
After lofting I traced onto paper that was folded in half. I then cut out the shape. I further refined the curves when cutting. After unfolding the two halves I now have two identical sides.
My next move is to build a strongback and cut the forms out. I'm not sure if I'm going to use plywood or particle board. I used ply last time and that worked well. But I'm think particle board might be easier to final shape with a rasp.
Rather than trace the paper templates I think I will lay it out and hit it with an ultra light dusting of spray paint to define the edges where I need to cut. That should be easier than tracing.


Rather than doing both waterlines and half breadths, Delftship is nice because you can simply added more lines to get the same amount of points on only one axis. This made it a lot easier and less confusing this time around. Rather than having 12 x's and 12 y's I just had 24 y's.
I plotted my points out and then used a thin cedar baton and push pins to fair curves on my plot. I used a piece of Sheetrock underneath for the pushpins. The sheerline is messy and just an approximation as I'll clean that up nice when actually building- it doesn't need to be exact here.
After lofting I traced onto paper that was folded in half. I then cut out the shape. I further refined the curves when cutting. After unfolding the two halves I now have two identical sides.
My next move is to build a strongback and cut the forms out. I'm not sure if I'm going to use plywood or particle board. I used ply last time and that worked well. But I'm think particle board might be easier to final shape with a rasp.
Rather than trace the paper templates I think I will lay it out and hit it with an ultra light dusting of spray paint to define the edges where I need to cut. That should be easier than tracing.


12/07/2017 01:49PM
There is a reason that canoes designed by naval architects like John Winters and Steve Killing are different, almost always with no recurved stems. While the waterline shape may not change with the recurve the area above the water is very different. Compare the the hull width at the sheer one or two feet in from the stem/waterline intersection. The recurved stem allows for no, or very little. flare in the hull. Recurved hulls tend to knife into waves, often giving bow paddlers a good bath. Hulls with longer sheerlines, extending the stem out instead of recurving allow for more flare in the bow section. The canoe tends to lift in a wave instead of knifing into it.
I've spent a lot of time on Saganaga as well as Rainy and Basswood and other big lakes. The canoes that I was most comfortable in and were the most seaworthy are the modern designs.
I've spent a lot of time on Saganaga as well as Rainy and Basswood and other big lakes. The canoes that I was most comfortable in and were the most seaworthy are the modern designs.
12/07/2017 10:39PM
Nice explanation sedges. I hadn't really thought about the relationship between the recurve and how it forces the shear line to narrow towards the bow to meet that curve. The design of my 1920's old town with big recurved stems forces a tumblehome all the way to the bow. My "newer" canoes flare towards the bow and don't recurve. But I don't think this is necessarily a new design. Looking through Adney's book, there are a number of traditional birch bark canoe styles that don't recurve and are closer to my "newer" style canoes. I think the recurved stems seen in most birch bark canoes was to solve a structural problem, but some found a way around it. I'll have to do more reading on that. Thanks.
12/08/2017 07:42AM
quote sedges: "There is a reason that canoes designed by naval architects like John Winters and Steve Killing are different, almost always with no recurved stems. While the waterline shape may not change with the recurve the area above the water is very different. Compare the the hull width at the sheer one or two feet in from the stem/waterline intersection. The recurved stem allows for no, or very little. flare in the hull. Recurved hulls tend to knife into waves, often giving bow paddlers a good bath. Hulls with longer sheerlines, extending the stem out instead of recurving allow for more flare in the bow section. The canoe tends to lift in a wave instead of knifing into it.
I've spent a lot of time on Saganaga as well as Rainy and Basswood and other big lakes. The canoes that I was most comfortable in and were the most seaworthy are the modern designs.
"
As it relates to my build, I put the recurve in because I wanted a more traditional look. I have "modern" canoes, but wanted something with the older look.
The stems are redbird stems- same dimensions
12/08/2017 08:37AM
You also said you named it Saganaga because you wanted a boat for traveling big waters. Choosing aesthetics over seaworthiness in that case seems odd. On the other hand, boats similar to your design have been plying big waters for along time. Yours will likely serve you well. It just that when you are struggling through a tough stretch of water and weather you won't be thinking "Doesn't my boat look cool".
12/11/2017 04:43PM
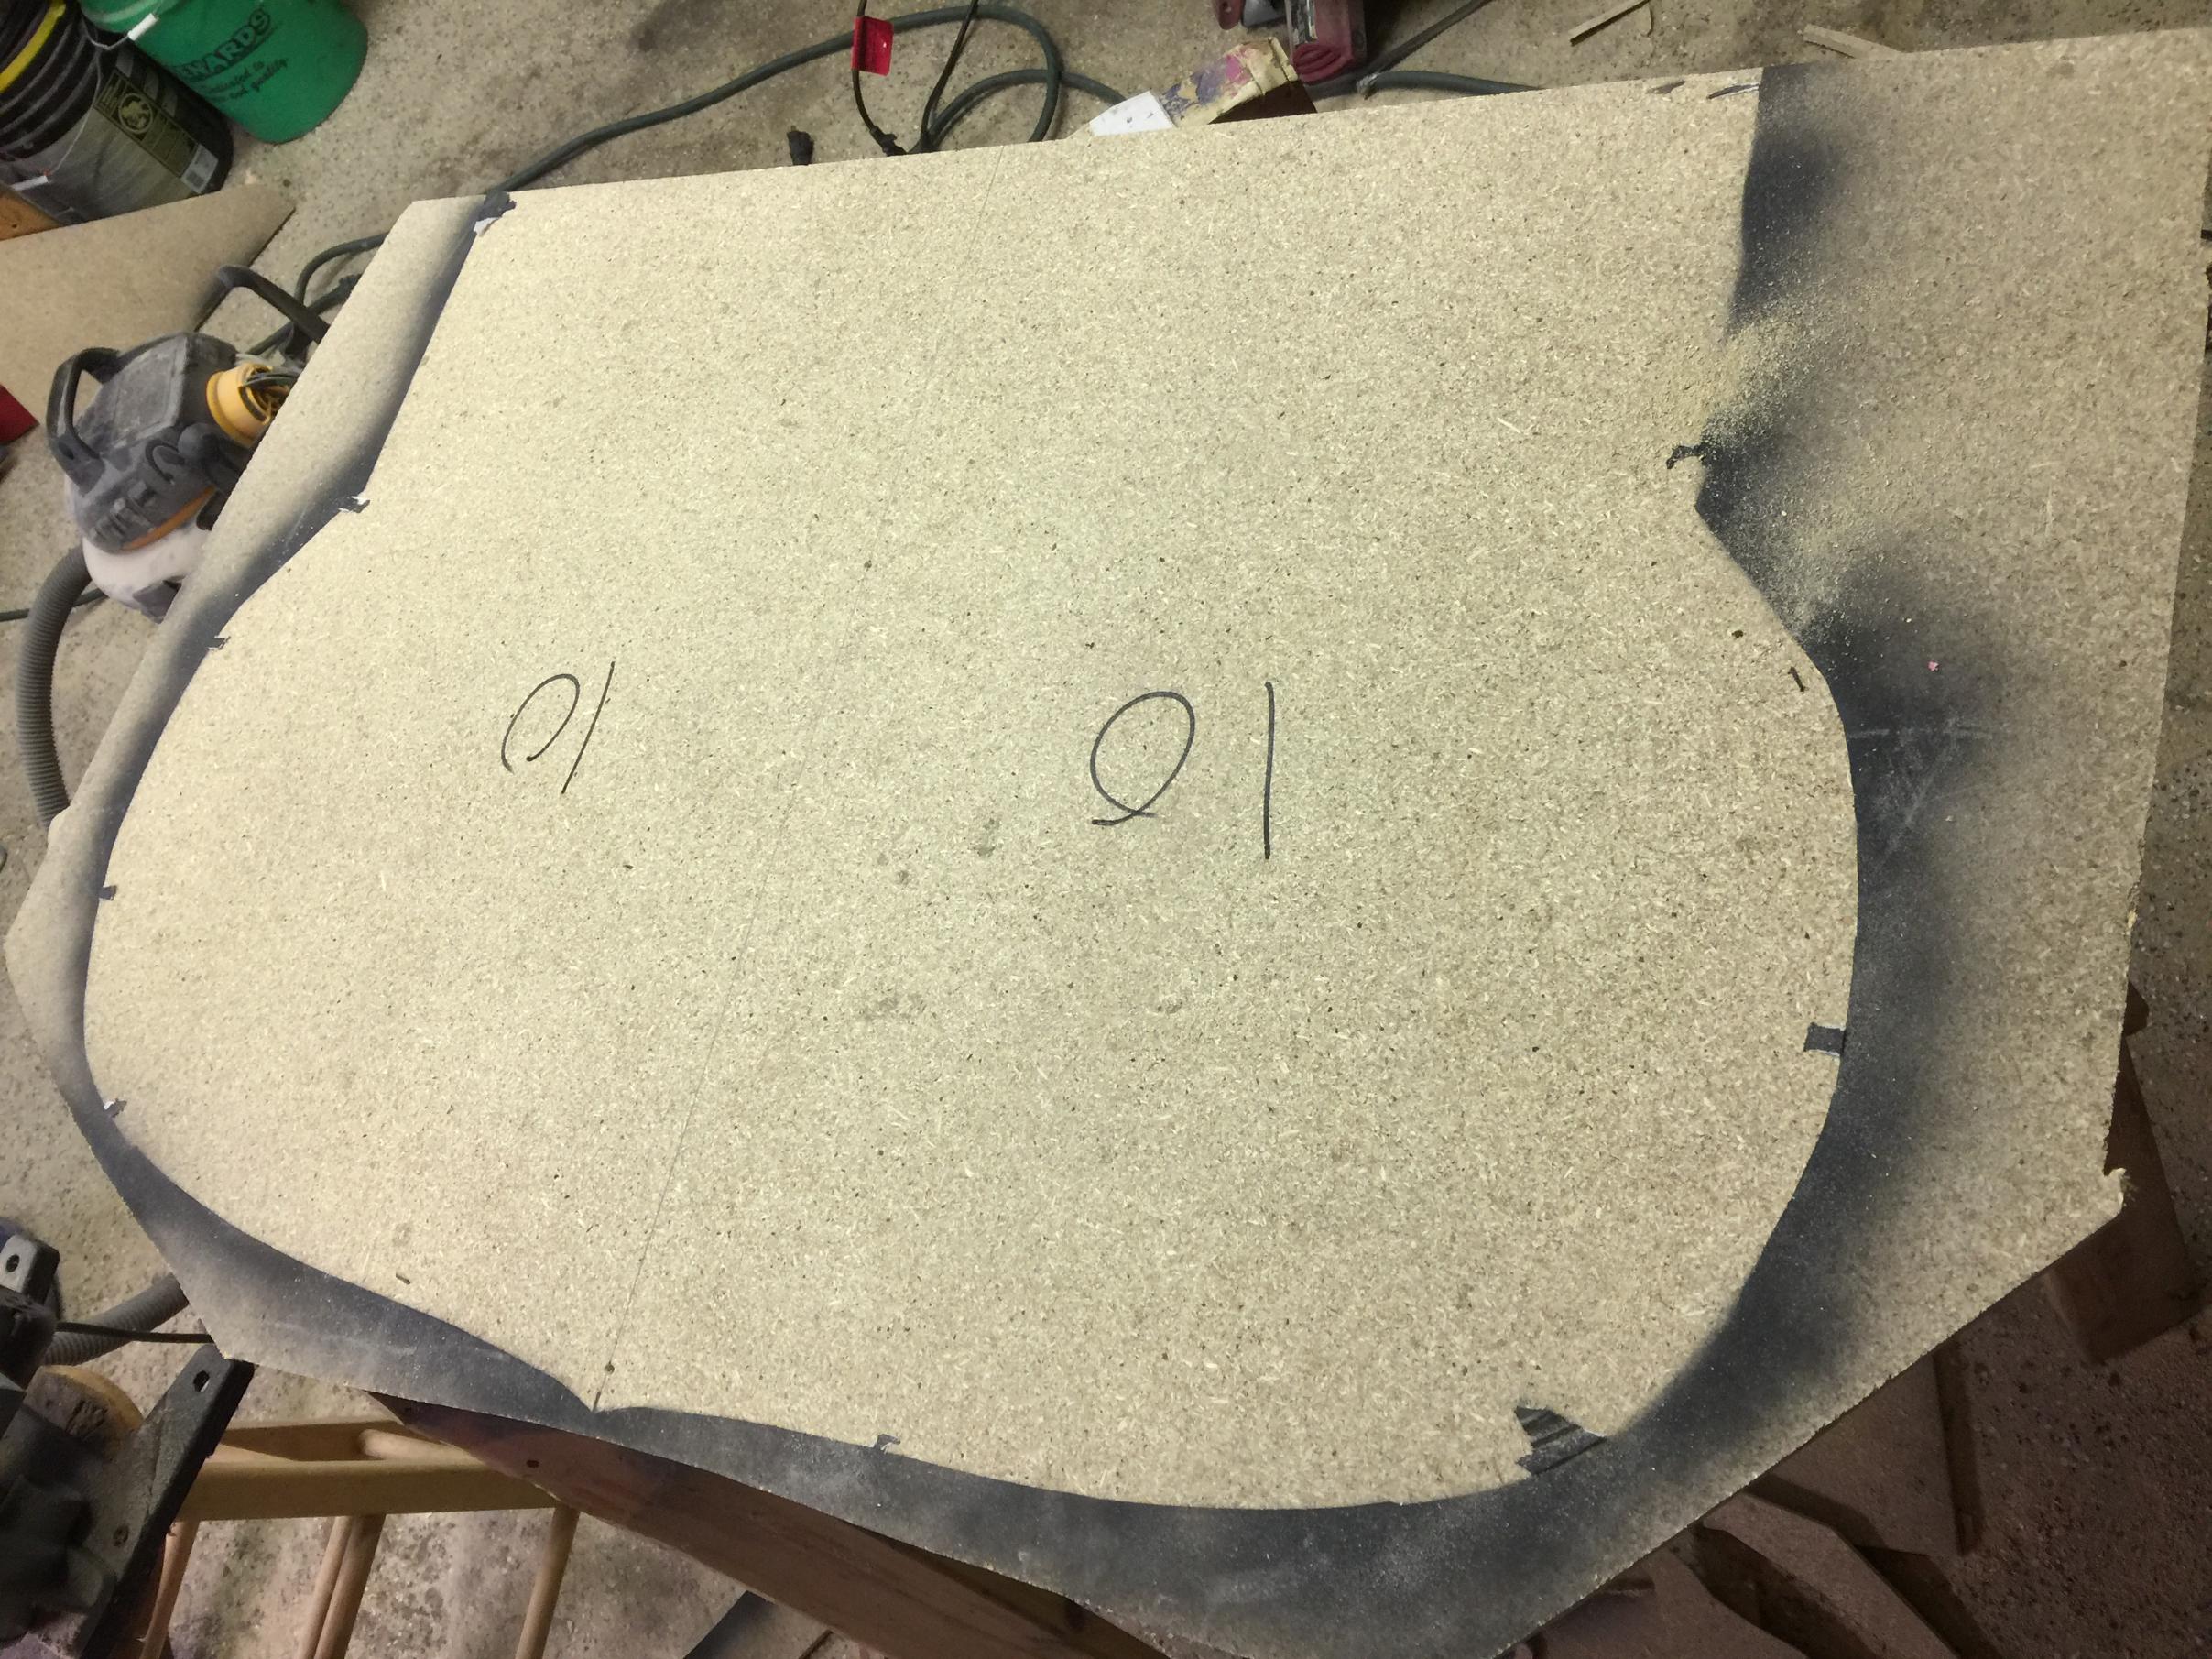
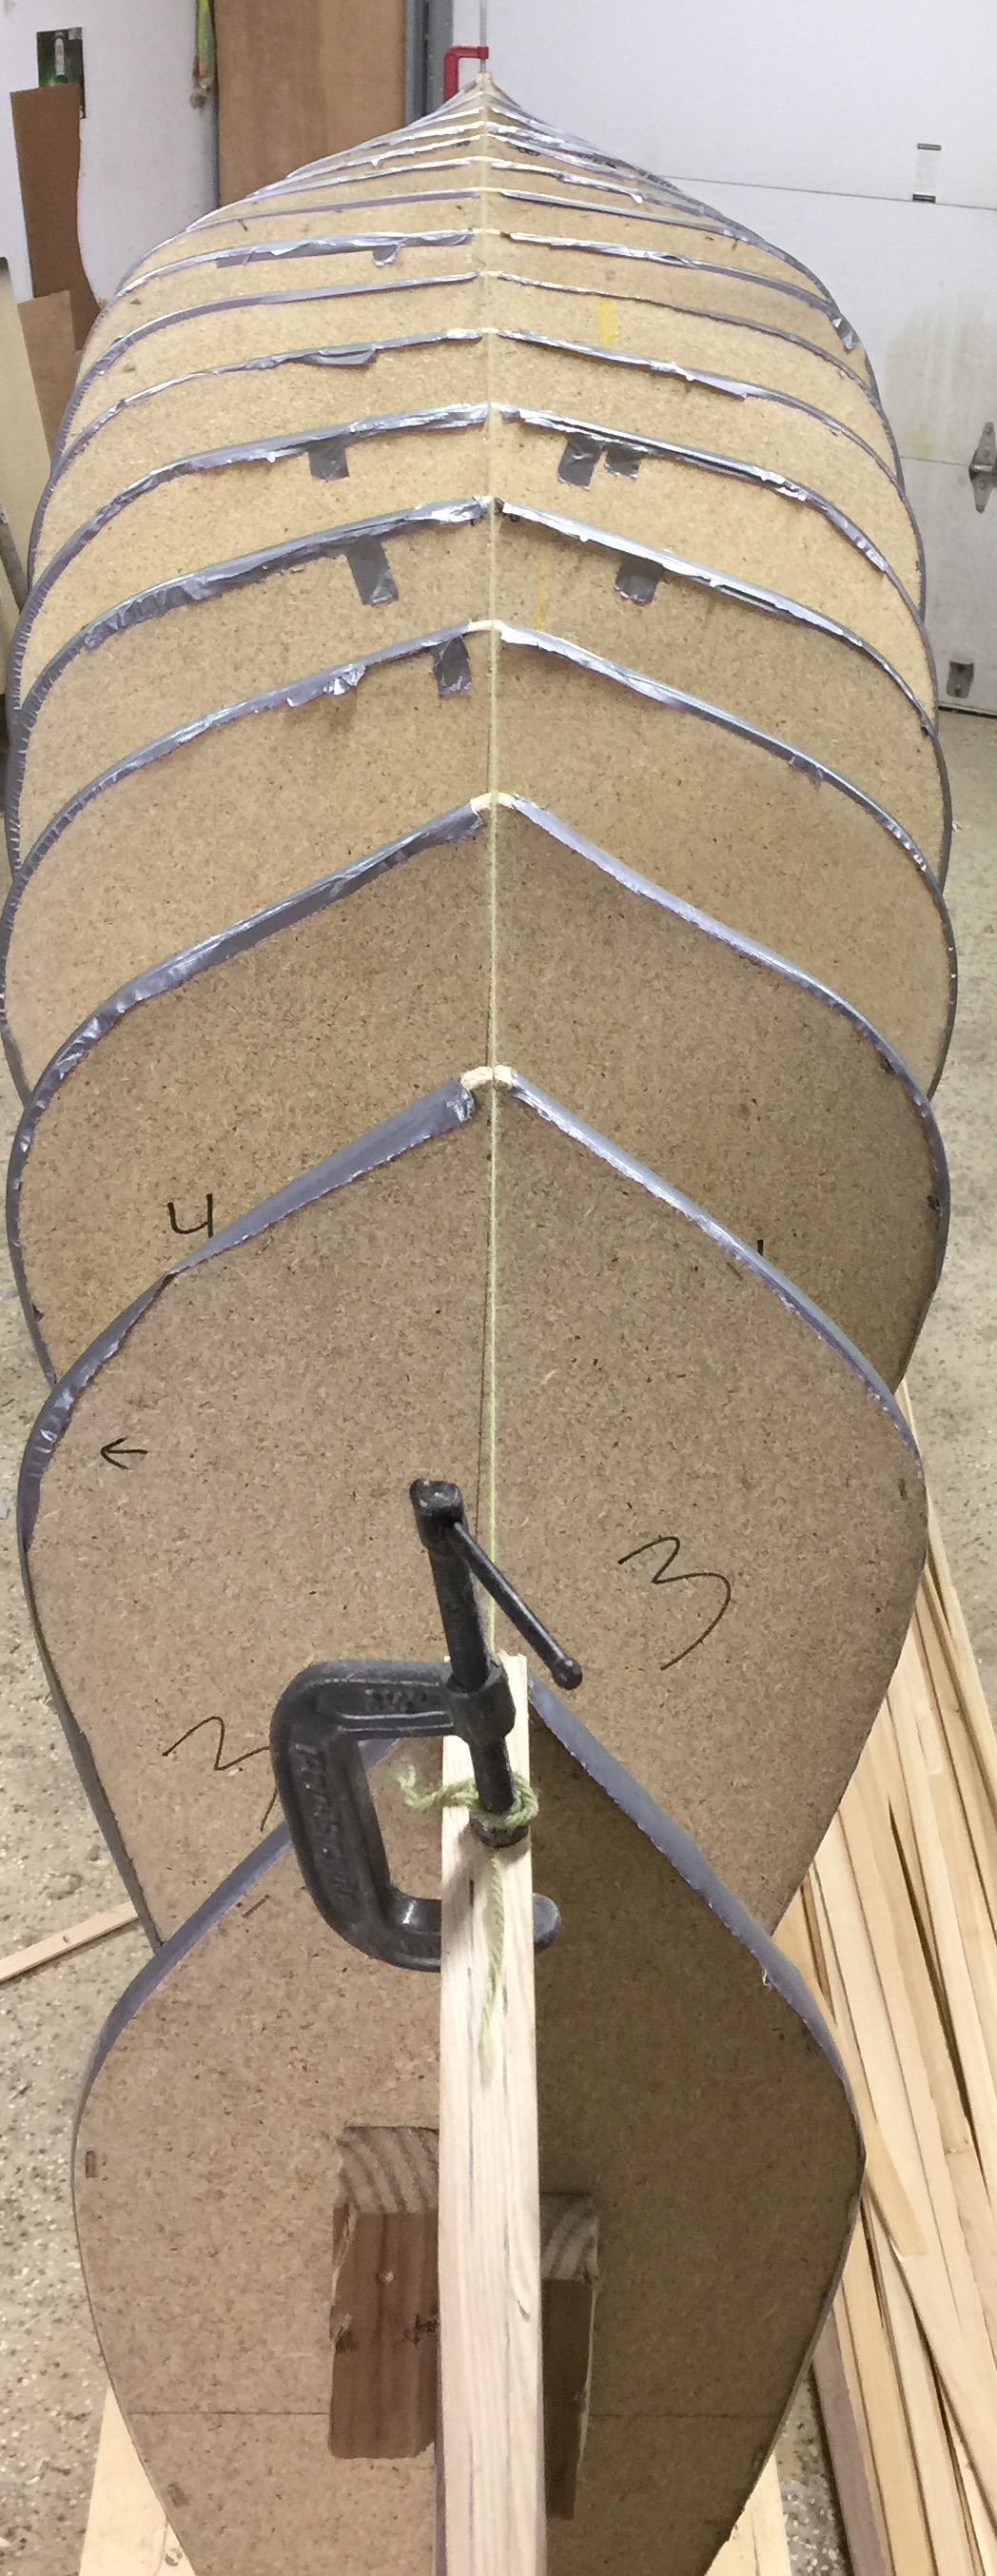
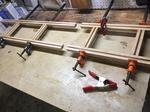
I had a chance to start working on *actual* construction this weekend starting with the forms. I decided to go with 1/2 particle board instead of ply wood or mdf. I also tried something different this time by lightly spray painting the edge of the templates to leave a line rather than tracing. This proved to work well. Then I cut out with a jigsaw 1/8 or so from the edge of the black. Since I have particleboard, it was easy to cut and easy just shave down with the sureform to simply remove the black. Next steps in order are: strong back, ripping stems, bending stems, Wood selection and finalizing accent design, ripping strips and bead /coving That will likely be a few weeks out though as I've got a busy couple of weeks.


12/13/2017 07:24AM
I've got a strongback you can have. It was last set up for a merlin solo, but I think you should be able to use it for an 18.5. I've built an 18.5 boat on a 16 foot strongback before. It was actually built by a machinist, and he did a great job. The legs are removable, so it breaks down to relatively easy storage size. If you want it, let me know. Its currently in Burnsville. I don't see myself building another boat for a long time, so I'd just like to see it go to a good home. Let me know if you want it.
12/17/2017 02:54PM
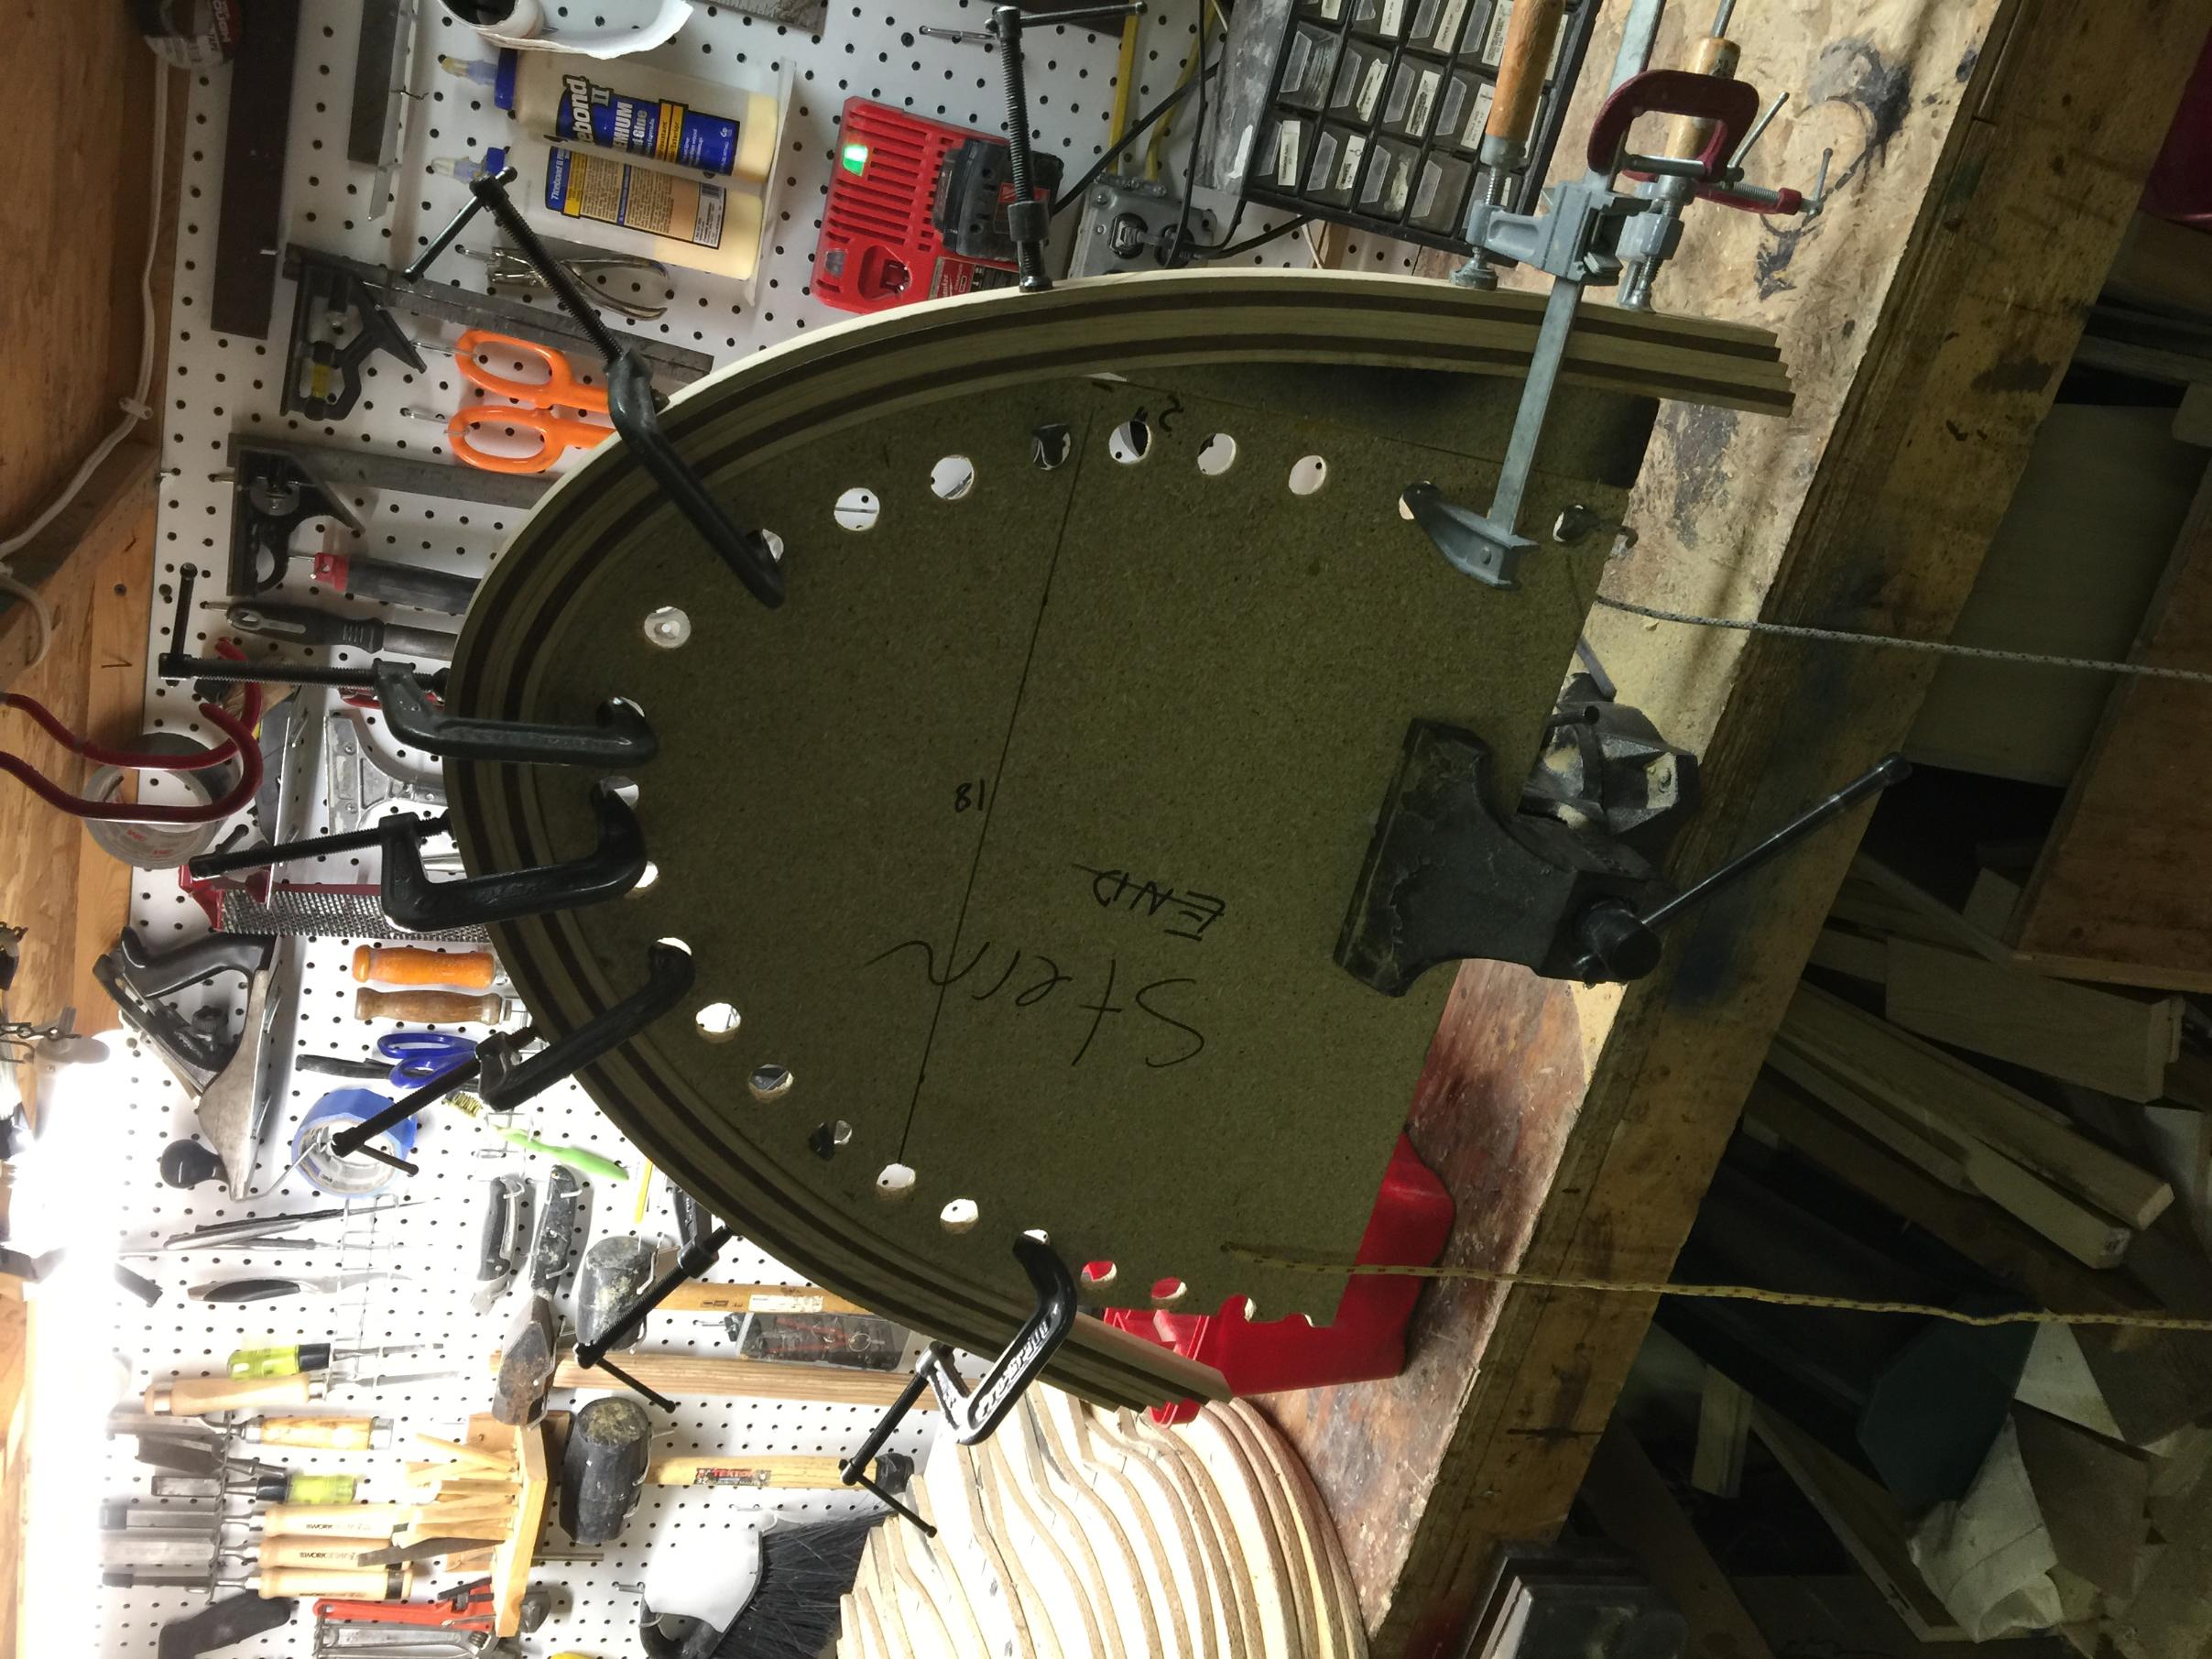
I was able to get a little work in this weekend.
I finished off the forms and even mocked up the layout to check for fairness.

First off. I have to say how absolutely amazed I am w delftship. I realize that it's professional naval architecture software, so it's supposed to be precise- that's it's job... but it really is incredible when you start with an idea in your head and bring it into the physical world...AND it is completely precise and everything is fair from the get-go.
Here is the end and stem molds- it's so precise my ruler basically bent itself right onto the form!
Anyway... here's a very rough mock up... its BIG and it looks amazing. So happy it APPEARS to be a fine looking boat.

Also, I settled on a color scheme for trim. Even though this isn't the boat design I will be using, these are the colors. White is ash where strength matters, basswood where it doesn't. Black is walnut.
12/18/2017 09:10AM
Interesting hump in the keel !
I'm guessing it will track. Turning will be tough, unless you heel it over a little. That will be also tough in a tandem.
Looking forward to how it paddles. Again Interesting design !
Curious ! How many sheets of Blandex did it require for the forms ?
Jim
I'm guessing it will track. Turning will be tough, unless you heel it over a little. That will be also tough in a tandem.
Looking forward to how it paddles. Again Interesting design !
Curious ! How many sheets of Blandex did it require for the forms ?
Jim
Keep your paddle wet and your seat dry!
12/18/2017 01:45PM
1JimD: " Interesting hump in the keel !
I'm guessing it will track. Turning will be tough, unless you heel it over a little. That will be also tough in a tandem.
Looking forward to how it paddles. Again Interesting design !
Curious ! How many sheets of Blandex did it require for the forms ?
Jim"
I Put a "hump" in as sort of an integral keel. Really the hull shape itself does it through the first 5 stations or so and the last 3-4, so it's just a few additional stations in the middle to keep it going all the way through.
That being said though, I will probably take it out- we'll see how I feel about it when I get there. It's really not that pronounced- just perspective I think in the pic.
I used 2 1/2 sheets. I think I only used 2 on my freedom if I recall, so the extra width and freeboard here probably makes the difference.
12/18/2017 09:51PM
I thought it was an optical illusion, but the "hump" will be a detriment IMO.
With a tandem I don't think tracking will be an issue and the "cheek" that the "hump" will create will suck, literally and figuratively.
Kent
With a tandem I don't think tracking will be an issue and the "cheek" that the "hump" will create will suck, literally and figuratively.
Kent
Good judgment comes from experience, and a lot of that comes from bad judgment.
12/22/2017 08:51AM


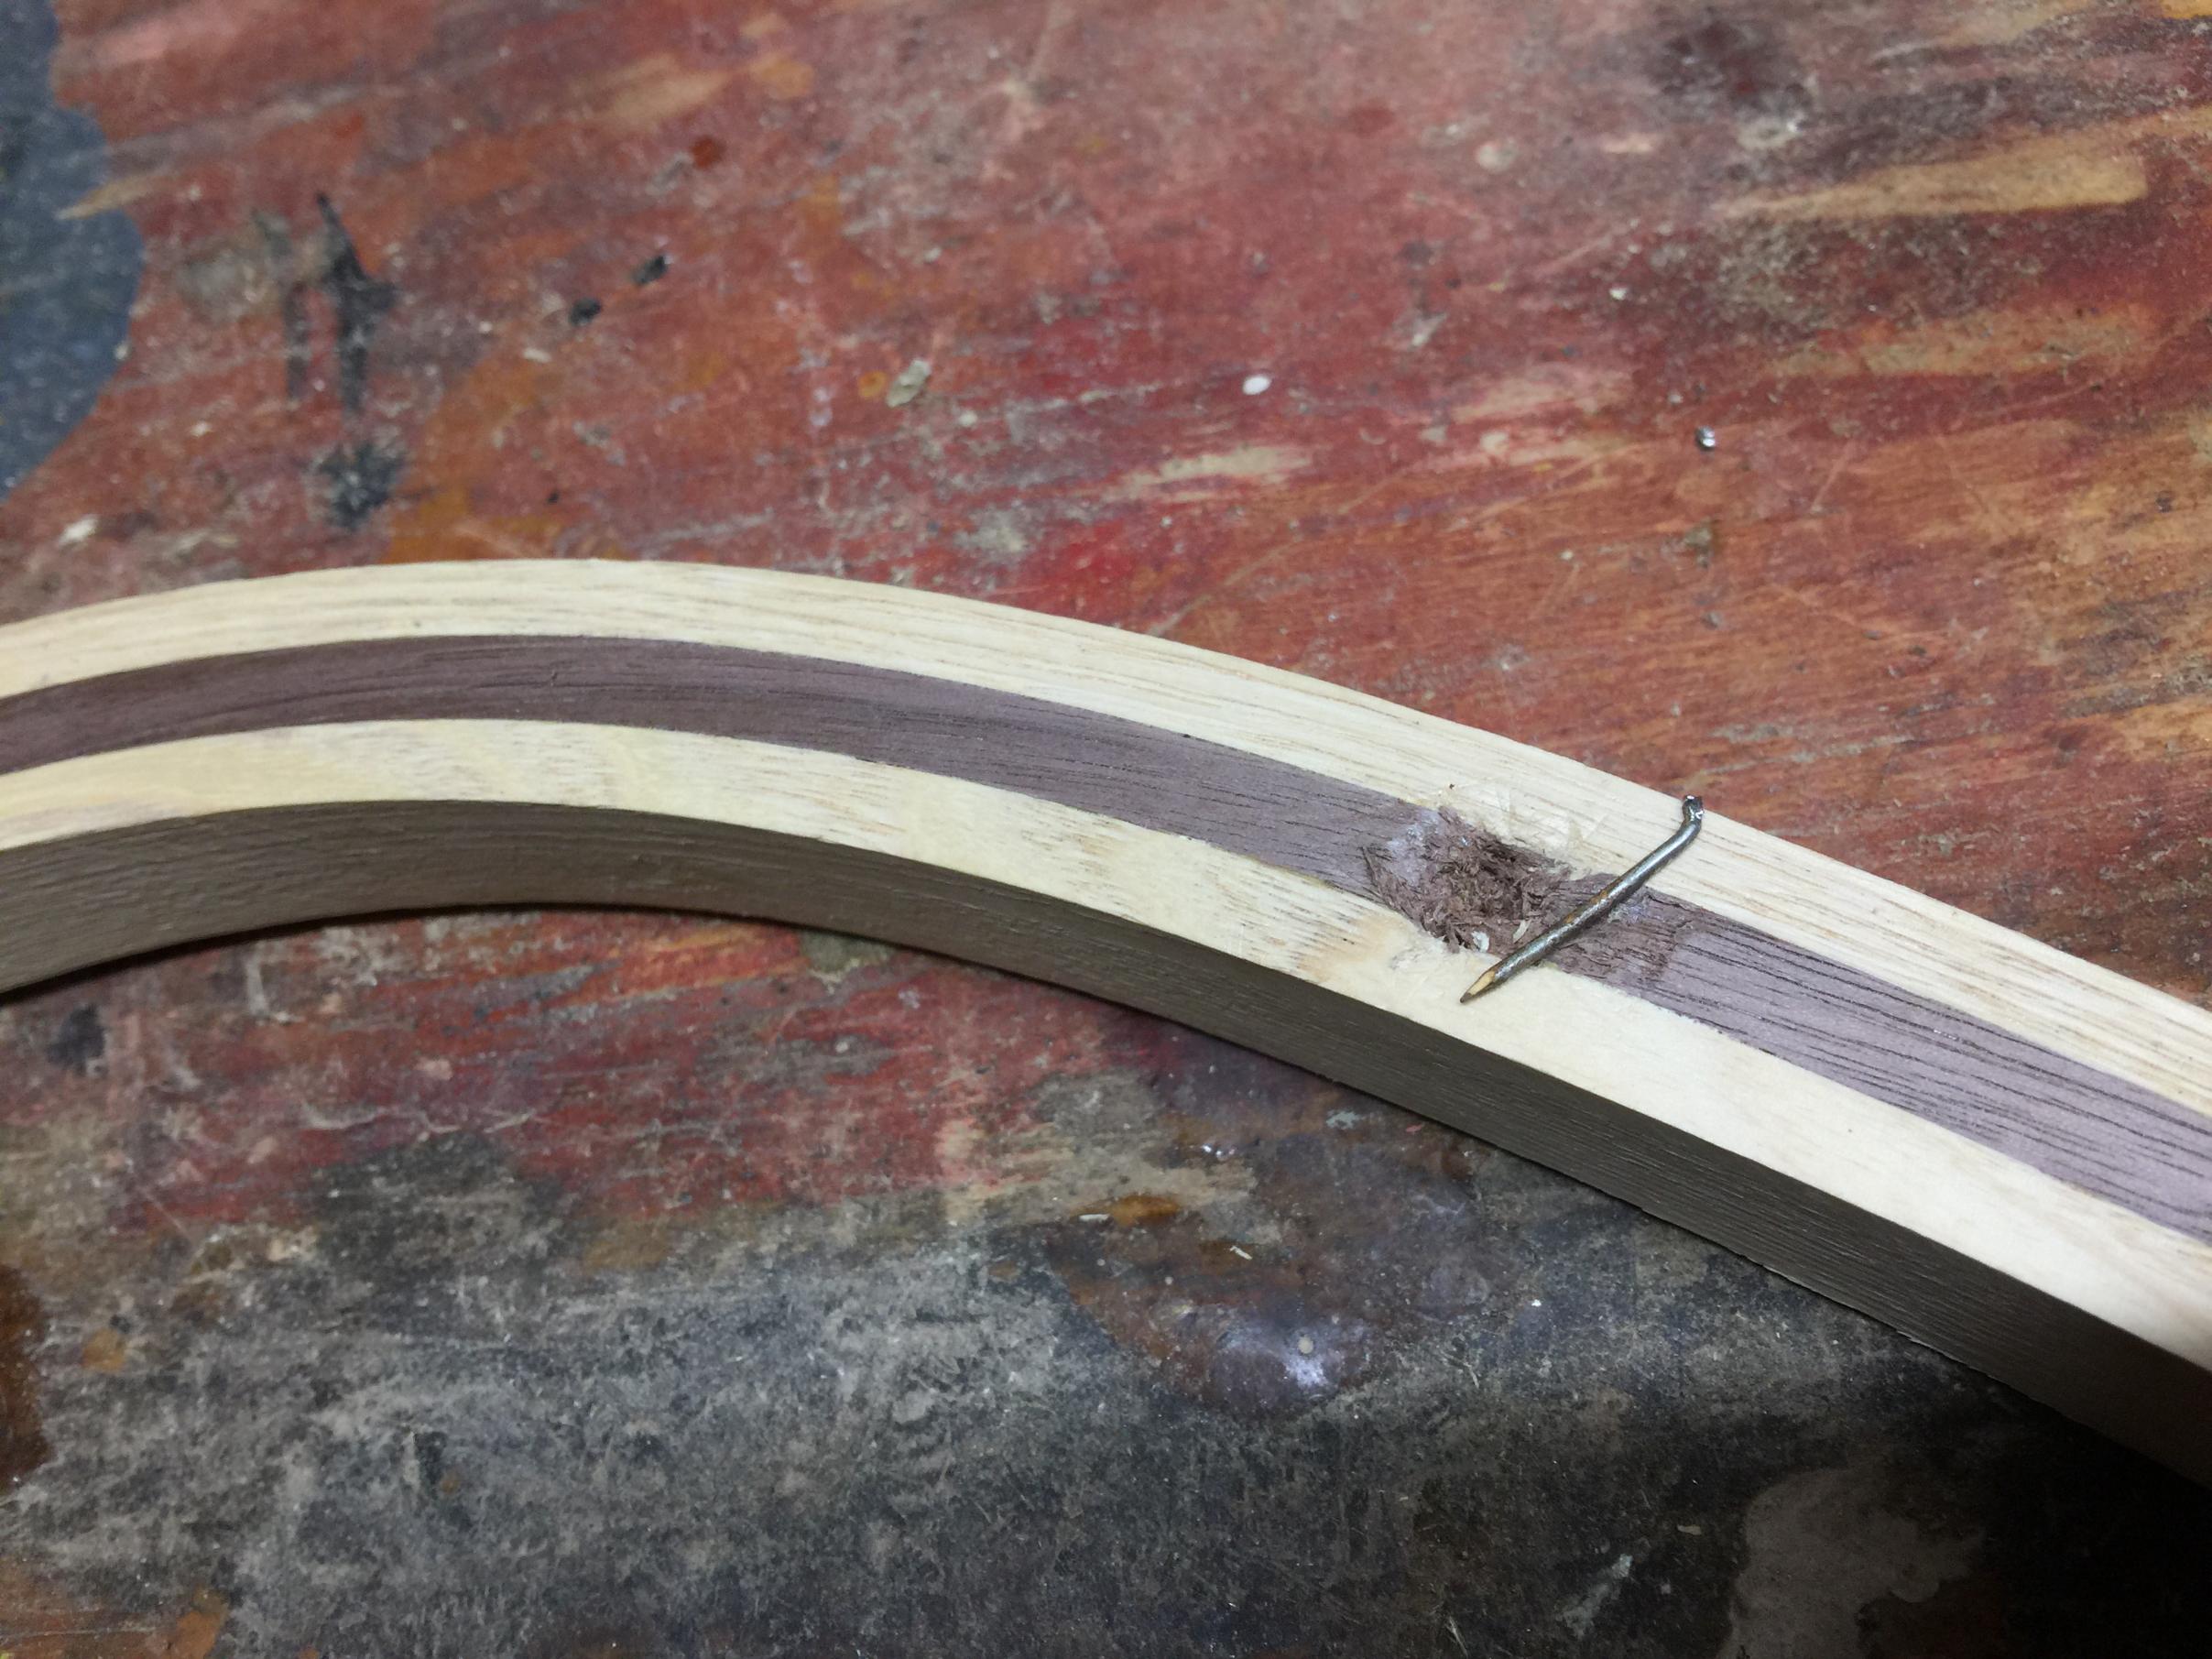
Was able to get a little work done yesterday. I was able to rip, plane, and steam bend the stems. It took longer than I had hoped since I broke a couple of the walnut pieces, and had to re-rip and start the Steam process over. Aside from a few broken pieces, it went very well.
I tried something new this time around: After clamping, I used some rope to hold the bend by lacing through the clamp holes. Works pretty darn well.... and frees up the clamps :)
I'll let these dry for a while then glue the laminations. Next I need to start ripping cedar.
01/06/2018 01:34PM
I hadn't updated this in a while- but thankfully I've been able to get a lot more work done over the holidays than I thought I would.
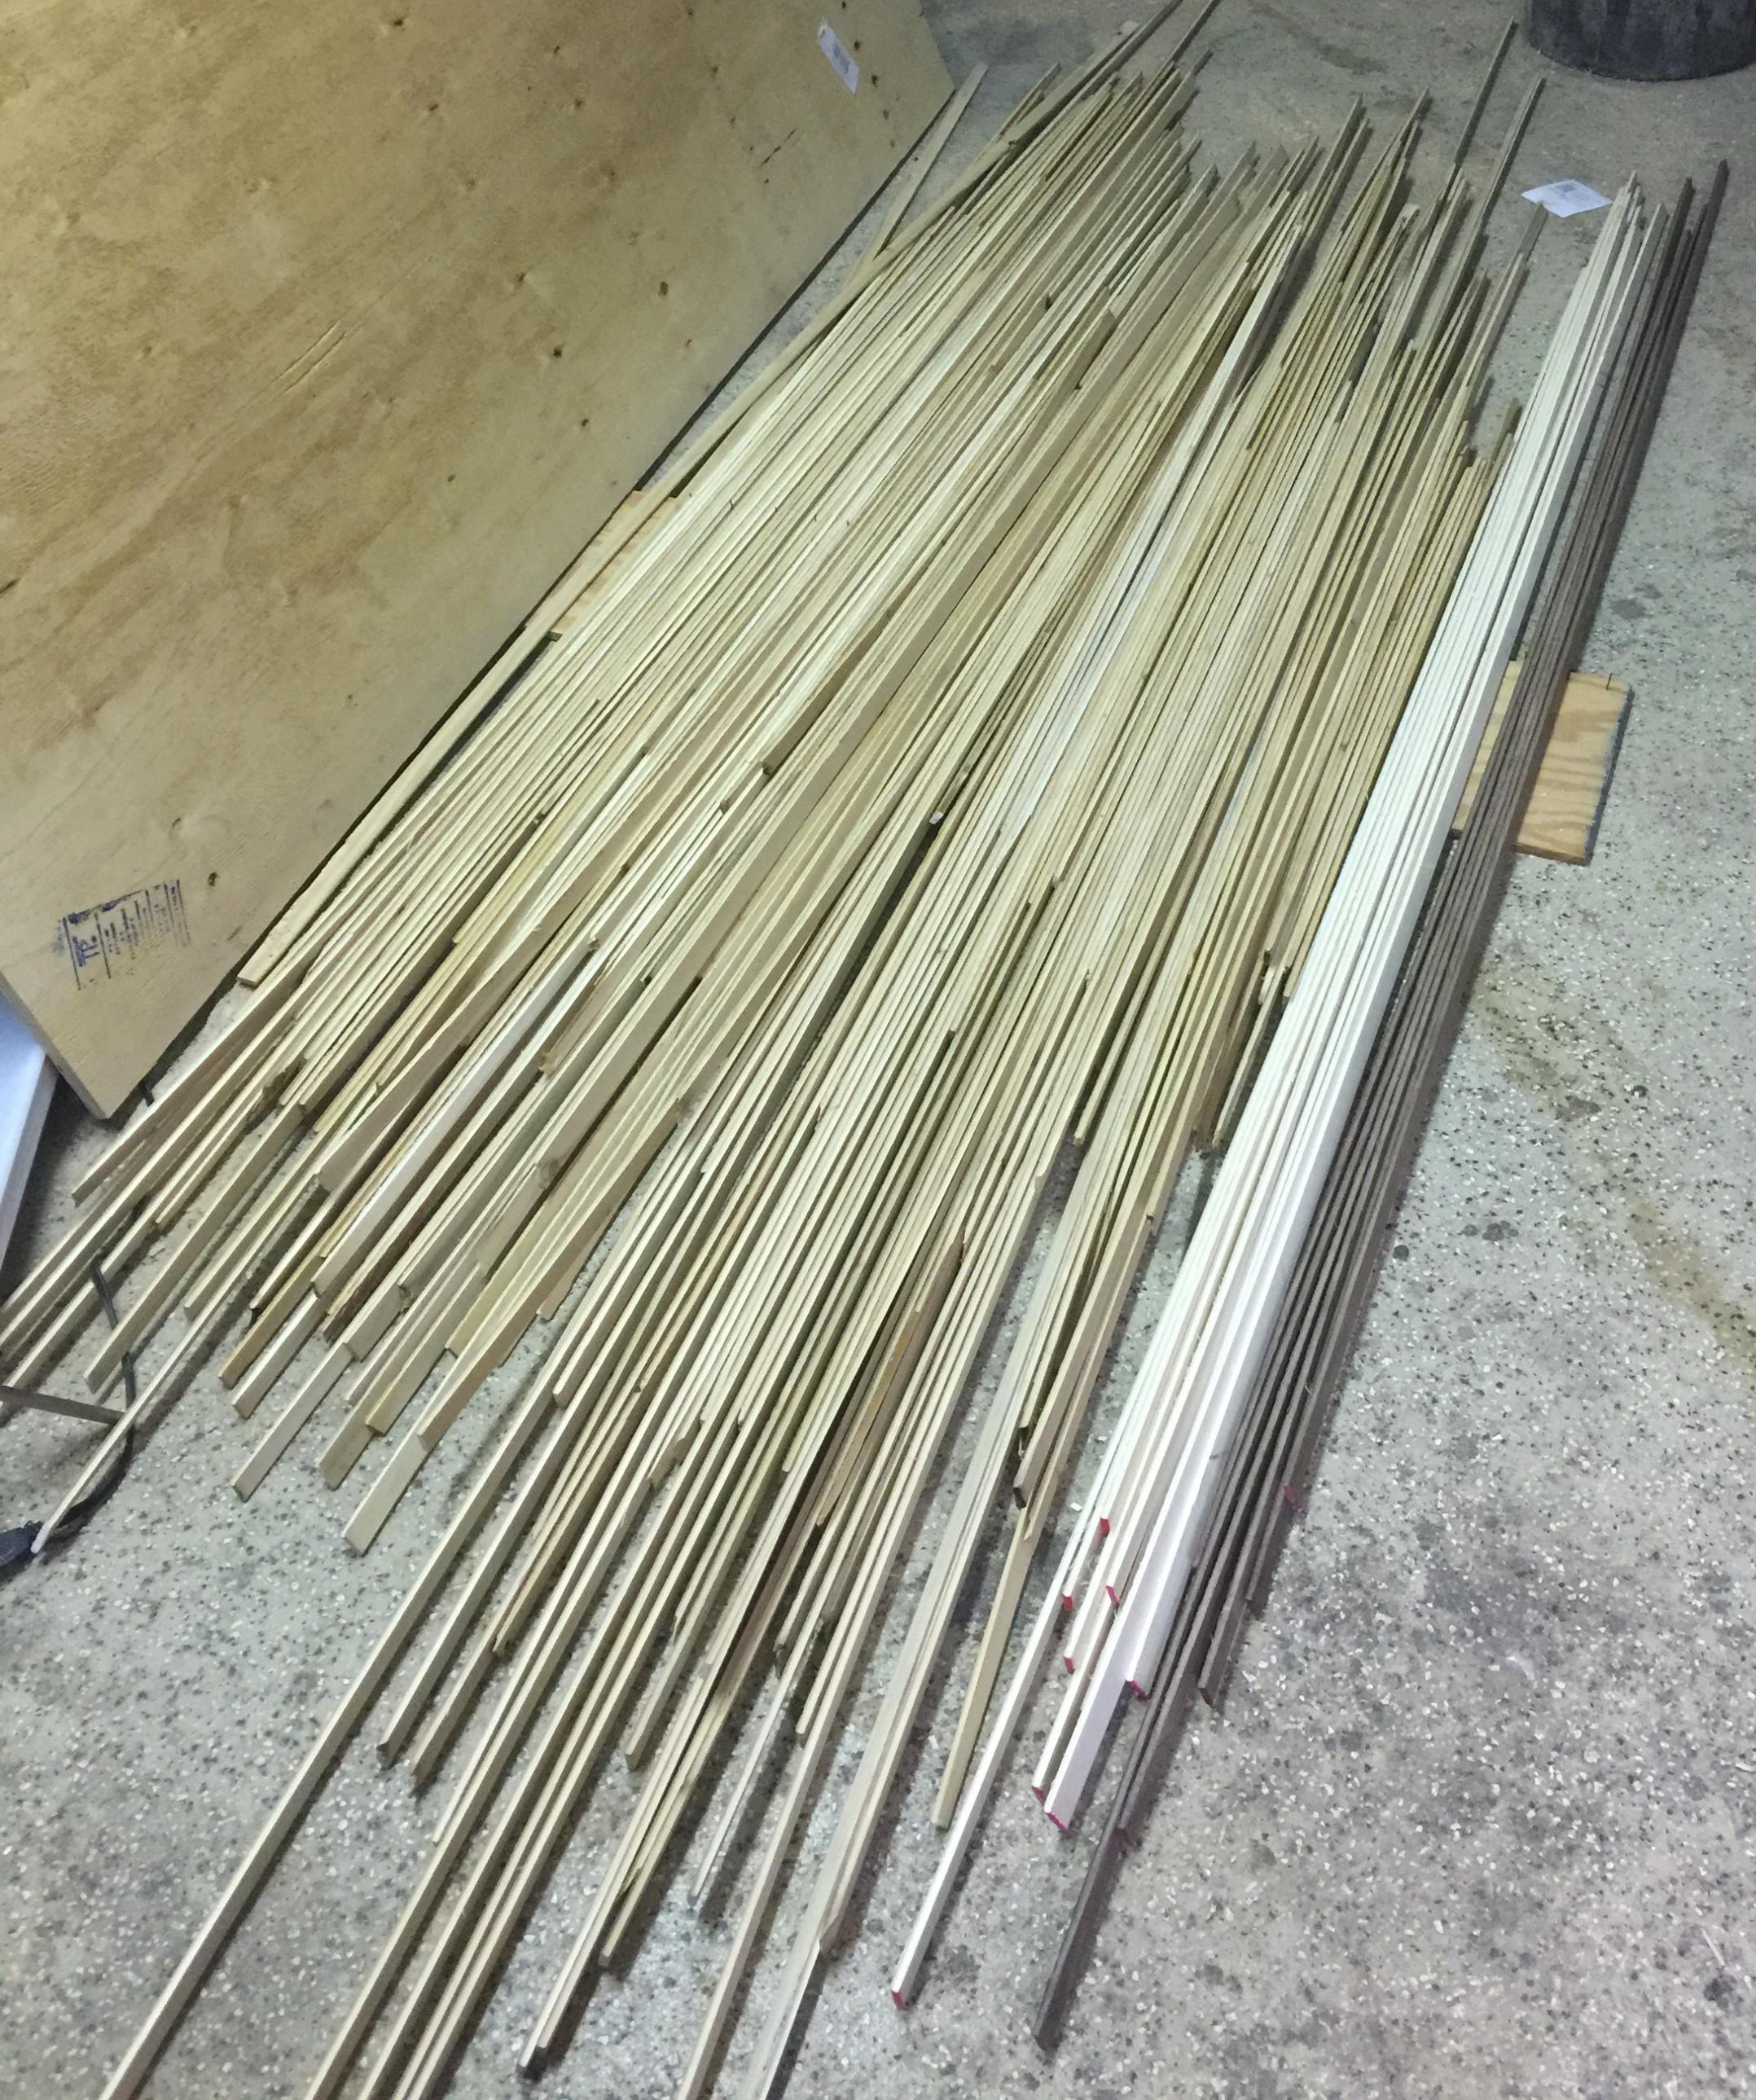
ripped cedar, basswood and walnut for the strips. I ripped to 5/16 then planed down to 1/4. This was helpful since I didn't have to worry about cutting my strips to thin and had a nice margin for error.

milled the bead and cove and sorted by color.

built a scarf jig at 10* and started gluing strips together.


Built my strongback and laid out forms. You may notice the "hump" is now gone. I did this by shimming with folded paper strips under duct tape.

And started stripping! I'm really digging the N white cedar look. Much more subtle.

Im going to keep working at stripping it for the next week. I'm also keeping a pretty diligent log of hours spent on the project. I'm curious to see where it ends up. I'm guessing about 150 hrs.
ripped cedar, basswood and walnut for the strips. I ripped to 5/16 then planed down to 1/4. This was helpful since I didn't have to worry about cutting my strips to thin and had a nice margin for error.

milled the bead and cove and sorted by color.
built a scarf jig at 10* and started gluing strips together.


Built my strongback and laid out forms. You may notice the "hump" is now gone. I did this by shimming with folded paper strips under duct tape.
And started stripping! I'm really digging the N white cedar look. Much more subtle.

Im going to keep working at stripping it for the next week. I'm also keeping a pretty diligent log of hours spent on the project. I'm curious to see where it ends up. I'm guessing about 150 hrs.
01/06/2018 02:13PM
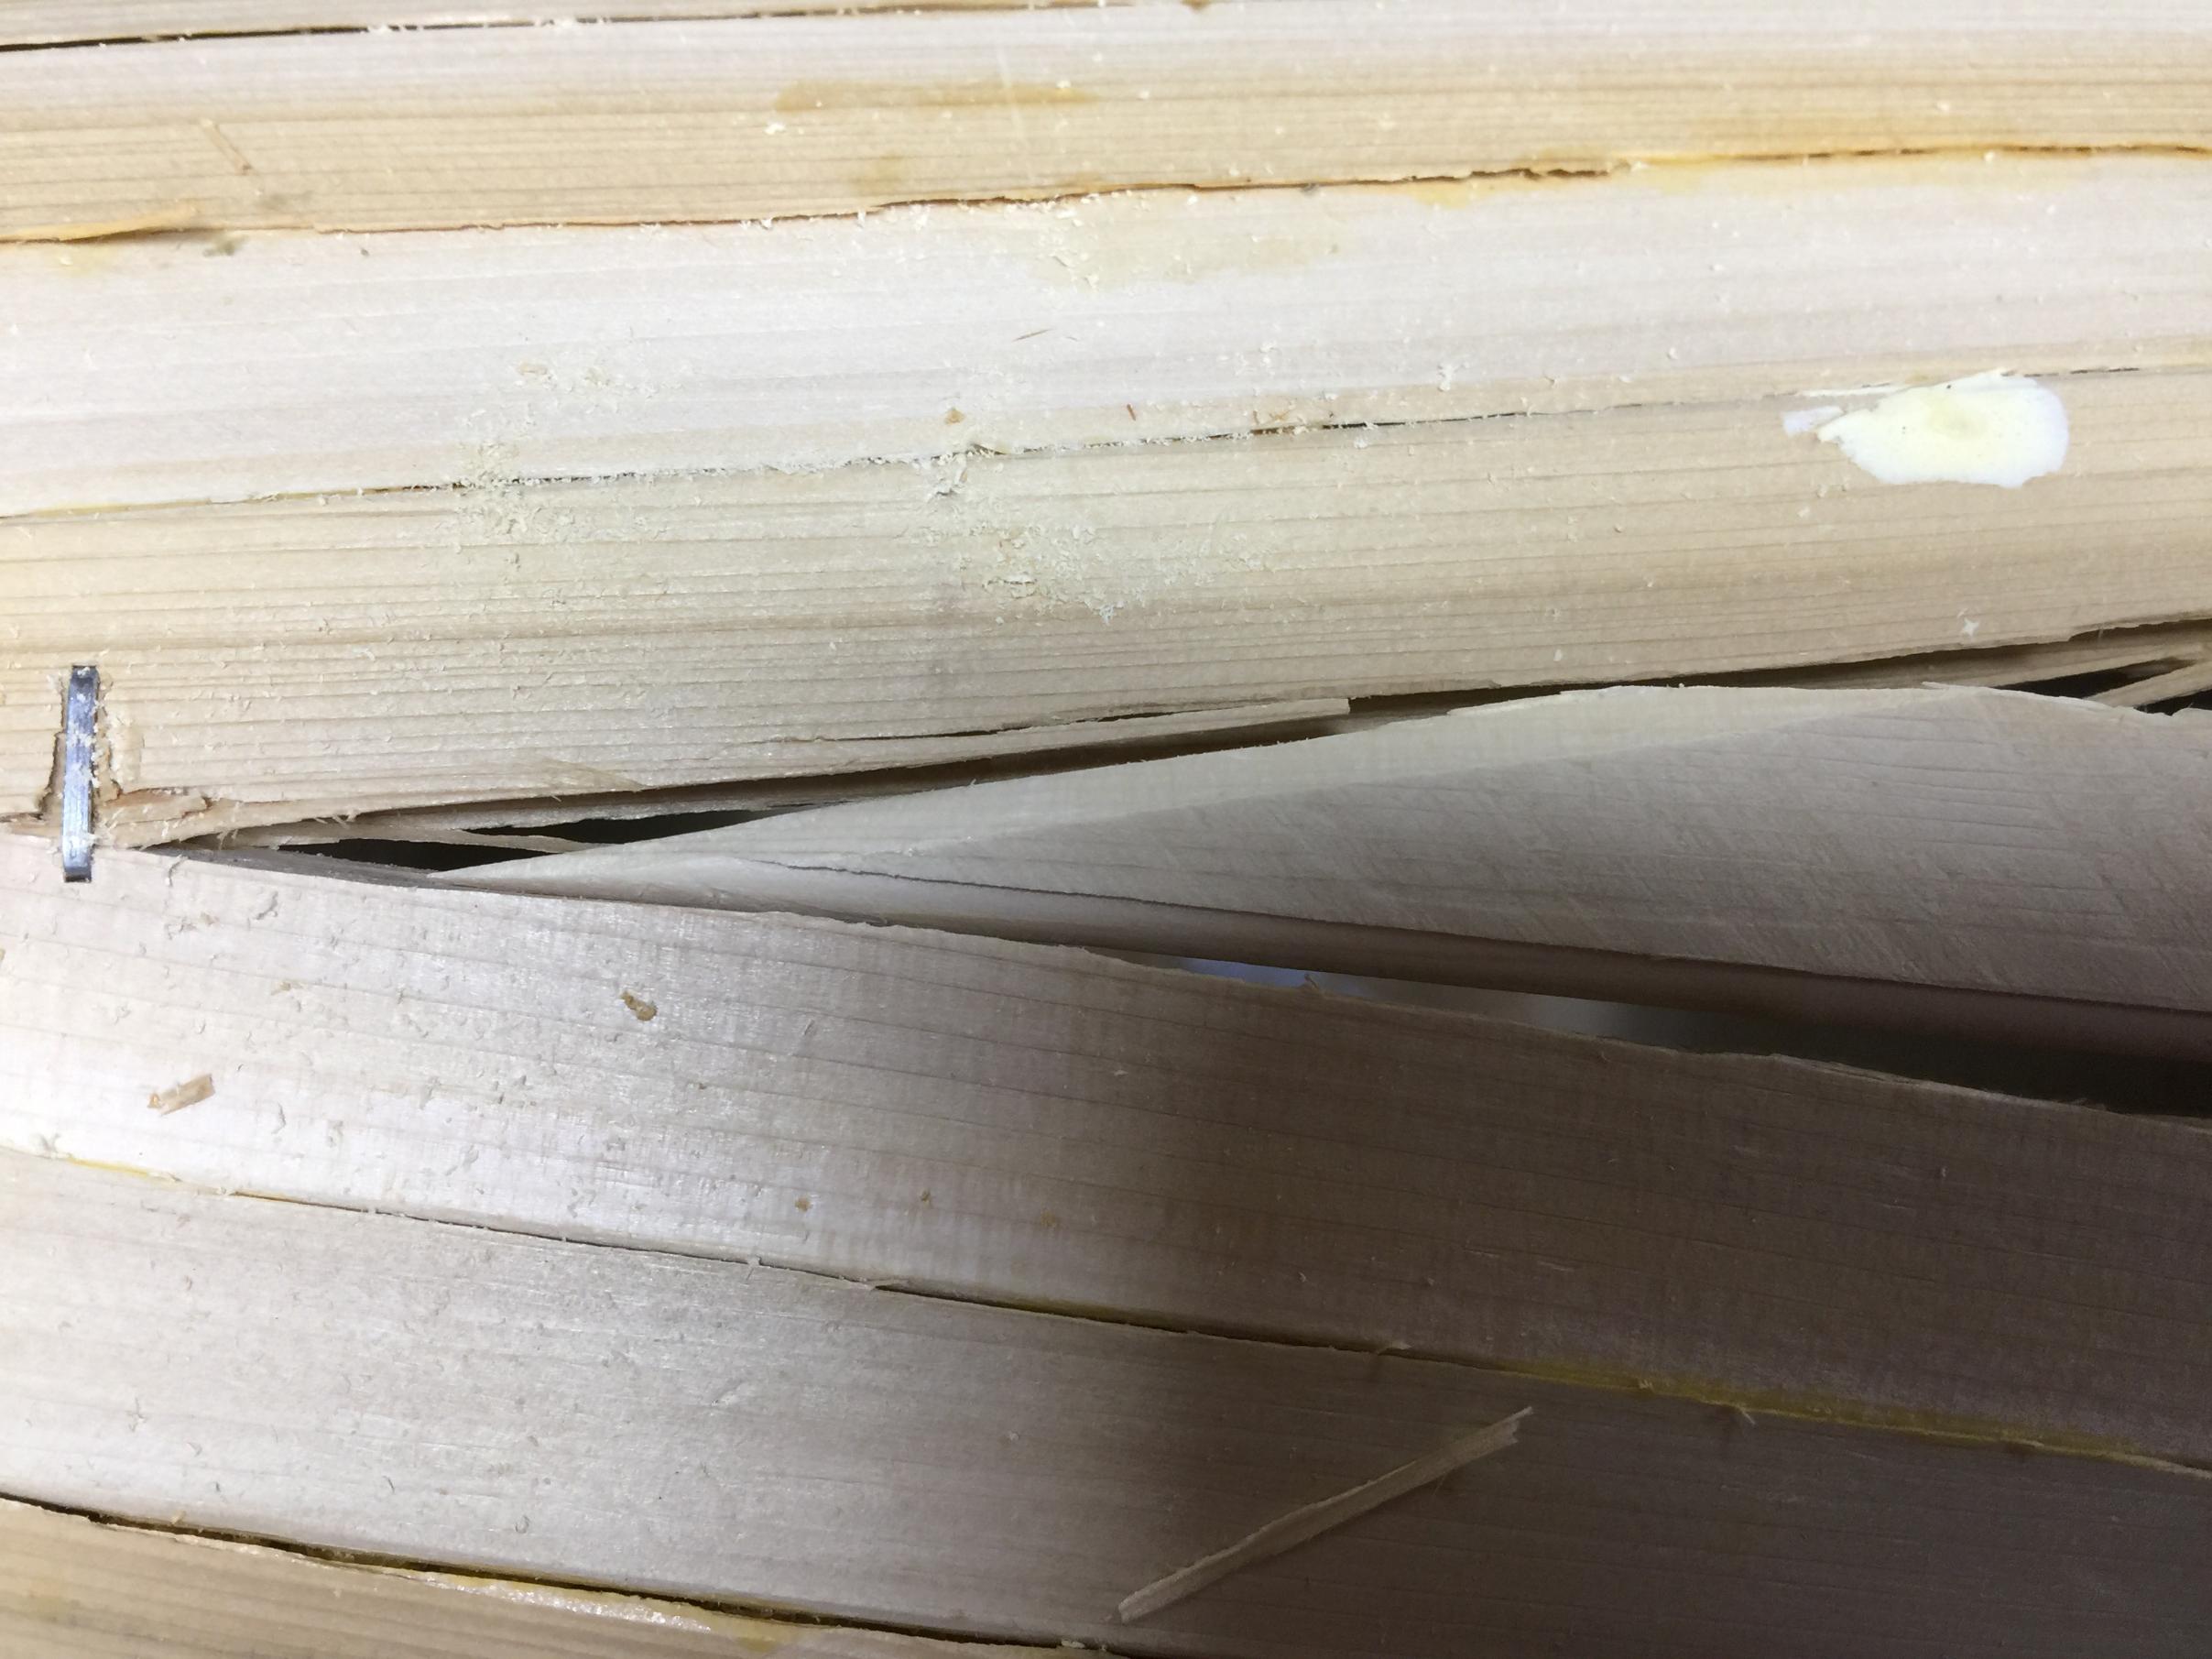
Also- I found this little gem in my completed stem after it took a chunk out of my planer blades. SOMEHOW my walnut had a nail in it??? I tried and tried to get it out but ended up having to dig. I was able to dig at it from the side which will be shaved away, so I don't think this will show up in the final product. 
01/14/2018 08:43AM
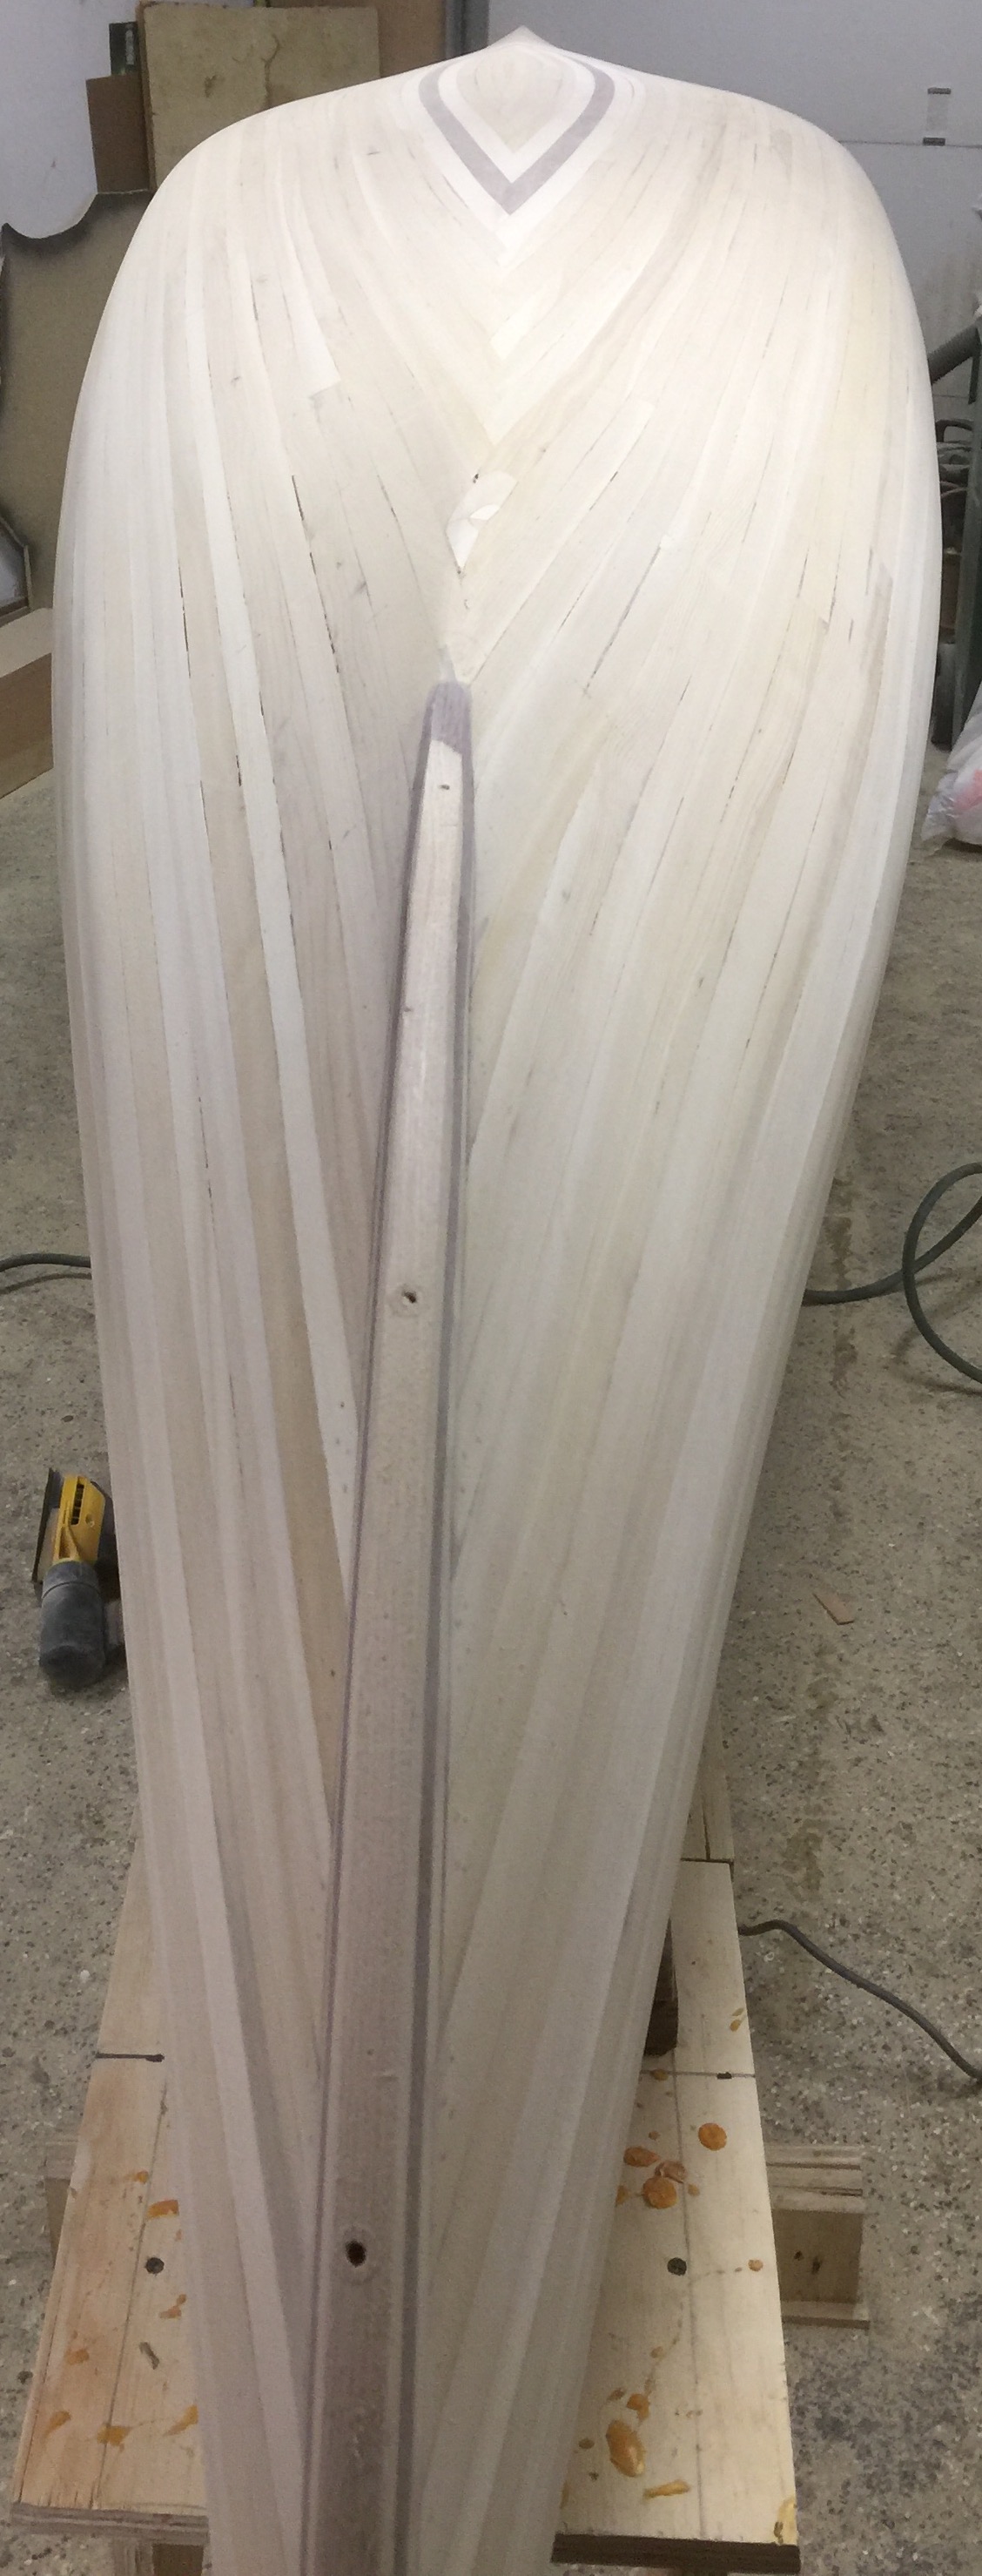
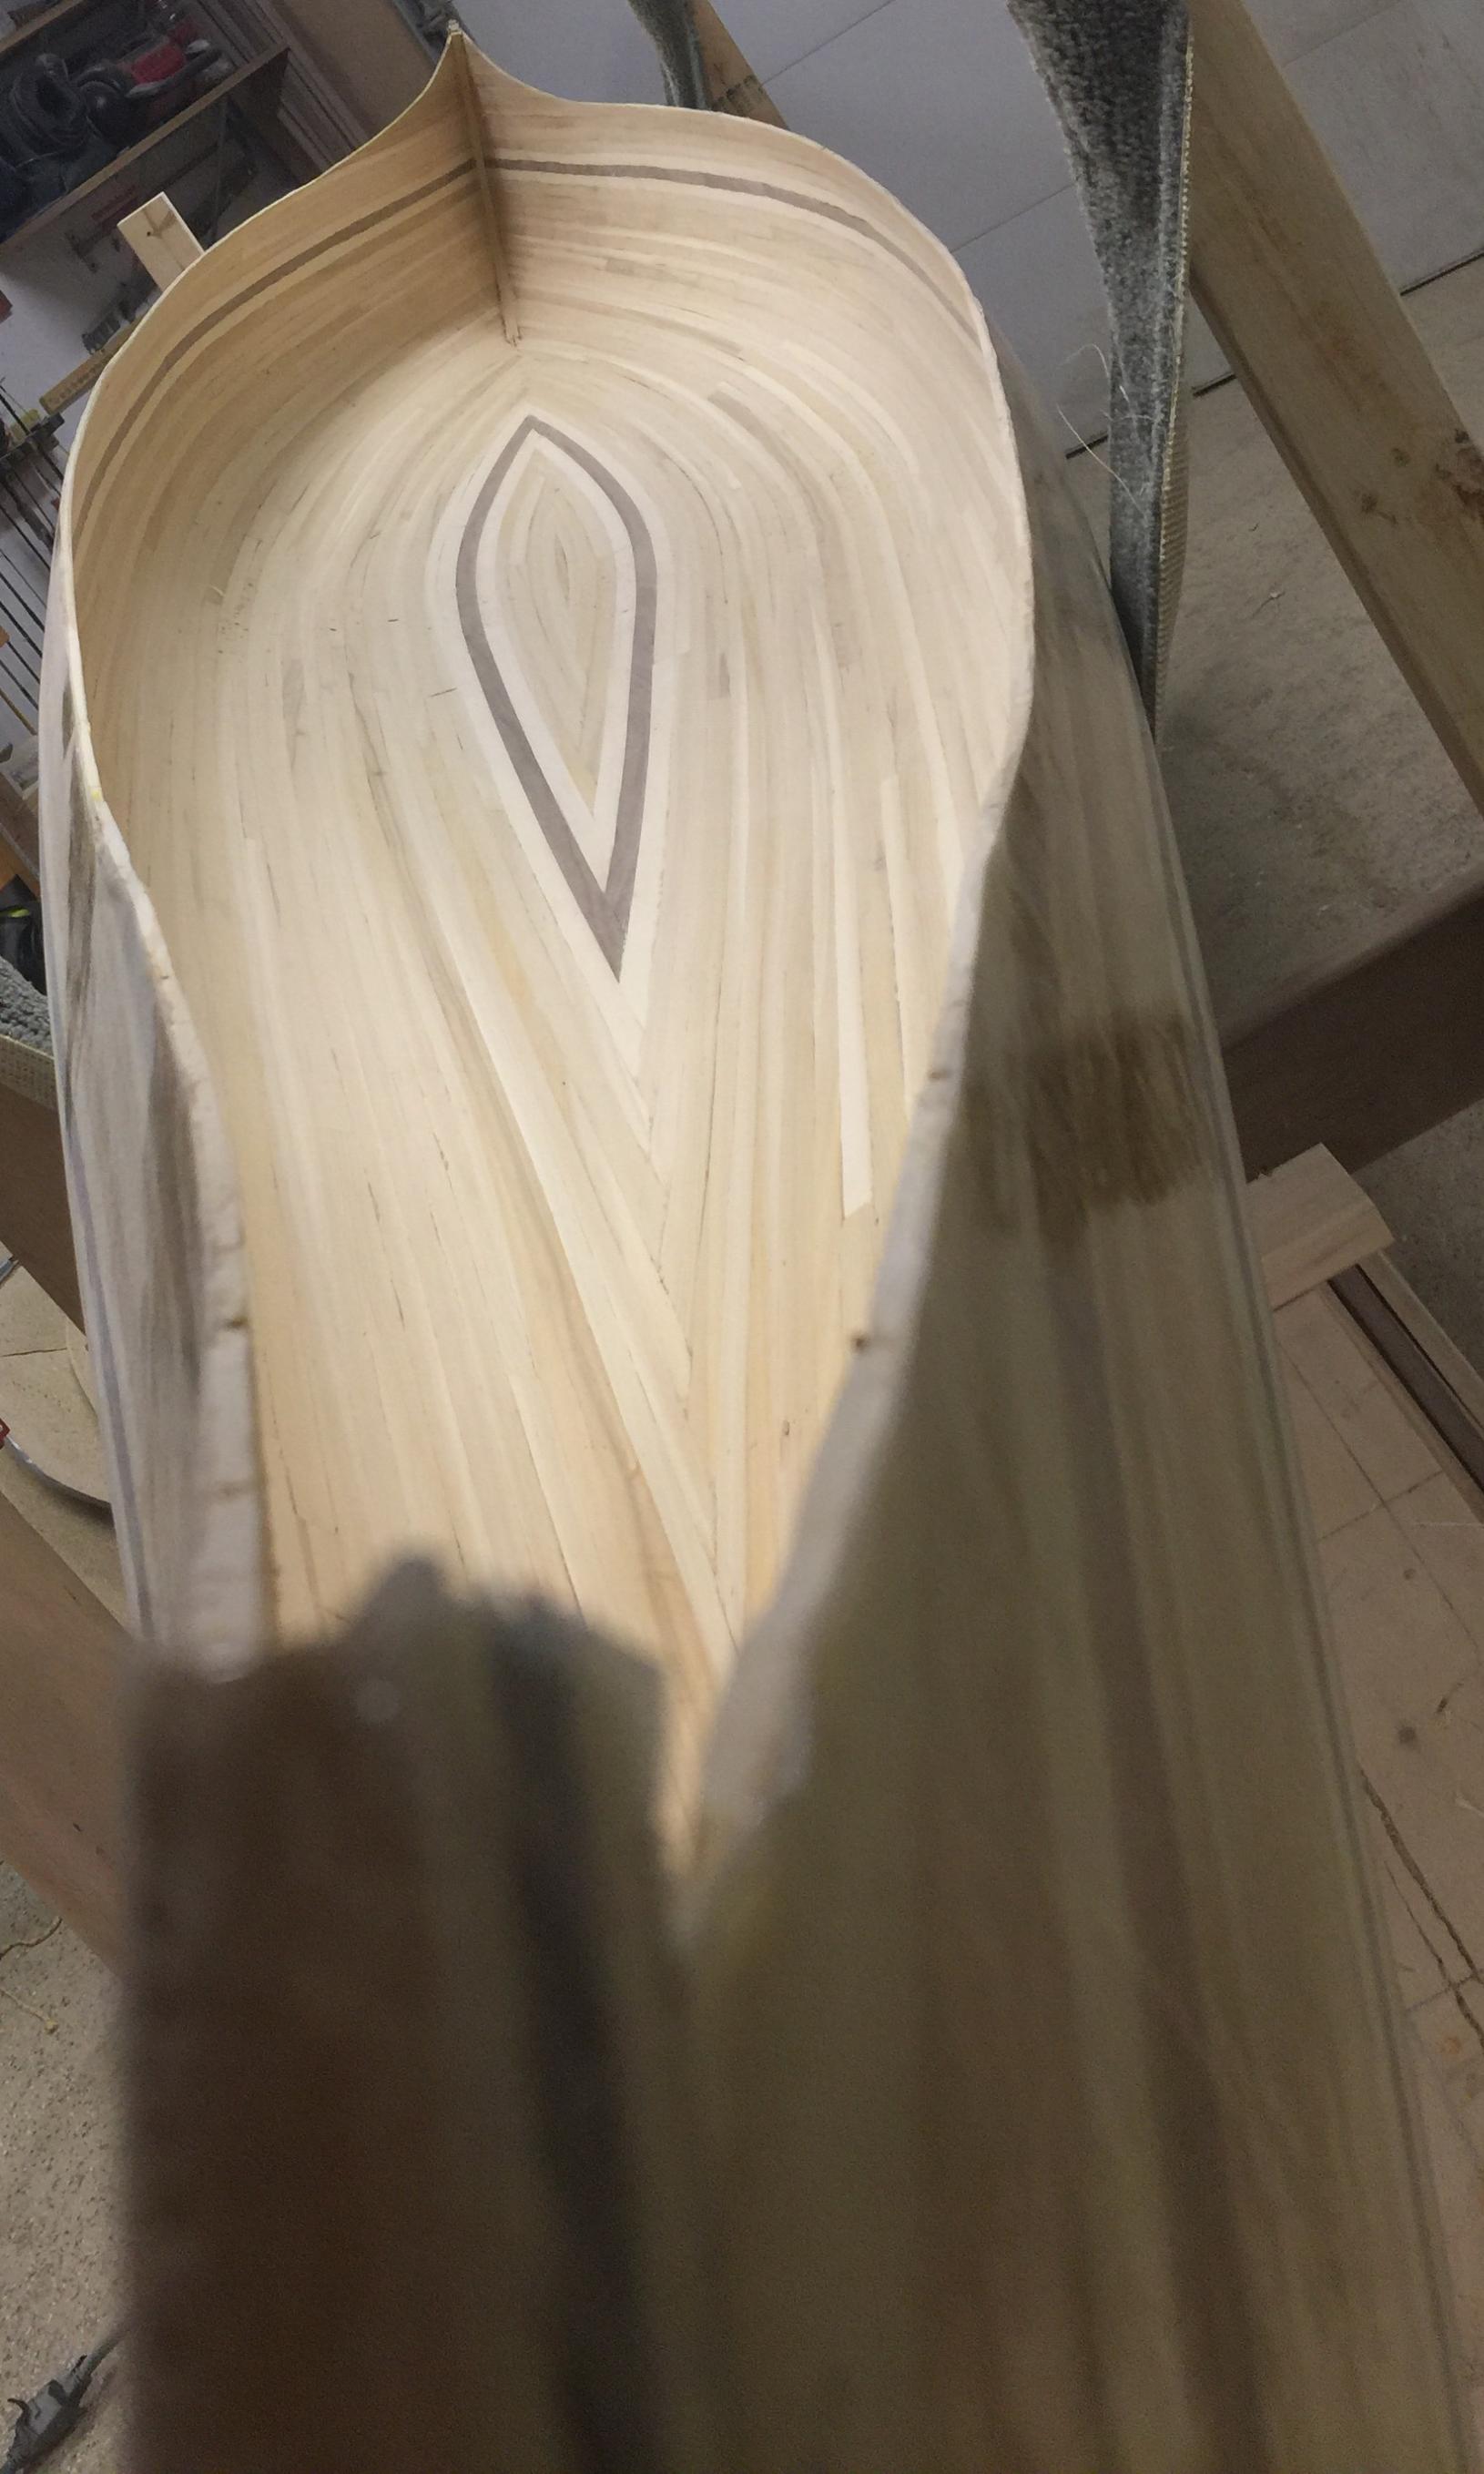
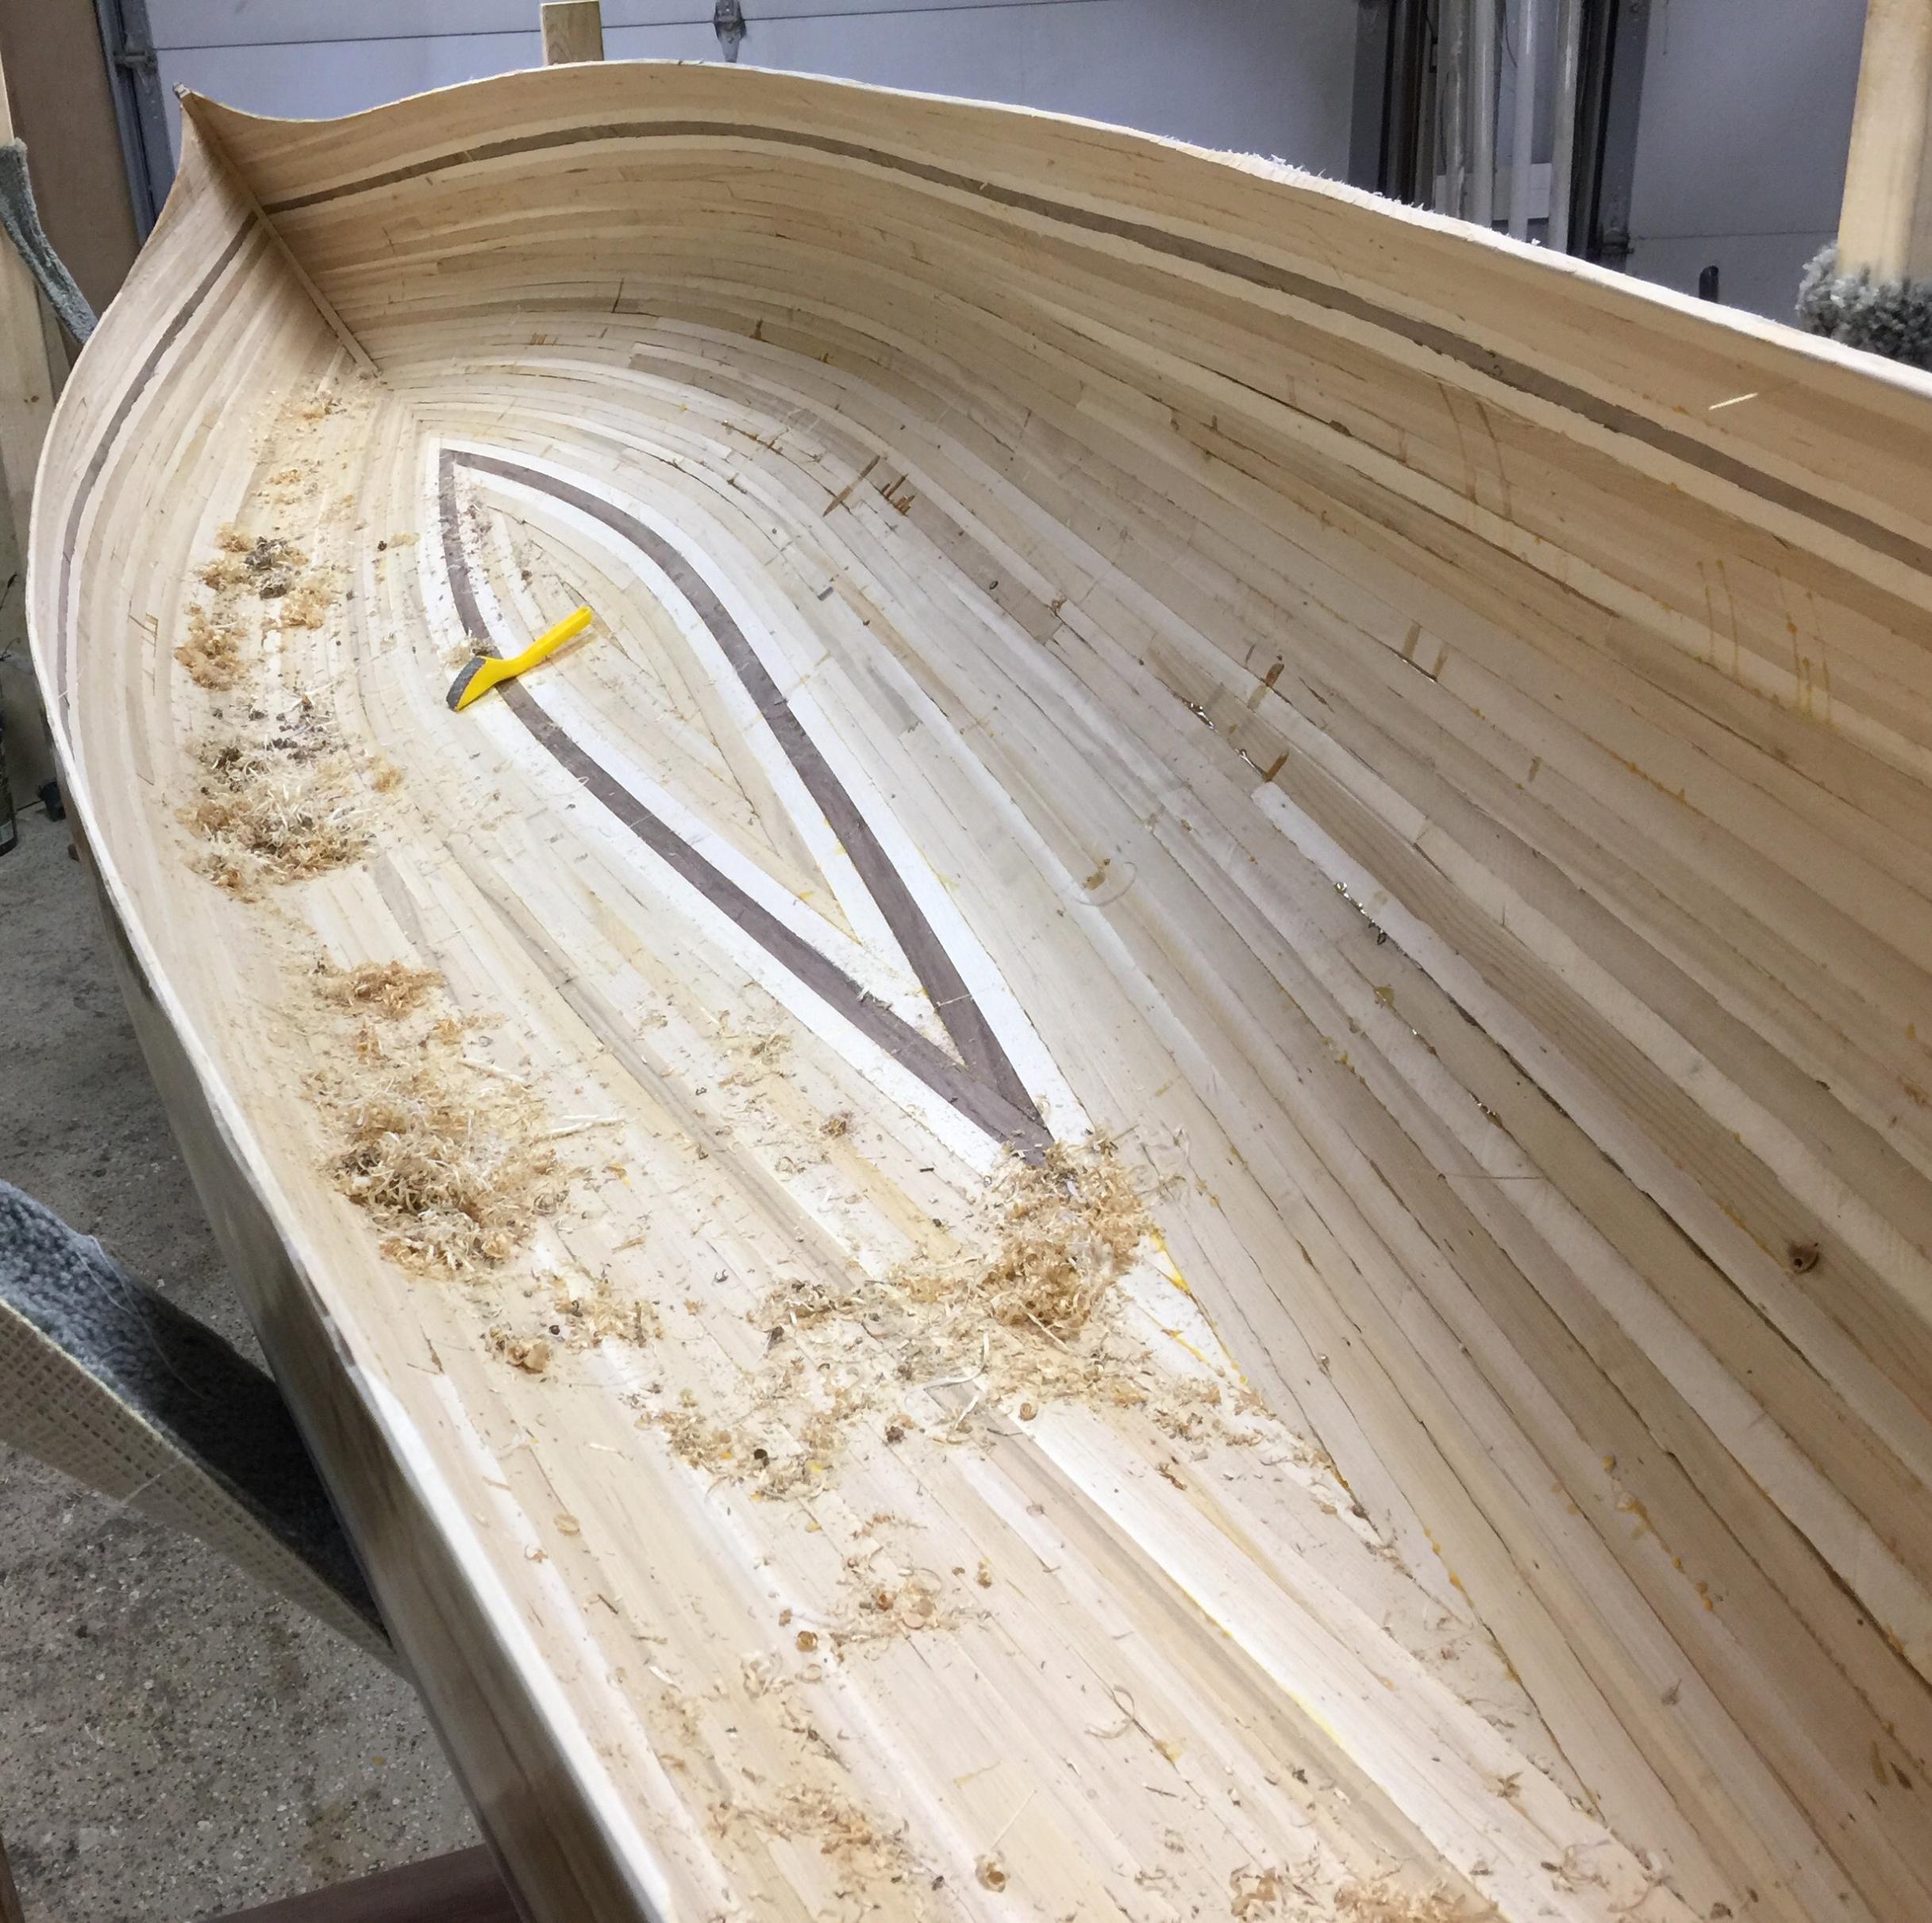
I finished 99% of the stripping this week.all I have left is the recurve part by the stems.

I decided to do herringbone on the football. This was more work, but not necessarily hard once I figured it out. Bead and cove stil work great for this if you bevel the non-beaded side so that it slips right in. It also creates an incredibly tight fit with this method- so much so that pulling it out after dry fitting was often times difficult due simply to the friction. Not that strength matters in a cedar strip, but his is definitely a strong joint.


Due to the sharper angle at the ends, the herringbone was difficult for 3 or so pieces until it "flattened out". This required some over- stapling to hold down tight.
I also added another decorative stripe in the football of basswood/walnut/basswood. I am a little nevous about these pieces when I pull staples. there is considerable pressure laterally- especially the walnut-to get it to bend. I had to tack with finish nails to hold. I'm hoping this eases over time. I used 4/4 and in retrospect I should have planed it to 3/4 or less to remove some pressure. I may even wait a few days to pull staples just to see if the wood sort of "realigns" in that bend. I'd hate for it to pop out. Planing and thinning of the strips in the next step should help ease the pressure as well.
I actually thought about using a heat gun to heat it right now- kind of like steaming a piece after its bent to Lessen springback - but I think that will destroy the glue, so that's off the table. If anyone has any thoughts I'd love to hear them.
All in all I am thrilled so far and the boat matches the modeled design to a T! I LOVE the subtlety of the white cedar over red.


I decided to do herringbone on the football. This was more work, but not necessarily hard once I figured it out. Bead and cove stil work great for this if you bevel the non-beaded side so that it slips right in. It also creates an incredibly tight fit with this method- so much so that pulling it out after dry fitting was often times difficult due simply to the friction. Not that strength matters in a cedar strip, but his is definitely a strong joint.

Due to the sharper angle at the ends, the herringbone was difficult for 3 or so pieces until it "flattened out". This required some over- stapling to hold down tight.
I also added another decorative stripe in the football of basswood/walnut/basswood. I am a little nevous about these pieces when I pull staples. there is considerable pressure laterally- especially the walnut-to get it to bend. I had to tack with finish nails to hold. I'm hoping this eases over time. I used 4/4 and in retrospect I should have planed it to 3/4 or less to remove some pressure. I may even wait a few days to pull staples just to see if the wood sort of "realigns" in that bend. I'd hate for it to pop out. Planing and thinning of the strips in the next step should help ease the pressure as well.
I actually thought about using a heat gun to heat it right now- kind of like steaming a piece after its bent to Lessen springback - but I think that will destroy the glue, so that's off the table. If anyone has any thoughts I'd love to hear them.
All in all I am thrilled so far and the boat matches the modeled design to a T! I LOVE the subtlety of the white cedar over red.

01/14/2018 10:11AM
Looks great !
A problem I had a few builds back, was that I had so much tension on the strips in the football, that when I pulled the staples, a Bump or rise developed in the keel. A Camel back if you will. A 1/2 - 5/8" gap, or rise.
I took a block of wood, and hot melt glued it to the hull from the inside, close to the form, and at the highest spot. I then pushed the hull back into shape, and with a sheet rock screw, fastened the block to the form. This worked great !
Glassed the exterior, and letting it cure for several weeks. Removed the screw, the hull stayed in shape.
Hopefully, that doesn't happen in your case !
Jim
Keep your paddle wet and your seat dry!
01/14/2018 11:08AM
1JimD: " Looks great !
A problem I had a few builds back, was that I had so much tension on the strips in the football, that when I pulled the staples, a Bump or rise developed in the keel. A Camel back if you will. A 1/2 - 5/8" gap, or rise.
I took a block of wood, and hot melt glued it to the hull from the inside, close to the form, and at the highest spot. I then pushed the hull back into shape, and with a sheet rock screw, fastened the block to the form. This worked great !
Glassed the exterior, and letting it cure for several weeks. Removed the screw, the hull stayed in shape.
Hopefully, that doesn't happen in your case !
Jim "
Great tip. That's exactly what I'm afraid of. Great remedy though-That'll be my fix if it happens.
01/19/2018 09:41PM
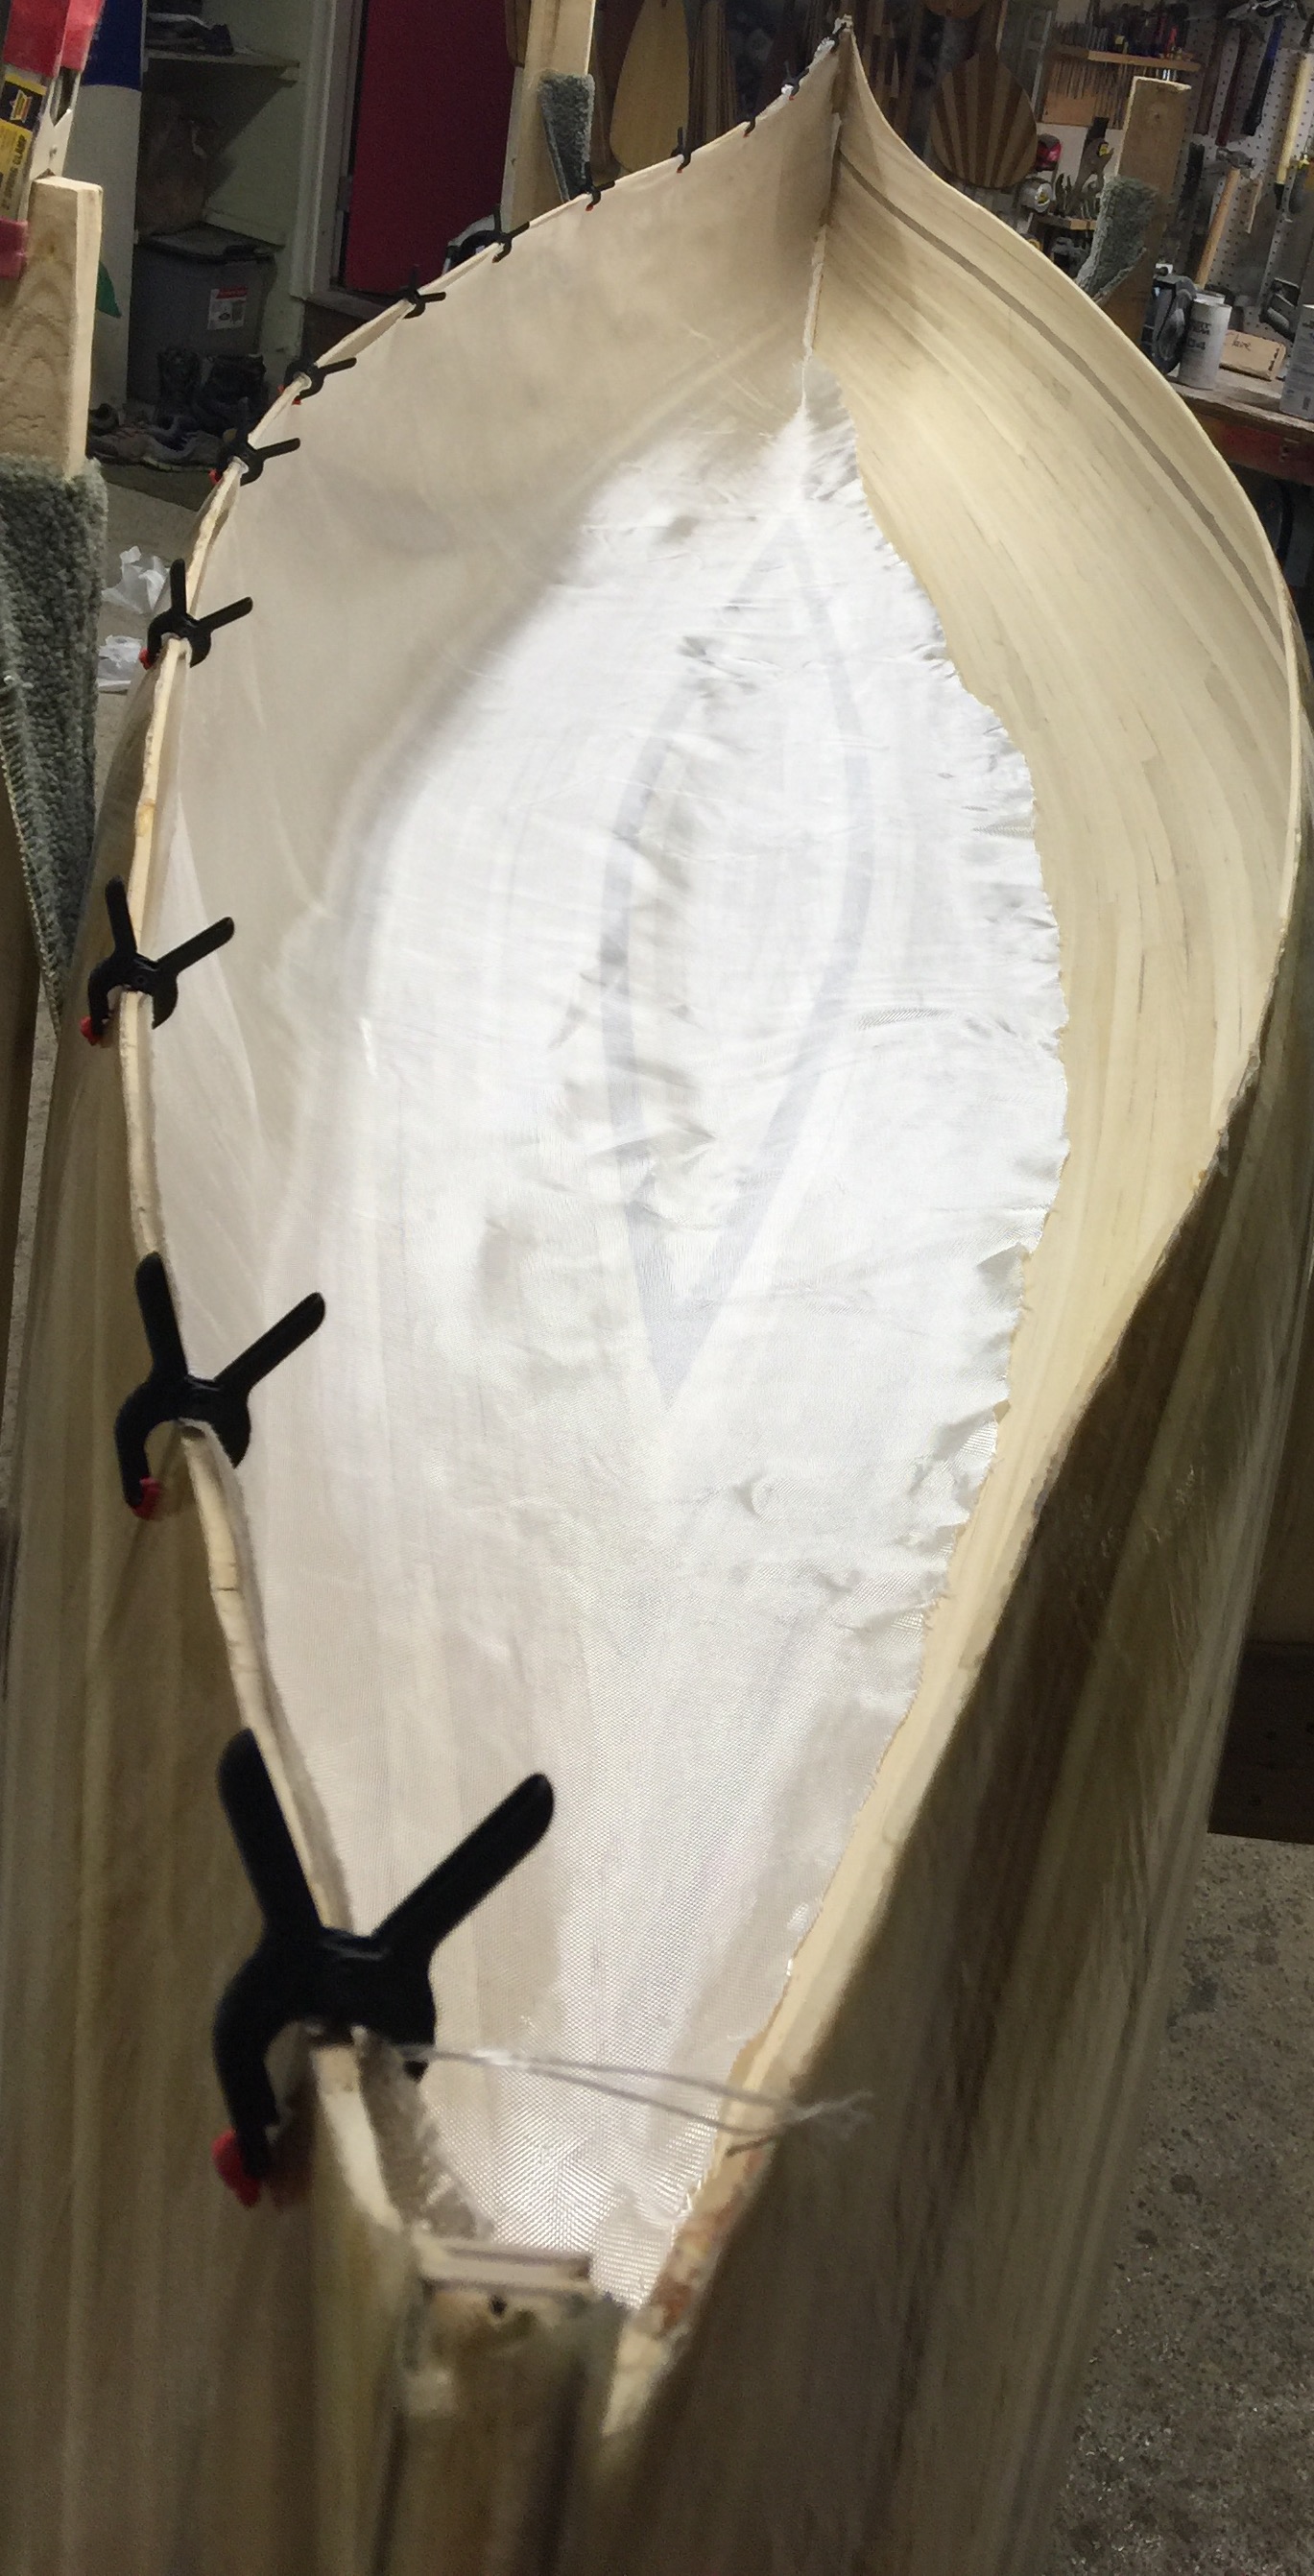
Well good news. No "bump" from the football and nothing pulled away.
I cut the mortise for the stems. I used a carpet knife to trace and make the vertical cut - just like Ted mores suggests. I Finished my stems and epoxied. I mixed up a black epoxy with the walnut dust and it looks pretty great with the boat.

One issue with the stems- because I laminated a stripe in the middle, I needed to taper from the inside, or my stripe would have disappeared on the bottom. I caught it in time though and think it looks great.
I pulled staples using a modified wire cutter(not sure what it's called). I ground the head down flat and thin to be able to pull even the tough staples. For those I couldn't get I used a 1/4 chisel.
I had this theory prior to building that the longest staples I could find would be the best because they wouldn't seat all the way and would be easy to pull. Well the reality is that they set all the way and since they were longer they were harder to pull! Lesson learned.
I'm happy with my choice of particleboard for the forms. It holds staples very well, but is easy to pull out and easy to shape (and cheaper) I'd recommend particleboard having used both particleboard and bcx.
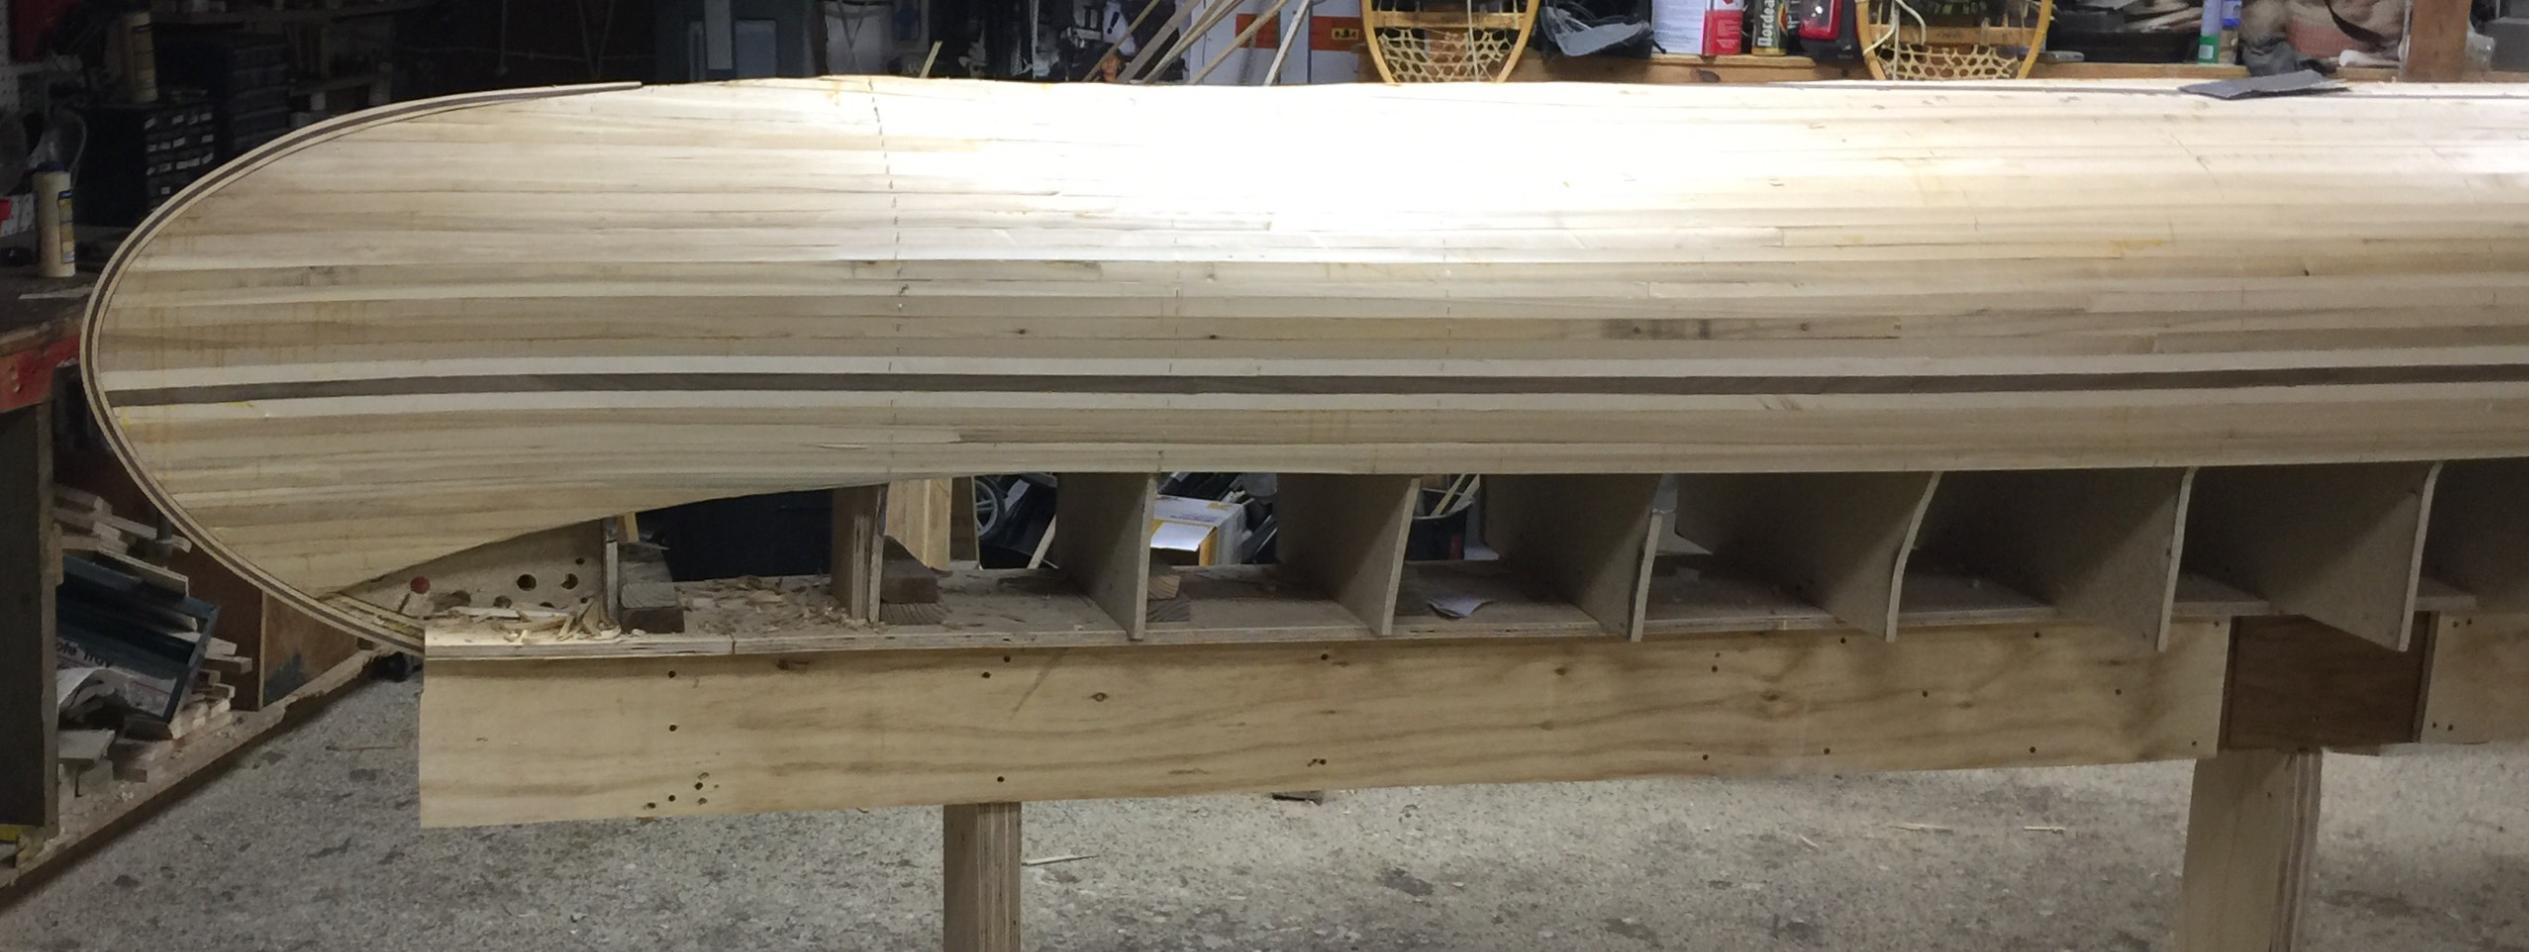
I cut the curve for my sheerline. Originally I cut it way too large, because I though it might look better. After much examination I trimmed it back so it matches my original design. I much happier with this second one and it looks a lot sleeker.

I finished planing in just an hour. I bought a FANTASTIC Japanese wood block plane for $10 on Amazon and it made that part Sooo much easier. Insanely sharp and nice and wide. I'd highly recommend if you haven't tried them.
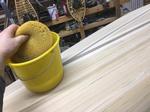
Ive now moved on to the torture board and 50 grit. This is going surprisingly fast. I only did about 5 minutes but it's already night and day and starting to get very fair.
After I've faired It Iwill fill gaps with epoxy tinted from the dust from fairing then re-fair and hit it with 120 and the ROS before glass. She's starting to look like a boat!!

I cut the mortise for the stems. I used a carpet knife to trace and make the vertical cut - just like Ted mores suggests. I Finished my stems and epoxied. I mixed up a black epoxy with the walnut dust and it looks pretty great with the boat.

One issue with the stems- because I laminated a stripe in the middle, I needed to taper from the inside, or my stripe would have disappeared on the bottom. I caught it in time though and think it looks great.
I pulled staples using a modified wire cutter(not sure what it's called). I ground the head down flat and thin to be able to pull even the tough staples. For those I couldn't get I used a 1/4 chisel.

I had this theory prior to building that the longest staples I could find would be the best because they wouldn't seat all the way and would be easy to pull. Well the reality is that they set all the way and since they were longer they were harder to pull! Lesson learned.
I'm happy with my choice of particleboard for the forms. It holds staples very well, but is easy to pull out and easy to shape (and cheaper) I'd recommend particleboard having used both particleboard and bcx.
I cut the curve for my sheerline. Originally I cut it way too large, because I though it might look better. After much examination I trimmed it back so it matches my original design. I much happier with this second one and it looks a lot sleeker.

I finished planing in just an hour. I bought a FANTASTIC Japanese wood block plane for $10 on Amazon and it made that part Sooo much easier. Insanely sharp and nice and wide. I'd highly recommend if you haven't tried them.

Ive now moved on to the torture board and 50 grit. This is going surprisingly fast. I only did about 5 minutes but it's already night and day and starting to get very fair.

After I've faired It Iwill fill gaps with epoxy tinted from the dust from fairing then re-fair and hit it with 120 and the ROS before glass. She's starting to look like a boat!!

01/26/2018 02:30PM
Few more updates.
I didn't anticipate the fiberglass width being an issue but the boat is 63"- wider than fiberglass is woven. Raka had some 72" but it's out of stock with no end in sight I did an exhaustive search but am SOl. I'm going to have to overlap 2 pieces-This isn't necessarily bad as it should add some atrength to the big boat, but more complexity than I anticiapated. Also more expensive.
I finished sanding with a ROS and spent an hr filling gaps with the dust from the ROS as color. Made a nice thick peanut butter for filling and cleaned up with acetone. Acetone takes the excess epoxy right off. Last photo is after cleanup and acetone yet to evaporate. Next steps now are to sand one more time with ROS at 40. Refill anywhere I missed. Then ROS at 80 and 120 and final cleaning before glass.


01/26/2018 09:25PM
/\/\/\/\ Jim beat me to it.
Express Composites has 60". I don't believe the last inch at the top would be and issue, but you could always lay a small piece to cover it using your scrap.
http://www.expresscomposites.com/?product_cat=fabrics&paged=2
Express Composites has 60". I don't believe the last inch at the top would be and issue, but you could always lay a small piece to cover it using your scrap.
http://www.expresscomposites.com/?product_cat=fabrics&paged=2
Good judgment comes from experience, and a lot of that comes from bad judgment.
01/26/2018 10:10PM
Oh the FUN of SANDING !
Well if you can pull it outside on a dry day, it's a little better.
I've found that anything that helps save time sanding ? Go for it !
Knowing when to quit sanding is the hard part. If you want it to look pretty, don't ignore swirl marks, thinking they will go away ? They will show right through !
You are gaining on it ! Look good.
Jim
Keep your paddle wet and your seat dry!
02/01/2018 08:56PM
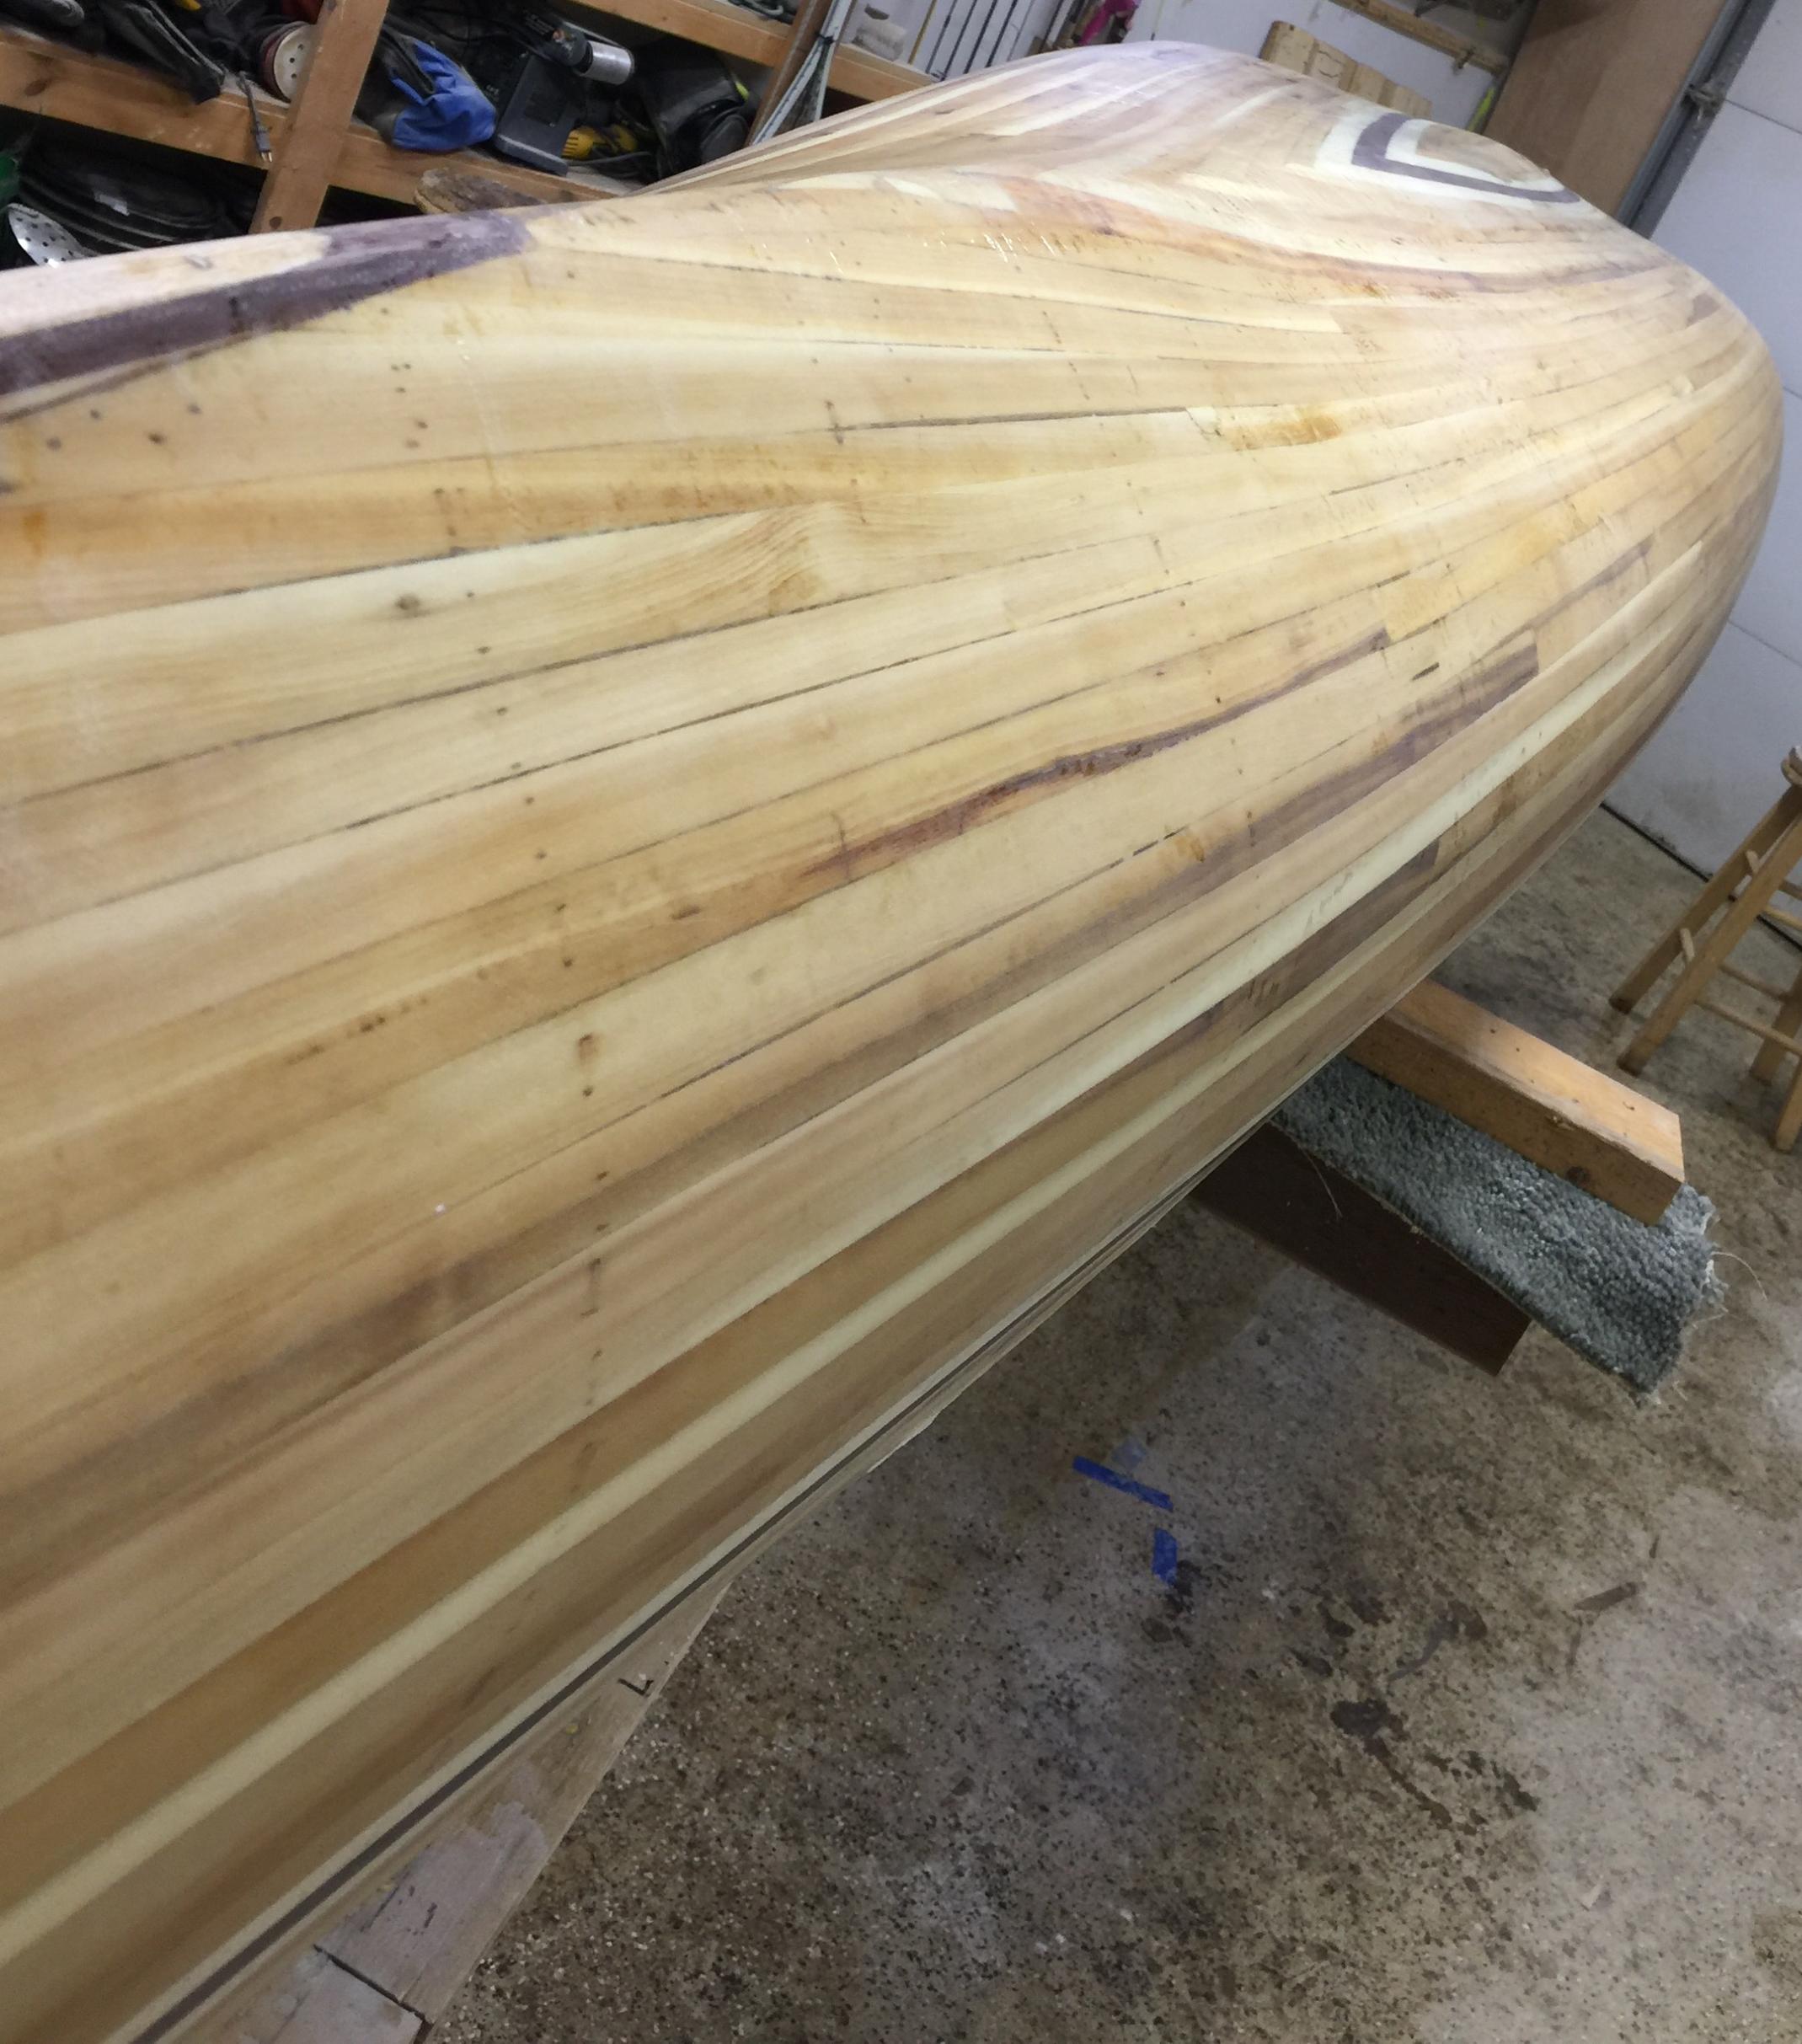
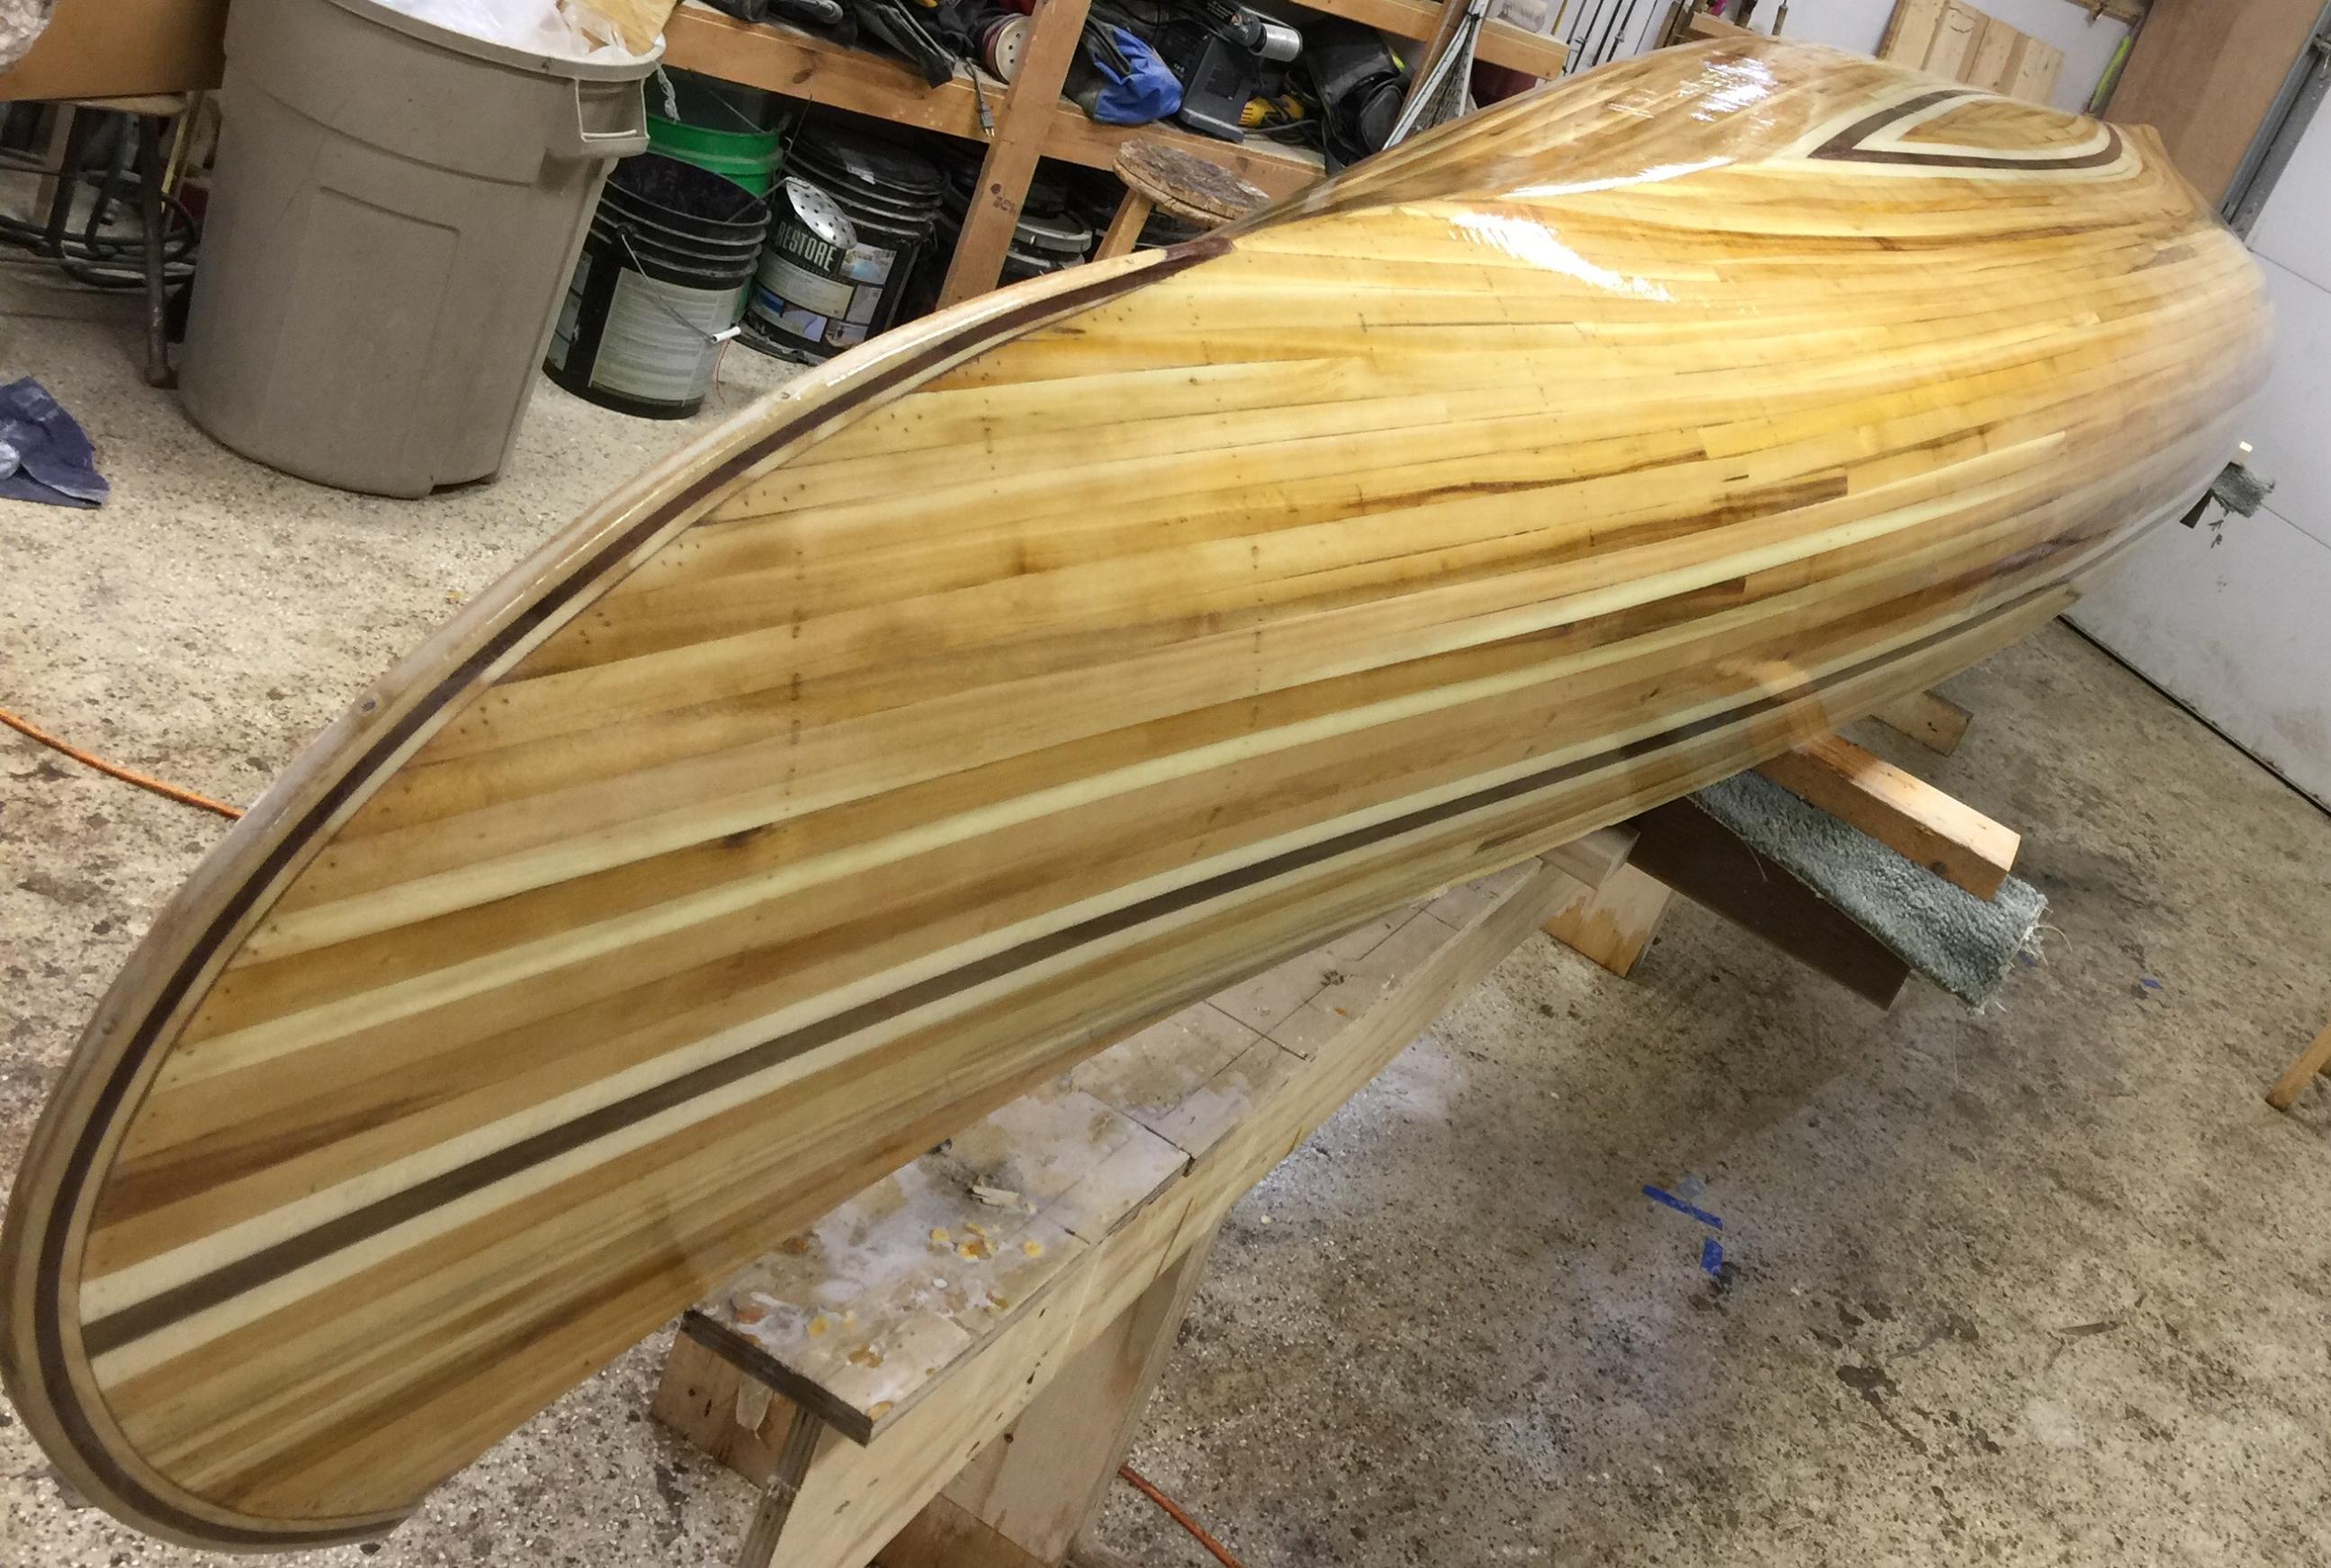
Well tonight I got my first peak at the finished product. I finished rough sanding after filling gaps. Then after a smoothing pass of 80 grit...

I I wet it down to raise up the grain and WHAM!! The colors popped!

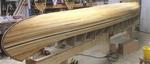
I'm tickled at how great this thing looks. The pic doesn't do it justice- IT looks great.
Regarding the glass issue- I ordered 40" glass from RAKA and will overlap the bottom in the football. I figure this can't be bad except for adding a little weight.
Next up is to finish sand 120 grit and go over with a fine tooth comb. I'll then glass it when we get a warmer day so the garage can heat up sufficiently- hard to keep it warm under 10 degrees.
02/02/2018 10:38AM
Looks great !
Yes, wait until you can get working temps up to 70 F or more!
Heat the hull higher if possible ! Then let it cool, as you apply cloth and resin. This will eliminate outgassing, the tiny bubbles that appear.
Jim
Yes, wait until you can get working temps up to 70 F or more!
Heat the hull higher if possible ! Then let it cool, as you apply cloth and resin. This will eliminate outgassing, the tiny bubbles that appear.
Jim
Keep your paddle wet and your seat dry!
02/06/2018 10:32AM
Well I may have screwed up!
Last night I glued up the yoke, thwart and carrying handles. That was easy enough.
Here's the issue: I designed the yoke with laminated ash and walnut. I'm using ash for "white" on the boat where I need tougher wood instead of basswood.
I got a little greedy looking at the yoke and thought- "man, baswood would really pop" ....and it does look sweet with walnut...so I got maybe too carried away and decided to use the basswood in the yoke instead of ash.
It's laminated with walnut, so except for the piece right smack in the middle joining the two halves which is all basswood, I'm not worried.
But that middle piece... now I'm now regretting my decision! I'm worried about strength.
To be fair, this is one inch thick and there will be 1 1/4 inch width at that piece plus 1/4 of walnut as well.
I'm not sure if this is a good or bad idea.
Thoughts?


02/06/2018 01:48PM
My guesstimate is that it would be fine. Even with the basswood instead of ash, there is strength in the laminate as a whole. The only way to find out is testing to destruction :) If you are worried about it you could always skin it with a clear layer of fiberglass. That would add substantial strength without affecting weight or aesthetics much.
"Everybody needs beauty as well as bread; places to play in and pray in, where nature may heal and give strength to body and soul" -John Muir
02/06/2018 08:48PM
It'll only be as strong as the longest glue joint, and by your layout(in the pic) right at the Nape of your neck looks to be the weak point. There is little issue with the wood itself.
Good judgment comes from experience, and a lot of that comes from bad judgment.
02/07/2018 10:44AM
Arcola: "It'll only be as strong as the longest glue joint, and by your layout(in the pic) right at the Nape of your neck looks to be the weak point. There is little issue with the wood itself."
Thanks. Yeah I agree that's why I use thickened epoxy for the yoke. Joint should be fine.
I roughed it out last night and I did beef up the nape slightly. I left about 1/4 basswood al the way through which I wasn't going to do and added 1/4 on the back. So I have about 1 3/4-2 inches now total including the 1/4 walnut. I think this should be fine. It feels pretty good and barely flexes even when putting considerable weight on it.
It will of course get thinned slightly and shaped - but I THiNK it'll be fine. Still not 100% confident.

02/07/2018 09:11PM
I think you'll be fine as well. It's my belief that canoes tend to be over-built as it is, so as Jim say's , If it breaks you can always make another. Looks cool too with the laminations.
Good judgment comes from experience, and a lot of that comes from bad judgment.
02/09/2018 09:38PM
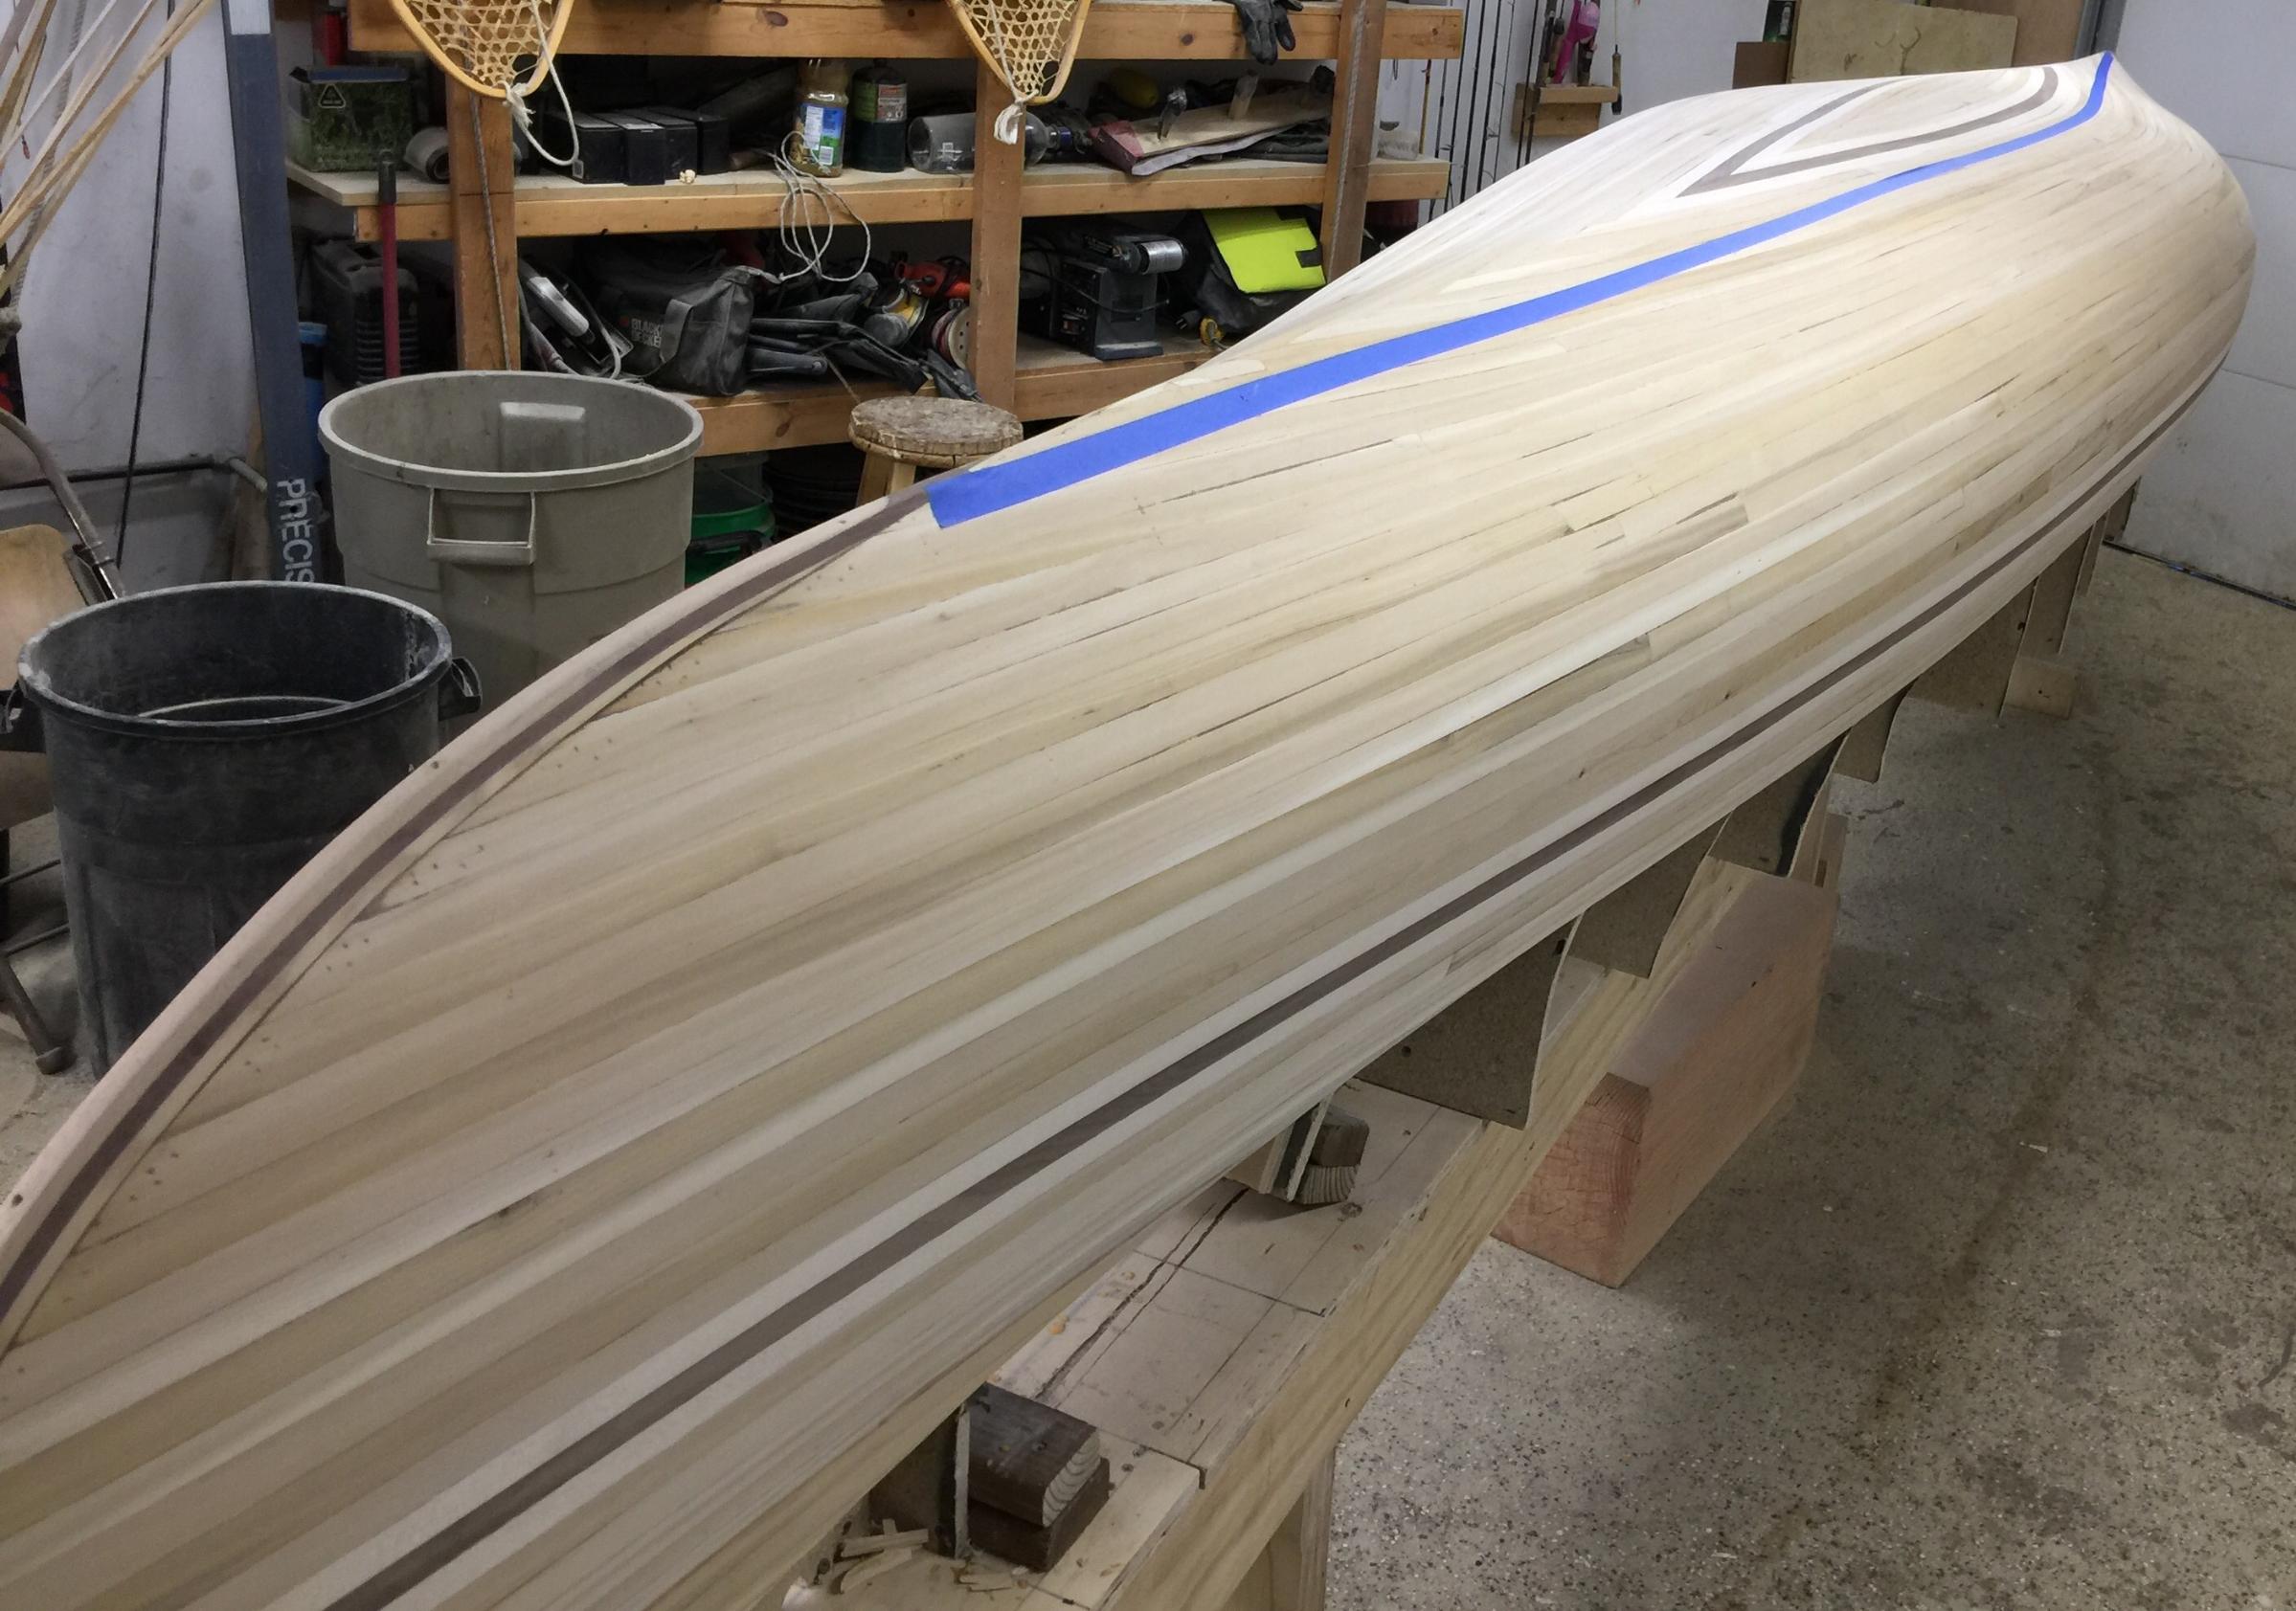
Big day today. Finished glassing outside.
I have a large garage heater so I'm able to keep my garage at temperature- but it blows, and I don't want dust blowing around the wet epoxy. My solution was to crank it up as far as it would go prior to epoxy, then build a "tent" which I could then lower around the boat between coats to allow the heater to heat the garage back up. Worked like a charm.
Another challenge- 2 seperate pieces of 40" fiberglass instead of one sheet.
I started by taping a line where I wanted the first piece of glass to end.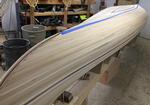
I glassed one side using Ted moore's paint brush method.
I had to wait until this started to tack though before I could do the other side- otherwise, I would not have been able to cut the glass clean at the tape line.
The other side was difficult- primarily since just laying he glass out- it wanted to stick to the already-glassed side. Also I couldn't use tape again since the tape would have stuck to the glass on the finished side.
Then I let it dry while I heated back up.
The tent is just a few wires I ran across the garage with poly up above and over it.
Then I floated the second layer with squeegee/ grunge can. I found a squeegee at Home Depot that wasn't really a squeegee- it was actually a plastic white paint trim guard- but it has the perfect flex for a squeegee and worked really well.
I rolled on the 3rd layer with a high density foam roller. Now I've used the little white ones before, and they work well until they start to fall apart, but this time I bought the really good Wooster foam roller, and let me tell you, it was worth it. It rolls easier and it never came apart despite putting on multiple coats. 100% worth it. !$/a
!$/a
The roller left such a perfect finish that I swear parts of the boat look varnished already.

All in all, I'm incredibly happy with the look and with what I see so far. The Saganaga is starting to take shape! Now I just have to keep my garage at temp all weekend while it cures.

I have a large garage heater so I'm able to keep my garage at temperature- but it blows, and I don't want dust blowing around the wet epoxy. My solution was to crank it up as far as it would go prior to epoxy, then build a "tent" which I could then lower around the boat between coats to allow the heater to heat the garage back up. Worked like a charm.
Another challenge- 2 seperate pieces of 40" fiberglass instead of one sheet.
I started by taping a line where I wanted the first piece of glass to end.
I glassed one side using Ted moore's paint brush method.

I had to wait until this started to tack though before I could do the other side- otherwise, I would not have been able to cut the glass clean at the tape line.
The other side was difficult- primarily since just laying he glass out- it wanted to stick to the already-glassed side. Also I couldn't use tape again since the tape would have stuck to the glass on the finished side.
Then I let it dry while I heated back up.
The tent is just a few wires I ran across the garage with poly up above and over it.
Then I floated the second layer with squeegee/ grunge can. I found a squeegee at Home Depot that wasn't really a squeegee- it was actually a plastic white paint trim guard- but it has the perfect flex for a squeegee and worked really well.
I rolled on the 3rd layer with a high density foam roller. Now I've used the little white ones before, and they work well until they start to fall apart, but this time I bought the really good Wooster foam roller, and let me tell you, it was worth it. It rolls easier and it never came apart despite putting on multiple coats. 100% worth it.
 !$/a
!$/aThe roller left such a perfect finish that I swear parts of the boat look varnished already.
All in all, I'm incredibly happy with the look and with what I see so far. The Saganaga is starting to take shape! Now I just have to keep my garage at temp all weekend while it cures.
02/19/2018 08:08AM
When you glass the inside of your canoe, you do not want the hull to heat up as you glass it. Air in the wood and joints will expand as it heats up and they come out as bubbles under the glass as it cures.
Warm the room up and the hull prior to glassing and keep the temp stable or allow it to drop ever so slightly after the first coat is applied. Little to no bubbles will form this way.
I am not a fan of putting on an initial coat of epoxy without the glass. It just adds weight to the boat.
Warm the room up and the hull prior to glassing and keep the temp stable or allow it to drop ever so slightly after the first coat is applied. Little to no bubbles will form this way.
I am not a fan of putting on an initial coat of epoxy without the glass. It just adds weight to the boat.
02/19/2018 11:56AM
tumblehome:
I am not a fan of putting on an initial coat of epoxy without the glass. It just adds weight to the boat.
"
I'll agree ! Except where a builder hasn't filled the staple holes, or has a lot of joints from splicing.
In that case I advise a Seal coat, Then I will brush staple holes, and joints, about an hour later, with a foam brush, and a small mix of resin. Usually a 3 oz batch is plenty !
This insures no weeping of resin through the holes !
Jim
Keep your paddle wet and your seat dry!
02/20/2018 02:47PM
Update.
Zero progress on the hull. I'm REALLY dreading the inside.... as I work up the nerve to start, I've been working on hardware. I've got the seats, carrying handles,thwart and yoke glued and machines. I just need to mortise and tennon the seats now. I've also machined all the gunwale strips. Since they're going to be laminated in and out with the white/black/white theme, I've got a pile of gunwale strips now that have been planed to thickness and waiting to be assembled.
I think I'll start on the inside this week...


02/20/2018 06:42PM
Just a thought, but I leave my Center form Strapped in, when I'm not sanding, or glassing. This keeps the hull to Specs, and also reduces the stress on the exterior cloth.
I've seen some hulls distort pretty badly when left without support !
Glassing the inside will give you a definite relief when done ! I used to give myself a deadline, seemed to Spur me on ! You Can Do It !
On the other hand, if you are having trouble with heating the work area, I'd hold off .
OH ! WE are waiting to see this canoe on the Water ! I'm Winking !
Jim
Keep your paddle wet and your seat dry!
02/22/2018 07:35PM
Another reason to get going on the inside, I too have seen canoes curl up like a leaf if they are left unfinished. Putting in a temp thwart(s) will indeed help it from curling in. But still, get going on it. Wear a good respirator, full goggles,and a tyvek suit. You can get it sanded in a day.
02/24/2018 06:32AM
tumblehome: "Another reason to get going on the inside, I too have seen canoes curl up like a leaf if they are left unfinished. Putting in a temp thwart(s) will indeed help it from curling in. But still, get going on it. Wear a good respirator, full goggles,and a tyvek suit. You can get it sanded in a day."
Wow. I had no idea this could happen. This might be my motivation :)
03/03/2018 04:08PM
I bit the bullet and got the inside shaped. Worst part of the build by far :).

The curved surform helped me a TON in roughing out the inside.

After roughing it all out, I sanded with a 40 grit ROS. This wasn't terrible and I was able to get most of it- curve wasn't a huge deal- just in spots.
I then cut the inside stems down where I want them and began the filling process. i used tape to mark out all my gaps.
Then I filled gaps and wiped down the surface with acetone while the epoxy was still wet.
That's drying as we speak. I will sand ROS with 80 next to take any of the filler off the surface. Then wet the grain and 120 hand sand to finish.
In the meantime while that's drying I was able to put my seats together.
Mortise and tennon completed and glued.
I was also able to glue up the decks. Though nonpics yet.
Here's the roughed hardware as it sits right now.
Next is final sand inside and glass.
The curved surform helped me a TON in roughing out the inside.
After roughing it all out, I sanded with a 40 grit ROS. This wasn't terrible and I was able to get most of it- curve wasn't a huge deal- just in spots.
I then cut the inside stems down where I want them and began the filling process. i used tape to mark out all my gaps.

Then I filled gaps and wiped down the surface with acetone while the epoxy was still wet.

That's drying as we speak. I will sand ROS with 80 next to take any of the filler off the surface. Then wet the grain and 120 hand sand to finish.
In the meantime while that's drying I was able to put my seats together.

Mortise and tennon completed and glued.


I was also able to glue up the decks. Though nonpics yet.
Here's the roughed hardware as it sits right now.

Next is final sand inside and glass.
03/03/2018 04:51PM
Just a tip ! I know, I'm always Throwing them out !
Scrape the epoxy filled areas while they are still soft ! Don't wait for it to harden more than a day or so !
Much better to scrape soft epoxy, than to sand half cured ! No dust ! A rounded edge of an old Butcher knife will work !
Jim
Scrape the epoxy filled areas while they are still soft ! Don't wait for it to harden more than a day or so !
Much better to scrape soft epoxy, than to sand half cured ! No dust ! A rounded edge of an old Butcher knife will work !
Jim
Keep your paddle wet and your seat dry!
03/04/2018 06:28AM
1JimD: " Just a tip ! I know, I'm always Throwing them out !
Scrape the epoxy filled areas while they are still soft ! Don't wait for it to harden more than a day or so !
Much better to scrape soft epoxy, than to sand half cured ! No dust ! A rounded edge of an old Butcher knife will work !
Jim"
That's a great tip jim- keep em coming :) I've never tried the old knife but I might have to give that a shot! I do use a rounded cabinet scraper and that was great on the inside as well, but the scraping area is pretty small compared to knife would be.
03/19/2018 06:52AM
Well it's been two weeks since I could do anything- been away a lot for work.
I finally finished sanding off all the fill epoxy- including the herringbone at the bottom- which was difficult. Also, around the stems is difficult of course. I have a little more to make it look really clean around the stems then jus a final pass with 120. It's almost done at this point- I wet it to raise the grain and was rewarded with look of a finished canoe. I hope to glass the inside this week after I finish sand everything. Glass is going to have to be a two- part job again. I have to do some thinking yet on the best way to make that work...


I finally finished sanding off all the fill epoxy- including the herringbone at the bottom- which was difficult. Also, around the stems is difficult of course. I have a little more to make it look really clean around the stems then jus a final pass with 120. It's almost done at this point- I wet it to raise the grain and was rewarded with look of a finished canoe. I hope to glass the inside this week after I finish sand everything. Glass is going to have to be a two- part job again. I have to do some thinking yet on the best way to make that work...


03/19/2018 11:21AM
Tip-O-the-day
When you glass the inside, don't let the epoxy set-up too long before you squeegie off the excess. If it gets too thick, it will really pull the glass away from the wood at the bilge. So squeegie after maybe 10 or 15 minutes depending on the pot life of your epoxy. The inside is definitely more work than the outside since gravity is not helping as much to hold the glass.
Use one hand on the squeegie and another hand behind it to help hold the glass against the wood. The more you work the epoxy, the more air you trap in the epoxy/glass thus causing a cloudy finish.
One way to help get the glass to fit is to drape it over the outside of the canoe while it's upside down. Cut the glass to fit and allow a few extra inches at the shear. Cut a slit in the glass where the inside stem is. Turn it over and fit it into place.
03/19/2018 08:28PM
tumblehome: "Tip-O-the-day
When you glass the inside, don't let the epoxy set-up too long before you squeegie off the excess. If it gets too thick, it will really pull the glass away from the wood at the bilge. So squeegie after maybe 10 or 15 minutes depending on the pot life of your epoxy. The inside is definitely more work than the outside since gravity is not helping as much to hold the glass.
Use one hand on the squeegie and another hand behind it to help hold the glass against the wood. The more you work the epoxy, the more air you trap in the epoxy/glass thus causing a cloudy finish.
One way to help get the glass to fit is to drape it over the outside of the canoe while it's upside down. Cut the glass to fit and allow a few extra inches at the shear. Cut a slit in the glass where the inside stem is. Turn it over and fit it into place.
"
Thanks for the tip, but in afraid it's much more complicated since I have to use two pieces of glass. The outside was easy enough with 2 pieces, but the inside will be difficult.
The part I have to figure out is how to precut so that they overlap where I want them to aesthetically and ultimately how to lay that 2nd piece down inside the canoe in the right spot without it sticking in a wrong spot while the other piece is still tacky enough so that I get a good chemical bond. It won't be easy laying out a 20ft piece from just one side without me snagging it on something or worse yet accidentally letting the dry piece stick to the still tacky piece- And being able to somehow smooth out any wrinkles without the piece getting stuck to the wet part. That's the challenge.
The trick I think is to let the one side get tacky first, but still, fiberglass sticks like crazy.
The practice of this is going to be messy I think.
03/19/2018 08:55PM
First rasp your shearline, so it doesn't snag your cloth.
Follow Tumblehome's idea of laying the cloth on the Outside to trim it to shape. Trim a little long.
Lay both pieces in . Try and make the overlap in the middle as even as possible.
If not, you can feather the edge of the overlap, and it will be near invisible.
With both layers laid in the hull, wet them out.
No need to wet them out separate !
I know it's hard to get the wrinkles out on the inside ! But if you start wetting out the cloth, in the middle first, and work both side towards the end, and tug on the cloth.
The ends of the stems are always the worse. Don't stress, you can come back for them.
Wish I could be there to help ! But you can do it !
Jim
Keep your paddle wet and your seat dry!
03/19/2018 11:00PM
Jim- thanks for the tip. I was always under the impression that two layers wetted at the exact same time was a bad idea due to gas getting trapped between the two layers, or floating cloth. If that's not the case, then maybe that's a solution- that's an easy one!
Either way I think laying it out first on both sides is key. If I do them seperate , then clamping the second side at the gunnel where I want it and folding up the overlap until ready is probably the best practice.
I plan to cut the overlap to follow the curve of the football on both sides.
Either way I think laying it out first on both sides is key. If I do them seperate , then clamping the second side at the gunnel where I want it and folding up the overlap until ready is probably the best practice.
I plan to cut the overlap to follow the curve of the football on both sides.
03/20/2018 07:01AM
It's really not a problem, unless it's a very tight weave.
I overlap the inside quite often, with the overlap going side to side. If I'm concerned about it showing, I'll place the seams under where the seat will be.
The edge of the bottom layer, will lift the top layer up very slightly. Don't over sand, or try and feather it, as it will thin the top layer at that point.
Now the top layer edge can be feathered, and just like your bias strips on the stems, will disappear, when varnished !
You will likely be the only one to know the seam is there.
Good luck !

There are 4 layers of cloth at the very bottom of the stem.
Jim
Keep your paddle wet and your seat dry!
03/21/2018 06:06AM
tumblehome: "For about $50 you can buy a piece of 60" wide glass 18' long. That will save you a lot of stress.
Tom"
Hi Tom. My hull is too wide for a 60" piece. I need 63". Thats why I have to put in two pieces. I did an exhaustive search for anything larger bu to no avail. RAKA had 72" but it was out of stock for over a yr and they weren't planning to restock it.
03/21/2018 06:52PM
Oh OK.
When I was building boats I often used 50" wide 5 oz glass on the inside of my boats that had a 60" beam at the center.
The 63" spot on your boat is very small and perhaps only two feet forward and aft of the center of your canoe. after that the beam narrows quickly and a piece of 60" glass will start having a lot of extra hanging over the ends of the shear line. Just the same way you had all that scrap when you did the outside.
The short glass will only extend down three inches if you use 60" glass. Of course you will want a little overhang over the shear line so it might be closer to 4" or 5" that you will add onto the glass.
All you need to do is add a small piece of glass in the very center at the top of the canoe to fill in that small spot. It will be just under the gunwale after you lay out your glass. If you drape the glass over your canoe when it's upside down you will see the area very easily.
It's very easy to add this piece of glass and blend it into the canoe. Nobody will see it and it won't weaken the boat at all. Really it's up to you and I'm not telling you your plan is wrong but for me I would rather add the little strip of glass than use two pieces. Just something to ponder.
I googled 6 oz fiberglass by 72" and found a few places including ebay selling. But you really don't need 72". Perhaps you are using lighter glass of a special weave.
03/22/2018 06:26PM
Got the inside fiberglassed. I did Jim Ds method of just wetting two layers at once. This is more difficult than doing just one as every pull of the squeegee wanted to tug either piece in opposing directions. it took considerable care to wet it all out in place. It was however the right call as after laying out my glass, I don't think there's any realistic way I would have been able to drape the dry over the tacky wet without it causing a giant mess.
I followed the general shape of the football with my edges of the two layers. The double layer did present some problems with bubbles, a little floating, and some delamination but nothing I couldn't handle with a little care.
The insides on the recurve ens were a B&@$! My last freedom build that was obviously not such a concern as it's a modern style and open. I used Ted mores method of painting the wood first then laying the fiberglass over it. Ultimately, a nitrile-gloved hand for smoothing and spreading was the best tool inside the ends.
I also added a temporary clamped-on thwart for stability while glassing.
Also, I just happened to be at IKEA last weekend and found this awesome squeegee for 1.99. I would HiGHLY recommend one of these for your next build.
Next steps. Let it cure and work on gunwales and sanding the outside while the inside is curing for the next week.


03/22/2018 06:47PM
tumblehome: "Oh OK.
I googled 6 oz fiberglass by 72" and found a few places including ebay selling. But you really don't need 72". Perhaps you are using lighter glass of a special weave."
Tom not to be a pain, but where did you find the 72" by just googling it. I searched for about 3 weeks for 72" 6oz. Everything I found was either chopped, or shorter pieces, etc. I'd appreciate the link where you found it. Thanks in advance.
03/25/2018 09:12PM
Very nice looking canoe. Congrats on having the inside glass work behind you. It is a great feeling to have that job done.
"Boredom, Tyler - that's what's wrong. And how do you beat boredom, Tyler?... Adventure...(Never Cry Wolf, 1983)
03/26/2018 07:47AM
Got some work done this weekend. Flipped the canoe back over and started wet-sanding the hull to a finish quality.
Started with 40 grit belt on a torture board. This went very quickly- 30min. I used a bucket and sponge and it worked like a charm to keep the dust down.
Sanding just goes to show you how uneven the epoxy really is. I had a SMOOTH epoxy finish and you can see here in this photo just how uneven it really was. This is after the torture board. It was still smooth, but now shows the low spots which are still shiny. The difference is very minute.

Then 80 grit ROS wet sanded as well. This took a little longer but still relatively quick.
Finally, I spent a good hour and a half wet sanding by hand to 120. Almost perfect finish. I find this best as you can feel the hull while sanding for any ripples or imperfections. .
.
I did have some spots where the cloth overlapped where I had some weave that was necessary to sand into (though it's just the top layer). Because of this, I decided to roll on a very light skim coat over the finish to rebury that cloth. This is the final skim coat. this should hopefully just require a very quick hand sand with 120 and it should be done.
I moved on to the gunwales. I scarfed my ash and walnut gunwale strips that I will be using for the lamination. I will bend the ends when I do laminate the gunwales to make bending the lamination easier as I don't think the lamination will want to Bend.
Next steps wait for the strips to cure and laminate the gunwales.
Started with 40 grit belt on a torture board. This went very quickly- 30min. I used a bucket and sponge and it worked like a charm to keep the dust down.
Sanding just goes to show you how uneven the epoxy really is. I had a SMOOTH epoxy finish and you can see here in this photo just how uneven it really was. This is after the torture board. It was still smooth, but now shows the low spots which are still shiny. The difference is very minute.

Then 80 grit ROS wet sanded as well. This took a little longer but still relatively quick.
Finally, I spent a good hour and a half wet sanding by hand to 120. Almost perfect finish. I find this best as you can feel the hull while sanding for any ripples or imperfections.
 .
.I did have some spots where the cloth overlapped where I had some weave that was necessary to sand into (though it's just the top layer). Because of this, I decided to roll on a very light skim coat over the finish to rebury that cloth. This is the final skim coat.
 this should hopefully just require a very quick hand sand with 120 and it should be done.
 I moved on to the gunwales. I scarfed my ash and walnut gunwale strips that I will be using for the lamination. I will bend the ends when I do laminate the gunwales to make bending the lamination easier as I don't think the lamination will want to Bend.
Next steps wait for the strips to cure and laminate the gunwales.
03/26/2018 10:41AM
Making great progress !
Places where the cloth shows (Bias strips, and Overlaps) don't need another coat of epoxy to hide them ! The varnish will do that ! People don't realize this, and just create extra work, and the expense of resin, for themselves.
Jim
Places where the cloth shows (Bias strips, and Overlaps) don't need another coat of epoxy to hide them ! The varnish will do that ! People don't realize this, and just create extra work, and the expense of resin, for themselves.
Jim
Keep your paddle wet and your seat dry!
03/26/2018 10:11PM
Varnish does a good job of covering spots where the weave shows through. I have a number of those spots on my current build and I am counting on it. Putting on a skim coat of epoxy over the exposed weave is tough and then you are faced with the problem of feathering out the edges before varnishing............ it will be likely that as you feather an edge you will cut back down to the weave........... a vicious circle on the road to perfection.
"Boredom, Tyler - that's what's wrong. And how do you beat boredom, Tyler?... Adventure...(Never Cry Wolf, 1983)
03/27/2018 07:38AM
HighPlainsDrifter: "
Varnish does a good job of covering spots where the weave shows through. I have a number of those spots on my current build and I am counting on it. Putting on a skim coat of epoxy over the exposed weave is tough and then you are faced with the problem of feathering out the edges before varnishing............ it will be likely that as you feather an edge you will cut back down to the weave........... a vicious circle on the road to perfection. "
I hear ya. I am the type to obsess over perfection- and thats especially true with a mirror finish on the outside hull. I did all the feathering necessary with the overlap on the last sanding pass- that's why I've got some weave showing. The skim coat is smooth over the feathered edges into the rest of the hull so I shouldn't have to feather again.
You're 100% right in that a good amount of the skim coat will be sanded off in the finish sand, but the slight added material should give me what I need to make it perfect- at least that's the plan :)
03/27/2018 11:46PM
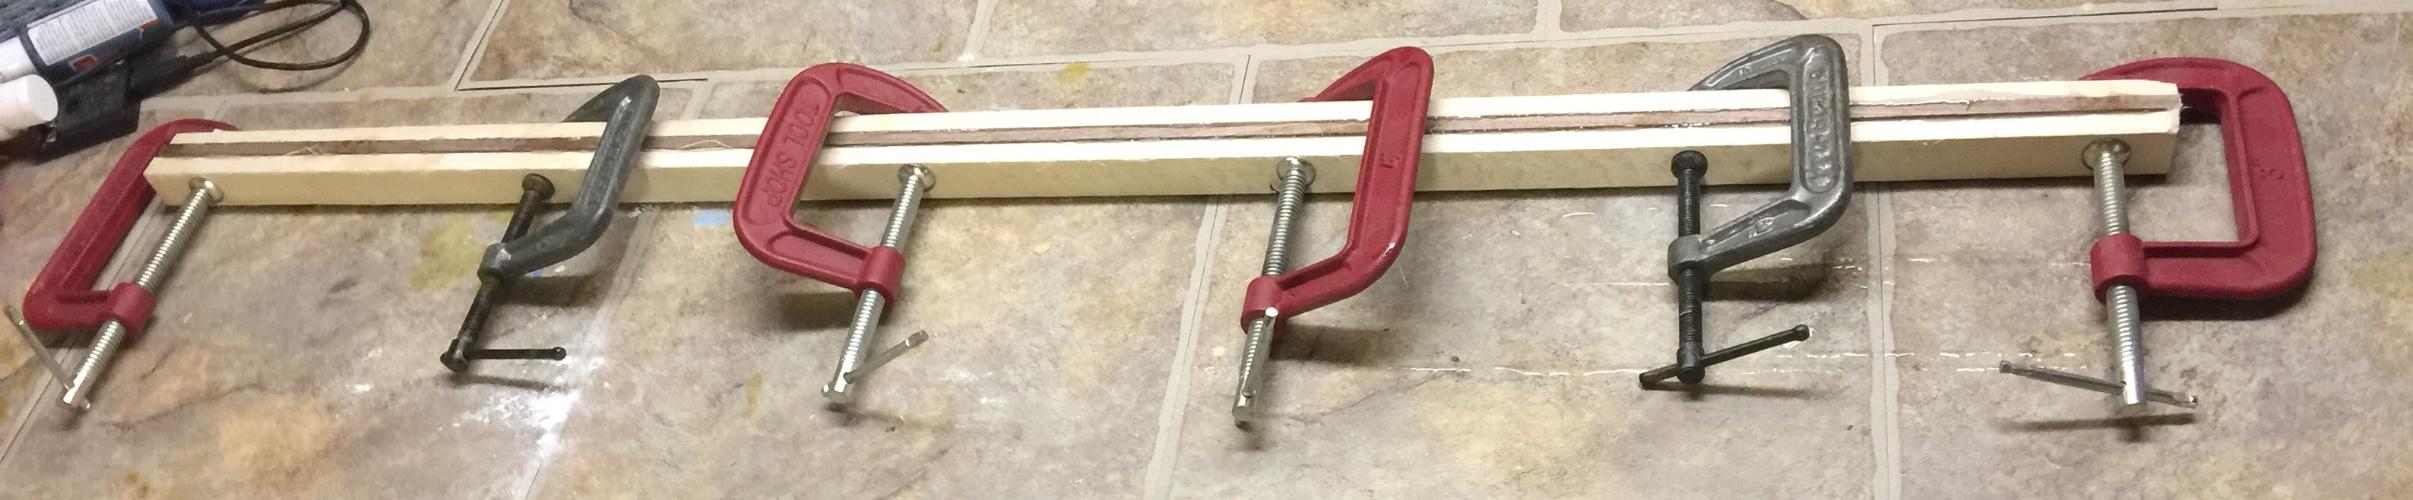
Gunwales.
Laminated the two outside gunwales, 2 inners tomorrow. As with most of this- took longer than I thought, but not terrible and I need more clamps :)
Was able to put a curve in the laminations and clamp in place to give a bend. This was easy enough, just bent against my feet and clamped. This should help me in bending the gunwales at ends.
Also, I'm hoping this curve is "flat enough" to be able to make it through the planer- I think it will be.

03/28/2018 11:02PM
That bending trick with laminates is new to me. Very clever idea. So, what I am seeing is that the bend is just "eyeballed". So the procedure,,,, help me out here. The laminates are free to slide over each other in an epoxy sandwich. When you get the bend where you want it, you clamp and that holds the bend?
"Boredom, Tyler - that's what's wrong. And how do you beat boredom, Tyler?... Adventure...(Never Cry Wolf, 1983)
03/29/2018 06:12AM
HighPlainsDrifter: "
That bending trick with laminates is new to me. Very clever idea. So, what I am seeing is that the bend is just "eyeballed". So the procedure,,,, help me out here. The laminates are free to slide over each other in an epoxy sandwich. When you get the bend where you want it, you clamp and that holds the bend?"
You nailed it. The precision of the bend doesn't really matter So eyeballing is fine. I figured the finished laminate would be resistant to bending more so than a solid piece, so this is a head start.
When you bend it and clamp the two outside pieces where you want them if they can't move they'll stay in place. I don't think you could bend an extreme bend like this, but with several clamps over a few feet it works well enough.
03/29/2018 01:43PM
I always thought that molds/forms are needed much like what we do when bending our stems. For this non-extreme bend it works. Thanks for the education.
"Boredom, Tyler - that's what's wrong. And how do you beat boredom, Tyler?... Adventure...(Never Cry Wolf, 1983)
04/07/2018 10:24PM
Today was the most satisfying day of the build for me thus far. I cut the final sheer line.
I felt ecstatic seeing the curves come out, and then something about having both sides perfect symmetrical and canoe-like now just made me smile, and keep smiling all day.
Keep in mind that I didn't really truthfully have a sheer line since I built this thing from nothing, sure my program told me where it should be since Imodeled one in 3D but always knew it'd come down to changing it for the real world. I had a general idea, but actually doing it, man, I just feel great about it. The boat looks exactly like my 3D renderings from months ago.
Anyways, I spent a few hours last night wet sanding down the inside to completion. I put a skim coat on that as well w epoxy as I have lots of weave showing. I know it may not be necessary, but I like burying the weave in epoxy better than in varnish. Since I was done with that, I decided it was time for the sheer line. I made a long Batton and clamped in place to get the lines I wanted. When I had it I traced it out I used my jigsaw to get a rough cut. Spokeshave made very quick work of it after that.
The other side... I couldn't come up with any real crafty ways to transcribe the first side to the 2nd, so I can up with this: I ran a string from the top of the bow stem to the top of the stern stem- right in the middle on both. Then I did the same about 3/4 down the stem. The two lines could now be used to judge when the boat is truly vertical. In fact, I hung plumb-bobs off of the top line down to the 2nd so I could see if the boat shifted out of vertical. Then I took a level and went horizontal from the completed side to the unfinished side, marking the inside of the canoe at every foot staple line. To transfer the mark to the outside of the hull I simply drilled a pilot hole through the hull from the inside to outside slightly above the line. Then it was just connect the dots. I know this works because I have a true vertical oriention on which I Can then judge the true horizontal via level. It looks bang- on to me now that I see it completed.
I'm sure someone will have a super easy way to do it now though that I'm. Done! :)
Next steps are to plane and thin my gunwale laminations to size. I'm going to put block scuppers every 2 inches in the inside gunwales, so I have to cut those little blocks as well.

I felt ecstatic seeing the curves come out, and then something about having both sides perfect symmetrical and canoe-like now just made me smile, and keep smiling all day.
Keep in mind that I didn't really truthfully have a sheer line since I built this thing from nothing, sure my program told me where it should be since Imodeled one in 3D but always knew it'd come down to changing it for the real world. I had a general idea, but actually doing it, man, I just feel great about it. The boat looks exactly like my 3D renderings from months ago.


Anyways, I spent a few hours last night wet sanding down the inside to completion. I put a skim coat on that as well w epoxy as I have lots of weave showing. I know it may not be necessary, but I like burying the weave in epoxy better than in varnish. Since I was done with that, I decided it was time for the sheer line. I made a long Batton and clamped in place to get the lines I wanted. When I had it I traced it out I used my jigsaw to get a rough cut. Spokeshave made very quick work of it after that.
The other side... I couldn't come up with any real crafty ways to transcribe the first side to the 2nd, so I can up with this: I ran a string from the top of the bow stem to the top of the stern stem- right in the middle on both. Then I did the same about 3/4 down the stem. The two lines could now be used to judge when the boat is truly vertical. In fact, I hung plumb-bobs off of the top line down to the 2nd so I could see if the boat shifted out of vertical. Then I took a level and went horizontal from the completed side to the unfinished side, marking the inside of the canoe at every foot staple line. To transfer the mark to the outside of the hull I simply drilled a pilot hole through the hull from the inside to outside slightly above the line. Then it was just connect the dots. I know this works because I have a true vertical oriention on which I Can then judge the true horizontal via level. It looks bang- on to me now that I see it completed.
I'm sure someone will have a super easy way to do it now though that I'm. Done! :)
Next steps are to plane and thin my gunwale laminations to size. I'm going to put block scuppers every 2 inches in the inside gunwales, so I have to cut those little blocks as well.


04/08/2018 09:56PM
Marking the sheer is pretty straight forward when you know where the sheer line is on the molds. I transfer my sheer line to the outside of the hull by drilling a small hole just as you describe. Your procedure for leveling and transferring the sheer from one side to the other is rather ingenious. Sitting here, I am not sure what my approach would be. The important thing is that it looks good and is looking like a canoe.
"Boredom, Tyler - that's what's wrong. And how do you beat boredom, Tyler?... Adventure...(Never Cry Wolf, 1983)
04/14/2018 11:50PM
Final sanding is all now finished. I planed my gunwales down to almost the right size and mocked up to gauge fit. My dilemma is now the angle of the gunwales. It is pretty severe due toThe tumble home. HPD had a thread on this a few months back. Here's what I'm going to do...
Inwales- cut and attach scuppers then add a wedge on the inside of the scuppers to wedge the inwale so it's flat. .
Outwales I'm going to have to do a bevel to get it flat on the inside piece.
Here's a few pics. As you can see the angle is pretty steep. I honestly don't mind the angled gunwales but i think it's best to get them to be flat.


04/15/2018 03:12AM
The outwhale looks pretty massive ! That makes the angle more prevalent.
A 3/8"- 1/2" outwhale, would not need so much beveling,
For the inwhale, 3/4" would be plenty. And mounting the seats to blocks, epoxied to the hull, would help the inwhale.
Yes that is a pretty steep angle ! Corectable next time .
Jim
A 3/8"- 1/2" outwhale, would not need so much beveling,
For the inwhale, 3/4" would be plenty. And mounting the seats to blocks, epoxied to the hull, would help the inwhale.
Yes that is a pretty steep angle ! Corectable next time .
Jim
Keep your paddle wet and your seat dry!
04/15/2018 08:41AM
1JimD: " The outwhale looks pretty massive ! That makes the angle more prevalent.
A 3/8"- 1/2" outwhale, would not need so much beveling,
For the inwhale, 3/4" would be plenty. And mounting the seats to blocks, epoxied to the hull, would help the inwhale.
Yes that is a pretty steep angle ! Corectable next time .
Jim
"
Hi Jim. Thanks for the input as always. I/m at 7/8 right now with a final plan to be at 3/4 at the top of the bevel. Are you saying this is too much? Ted moores suggest 3/4- 1 1/8 as the outwales size. I'd be all about trimming it down if I can to 3/8 or 1/2... in your experience that is enough on an 18ft+ boat?
04/15/2018 09:12AM
On my Solos, I use 3/8"x 3/4" Ash, for my outwhale. Surely 1/2"x 3/4", would be enough for a tandem !
At 1 1/8" , maybe if using Cherry, or a soft wood.
I have an 18 1/2' Tandem stripper, that has been to the BWCA a few times, showed no need for more. I'm pretty sure it's no more than a 1/2"x 3/4" for the outwhale, and 3/4"x 3/4" for the inwhale with scuppers. Ash of course.
I also glue the gunnels to the hull, to insure no moisture gets in to rot !
Jim
Keep your paddle wet and your seat dry!
04/19/2018 10:41AM
After much deliberation, I made the executive decision to NOT bevel the gunwales flat. It wasn't a decision out of laziness, it just really like the way it looks - it adds to the curves and lines of the boat with a sight angle on the gunwales. I used a round over bit to round the gunwales a fair amount so the roundover cuts down the appearance of the angle a little more. I will also thin the outwales to 5/8 and roundover which should cut down the angle even more The angle will complicate hanging seats slightly, but I think it's worth it.
I've scuppered the gunwales after planing to thickness and tapering the end. I used 1/4 walnut in 2" lengths spaced every 2".
I've glued up one side and will do the other tonight.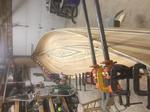
I also finished my yoke and thwart (no thwart pic)

I've scuppered the gunwales after planing to thickness and tapering the end. I used 1/4 walnut in 2" lengths spaced every 2".

I've glued up one side and will do the other tonight.

I also finished my yoke and thwart (no thwart pic)

04/20/2018 01:09PM
Griz
It is a little late to make this comment. You have been following what I did with the gunwales on my build. I too liked the looks of my gunwales without beveling. But, thinking of the difficulty of hanging the seat off the gunwale, turned me to thinking make it level. I am sure you have a plan in mind. Keep going, the canoe looks good.
"Boredom, Tyler - that's what's wrong. And how do you beat boredom, Tyler?... Adventure...(Never Cry Wolf, 1983)
04/25/2018 01:55PM
Construction complete! Gunwales glued and screwed! I need to attach the seats, yoke, etc yet... but they're all made and being varnished. Nothing left to add to the boat! It's a great feeling! I need to do some sanding on the gunwales and decks yet- a few other things to clean up and cut the stems flush- but construction complete.
I'll start varnishing after some more finish sanding....


I'll start varnishing after some more finish sanding....


05/07/2018 06:34PM
Update.
Been sanding and varnishing for he last 2 weeks. 7 coats on the outside and 2 inside this far. I think I'll end up with 3 inside and 7 out.
All I can say about epifanes is ... WOW. This stuff is amazing. The shine on this is incredible. I've been through about 2 liters ($100). Worth it!
Hardware is all varished as well.
I also built a portage pad for the yoke. It through bolts to the yoke. It's intended to be screwed on with wing nuts to allow for hand removal. I used 6 inches of high density foam (which is compressed to about 3) an then upholstered. signs point to this working well but we'll see. It's a horseshoe collar type pad.
I'm also going to strategically string bungees under the seats and yoke to make attaching paddles easy when portaging. There's a thread on this somewhere that im too lazy to find :)
My target date is next weekend- Mother's Day. I plan on finishing and attaching all hardware by next Saturday. If weather is nice we'll launch on Sunday!!!
No pics... I'll spare the "shiny" varnish pics for now until it's complete.
05/07/2018 10:16PM
7 coats !! That has got to be a beauty. I was looking at mine today thinking that 3 coats is not enough. I really need to put on a couple more coats. But that will wait until I scratch her.
"Boredom, Tyler - that's what's wrong. And how do you beat boredom, Tyler?... Adventure...(Never Cry Wolf, 1983)
05/14/2018 03:01PM
Well. It’s been a long journey and finally come to a conclusion!!!
The “Saganaga” has not yet seen water, but hopefully I can do that soon. I’ll report back on the seaworthiness of it then.
I began designing this boat back in late October. I designed it from nothing using a computer program and brought it into being by extracting offset tables and lofting out the forms. It’s hard to believe it’s done finally.
I diligently tracked all time worked and expenses. It came out to 299 hours and $1,791.
Its 19ft long. 39 inch beam. Asymmetrical in design with the max beam aaroubd the 10-11 ft mark. I’m super impressed with the epifanes high gloss finish-it’s like a mirror.
ITS BIG.ITS BEAMY. ITS BEAUTIfUL. t’s meant be a tripping canoe for 2 parents, 2 kids, and a weeks worth of gear. Not yet weighed but doesn’t seem much heavier than my freedom- so I’ll say 70-75lbs.
Here are a few of my final pics. It’s been a blast and thanks for following the last few months. Now.... what boat to build next...:)


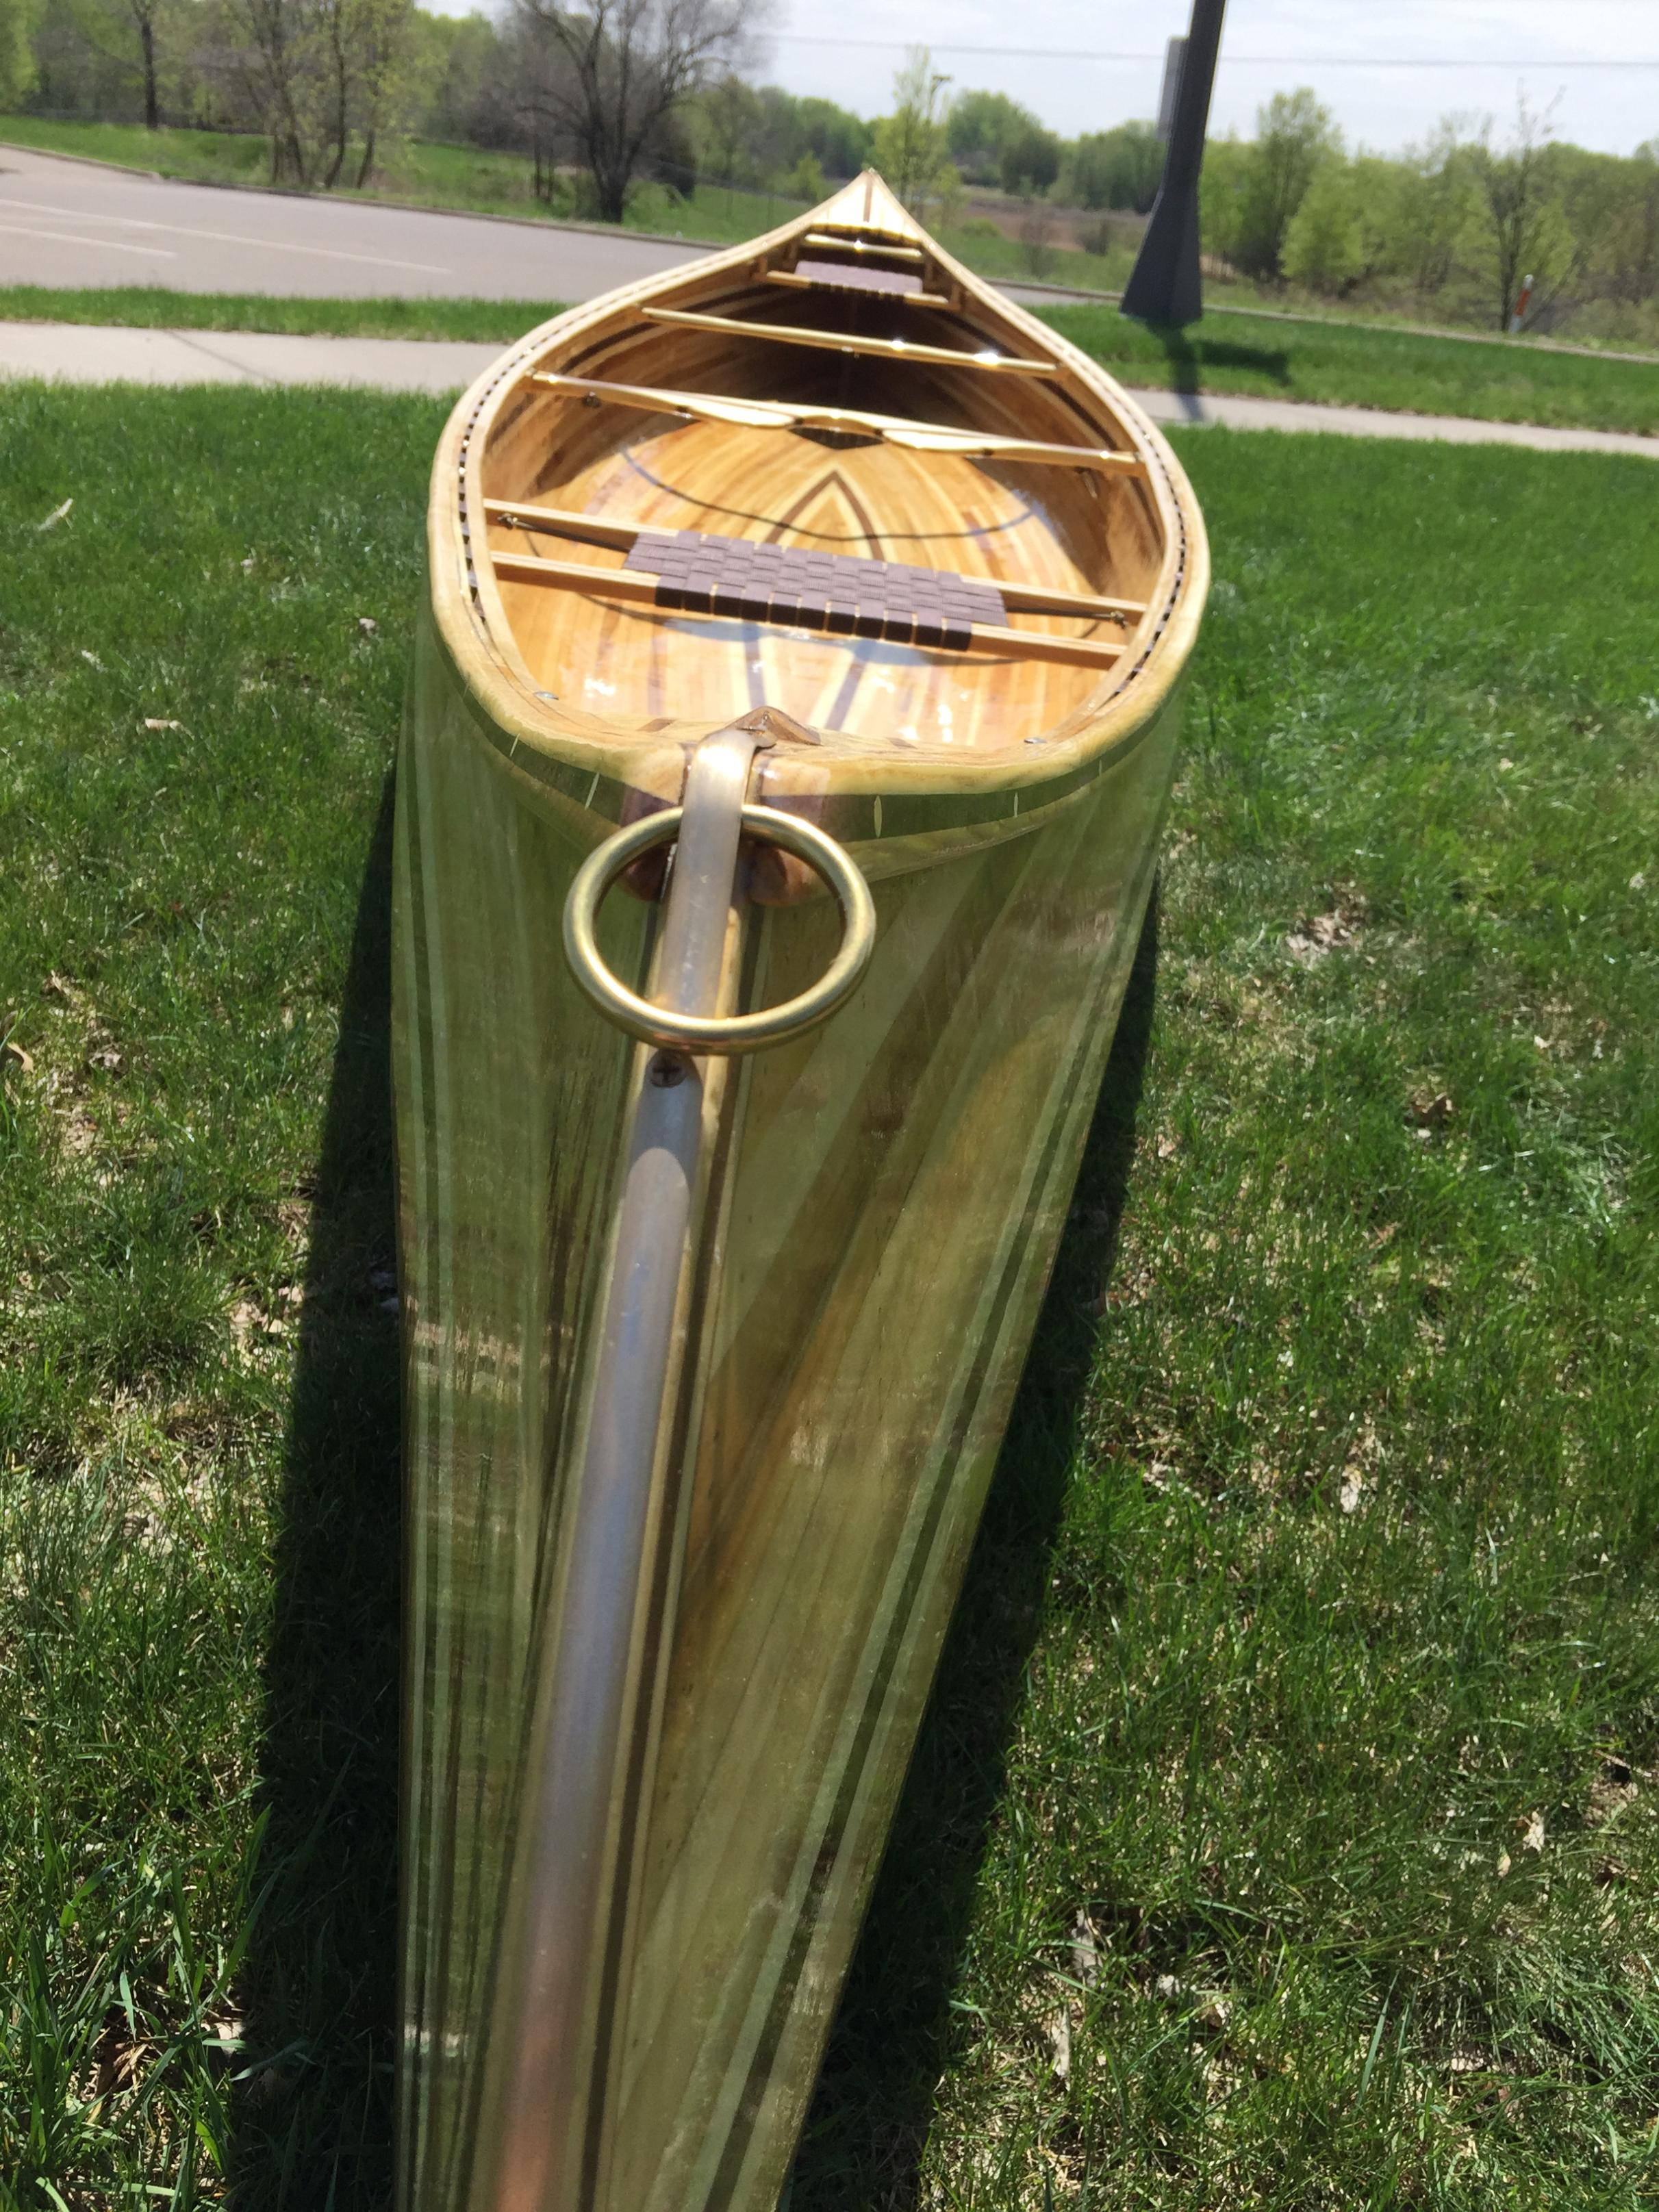


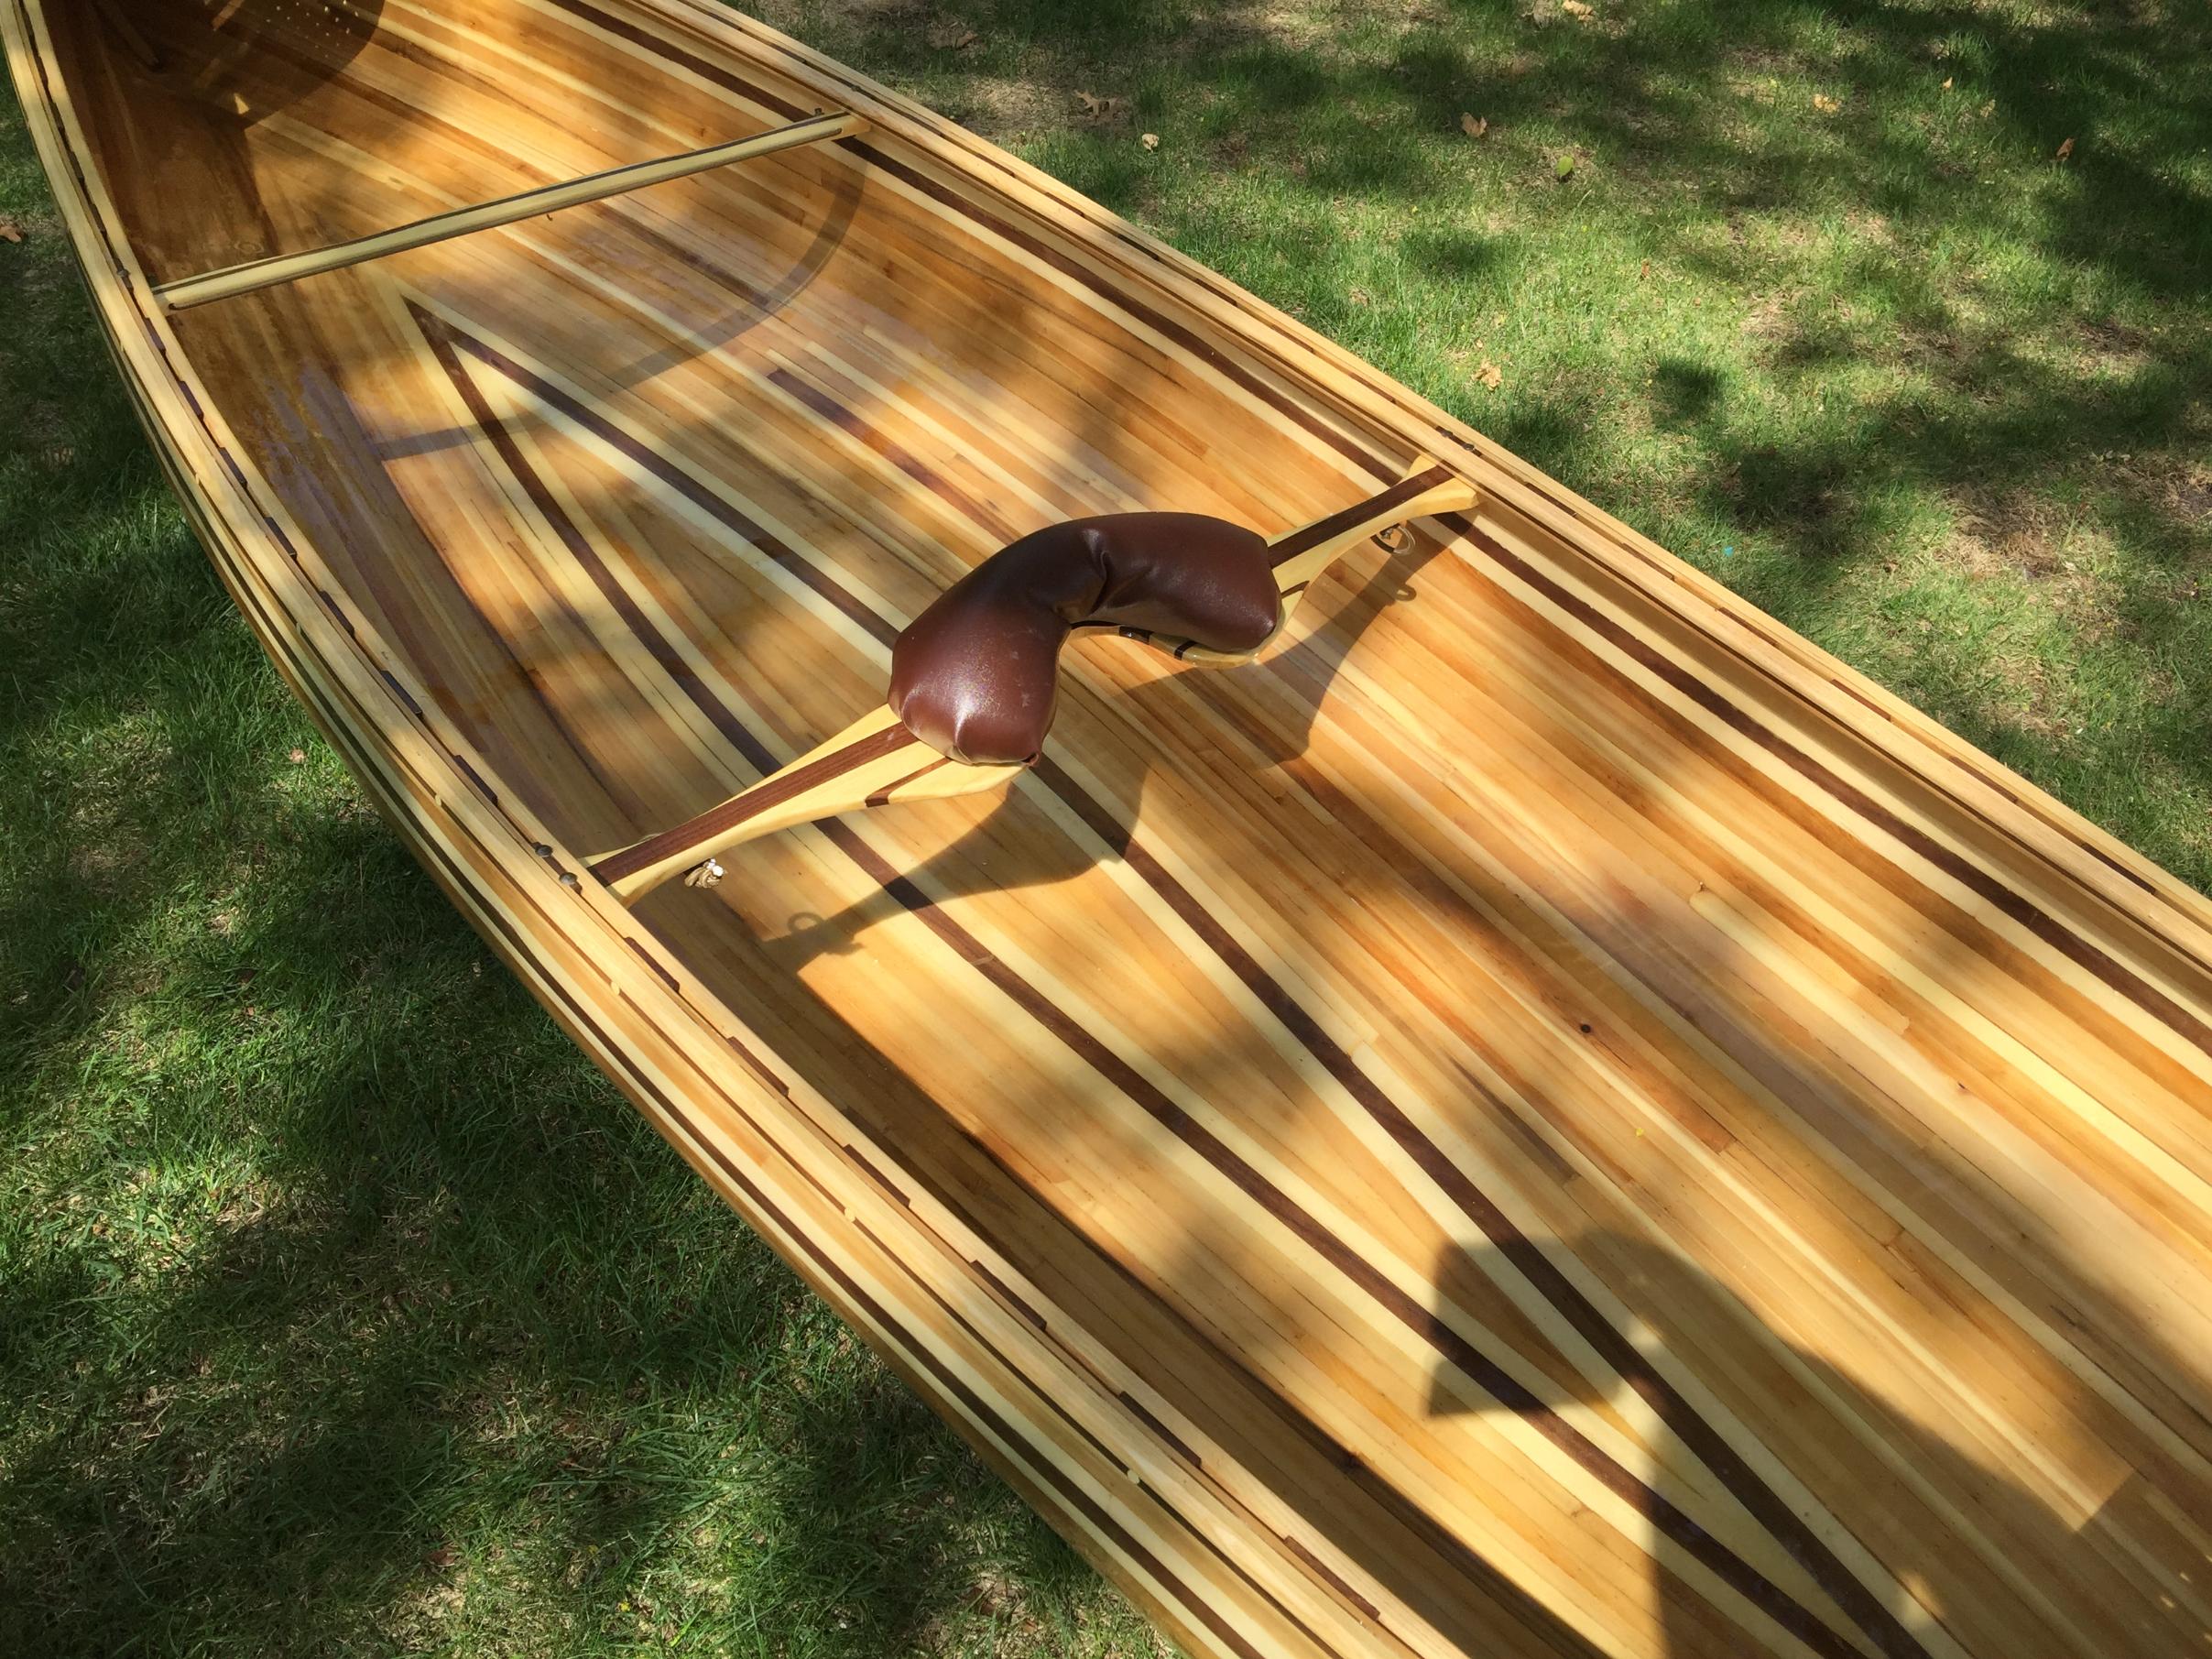
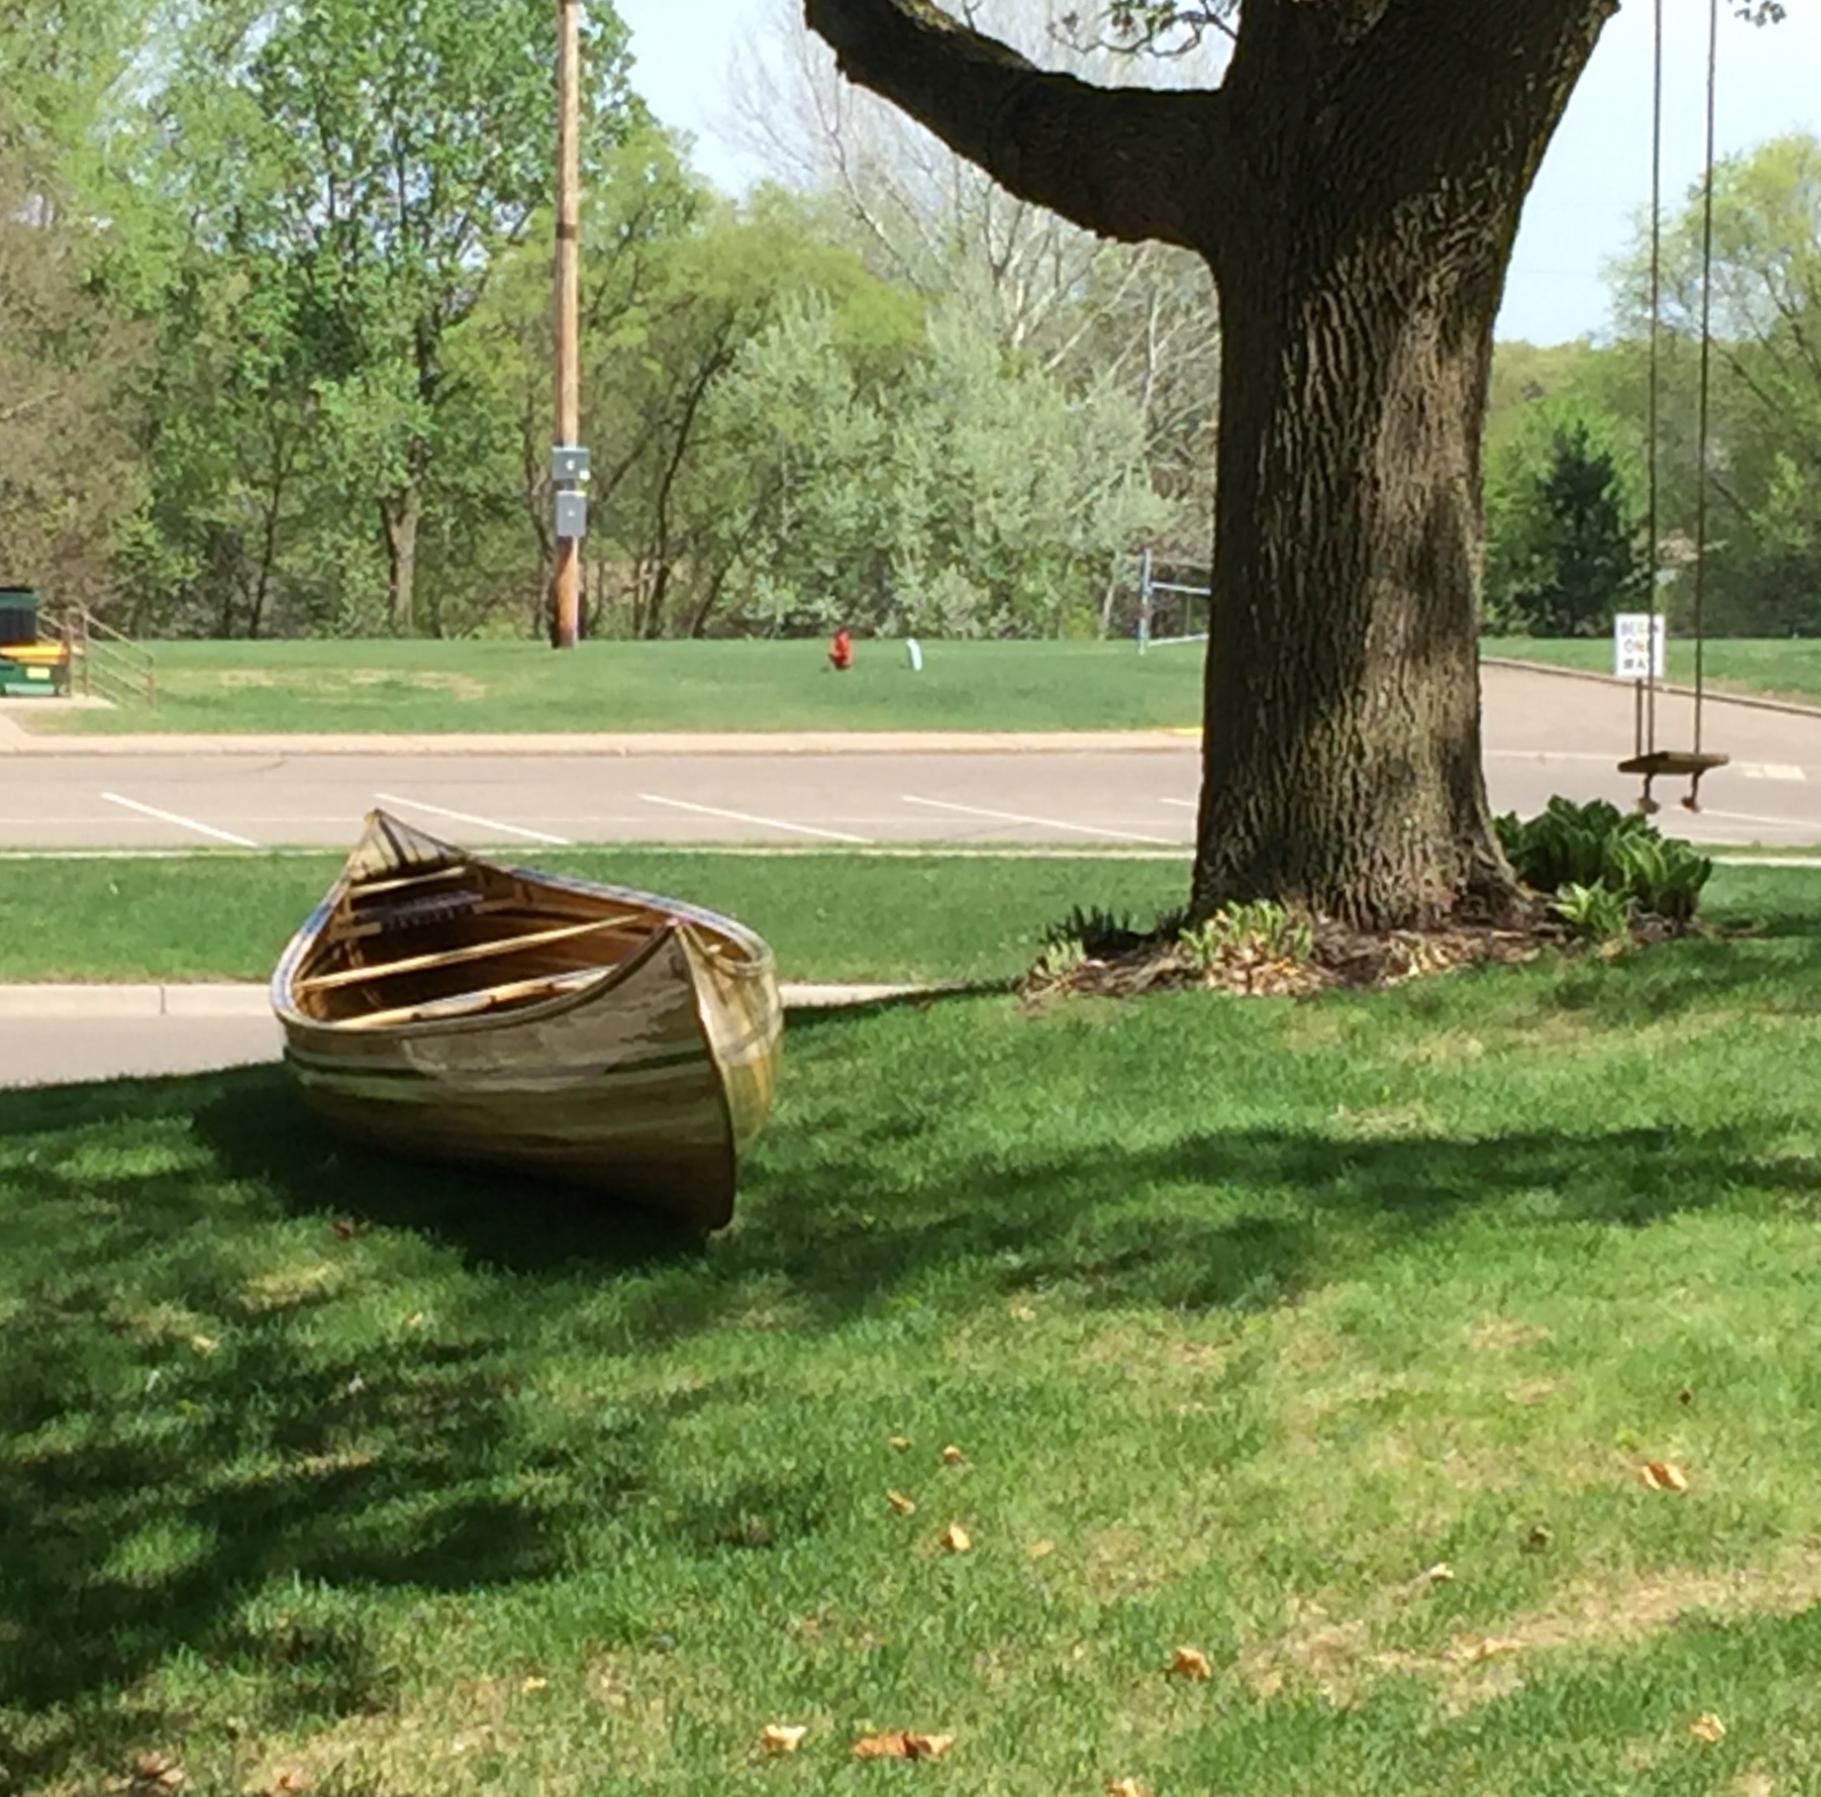
05/18/2018 08:52PM
Congratulations. That is one very pretty big canoe. Beautiful work. I will be interested in reading the results of her sea trials.
I read an interesting quote in the April issue of Wooden Canoe and that goes:
"any kind of technique or apparatus, in which the quality of the result is not predetermined, but depends on judgement, dexterity and care which the maker exercises as he works. The essential idea is that the quality of the result is continually at risk during the process of making; and so I shall call this kind of workmanship "the workmanship of risk"
Surely, this applies to all who have built strip canoes and especially your work where there was considerable risk at all stages.
"Boredom, Tyler - that's what's wrong. And how do you beat boredom, Tyler?... Adventure...(Never Cry Wolf, 1983)
05/29/2018 05:52PM
To put a cap on this build thread:
I Took it out about a week ago for the first paddle. I was very pleased with the design. Delftship provided hydrostatic data, and according to that this was going be be a very stable design, that took slightly more effort to paddle than my freedom with a similar top speed. That ended up being spot on as it was rock solid, which was a goal of mine, and we were able to get it moving at a pretty good clip. I’m going to assume this is the assymetric 19 ft hull in action despite being 39” in beam. I should have checked mph with the gps but didn’t. Wind wasn’t blowing so I didn’t get to test in waves, but I don’t think I will have any surprises there. This has more freeboard than typical, which was another design goal, so it may be influenced more by wind, but I don’t think that will matter all that much. The one big surprise was just How solid it really was, even trying to rock it quite aggressively-it was very resistant- which was again a primary goal for bringing the family with. I sat I both the front and back. Plenty of room up front, and a lot more cargo space than my freedom from the view in the captains chair.
The one grip I have is that the rear seat is a little to high, which is due to the upswept stern profile. For all my planning, I did not plan on this LOL!!It feels too high off the water, but as I said, is stable regardless- so it doesn’t impact stability much. I may have to get some longer bolts and refit it at a later date, it’s ok for now.
I also didn’t load it with gear, but as with most boats they usually only get better with gear. Since the hull has such a large volume, the displacement with gear should be pretty minimal compared to most boats. it will take a lot of weight to really change the hull shape a significant amount, so it may be that it doesn’t matter too much.
All in all, I am extremely happy with the design!

Subscribe to Thread
Become a member of the bwca.com community to subscribe to thread and get email updates when new posts are added. Sign up Here
 Search BWCA.com
 Donate