|
 Boundary Waters Quetico ForumGroup Forum: Boat Builders and RepairNew build: Ashes Solo Pack
|
Author
Text
")


09/10/2021 09:53PM
I swear this will be my last one. But I said that after my last one. I wonder if there is a 1/2 way house for builders who fall off the wagon?
Anyway, the new canoe has been started, but it really started in my mind months ago. I wavered back and forth on what to build, what to build, never deciding until I looked at the Ashes Solo Pack (very sweet lines). You may ask, why build a tiny 13' canoe? What is it good for? Well, it is easy to load and unload, it is easy on my 73 year old frame (and shoulders), it fits (barely) in my shop, etc.... But, the easy answer is that a small canoe is fun (after you get used to her fickle ways). I think my canoe trip days are over. I have no need for a canoe worthy of a wilderness trip. But I do need paddle time and that is where the small canoe makes my life easy.
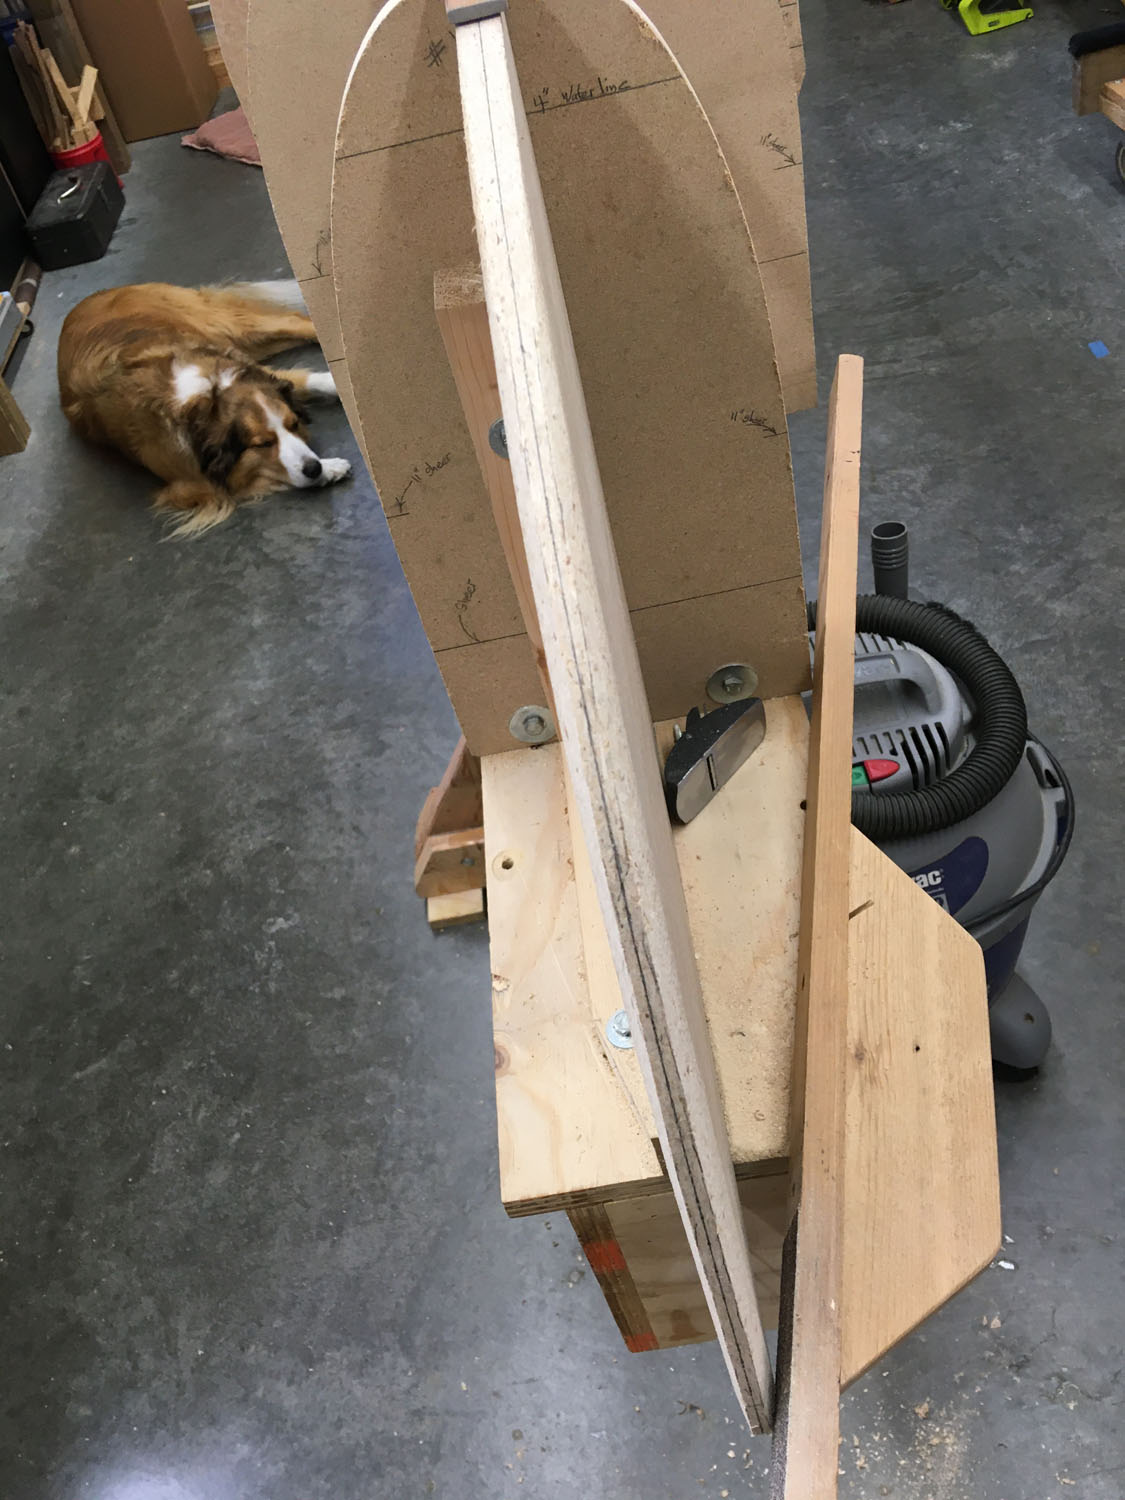
I gathered up and scarfed (on the bench) all my leftover 1/4" bead and cove cedar and redwood pieces. That yielded 26 strips that were 14' long. On a trip to Menards, I snagged 5 S1S2E cedar 1x6's (8' and 10') that were clear and straight (2 of these I did not cut and put them in storage ). When done cutting and milling, I was sitting on 67 14' strips (more than enough according to Ashes). I built my mold stations from 5/8" particle board because I got two 4'x8' sheets free from Lowes (they were used for packing and destined for the trash). My strong back was dusted off, put together and I was on my way.
Pictures show stemless construction and beveling the stem edge and the first 2 strips on the molds. I see a canoe being born.

"Boredom, Tyler - that's what's wrong. And how do you beat boredom, Tyler?... Adventure...(Never Cry Wolf, 1983)
09/11/2021 05:25PM
Funny ! My Wife gives me that Look, Like " I'm going to have you committed! " So far ? So Good !
Great start !
I always liked small canoes for my local river trips, for the same reasons you mentioned !
As for the amount of strips ? I cut a bunch extra, as it allows me to sort, and match, and throw out culls.
You should still be fine !
Love the pics ! Keep them coming ! I haven't seen a good build lately.
Jim
Keep your paddle wet and your seat dry!
09/14/2021 07:02PM
Looks like a great fall project and I look forward to watching the progress.
I paddled a 13’ wood canvas canoe this summer. It was a very interesting experience. I was able to spin it in circles and really play in the water. It took a little bit of time to get used to it.
I’m starting some early planning of building two Merlins. One dark red cedar and one white cedar. Fraternal twins. Highly figured birds eye maple for the trim. I plan to sell them at a premium price when finished.
Tom
09/14/2021 10:35PM
Hi Tom
Before the current construction I built a 13' cedar strip after adopting plans that were for wood canvas construction. That canoe was designed by Alex Comb (Stewart River Boat Works). Alex calls the canoe the Damselfly. I sort of fell in love with the little canoe at a Sawbill wooden canoe gathering (2014). I liked paddling her so decided I should build one as a stripper. I like the Damselfly and have practiced some free style paddling in her. I am a little bit shy of getting her too far heeled over and that limits what I can do.
Anyway I have no idea of how the Ashes Solo Pack will handle. It is an asymmetric canoe (unlike the Damselfly). I am pretty sure that it might be a little less forgiving than the Damselfly. Time will tell.
By way of a little history remember that you let me paddle your Merlin before I built her. I appreciated that.
"Boredom, Tyler - that's what's wrong. And how do you beat boredom, Tyler?... Adventure...(Never Cry Wolf, 1983)
09/15/2021 07:25AM
Small world!
It was the Damselfly that I paddled this past summer with Alex while out on a weekend paddle. I’m glad you paddled that canoe since you and I can both attest to how they perform in the water. I thought I was going to fall right out of it but I never got wet. Getting in and out of the canoe from a dock was a little precarious though. It was a fun little canoe to paddle, like floating on a leaf.
Tom
09/25/2021 09:50PM
Progress update.
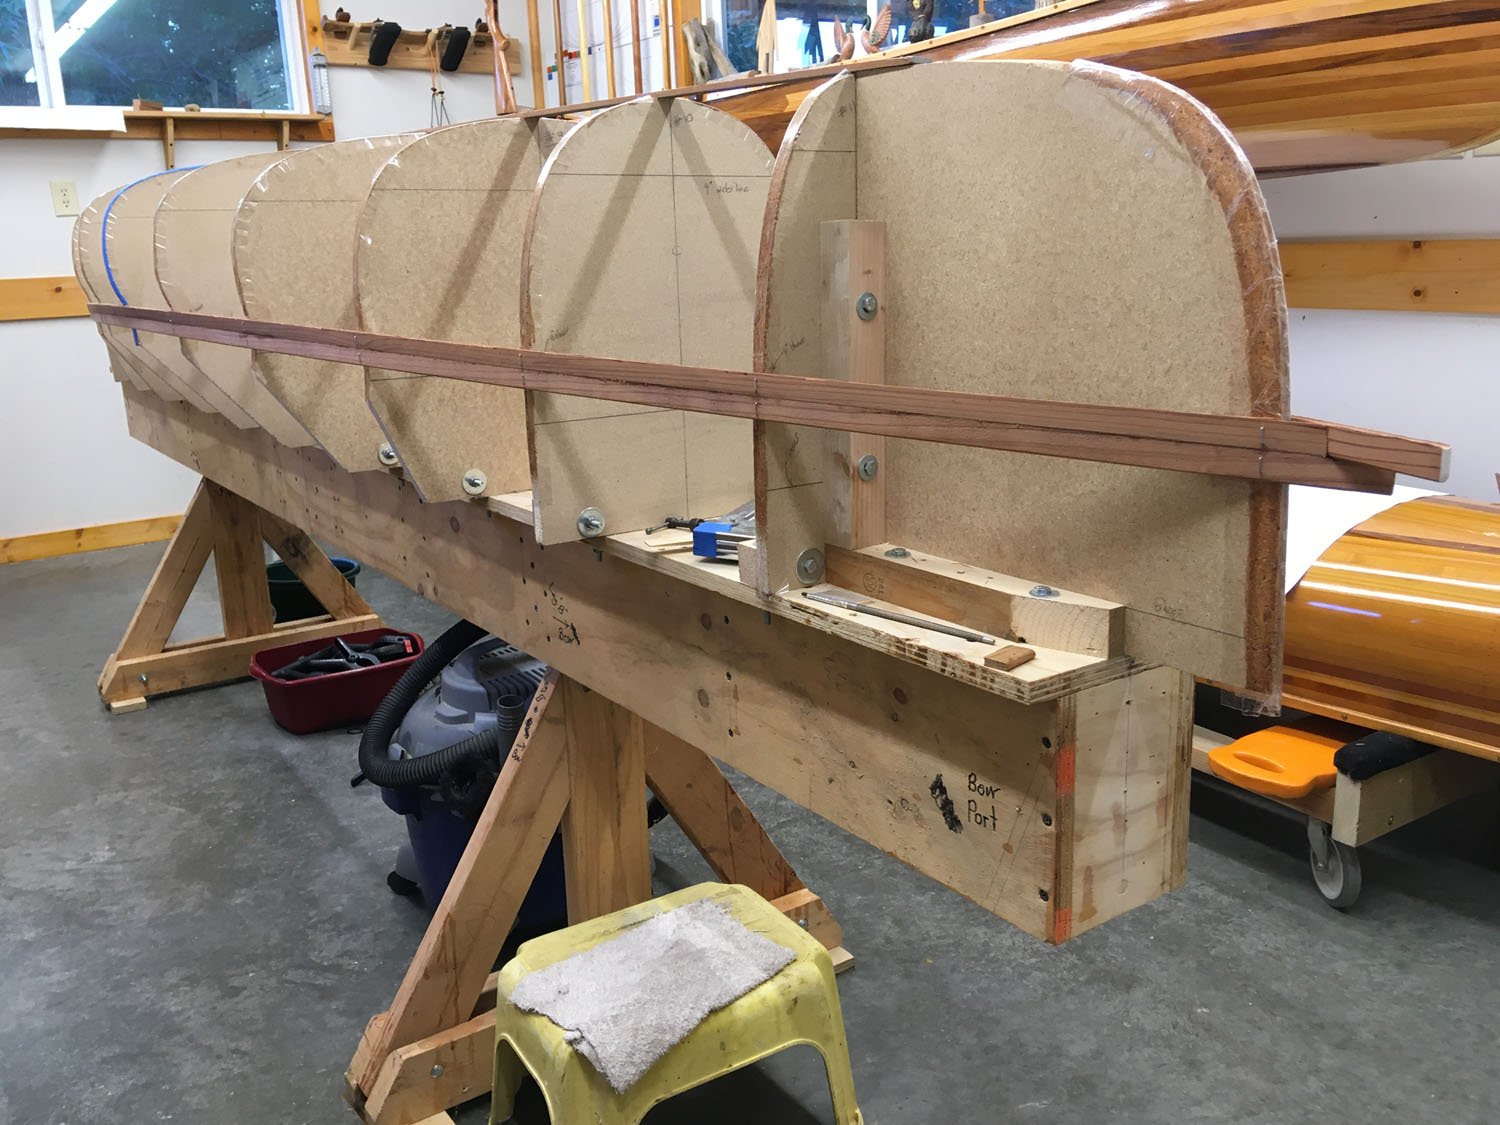
My progress has been slow, but I am in no hurry. The build is going pretty good and I have fallen into the groove of stemless construction. I tend to spend a bit of time on each strip looking for that perfect angle and perfect fit. I am still not a convert to the stemless method. For the way I build, I do not see a savings in time (compared to using inner and outer stems). But there will be the precious savings in weight and that is why I am building stemless. And trying something new makes building a challenge and fun.
The 2 new photos show that I am rounding the bilge area and a close up of my strip weave. Rounding the bilge is an important moment because I can finally see the lines of the canoe and I like what I see.


"Boredom, Tyler - that's what's wrong. And how do you beat boredom, Tyler?... Adventure...(Never Cry Wolf, 1983)
10/02/2021 12:32PM
I just returned from the BWCA yesterday. Thought I'd look in and see what is up.
Hull looks fine. You are getting to the interesting part now. It does take a little pondering to fit the strips, from where they go from Vertical to Horizontal. You will get it !
Hull looks fine. You are getting to the interesting part now. It does take a little pondering to fit the strips, from where they go from Vertical to Horizontal. You will get it !
Keep your paddle wet and your seat dry!
10/02/2021 09:16PM
1JimD: " I just returned from the BWCA yesterday. Thought I'd look in and see what is up.
Hull looks fine. You are getting to the interesting part now. It does take a little pondering to fit the strips, from where they go from Vertical to Horizontal. You will get it !
"
Jim, so where the strips go from Vertical to horizon you call "interesting"? I had a lot of other names for this that I won't print here. I went to your Pearl building post many times looking for clues and the perfect close up of your technique. I think I pondered this for a couple of days. What made matters worse was that I had a slight difference in height between the port and starboard side. I fixed the height problem by taking down the cove on the canoe with a rat tail file. I finally said to self there is no way that I am going to get a perfect fit of the bead in the new strip into the cove on the canoe. I cheated it and got a close approximation and said to self that I will figure out how to hide this later on........... glue it up and move on.

"Boredom, Tyler - that's what's wrong. And how do you beat boredom, Tyler?... Adventure...(Never Cry Wolf, 1983)
10/02/2021 09:57PM
HighPlainsDrifter: "1JimD: " I just returned from the BWCA yesterday. Thought I'd look in and see what is up.
Hull looks fine. You are getting to the interesting part now. It does take a little pondering to fit the strips, from where they go from Vertical to Horizontal. You will get it !
"
Jim, so where the strips go from Vertical to horizon you call "interesting"? I had a lot of other names for this that I won't print here. I went to your Pearl building post many times looking for clues and the perfect close up of your technique. I think I pondered this for a couple of days. What made matters worse was that I had a slight difference in height between the port and starboard side. I fixed the height problem by taking down the cove on the canoe with a rat tail file. I finally said to self there is no way that I am going to get a perfect fit of the bead in the new strip into the cove on the canoe. I cheated it and got a close approximation and said to self that I will figure out how to hide this later on........... glue it up and move on."
Faithful dog!
"In wilderness is the salvation of mankind." Thoreau.
10/03/2021 09:33PM
That will work fine, Joe.
Everyone has there own idea of where to start the football. So long as its very close to the football.
To me it's where the stem forms are covered by the vertical strips.
I will offer another tip. Next time lower your stem forms by about a 1/4". This will help eliminate the little hump, above the stem forms. You will see what I mean, when you start shaping the hull.
Keep your paddle wet and your seat dry!
10/26/2021 09:44PM
Progress report: Slow but sure. I am at a good point in stripping and enjoying the build. If I work too fast then I work myself out of a job. To close the hull, I decided to lay strips straight strips down the keel line. I find that the strips are easy to handle being laid down in a straight line and the angles are fairly easy to cut.


"Boredom, Tyler - that's what's wrong. And how do you beat boredom, Tyler?... Adventure...(Never Cry Wolf, 1983)
10/27/2021 06:01PM
A good method Joe. You spend more time fitting strips, but you have that down pat !
Nearly all the Minnesota builders I grew up with, either used this method, or a Herring bone pattern.
Your canoe will look great !
Jim
Nearly all the Minnesota builders I grew up with, either used this method, or a Herring bone pattern.
Your canoe will look great !
Jim
Keep your paddle wet and your seat dry!
11/11/2021 09:43PM
It is coming down to the closing time. I have 2 really fun shapes to create because of the stripping method that I used on the bottom. To pick up the shape of the closing strip, I tape the opening, and rub the edges of the opening with a pencil. The shape is then transferred to the strip to be cut. Easier said than done, but it gets me in the ball park.


"Boredom, Tyler - that's what's wrong. And how do you beat boredom, Tyler?... Adventure...(Never Cry Wolf, 1983)

01/31/2022 09:43PM
Here is an end-of-the-month progress report. Photos show: 1) hull after fairing, 2) fiber glass draped, and 3) epoxy work finished. Fiber glass is 4-oz plain weave, and epoxy is Systems 3. I used 2 layers of cloth in the midship area, 2 layers along the keel line, and 3 layers around the stems extending to the keel line. Stem cloth was cut on the bias. My wife mixed and ran around looking for skips and air bubbles.
I did not use a seal coat on the hull. Glass and wood were wet up together using brushes and squeegee. Following initial wet up, I put on 2 fill coats with a foam roller. I found that wetting up 2 layers of 4 oz glass is a royal pain in the backside. The layers seem to trap air and a lot of time was spent tapping down air bubbles. I think I will have only a marginal savings in weight by using 4oz. I should have just used 6oz on the outside and 4oz on the inside........... maybe??
If you wonder why there are little blocks nailed to the gunwale strip, then read my post about strips pulling away from the forms.


"Boredom, Tyler - that's what's wrong. And how do you beat boredom, Tyler?... Adventure...(Never Cry Wolf, 1983)
02/01/2022 09:07AM
Hull looks great !
Buying extra planks ? Gives you an excuse to build another !
I too learned the hard way trying to wet out two layers of cloth at one time. In my case, it was two 6 oz, and temps were cool. Never again !
I lay a second layer over the football, on Top of the main layer. When it comes time to sand, I feather the edge of the extra layer, without sanding into the main layer. It also ends up invisible, when varnished.
Here is an illustration that should aid. Top illustration is correct.
layering cloth
Keep your paddle wet and your seat dry!
02/02/2022 10:29PM
tumblehome: "Lookin’ good!
Your fleet is coming along well. I’m following along.
Tom"
"My Fleet"........ Remember Tom, that on May 3, 2010, you sold me enough bead and cove strips to build the Merlin (my first build). Those strips should have come with a warning (from you) that canoe building may become addictive. This will be my last build. I have run out of room.
"Boredom, Tyler - that's what's wrong. And how do you beat boredom, Tyler?... Adventure...(Never Cry Wolf, 1983)
02/07/2022 09:23PM
I had 3 coats of epoxy on the canoe (wet up + 2 fill coats). My gut was telling me to lay on a 3rd fill coat, but I was tired of epoxy. I started sanding (80 grit) and quickly remembered that I hate epoxy dust more than laying on epoxy. I had the hull nicely smoothed but noticed too many spots where the weave pattern was starting to show. I was dangerously close to cutting into the glass and I still wanted to go over the hull with 120 grit. So, the brakes went on. I cleaned up the hull and laid on a 3rd fill coat. I should have listened to my gut feeling.
I have been using a Wooster T1Z (7" x 1/8") foam cover. I cut these in half (3 1/2"). I apply and then tip off with a dry brush. Today the epoxy gods were on my side. The epoxy went on beautiful and flattened perfectly. It almost looks like a varnish job. Anyway, the beauty will be short lived. Soon I will sand it with 120 and finally get the hull off the molds.

"Boredom, Tyler - that's what's wrong. And how do you beat boredom, Tyler?... Adventure...(Never Cry Wolf, 1983)

02/18/2022 05:07PM
Looks great !
A good array of tools !
I would add one of those stiff backed, sanding discs, in about the 8" diameter variety.
You can easily bend them to match the hull contour. and they can get into the stem area very good also. They come in just a few grits, at least that's what I've found. 50 and 80 grit are good.
Pool noodles (the heavy duty kind) make great too wrapped with paper, or used sanding discs.

Keep your paddle wet and your seat dry!
03/12/2022 08:38PM
The interior hull is now glassed. I decided to lay the cloth in several pieces rather than in one continuous piece. That worked out nicely, but I am not real proud of my epoxy work. I got behind and failed to do a good job with the squeegee. I am going to blame some of that on failing shoulders. I know, it is a poor workman who blames his tools.
Weather this week may allow me to take it outside and sand out some of the runs and ripples. I hate epoxy dust.
As the canoe now sits, it weighs 23.8 lbs. I doubt that I will reach my goal of under 30.
To save weight, I intend to laminate 1/4" cedar and cherry for my inwale stock. Outwale will be 1/2" cherry. These are the materials that I have on hand. No decks. intend to have bow and stern handles and one thwart. Undecided on seat or kneeling thwart.

"Boredom, Tyler - that's what's wrong. And how do you beat boredom, Tyler?... Adventure...(Never Cry Wolf, 1983)
03/12/2022 09:39PM
Scrape, instead of sanding. You can do that the very next day.
I do epoxy work, so much better in July than March !
My Old wrists don't handle squeegees very well.
Try switching to a dry roller, instead of a squeegee.
Jim
I do epoxy work, so much better in July than March !
My Old wrists don't handle squeegees very well.
Try switching to a dry roller, instead of a squeegee.
Jim
Keep your paddle wet and your seat dry!
01/27/2023 09:25PM
I took a lot of time off with a hurt shoulder, but I am back on track. There are a lot of building details between my last post and the current post. I'll pass over what was done in the past and skip to today.
I mounted the seat, thwart and carry handles and weighed her........... 30.4 lbs. I will miss my goal of under 30 pounds.


I mounted the seat, thwart and carry handles and weighed her........... 30.4 lbs. I will miss my goal of under 30 pounds.


"Boredom, Tyler - that's what's wrong. And how do you beat boredom, Tyler?... Adventure...(Never Cry Wolf, 1983)
01/29/2023 09:53PM
Thanks for the nice comments. Now, true confessions:
This canoe presented me with some challenges. From the get-go, I said to self....... self, you know how to build a canoe the "Ted Moores" way. "Canoecraft" has been my bible and when you follow Ted's ways, you will build a good canoe. So, I decided to do things a bit different.
I set a goal of 30 pounds and that dictated my direction. I spotted the Ashes Solo Pack 13' canoe and was drawn to the shape and possibly "light weight". My biggest hurdle in building light was the "stemless" construction. This is one of those building techniques that would be nice to see up close before jumping in. But I got it done.
Next light weight idea was to machine 3/16" strips. I had 26 bead and cove strips left from previous builds (1/4" x 15'). I tried planing some scrap and decided to forget 3/16" and go with what I had. So, the hull was built with 1/4" bead and cove.
The other "weight saver" was using 4- ounce glass. My paranoia about ending up with a canoe that "oil canned" found me doubling up the cloth on the bottom "football area" both inside and outside. I doubt that I saved weight and if anything added unnecessary weight. I also found that I did not like working with 4- ounce cloth.......... and I had fits getting air bubbles out of the double layer when I was laying on the epoxy.
I laminated my 3/4" inwales by using 2 strips of 1/4" cedar and 1 strip of hardwood (facing inboard). The outwale is 1/2" cherry (on top) and beveled to about 1/4" on the bottom. They will probably do the job remembering that this canoe is not going to see rough service.
I decided that I am going to paddle this canoe like a kayak with a double blade........... after parting ways with the idea that a good canoeist paddles a canoe with a single blade........ Tradition! So, the seat was dropped to 4" above the deck and seat supports were glued to the hull (thickened epoxy). This decision was also made with the thought this canoe is going to be a bit tippy if I plant my ass on a seat hung from the gunwales.
So, there you have it........ builders log closed and I do think that this canoe is my last build.
"Boredom, Tyler - that's what's wrong. And how do you beat boredom, Tyler?... Adventure...(Never Cry Wolf, 1983)
01/30/2023 07:18PM
After learning to ride a bike ? did you quit ?
You have gained a lot of knowledge, getting to this point in building canoes !
Instead of quiting ?
Share with someone locally ! I have found that much more rewarding than building one for myself !
The plus side ? You don't have to sand ! Wittnessing the look on others faces, as a canoe begins to appear in front of them ? It's priceless !
Hang in there Joe !
Jim
Keep your paddle wet and your seat dry!
01/30/2023 10:08PM
Hi Jim
True words and I agree. I am not quitting. I do preach the "wooden canoe gospel" to all that will listen. The best audience is usually at our Nature Park when I am loading or unloading a canoe. These canoes are eye candy and they do draw questions that I readily answer. Some just stand there like a deer caught in the headlights and say, "I could never do that". Of course, I tell them they can IF THEY HAVE THE DESIRE. Desire is the big motivator.
"Boredom, Tyler - that's what's wrong. And how do you beat boredom, Tyler?... Adventure...(Never Cry Wolf, 1983)
01/31/2023 07:11AM
I’ve done 3/16” strips before. I think it’s getting too thin since we at the very least sand the strips down to that when we build the canoe.
I don’t think oil canning would have been an issue. I always use 4oz glass on the inside, sometimes with just one coat of epoxy.
You probably saved as much weight as you could and it turned out nice. There is a tipping point where sacrificing weight becomes a strength issue. No reason to go that far.
Anyway, congrats. Time for another one!
Tom
01/31/2023 10:14AM
Built my first 3/16" thick strip canoe. I used 4 oz S-glass inside and out, with an addition 6 oz E- glass on the outside bottom, up to about the 3" water line.
The hull is complete, and very light. Now If I don't add too much trim weight !
Jim
The hull is complete, and very light. Now If I don't add too much trim weight !
Jim
Keep your paddle wet and your seat dry!
Subscribe to Thread
Become a member of the bwca.com community to subscribe to thread and get email updates when new posts are added. Sign up Here
 Search BWCA.com
 Donate